

Work with the feeds UI
This document explains how to create, troubleshoot, and manage feeds within the Feed Management UI, including instructions for modifying, enabling, and deleting them.
Before you begin
Each data feed requires specific prerequisites before setup in Google Security Operations. To find the requirements for your feed, see Configuration by source type and search for your specific data source.
Supported compression formats and file sizes
Supported compression formats for feed ingestion include .gz, .tar.gz, .tar, and solr.gz. The following table outlines the different file sizes that Google SecOps feeds transformation supports:
| Operation | Input type | Recommended size | Expected duration | Max size |
|---|---|---|---|---|
| Data Modeling | CSV | < 5 GB | < 7 min | 10 GB |
| Data Modeling | CSV | < 5 GB | ~30 min | 10 GB |
| Data Modeling | CSV | TBD | TBD | 2 GB |
| Data Modeling | XML / JSON | < 1 GB | < 10 min | 2 GB |
| Data Modeling | XLS / XLSX | < 50 MB | ~1 min | 50 MB |
| Merge Files | Any | < 1 GB | Varies on number of files | 100 GB |
| Decompress Files | Non-ZIP | < 5 GB | Varies on number of files | 10 GB (uncompressed) |
| Decompress Files | ZIP | - | Varies on number of files | 4 GB (uncompressed) |
Log line limits and delimiters
When ingesting text-based logs (JSON, CSV, or Syslog), ensure your data adheres to these specific ingestion limits:
- Maximum Line Size: A single log line cannot exceed 4MB. If a single
line exceeds this limit, the feed fails with the error
MaxLogLineSize4MBExceeded. - Supported Delimiters: Both Newline (
\n) and Carriage Return + Newline (\r\n) are supported.
Impact of changing your linked Cloud Project on data feeds
If you are updating the Google Cloud project associated with your Google SecOps instance, all feeds ingesting data using the following connectors will stop, and must be re-created manually:
- AMAZON_S3_V2
- AMAZON_SQS_V2
- GOOGLE_CLOUD_STORAGE_V2
- AZURE_BLOBSTORE_V2
- GOOGLE_CLOUD_STORAGE_EVENT_DRIVEN
For all other feeds that are not utilizing these connectors, ingestion continues without any interruption. No action needs to be taken by customers.
What to expect during migration
For impacted feeds, you will observe the following changes:
- Feed status: Feeds created prior to the migration will immediately stop pulling live data and will become read-only.
- Existing data: Any data that was already transferred to Google SecOps before the migration will be ingested automatically; no data will be lost.
- Error messages: If you attempt to edit or delete an older feed, you will receive a message stating:
This feed is read-only because this SecOps has now moved to a new Google Cloud Project (BYOP). To continue ingesting data from this source, please create a new feed.
Required actions for customers
To ensure continuous data ingestion, you must manually re-create your feeds in the new environment. Follow these steps to minimize disruption:
- Re-create feeds: You must create new feeds to replace the ones that existed pre-migration.
- Configure Max File Age: When setting up your new feeds, set the Max File Age to around 2 hours before the BYOP update was initiated. This time buffer ensures a smooth transition.
Manage duplicate data: Depending on the Max File Age you select, you may experience some duplicate data transfer. For technical details on how Google SecOps filters these redundant logs, see Prevent deduplication.
Record and delete existing feeds (before migration): Before you begin the BYOP migration, record the configuration settings for all existing feeds that use the impacted connectors (for example, Amazon S3 V2), and then delete the feeds. If you don't delete feeds created before migration, they become unmanageable and remain in the Google SecOps web interface as orphaned settings.
Ways to set up feeds
There are two ways for Google SecOps customers to set up a feed in the platform. Use the method that works best for your environment:
- SIEM Settings > Feeds (standard)
- Content Hub > Content Packs (premium)
Configure your feeds
This section describes how to generally configure your feeds, starting with the standard procedural flow. The data feeds listed on the Feeds page include all the feeds that Google has configured for your account, including the feeds that you configured.
Add a feed
To add a feed to your Google SecOps account, complete the following steps:
In the Google SecOps menu, select SIEM Settings > Feeds.
Click Add New Feed.
On the next page, click Configure a single feed. Note: This step is not relevant for customers who use the Google SecOps SIEM standalone platform.
Add a feed name.
In the Source type list, select the source type for importing data into Google SecOps. You can select from the following feed source types:
- Amazon Data Firehose
- Amazon S3 (Deprecated)
- Amazon S3 (V2)
- Amazon SQS (Deprecated)
- Amazon SQS (V2)
- Azure Blob Storage (Deprecated)
- Azure Blob Storage (V2)
- Custom API
- Google Cloud Pub/Sub
- Cloud Storage (Deprecated)
- Cloud Storage (V2)
- Cloud Storage Event Driven
- Third party API
- Webhook
Important:
- When using Amazon S3 (Deprecated), Amazon SQS (Deprecated), Azure Blob Storage (Deprecated), and Google Cloud Cloud Storage (Deprecated) feeds, make sure that you have a valid directory path.
- When using Amazon SQS (Deprecated) or Amazon SQS (V2), explicitly grant Google SecOps permissions to delete messages from the Amazon SQS queue.
- When using Amazon SQS (Deprecated) feeds, make sure only one feed consumes messages from the queue. Messages read by another application or feed don't get ingested into the current feed.
- Using Amazon SQS (Deprecated) as the feed source type is only supported for logs in Amazon S3 buckets.
In the Log type list, select the log type that corresponds to the logs you want to ingest. The available logs vary depending on the source type you selected earlier.
If you select Cloud Storage as the source type, use the Get service account option to get a unique service account. See Google Cloud Storage feed setup example.
Click Next.
Specify the parameters needed from the Input Parameters tab. The options presented here vary depending on the source and log type selected on the Set Properties tab. Hold the pointer over the question icon for each field to get additional information on what you need to provide.
Optional: You can specify a namespace in the Set Properties tab. For more information about namespaces, see Work with asset namespaces.
Click Next.
Review your new feed configuration on the Finalize tab.
Click Submit. Google SecOps completes a validation check of the new feed. If the feed passes the check, a name is generated for the feed, it's submitted to Google SecOps, and Google SecOps begins to attempt to fetch data.
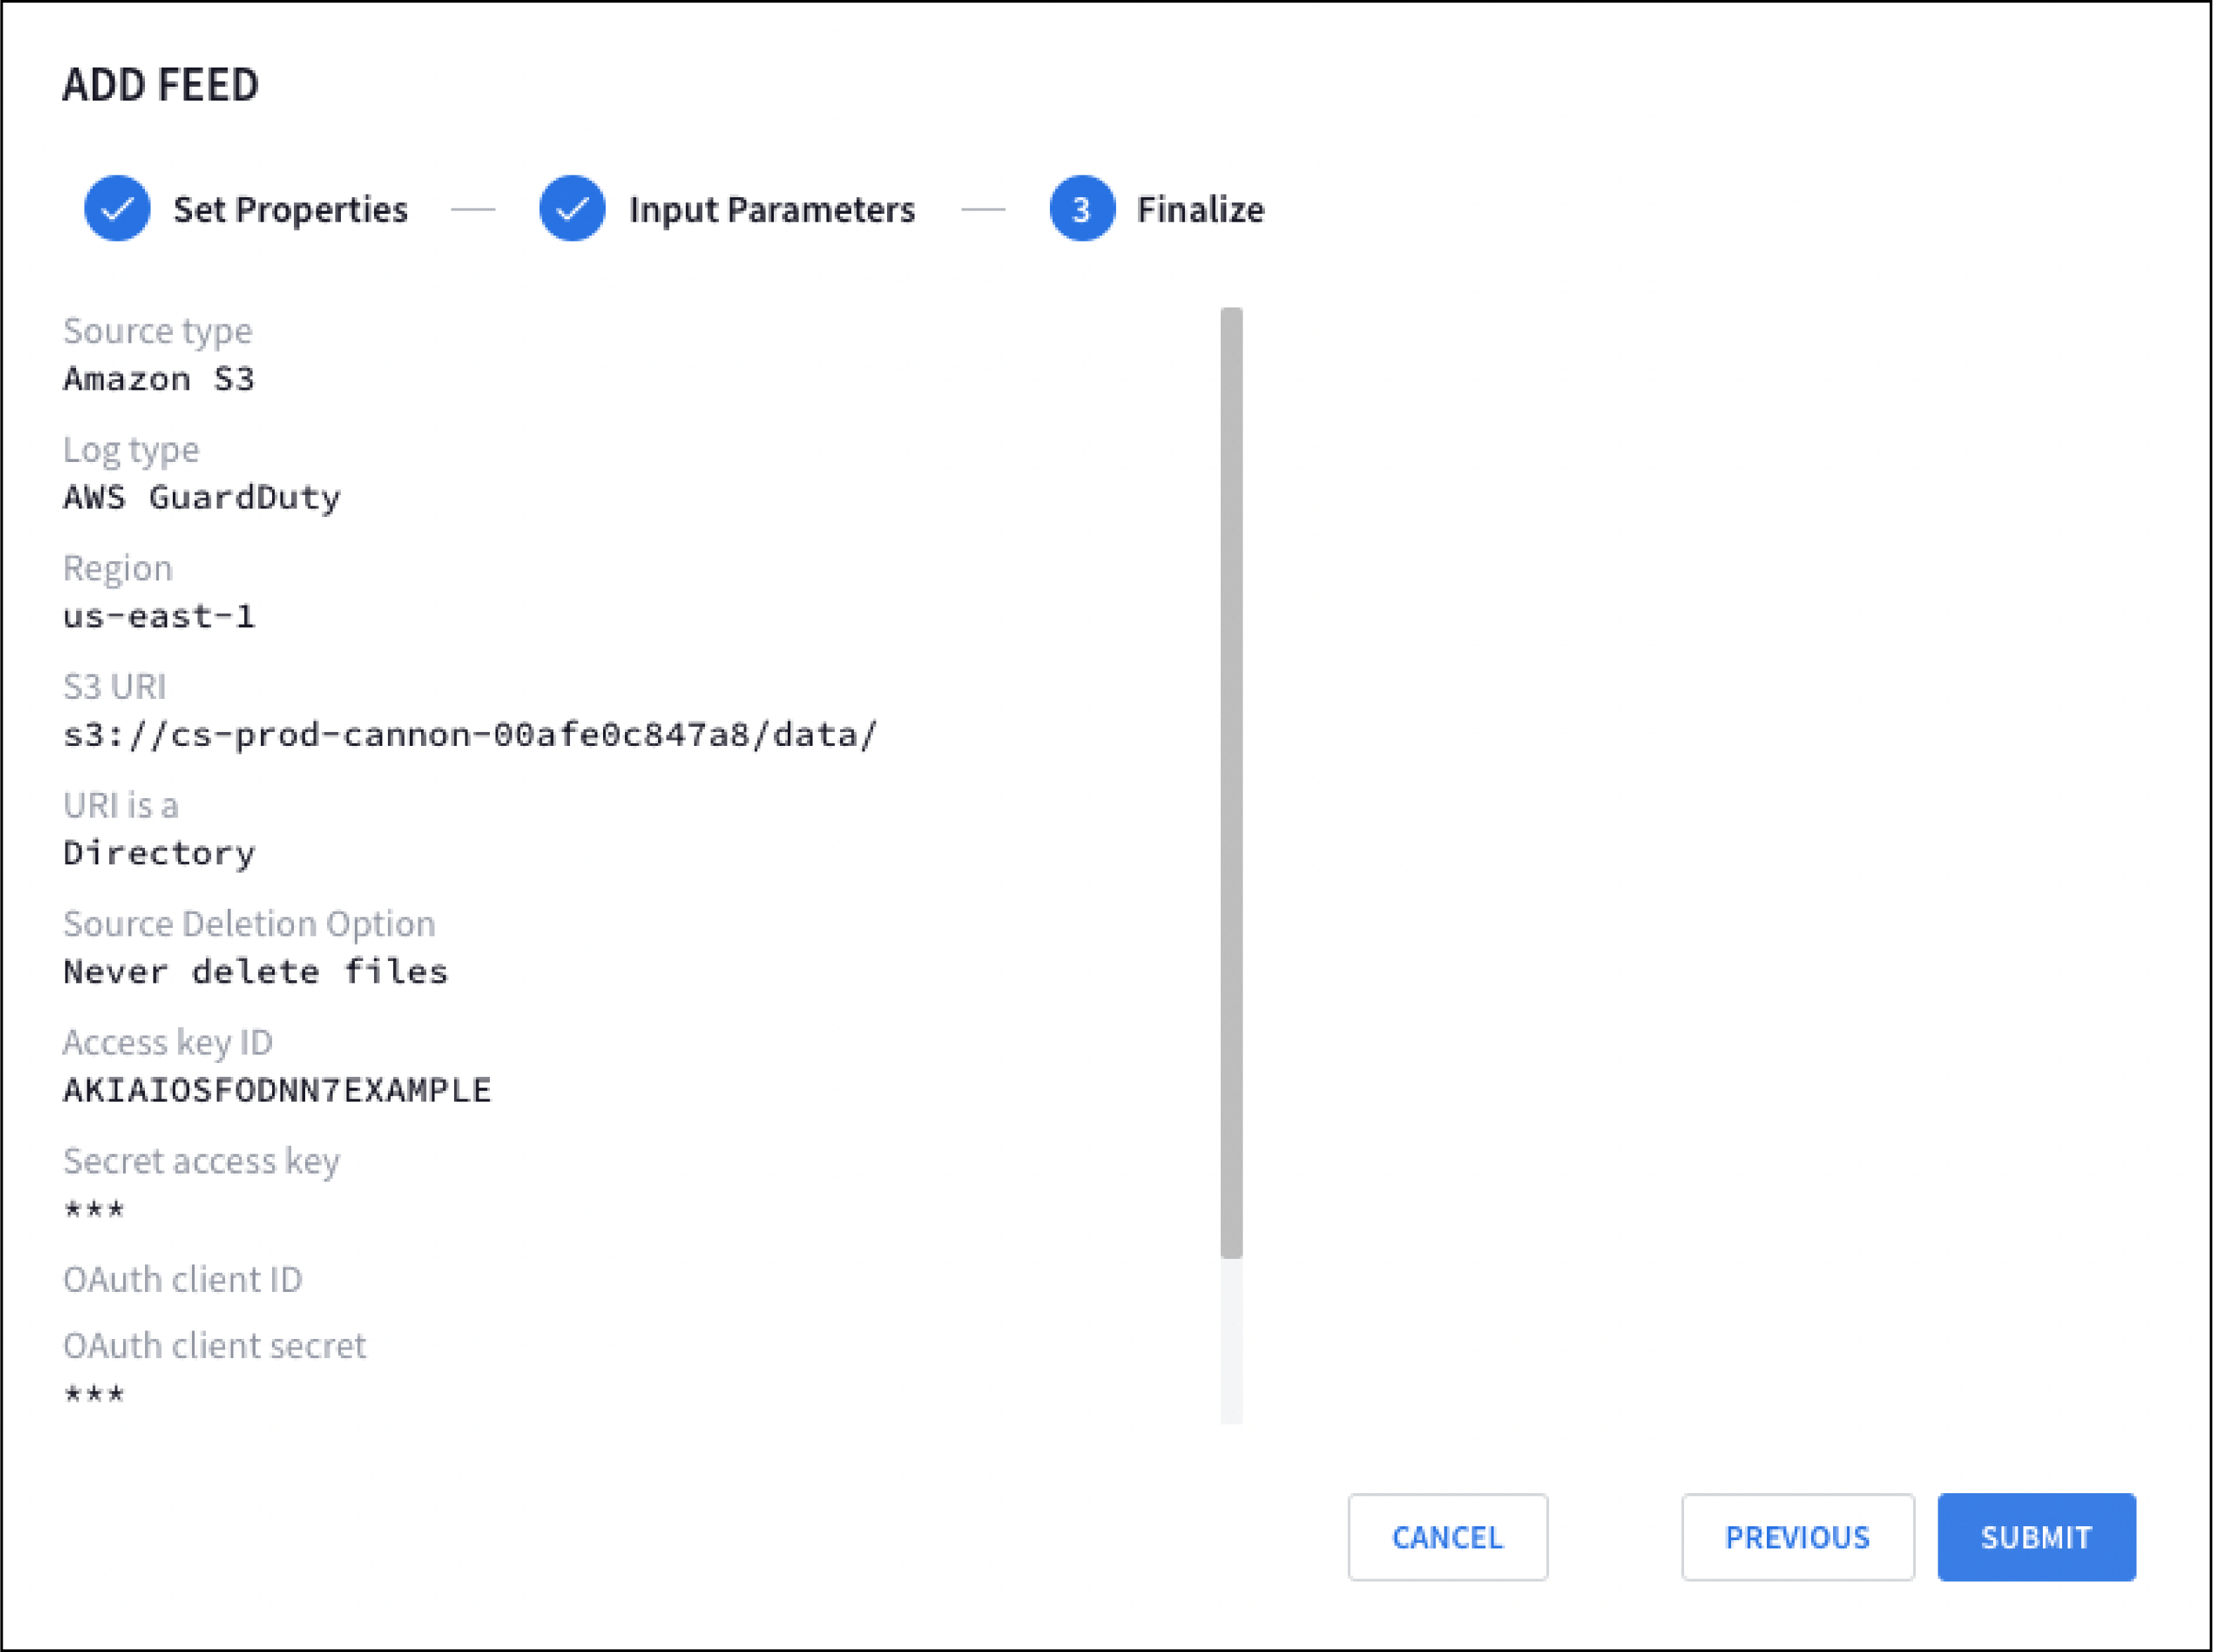
Configure multiple feeds for a product family (Google SecOps customers only)
You can configure multiple feeds per product family, based on log type.
- Baseline log types: Marked as recommended. These log types are recommended for core platform functionality.
- Supplementary log types: Marked as optional. These log types provide additional context.
To simplify the setup, the platform provides specific setup instructions and predefined parameters for each configuration. For example, for CrowdStrike Falcon, you can create multiple unique feeds under both recommended and optional log types to make sure there's enough comprehensive data coverage.
Configure the feed for CrowdStrike EDR
Follow these steps to configure a log feed for CrowdStrike EDR.
- From Settings > Feeds, click Add New Feed
- Click the CrowdStrike Falcon product:.
- Select CrowdStrike EDR log type.
- Alternatively, from Content Hub > Content Packs, click the CrowdStrike Falcon product:
- Click Get Started.
- Select CrowdStrike EDR log type.
Specify values for the following fields:
Field Description Source TypeAmazon SQS RegionThe AWS S3 region associated with the URI. Queue NameThe SQS queue name to read from. Account NumberThe SQS account number. Source Deletion OptionIndicates whether to delete files and directories after the transfer. Queue Access Key IDA 20-character alphanumeric access key for the account, such as AKIAOSFOODNN7EXAMPLE.Queue Secret Access KeyA 40-character alphanumeric secret access key for the account, such as, wJalrXUtnFEMI/K7MDENG/bPxRfiCYEXAMPLEKEY.Optional: Configure the following parameters:
- Feed Name: prepopulated unique name for the feed.
- Asset namespace: namespace associated with the feed.
- Ingestion labels: labels applied to the events from this feed.
Click Create Feed.
You can repeat this process to create additional feeds for the same log type. You can also configure feeds for other available log types directly from this page. When finished, go to the Feed Management page to view a detailed summary of all configured log types.
IP allowlisting
Enable allowlisting and add the Google IP ranges for all log types that ingest data from third-party APIs.
Delete source files
The source deletion option lets you delete feed source objects (files and folders) from storage, after a successful transfer. This option is only available for selected feed source types, including Cloud Storage. These feed source types include the SOURCE DELETION OPTION field in their Add new and Edit feed workflows.
Source deletion options
For supported feed source types, including Cloud Storage, the SOURCE DELETION OPTION field offers these options:
- Never delete files
- Delete transferred files and empty directories
- Delete transferred files
Microsoft Azure Blob Storage (AZURE_BLOBSTORE) doesn't support deletion of source files. For the SOURCE DELETION OPTION field, only select the Never delete files option.
For the following feed sources (
"feedSourceType"):GOOGLE_CLOUD_STORAGE_V2,GOOGLE_CLOUD_STORAGE_EVENT_DRIVEN,AMAZON_S3_V2,AMAZON_SQS_V2, andAZURE_BLOBSTORE_V2, the SOURCE DELETION OPTION field offers two options:- NEVER: Never deletes any files after transfers.
- ON_SUCCESS: Deletes all files and empty directories after transfer.
Source-specific setup and permissions
Different source types require specific authentication and networking configurations to communicate with Google SecOps. This section describes how to configure permissions and set up service accounts. The setup outlined focuses on Cloud Storage ingestion (pull based), multi-cloud ingestion (cross-cloud pull), and push-based ingestion (API or real-time).
Google Cloud Storage feed setup example
- From the Google SecOps menu, select Settings, and then click Feeds.
- Click Add New Feed.
- On the next page, click Configure a single feed. This step doesn't apply if you are using the Google SecOps SIEM standalone platform.
- Select Cloud Storage v2 for Source Type.
- Select the Log type. For example, to create a feed for Google Kubernetes Engine audit logs, select Google Kubernetes Engine audit logs as the Log Type.
- Click Get service account. Google SecOps provides a unique service account that Google SecOps uses to ingest data. Alternatively, you can get this service account programmatically using the API. See Fetch service account.
- Optional: Configure the service account. For more information, see Grant access to the Google SecOps service account.
- Click Next.
Based on the Cloud Storage configuration that you created, specify values for the following fields:
Storage bucket URI
Source deletion option
To learn more about how to set up Cloud Storage buckets, see Create Buckets.
Click Next and then click Submit.
Grant access to the Google SecOps service account
- In the Google Cloud console, go to the Cloud Storage Buckets page.
Grant access to the service account to the relevant Cloud Storage objects.
To grant read permission to a specific file, complete the following steps:
- Select the file and click Edit access.
- Click Add principal.
- In the New principals field, enter the name of the Google SecOps service account.
- Assign a role that contains the read permission to the Google SecOps service account. For example, Storage Object Viewer
(
roles/storage.objectViewer). This can only be done if you've not enabled uniform bucket-level access. - Click Save.
To grant read permission to multiple files, grant access at the bucket level as follows:
For
"feedSourceType": "GOOGLE_CLOUD_STORAGE":- Add the Google SecOps service account as a principal to your
storage bucket and grant it the IAM Storage Object
Viewer (
roles/storage.objectViewer) role. - If you configure the feed to delete source files, you must add the
Google SecOps service account as a principal on your bucket and
grant it the IAM Storage Object Admin
(
roles/storage.objectAdmin) role.
- Add the Google SecOps service account as a principal to your
storage bucket and grant it the IAM Storage Object
Viewer (
For
"feedSourceType": "GOOGLE_CLOUD_STORAGE_V2", grant the following roles:Grant this role:
- Storage Object Viewer (
roles/storage.objectViewer) if the transfer is to another Cloud Storage bucket.
- Storage Object Viewer (
Grant one of the following roles, depending on what you select for the Source Deletion Option. If you select On Success, grant the Storage Legacy Bucket Writer role. If you select Never, grant the Storage Legacy Bucket Reader role:
- Storage Legacy Bucket Writer (
roles/storage.legacyBucketWriter) if object delete permission is required. - Storage Legacy Bucket Reader (
roles/storage.legacyBucketReader) if object delete permission is not required.
- Storage Legacy Bucket Writer (
For
"feedSourceType": "GOOGLE_CLOUD_STORAGE_EVENT_DRIVEN":Grant either of these roles:
- Storage Object Viewer (
roles/storage.objectViewer) if the transfer is to another Cloud Storage bucket. - Storage Object Creator (
roles/storage.objectCreator) if the transfer is to a file system.
- Storage Object Viewer (
Grant either of these roles:
- Storage Legacy Bucket Writer (
roles/storage.legacyBucketWriter) if object delete permission is required. - Storage Legacy Bucket Reader (
roles/storage.legacyBucketReader) if object delete permission is not required.
- Storage Legacy Bucket Writer (
Enable STS access for Amazon S3 and Azure Storage
The STS is used by the following Google Cloud Storage feeds to transfer data from Amazon S3 and Azure Storage blobstores to Google SecOps:
- Amazon S3 (V2)
- Amazon SQS (V2)
- Azure Blob Storage (V2)
STS sends data transfer requests to the Amazon S3 and Azure storage services from a set of defined STS IP address ranges. These STS IP address ranges are published in the following JSON file: IP ranges
To use these STS feed source types, you may need to adjust IP access restrictions to enable STS to access your Amazon S3 and Azure storage services:
Pull the latest IP ranges from the JSON file.
We recommend reading data from this JSON file at least weekly to keep your security configuration up to date. When a new range is added to the file, the system waits at least 7 days before using that range for requests from STS.
For a sample Python script that fetches IP ranges from a JSON file, see IP addresses for default domains.
Compare the current IP range
creationTimeto the IP rangecreationTimeread from the previous JSON file. If these differ, update the IP access restrictions in Amazon S3 and Azure Storage blobstores.For Amazon S3
To update the IP access restrictions in your Amazon S3 blobstore:
If your AWS project uses IP restrictions for access to storage, you must add the IP ranges used by STS workers to your list of allowed IPs.
To add these ranges as allowed IPs, use the
Conditionfield in abucket policy, as described in the AWS S3 documentation: Managing access based on specific IP addresses.For Azure Storage
To update the IP access restrictions in your Azure Storage blobstore:
If you restrict access to your Azure resources using an Azure Storage firewall, you must add the IP ranges used by STS workers to your list of allowed IPs.
To add these ranges as allowed IPs, follow these instructions: Configure Azure Storage firewalls and virtual networks.
Set up a Pub/Sub push feed
To set up a Pub/Sub push feed, do the following:
- Create a Pub/Sub push feed.
- Specify the endpoint URL in a Pub/Sub subscription.
Create a Pub/Sub push feed
- In the Google SecOps menu, select Settings, and then click Feeds.
- Click Add new.
- In the Feed name field, enter a name for the feed.
- In the Source type list, select Google Cloud Pub/Sub Push.
- Select the Log type. For example, to create a feed for Open Cybersecurity Schema Framework, select Open Cybersecurity Schema Framework (OCSF) as the Log type.
- Click Next.
- Optional: Specify values for the following input parameters:
- Split delimiter: the delimiter that is used to separate log lines. You can only use
\n. - Asset namespace: the asset namespace.
- Ingestion labels: the label to be applied to the events from this feed.
- Split delimiter: the delimiter that is used to separate log lines. You can only use
- Click Next.
- Review your new feed configuration in the Finalize screen, and then click Submit.
- From the Details tab, copy the feed endpoint URL from the Endpoint Information field. You need this endpoint URL to create a push subscription in Pub/Sub.
- Optional: Click the Feed Enabled toggle to disable the feed. The feed is enabled by default.
- Click Done.
Specify the endpoint URL
After you create a Pub/Sub push feed, specify the endpoint URL as follows:
- In Pub/Sub, create a push subscription. For more information about how to create a push subscription, see Create push subscriptions.
- Specify the endpoint URL, which is available in the Google Cloud Pub/Sub push feed.
- Select Enable authentication, and select a service account.
- Disable both the Push payload unwrapping and Push payload unwrapping write message metadata options.
Set up an Amazon Data Firehose feed
To set up an Amazon Data Firehose feed, do the following:
- Create an Amazon Data Firehose feed and copy the endpoint URL and secret key.
- Create an API key to authenticate to Google SecOps. You can also reuse your existing API key to authenticate to Google SecOps.
- Specify the endpoint URL in Amazon Data Firehose.
Create an Amazon Data Firehose feed
- In the Google SecOps menu, select Settings, and then click Feeds.
- Click Add new.
- In the Feed name field, enter a name for the feed.
- In the Source type list, select Amazon Data Firehose.
- Select the Log type. For example, to create a feed for Open Cybersecurity Schema Framework, select Open Cybersecurity Schema Framework (OCSF) as the Log type.
- Click Next.
- Optional: Specify values for the following input parameters:
- Split delimiter: the delimiter that is used to separate log lines. You can only use
\n. - Asset namespace: the asset namespace.
- Ingestion labels: the label to be applied to the events from this feed.
- Split delimiter: the delimiter that is used to separate log lines. You can only use
- Click Next.
- Review your new feed configuration in the Finalize screen, and then click Submit.
- Click Generate Secret Key to generate a secret key to authenticate this feed.
- Copy and store the secret key as you cannot view this secret again. You can generate a new secret key again, but regeneration of the secret key makes the previous secret key obsolete.
- On the Details tab, copy the feed endpoint URL from the Endpoint Information field. You need this endpoint URL when you specify the destination settings for your delivery stream in Amazon Data Firehose.
- Optional: Click the Feed Enabled toggle to disable the feed. The feed is enabled by default.
- Click Done.
Create an API key for the Amazon Data Firehose feed
To create an API key for the Amazon Data Firehose feed, do the following:
- Go to the Google Cloud console Credentials page.
- Click Create credentials and select API key.
- Restrict the API key access to the Chronicle API.
Specify the endpoint URL
In Amazon Data Firehose, specify the HTTPS endpoint and access key, as follows:
Append the API key to the feed endpoint URL and specify this URL as the HTTP endpoint URL in the following format:
ENDPOINT_URL?key=API_KEYReplace the following:
ENDPOINT_URL: the feed endpoint URL.API_KEY: the API key to authenticate to Google SecOps.
For the access key, specify the secret key that you obtained when you created the Amazon Data Firehose feed.
Set up an HTTPS webhook feed
Before you begin:
- Ensure that a Google Cloud project for Google SecOps is configured and the Chronicle API is enabled for the project.
To set up an HTTPS webhook feed, do the following:
- Create an HTTPS webhook feed and copy the endpoint URL and secret key.
- Create an API key that is specified with the endpoint URL. You can also reuse your existing API key to authenticate to Google SecOps.
- Specify the endpoint URL in your application.
Send multiple events in a single webhook request
The following code sample shows how to format a single request body with multiple, newline-separated JSON objects after the curl --location item:
--header 'Content-Type: application/json' \
--header 'X-goog-api-key: API_KEY' \
--header 'X-Webhook-Access-Key: SECRET' \
--data '{"principal": {"asset_id": "asset 123"}, "metadata": {"event_type": "GENERIC_EVENT", "product_name": "Product Acme"}}
{"principal": {"asset_id": "asset 123"}, "metadata": {"event_type": "GENERIC_EVENT", "product_name": "Product Acme"}}'
Set up a Custom API feed
Google Security Operations Custom API feeds (also known as Codeless Connectors) enable you to ingest telemetry from third-party REST APIs using a flexible, configuration-based model. You can configure data pulls by defining endpoints, authentication, pagination strategies, and state management directly in the console.
Key benefits
- Accelerate integration: Onboard new telemetry sources in minutes through a guided wizard without waiting for backend updates.
- Stateful checkpointing: Ensure zero data duplication and zero missing logs across polling cycles.
- Parent-child fan-out: Supports two-tier discovery workflows, such as listing resources and fetching their associated telemetry.
- Automated resilience and rate limiting: Prevents vendor throttling and quota exhaustion. For reliable, uninterrupted ingestion, the Custom API feed automatically handles HTTP 429 responses with an exponential backoff, paces requests with configurable rate limiting and task delay staggering, and enforces safety guardrails (500 child request cap, 50-MB payload ceiling). For more information, see Rate limiting and throttling guardrails.
Prerequisites
Verify the following prerequisites before creating a Custom API feed:
- Permissions: To create or modify feeds, you must have the Chronicle API Admin (
roles/chronicle.admin) or Chronicle API Editor (roles/chronicle.editor) role. - Third-party API requirements:
- A valid API base URL (must use
https://). - API Credentials (API Key, Basic Auth credentials, or OAuth 2.0 Client ID/Secret).
- Vendor API documentation detailing endpoint paths, request parameters, JSON response structures, and rate limits.
- A valid API base URL (must use
- Secret Manager access: Credentials are encrypted and managed securely within Secret Manager. The service identity executing the connector automatically interacts with Secret Manager (
roles/secretmanager.secretAccessorandroles/secretmanager.admin).
Configure a Custom API feed
To set up a Custom API feed, do the following:
- Go to SIEM Settings > Feeds.
- Click Add new feed.
- Click Configure a single feed.
- In the Feed name field, enter a unique descriptive name (for example,
1Password-Audit-Events). - In the Source type list, select Custom API.
- In the Log type list, select the target Google SecOps Log Type.
- Click Next.
Under General settings, configure the following:
Base URL: Enter the primary host (for example,
https://events.1password.com). It must start withhttps://. Don't append sub-paths or trailing slashes.Polling frequency: Specify how often the platform checks the API for new telemetry, in minutes. Supported range: 5 - 2880 minutes (default: 15 minutes). For Standard API (Sequential) feeds, 10–15 minutes is standard; for List & Detail (Parent-Child) feeds, 30–60 minutes is recommended to allow full fan-out task execution without overlap.
Under Authentication, select one of the supported authentication methods, and then configure the required fields:
- Basic Authentication: Enter the Username (API account identity)and Secret (secret password or token).
- OAuth 2.0 Client Credentials: Authenticate using OAuth 2.0 Client Credentials Grant flow. Google SecOps automatically requests, caches, and refreshes bearer access tokens before each ingestion cycle. Enter the OAuth token endpoint (for example,
https://auth.vendor.com/oauth/token) OAuth client ID, and OAuth client secret. - API Key Request Headers: Authenticate using custom API keys injected into request headers (the most common enterprise REST pattern). Enter the Header name (for example,
AuthorizationorX-API-Key) and Header value (for example,Bearer <SECRET_TOKEN>or<SECRET_KEY>). - API Key Query Parameters: Authenticate using custom API keys injected into URL query parameters. Enter the Query parameter name (for example,
api_key) and Query parameter value (for example,<SECRET_KEY>).
Select the connector model that your custom API uses:
- Standard API (Sequential): A linear polling flow where each poll builds directly on the state of the previous one. In this model, the next poll uses a cursor, token, or timestamp extracted from the previous poll to fetch only new data. Select this card when the vendor provides an endpoint that directly returns telemetry event records (for example, 1Password, Okta, SentinelOne, GitHub, Slack).
- List & Detail (Parent-Child): A two-tier discovery flow. The feed makes an initial call (parent) to retrieve a list of resources or objects (for example, a list of user IDs or zones). The feed then automatically spawns dependent follow-up calls (child) to fetch detailed telemetry for each individual resource identified. Select this card when the vendor API requires a two-tier discovery pattern: first calling an endpoint to fetch a dynamic list of entities (for example, zones, accounts, projects, devices), and then executing follow-up detail requests per entity to retrieve telemetry (for example, Cloudflare, AWS CloudWatch, Tenable).
If you selected Standard API (Sequential), do the following:
- Under API endpoint, configure the following parameters to define the technical route and rate pacing for the request:
- Endpoint path: The specific API route appended to the Base URL (for example,
/api/v1/auditevents). Defines the exact telemetry resource to query. - HTTP method: Select GET to retrieve data using URL query parameters, or POST to submit a search payload or filter body.
- Endpoint path: The specific API route appended to the Base URL (for example,
- Request body: For POST requests, provide the JSON data payload. You can embed dynamic checkpoint variables such as
{"limit": 100, "start_time": "{{.last_timestamp}}"}. - Max requests per minute: Enter the maximum number of requests to send per minute. This is a client-side rate limiter to comply with vendor API rate limits (default: 5 RPM = 1 request every 12 seconds). This setting prevents quota exhaustion during multi-page pagination.
- Optional: Under Custom heeders, configure the Header name and Value, and then click Add to define specialized HTTP headers required by the target API (for example,
Content-Type: application/json, Accept: application/json). - Optional: Under Query parameters, configure the Key and Value, and then click Add to specify extra filters or options appended to the URL query string (for example,
count=1000,status=active) or bind dynamic template variables (for example,start={{.last_run_time}}). - Under Pagination strategy: Select the paging mechanism that the third-party API requires to handle multi-page result sets, and then configure the required fields:
- None: Fetch data in a single request without paging.
- Token Pagination: Use tokens (custom keys) to get the next page. Enter the Next page token JSON path (for example,
meta.next_cursor) and Token pagination query parameter name (for example,cursor). - Link Pagination: Follow URLs provided in the response to get more data. Enter the Next page link JSON path (for example,
links.nextor@odata.nextLink). - Offset Pagination: Skip a set number of records to get the next set. Enter the Offset query parameter name (for example,
offset). - Page Number Pagination: Go to the next sequential page number. Enter the Page number query parameter name (for example,
page).
Under Checkpointing, configure the settings that allow the connector to remember where it left off between recurring polling cycles:
- Strategy: Choose one of the following strategies and configure the required fields:
- None: Fetch all available data without tracking progress across cycles.
- Latest Timestamp: Track the timestamp of the newest record. Enter the Checkpoint value JSON path (for example,
timestamporevent_time) and Checkpoint variable (for example,last_run_time, referenced in subsequent polls as{{.last_run_time}}). - Latest Record: Track the highest record ID to fetch only new records. Enter the Checkpoint value JSON path (for example,
idorevent_id) and Checkpoint variable (for example,last_id, referenced as{{.last_id}}). - Iterator Token: Use persistent continuation tokens provided by the API. Enter theCheckpoint value JSON path and Checkpoint variable (for example,
iterator_token, referenced as{{.iterator_token}}).
- Strategy: Choose one of the following strategies and configure the required fields:
Under Response Mapping, provide rules that tell the platform how to locate and extract logs:
- Target data JSON path: Enter the exact path in the API response payload where the list of target log entries is located. For object-wrapped arrays (for example,
{"items": [...]}), enteritems. For APIs returning a root JSON array directly (for example,[{...}, {...}]), leave this field completely empty ([]).
- Target data JSON path: Enter the exact path in the API response payload where the list of target log entries is located. For object-wrapped arrays (for example,
- Under API endpoint, configure the following parameters to define the technical route and rate pacing for the request:
If you selected List & Detail (Parent-Child), do the following:
- Parent Request (Discovery): Configure the endpoint that returns a list of items:
- Under API endpoint, configure the following parameters to define the technical route and rate pacing for the request:
- Endpoint path: The specific API route appended to the Base URL (for example,
/api/v1/auditevents). Defines the exact telemetry resource to query. - HTTP method: Select GET to retrieve data using URL query parameters, or POST to submit a search payload or filter body.
- Request body: For POST requests, provide the JSON data payload. You can embed dynamic checkpoint variables such as
{"limit": 100, "start_time": "{{.last_timestamp}}"}. 1 Max requests per minute: Enter the maximum number of requests to send per minute. This is a client-side rate limiter to comply with vendor API rate limits (default: 5 RPM = 1 request every 12 seconds). This setting prevents quota exhaustion during multi-page pagination.
- Endpoint path: The specific API route appended to the Base URL (for example,
- Optional: Under Custom headers, configure the Header name and Value, and then click Add to define specialized HTTP headers required by the target API (for example,
Content-Type: application/json, Accept: application/json). - Optional: Under Query parameters, configure the Key and Value, and then click Add to specify extra filters or options appended to the URL query string (for example,
count=1000,status=active) or bind dynamic template variables (for example,start={{.last_run_time}}). - Under Pagination strategy: Select the paging mechanism that the third-party API requires to handle multi-page result sets, and then configure the required fields:
- None: Fetch data in a single request without paging.
- Token Pagination: Use tokens (custom keys) to get the next page. Enter the Next page token JSON path (for example,
meta.next_cursor) and Token pagination query parameter name (for example,cursor). - Link Pagination: Follow URLs provided in the response to get more data. Enter the Next page link JSON path (for example,
links.nextor@odata.nextLink). - Offset Pagination: Skip a set number of records to get the next set. Enter the Offset query parameter name (for example,
offset). - Page Number Pagination: Go to the next sequential page number. Enter the Page number query parameter name (for example,
page).
- Under Checkpointing, configure the settings that allow the connector to remember where it left off between recurring polling cycles:
- Strategy: Choose one of the following strategies and configure the required fields:
- None: Fetch all available data without tracking progress across cycles.
- Latest Timestamp: Track the timestamp of the newest record. Enter the Checkpoint value JSON path (for example,
timestamporevent_time) and Checkpoint variable (for example,last_run_time, referenced in subsequent polls as{{.last_run_time}}). - Latest Record: Track the highest record ID to fetch only new records. Enter the Checkpoint value JSON path (for example,
idorevent_id) and Checkpoint variable (for example,last_id, referenced as{{.last_id}}). - Iterator Token: Use persistent continuation tokens provided by the API. Enter theCheckpoint value JSON path and Checkpoint variable (for example,
iterator_token, referenced as{{.iterator_token}}).
- Strategy: Choose one of the following strategies and configure the required fields:
- Under API endpoint, configure the following parameters to define the technical route and rate pacing for the request:
- Data extraction (the bridge): Configure the following:
- Item identifier JSON path: The specific field in the parent response that uniquely identifies an individual entity (for example,
idorzone_id). The connector extracts this identifier from each item in the parent array. - Template variable name: Specify a custom variable name to hold the extracted ID (for example,
zone_id). The UI displays a dynamic badge: Use{{.zone_id}}in your child request below.
- Item identifier JSON path: The specific field in the parent response that uniquely identifies an individual entity (for example,
- Child Request (Detail): Configure the endpoint that returns detailed logs for each item:
- Under API endpoint, configure the following parameters to define the technical route and rate pacing for the request:
- Endpoint path: The specific API route appended to the Base URL (for example,
/client/v4/zones/{{.zone_id}}/logs/received). Defines the exact telemetry resource to query. - HTTP method: Select GET to retrieve data using URL query parameters, or POST to submit a search payload or filter body.
- Request body: For POST requests, provide the JSON data payload. You can embed dynamic checkpoint variables such as
{"limit": 100, "start_time": "{{.last_timestamp}}"}.
- Endpoint path: The specific API route appended to the Base URL (for example,
- Max requests per minute: Enter the maximum number of requests to send per minute. This is a client-side rate limiter to comply with vendor API rate limits (default: 5 RPM = 1 request every 12 seconds). This setting prevents quota exhaustion during multi-page pagination.
- Optional: Under Custom headers, configure the Header name and Value, and then click Add to define specialized HTTP headers required by the target API (for example,
Content-Type: application/json, Accept: application/json). - Optional: Under Query parameters, configure the Key and Value, and then click Add to specify extra filters or options appended to the URL query string (for example,
count=1000,status=active) or bind dynamic template variables (for example,start={{.last_run_time}}). - Under Pagination strategy: Select the paging mechanism that the third-party API requires to handle multi-page result sets, and then configure the required fields:
- None: Fetch data in a single request without paging.
- Token Pagination: Use tokens (custom keys) to get the next page. Enter the Next page token JSON path (for example,
meta.next_cursor) and Token pagination query parameter name (for example,cursor). - Link Pagination: Follow URLs provided in the response to get more data. Enter the Next page link JSON path (for example,
links.nextor@odata.nextLink). - Offset Pagination: Skip a set number of records to get the next set. Enter the Offset query parameter name (for example,
offset). - Page Number Pagination: Go to the next sequential page number. Enter the Page number query parameter name (for example,
page).
- Under Checkpointing, configure the settings that allow the connector to remember where it left off between recurring polling cycles:
- Strategy: Choose one of the following strategies and configure the required fields:
- None: Fetch all available data without tracking progress across cycles.
- Latest Timestamp: Track the timestamp of the newest record. Enter the Checkpoint value JSON path (for example,
timestamporevent_time) and Checkpoint variable (for example,last_run_time, referenced in subsequent polls as{{.last_run_time}}).
- Strategy: Choose one of the following strategies and configure the required fields:
- Under API endpoint, configure the following parameters to define the technical route and rate pacing for the request:
- Parent Request (Discovery): Configure the endpoint that returns a list of items:
Configure the following Scheduling & Labels settings:
- Polling Frequency: Select a standard interval (for example,
5m,1h). - Namespace: Optional organizational tag.
- Ingestion Labels: Key-value pairs for Data RBAC.
- Polling Frequency: Select a standard interval (for example,
Click Submit. Google SecOps performs an automated credential and endpoint validation check. If validation succeeds, the feed begins polling.
Sample configuration 1: 1Password audit events (Standard API (Sequential) model)
The following declarative JSON configuration demonstrates a Standard API (Sequential) model, with cursor-based checkpointing for 1Password:
{
  "base_url": "https://events.1password.com",
  "polling_frequency": 15,
  "header_auth": {
    "header_key_values": [
      {
        "key": "Authorization",
        "value": "Bearer <SECRET_STORED_IN_SECRET_MANAGER>"
      }
    ]
  },
  "primary_request": {
    "request_settings": {
      "endpoint_path": "/api/v1/auditevents",
      "http_method": "POST",

      "request_body": "{\"limit\": 1000, \"start_time\": \"{{.last_run_time}}\"}",

      "custom_headers": [
        {
          "key": "Content-Type",
          "value": "application/json"
        }
      ],
      "max_requests_per_minute": 5
    },
    "pagination_strategy": {
      "token": {
        "next_page_token_json_path": "additional_items_url",
        "query_param": "cursor"
      }
    },
    "checkpointing": {
      "latest_timestamp_strategy": {
        "checkpoint_value_path": "timestamp",
        "checkpoint_variable": "last_run_time"
      }
    },
    "response_mapping": {
      "target_data_path": ["items"]
    }
  }
}
Concrete sample configuration 2: Cloudflare zone telemetry (List & Detail (Parent-Child) model)
The following declarative JSON configuration demonstrates a List & Detail (Parent-Child) fan-out model for Cloudflare:
{
 "base_url": "https://api.cloudflare.com",
 "polling_frequency": 30,
 "header_auth": {
   "header_key_values": [
     {
       "key": "Authorization",
       "value": "Bearer <SECRET_STORED_IN_SECRET_MANAGER>"
     }
   ]
 },

 "primary_request": {
   "request_settings": {
     "endpoint_path": "/client/v4/zones",
     "http_method": "GET"
   },
   "response_mapping": {
     "target_data_path": ["result"]
   },
   "pagination_strategy": {
     "none": {}
   },
   "checkpointing": {
     "none_strategy": {}
   },
   "dependent_requests_config": {
     "item_id_json_path": "id",
     "item_id_variable": "zone_id",
     "dependent_requests": [
       {
         "request_settings": {
           "endpoint_path": "/client/v4/zones/{{.zone_id}}/logs/received",
           "http_method": "GET",
           "query_parameters": [
             {
               "key": "start",
               "value": "{{.last_run_time}}"
             },
             {
               "key": "count",
               "value": "1000"
             }
           ],
           "max_requests_per_minute": 5
         },

         "pagination_strategy": {
           "none": {}
         },
         "checkpointing": {
           "latest_timestamp_strategy": {
             "checkpoint_value_path": "EdgeStartTimestamp",
             "checkpoint_variable": "last_run_time"
           }
         },
         "response_mapping": {
           "target_data_path": []
         }
       }
     ]
   }
 }
}
Custom API best practices
- Start with moderate polling intervals: Set initial polling to 15 minutes or 30 minutes for high-volume endpoints to observe vendor API quota behavior before lowering to 5 minutes.
- Validate ingestion paths: Use vendor documentation or API testing tools to confirm the exact JSON field name for timestamps before configuring state checkpointing.
- Decompose multi-child APIs: If a third-party API requires fetching alerts AND audit logs for a single user list, create two separate single-child feeds (one for alerts, one for audit logs) to maintain optimal isolation.
Rate limiting and throttling guardrails
To prevent customer feed configurations from overwhelming third-party vendor quotas or monopolizing system resources, the Custom API feed type implement the following automated guardrails:
- Configurable request pacing (rate limiting): Outgoing HTTP requests are automatically paced to prevent exceeding vendor rate limits. The default pacing rate is 5 requests per minute (1 request every 12 seconds). You can tune this per endpoint using the Max requests per minute field in the endpoint settings to match your vendor's published API quotas.
- Child request ceiling: For Parent-Child (List & Detail) feeds, a discovery request can dispatch up to 500 child requests per polling cycle.
- Single-level fan-out depth: The connector strictly enforces a maximum fan-out depth of 1 level (Parent discovery → Child details). Nested dependent requests (grandchild calls) are not supported.
- Response payload size ceiling: The maximum allowed HTTP response size for any single request or page is 50 MB. If an unpaginated API returns a response exceeding 50 MB, the fetch will fail with a resource exhausted error. To prevent this, always configure pagination query parameters (such as limit or page_size) to retrieve records in smaller batches.
- Polling interval guidance: Polling frequency can be configured between 5 minutes and 2,880 minutes (48 hours) (default: 15 minutes). For Parent-Child feeds discovering dozens or hundreds of resources, setting a polling interval of 30 to 60 minutes is strongly recommended to allow all paced child tasks to complete cleanly before the next discovery cycle initiates.
- Automated HTTP 429 back-off: If a third-party vendor API responds with HTTP 429 (Too Many Requests), Google SecOps automatically captures the status and initiates an exponential back-off period, pausing task execution until the vendor quota window refills.
Custom API limitations
When planning your ingestion paths, note that the Custom API feed type has the following limitations:
- Strict JSON support: Only JSON API responses are supported. Other formats such as XML, CSV, Parquet, and Avro are not supported.
- No dynamic request signing: APIs requiring dynamic cryptographic signatures per request are not supported (for example, AWS SigV4, Akamai, or Oracle OCI).
- No multi-step aAuthentication: APIs that require an initial programmatic login call to exchange credentials for a temporary session token (such as Saviynt) before polling are not supported.
- No WebSockets or Push ingestion: Custom API feeds support standard HTTPS pull polling. Persistent streaming connections (WebSockets) and incoming webhooks are not supported.
- No Mutual TLS (mTLS): Authentication must rely on API keys, basic authentication, or standard OAuth 2.0 client credentials. Client-side certificate handshakes are not supported.
Troubleshoot Custom API feeds
To investigate errors for Custom API feeds in Cloud Logging Logs Explorer, use the following queries:
resource.type="gce_instance" OR resource.type="generic_task"
jsonPayload.service="gopher"
jsonPayload.feed_id="<YOUR_FEED_ID>"
To filter specifically for failed HTTP requests:
jsonPayload.service="gopher"
jsonPayload.feed_id="<YOUR_FEED_ID>"
jsonPayload.http_status_code >= 400
Common failure modes and solutions
| Symptom / Error | Root cause | Solution / Remedy |
|---|---|---|
| HTTP 401 Unauthorized / HTTP 403 Forbidden | Expired or invalid API Key, password, or OAuth credentials. | Edit the feed, re-enter valid credentials, and click Submit. |
| HTTP 404 Not Found | Incorrect Base URL or Endpoint Path template. | Inspect endpoint in vendor API docs. Make sure Base URL ends cleanly and Endpoint Path starts with /. |
| HTTP 429 Too Many Requests | Exceeded vendor API rate limits. | Increase polling interval or reduce the limit parameter in query settings. |
| JSON Extraction Error (items_path empty) | Mismatch in response configuration path. | Verify API response payload structure. Update the target data JSON path. |
| Duplicate Data Ingestion | Invalid state configuration timestamp or ID extractor path. | Check log record field name for timestamp and update the extractor path. |
Create an HTTPS webhook feed
- In the Google SecOps menu, select Settings, and then click Feeds.
- Click Add new.
- In the Feed name field, enter a name for the feed.
- In the Source type list, select Webhook.
- Select the Log type. For example, to create a feed for Open Cybersecurity Schema Framework, select Open Cybersecurity Schema Framework (OCSF) as the Log type.
- Click Next.
- Optional: Specify values for the following input parameters:
- Split delimiter: the delimiter that is used to separate log lines. You can only use
\n. - Asset namespace: the asset namespace.
- Ingestion labels: the label to be applied to the events from this feed.
- Split delimiter: the delimiter that is used to separate log lines. You can only use
- Click Next.
- Review your new feed configuration in the Finalize screen, and then click Submit.
- Click Generate Secret Key to generate a secret key to authenticate this feed.
- Copy and store the secret key as you cannot view this secret again. You can generate a new secret key again, but regeneration of the secret key makes the previous secret key obsolete.
- From the Details tab, copy the feed endpoint URL from the Endpoint Information field. You need to specify this endpoint URL in your client application.
- Optional: Click the Feed Enabled toggle to disable the feed. The feed is enabled by default.
- Click Done.
Create an API key for the webhook feed
- Go to the Google Cloud console Credentials page.
- Click Create credentials, and then select API key.
- Restrict the API key access to the Chronicle API.
Specify the endpoint URL
- In your client application, specify the HTTPS endpoint, which is available in the webhook feed.
Enable authentication by specifying the API key and secret key as part of the custom header in the following format:
X-goog-api-key = API_KEYX-Webhook-Access-Key = SECRETWe recommend that you specify the API key as a header instead of specifying it in the URL. If your webhook client doesn't support custom headers, you can specify the API key and secret key by using query parameters in the following format:
ENDPOINT_URL?key=API_KEY&secret=SECRETReplace the following:
ENDPOINT_URL: the feed endpoint URL.API_KEY: the API key to authenticate to Google SecOps.SECRET: the secret key that you generated to authenticate the feed.
Manage feeds
After you configure your data feeds, use the management tools to monitor ingestion health, modify existing parameters, and manage the feed lifecycle. This section outlines how to interpret feed statuses and perform essential maintenance tasks to ensure continuous data visibility.
The Feeds page provides several tools to help you navigate and organize your list of configured feeds:
Search: Use the search bar to find a feed by its Feed Name, Feed ID, or Source type.
Filter: Click the filter icon to narrow the list based on specific feed attributes.
Download CSV: Click Download as CSV to export the current list of feeds to a CSV file.
Pagination: Use the pagination controls to:
Change the number of Rows per page.
Navigate through multiple pages of feeds using the page tabs and arrows.
Last refreshed time: View the timestamp to see when the feed list was last updated.
View configured feeds
The Feeds page shows all the feeds you've configured.
- Go to SIEM Settings > Feeds. The main page displays all your configured feeds.
- Hold the pointer over each row to display the more_vert More menu.
- In the menu, you can view feed details, edit, disable, or delete the feed.
Monitor the feed status
You can monitor the status of the feed on the initial Feeds page, where feeds can have the following statuses:
- Active: Feed is configured and ready to ingest data into your Google SecOps account.
- InProgress: Google SecOps attempts to pull data from the configured third party.
- Completed: Data successfully retrieved by this feed.
- Archived: Disabled feed.
Failed: Feed is failing to successfully fetch data. This is likely due to a configuration issue. Click the question to display the configuration error. Once you've corrected the error and resubmitted the feed, return to the Feeds page to determine whether or not the feed is now working.
Edit existing feeds
On the Feeds page, you can edit an existing feed, as follows:
Hold the pointer over an existing feed and click more_vert in the right column.
Click Edit Feed. You can now modify the input parameters for the feed and resubmit it to Google SecOps, which will attempt to use the updated feed.
Enable and disable feeds
In the Status column, enabled feeds are labeled as Active, InProgress, Completed, or Failed. Disabled fields are labeled as Archived. For a description, see the feed status.
On the Feeds page, you can enable or disable any of the existing feeds:
Hold the pointer over an existing feed and click more_vert in the right column.
Optional: Click the Feed Enabled toggle to disable the feed.
Optional: Click the Disable Feed toggle to disable the feed. The feed is now labeled as Archived.
Delete feeds
On the Feeds page, you can also delete an existing feed:
Hold the pointer over an existing feed and click more_vert in the right column.
Click Delete Feed. The DELETE FEED window opens. To permanently delete the feed, click Yes, delete it.
For Custom API feeds, a dialog window appears with an optional checkbox: Delete pending backlog data:
- Unchecked (Default): The feed configuration and credentials are deleted, but queued backlog data is allowed to process through to ingestion.
- Checked: The feed configuration, credentials, and all pending backlog data are permanently removed.
Control the rate of ingestion
When the data ingestion rate for a tenant reaches a certain threshold, Google Security Operations restricts the rate of ingestion for new data feeds to prevent a source with a high ingestion rate from affecting the ingestion rate of another data source. In this case, there is a delay but no data is lost. The ingestion volume and tenant's usage history determine the threshold.
You can request a rate limit increase by contacting Cloud Customer Care.
Troubleshoot failed feeds
On the Feeds page, you can view details such as source type, log type, feed ID, and status of the existing feeds, as follows:
Hold the pointer over an existing feed and click more_vert in the right column.
Click View Feed. A dialog appears showing the feed details. For a failed feed, you can find error details under Details > Status.
For a failed feed, the details include the cause of the error and steps to fix it.
See the Source and Ingestion Errors table for error messages that you might encounter when working with data feeds.
For detailed analysis and troubleshooting of feed activity, you can view logs in Cloud Logging. See Analyze feed activity with Cloud Logging.
Need more help? Get answers from Community members and Google SecOps professionals.