
Pre-migration validation guide
This document outlines a systematic, step-by-step diagnostic approach for validating the Google Security Operations instance and authentication setup before SOAR migration. This guide focuses on the SAML and OIDC standard that is used for user authentication and authorization.
Chronicle API setup validation
To check if Chronicle API is correctly configured in your Google Cloud project, follow these steps:
- Sign in to the Google Cloud console and select the correct Google Cloud project from the project list in the top navigation bar.
- Open the navigation menu (≡) and go to APIs & Services > Enabled APIs & services.
- Go to the list of Enabled APIs & Services to find
Chronicle API. If it is listed: The API is enabled.
If it is NOT listed: Click + ENABLE APIS AND SERVICES at the top, search for
Chronicle API, and click Enable.
To verify whether the Service Account is created, do the following:
- Go to the IAM Page in the Google Cloud console.
- Reveal hidden accounts (crucial step): You must select the box on the right side of the filter bar that says Include Google-provided role grants.
- Search for the agent: In the filter bar, type
chronicle. You're looking for an email address that matches this specific pattern:service-[PROJECT_NUMBER]@gcp-sa-chronicle.iam.gserviceaccount.com - Verify permissions: Ensure it has the role of Chronicle Service Agent. If the role is missing, click edit Edit and add it back.
Google SecOps Set up validation
- In the Google Cloud console, select the correct Google Cloud project from the list.
- Go to Security > Google SecOps and the Single Sign-On tab appears.
- If Google SecOps is enabled, you should see a tab called Single Sign-On. If not, the prospect initiation is incomplete. Provide the Google Cloud project ID in the Google form found in the in-product notification. Confirm the migration date and time slot, and then submit the form. If you don't receive a response within 72 hours of submission, contact soar-migration-to-gcom@google.com.
- If the tab exists, click Go to SecOps. Successful login confirms that the authentication configuration is correct. If login fails, use the next section to debug the configuration. If login fails, use the next section to debug the configuration.
SAML Flow and troubleshooting
This section provides an overview of the SAML authentication process and outlines a systematic approach for diagnosing and resolving common configuration issues.
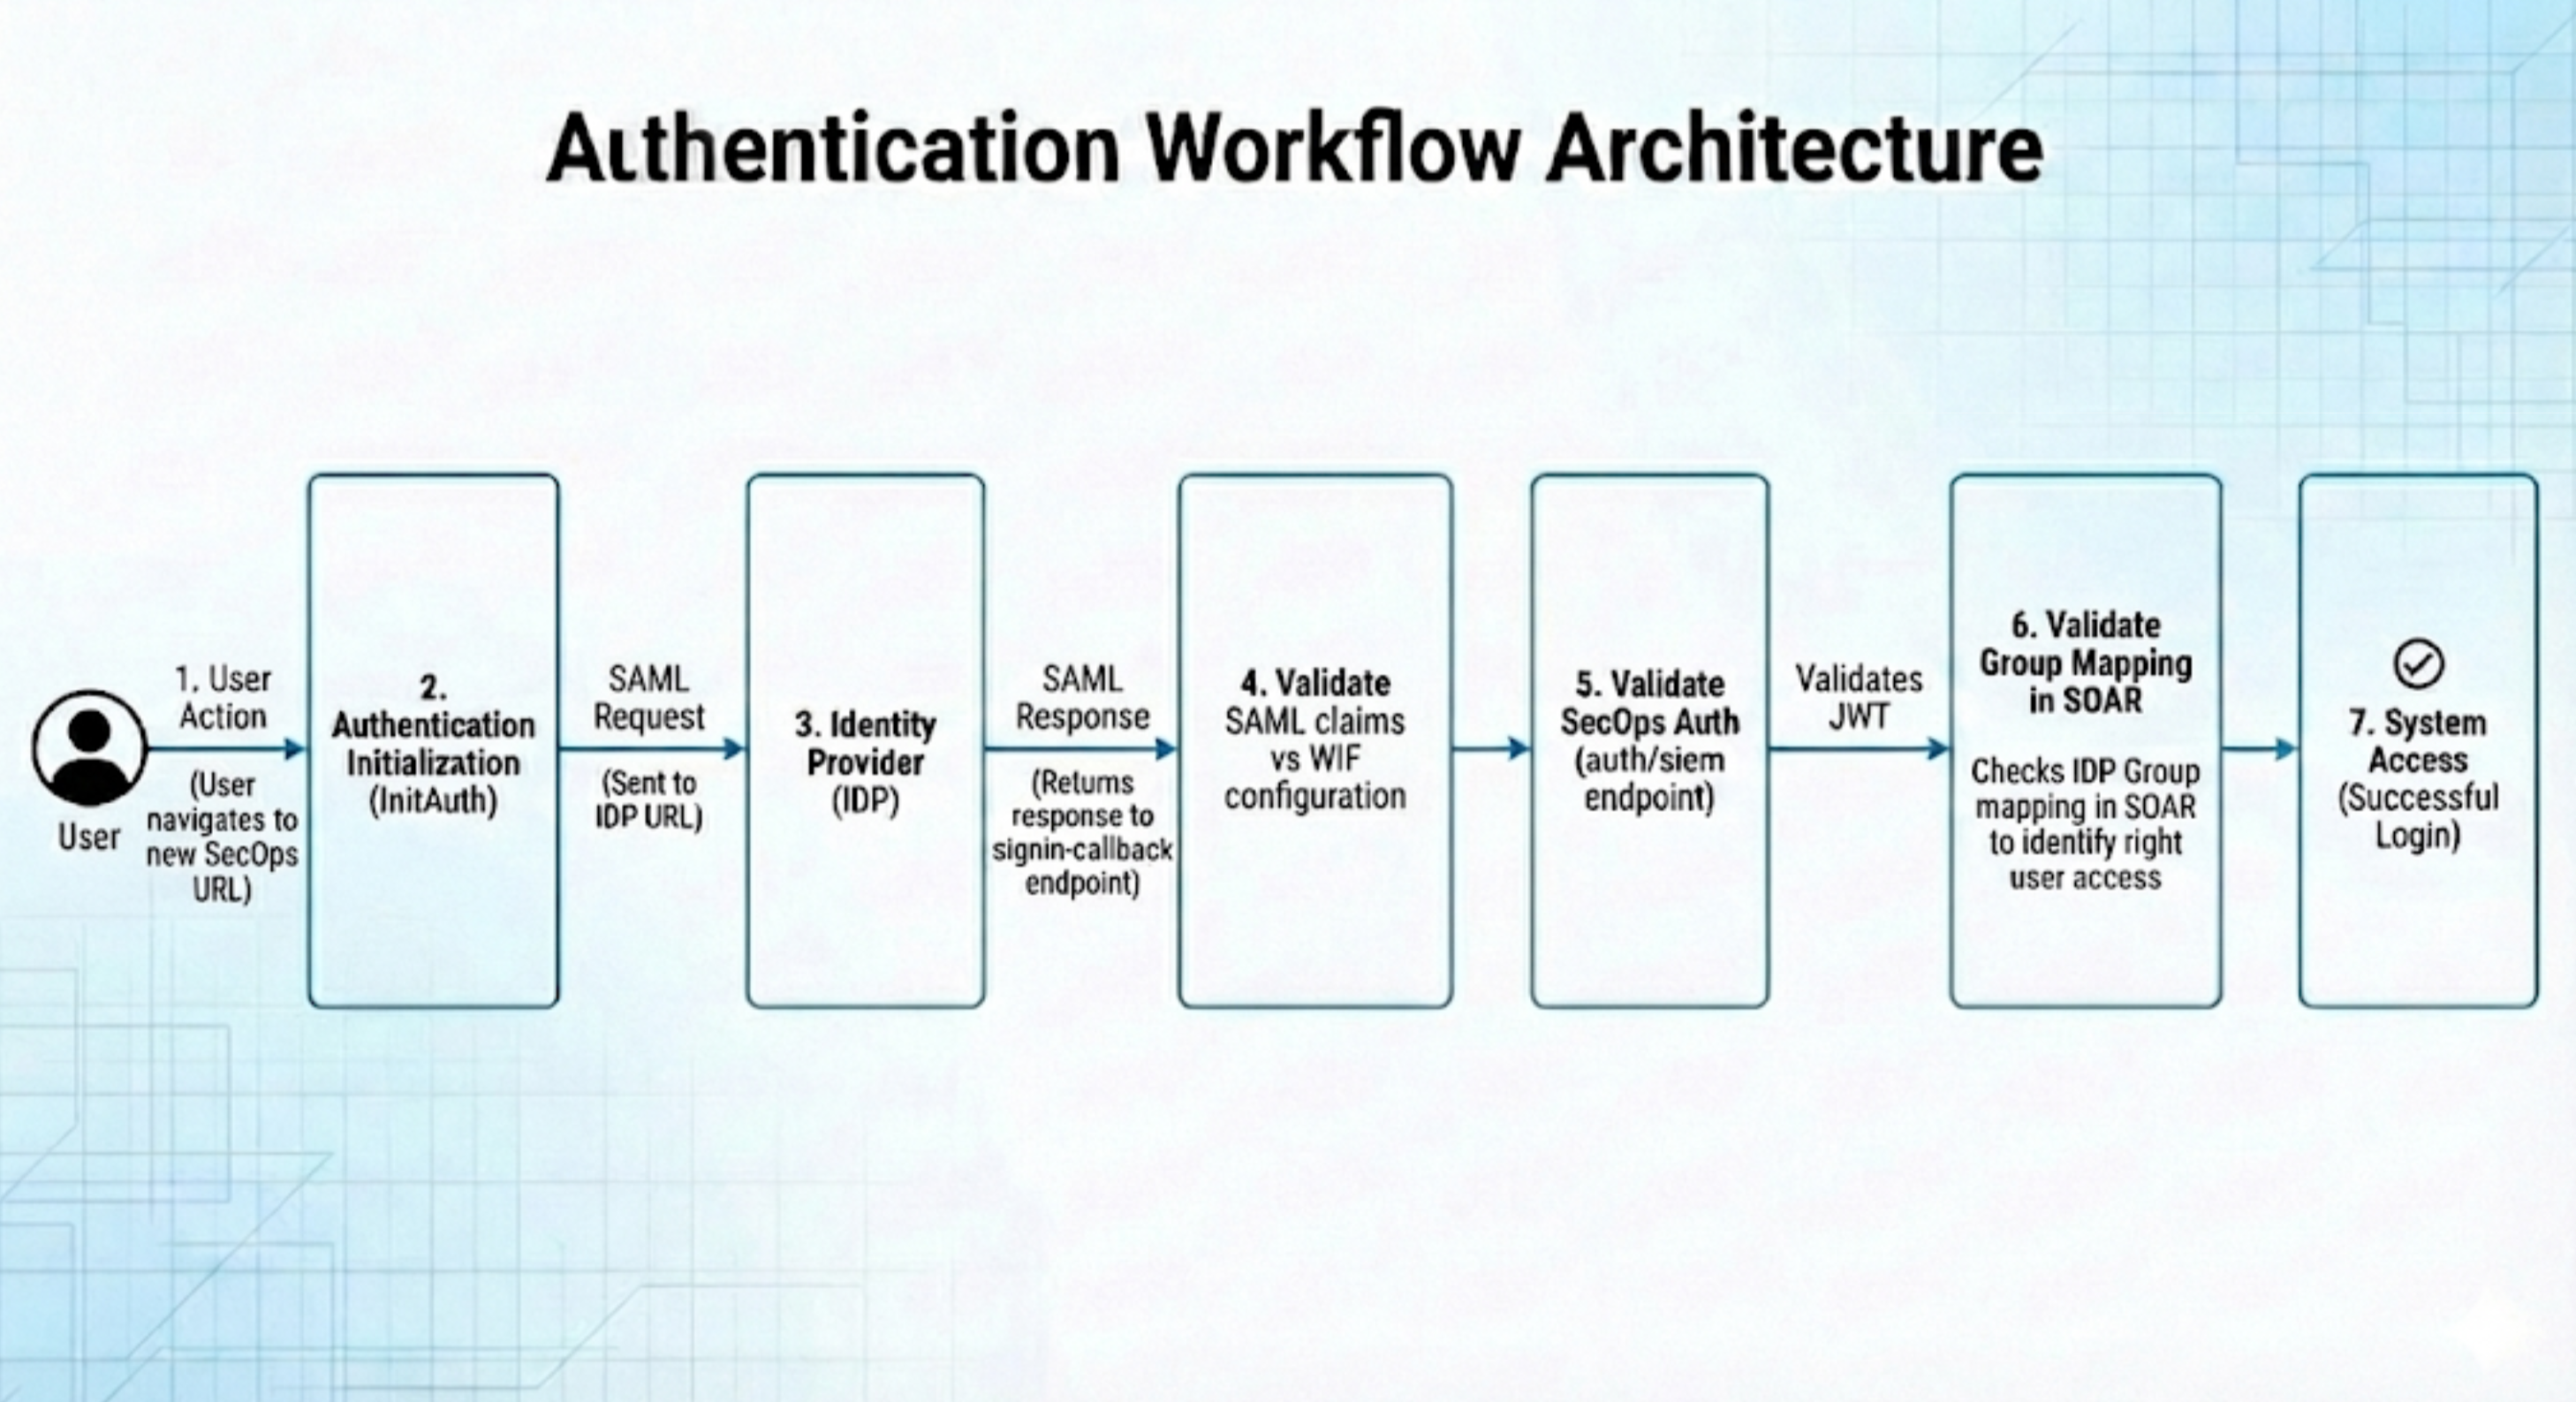
Authentication workflow architecture
Understanding the request flow is critical for isolating any failure points. The following diagram illustrates the sequential path of a successful login.
Step-by-step troubleshooting procedure
To diagnose and trace the SAML authentication process effectively, you can use the web-based utilities listed in the following sections.
Although Google does not endorse any particular product, the following tools are known to aid in troubleshooting the process:
- SAML validation: https://www.samltool.io/
- Purpose: Used to decode and validate raw SAML requests and responses.
- JWT inspection: https://www.jwt.io/
- Purpose: Used to inspect the claims and contents of JSON Web Tokens (JWTs).
Phase 1: Environment preparation
Before you begin, make sure your browser environment is ready to capture network traffic by completing the following steps::
- Open a new browser tab or use an Incognito window.
Open Developer Tools using the shortcut for your operating system:
- Windows: Press F12
- Linux: Press Ctrl + Shift + I
- macOS: Press Cmd + Option + I
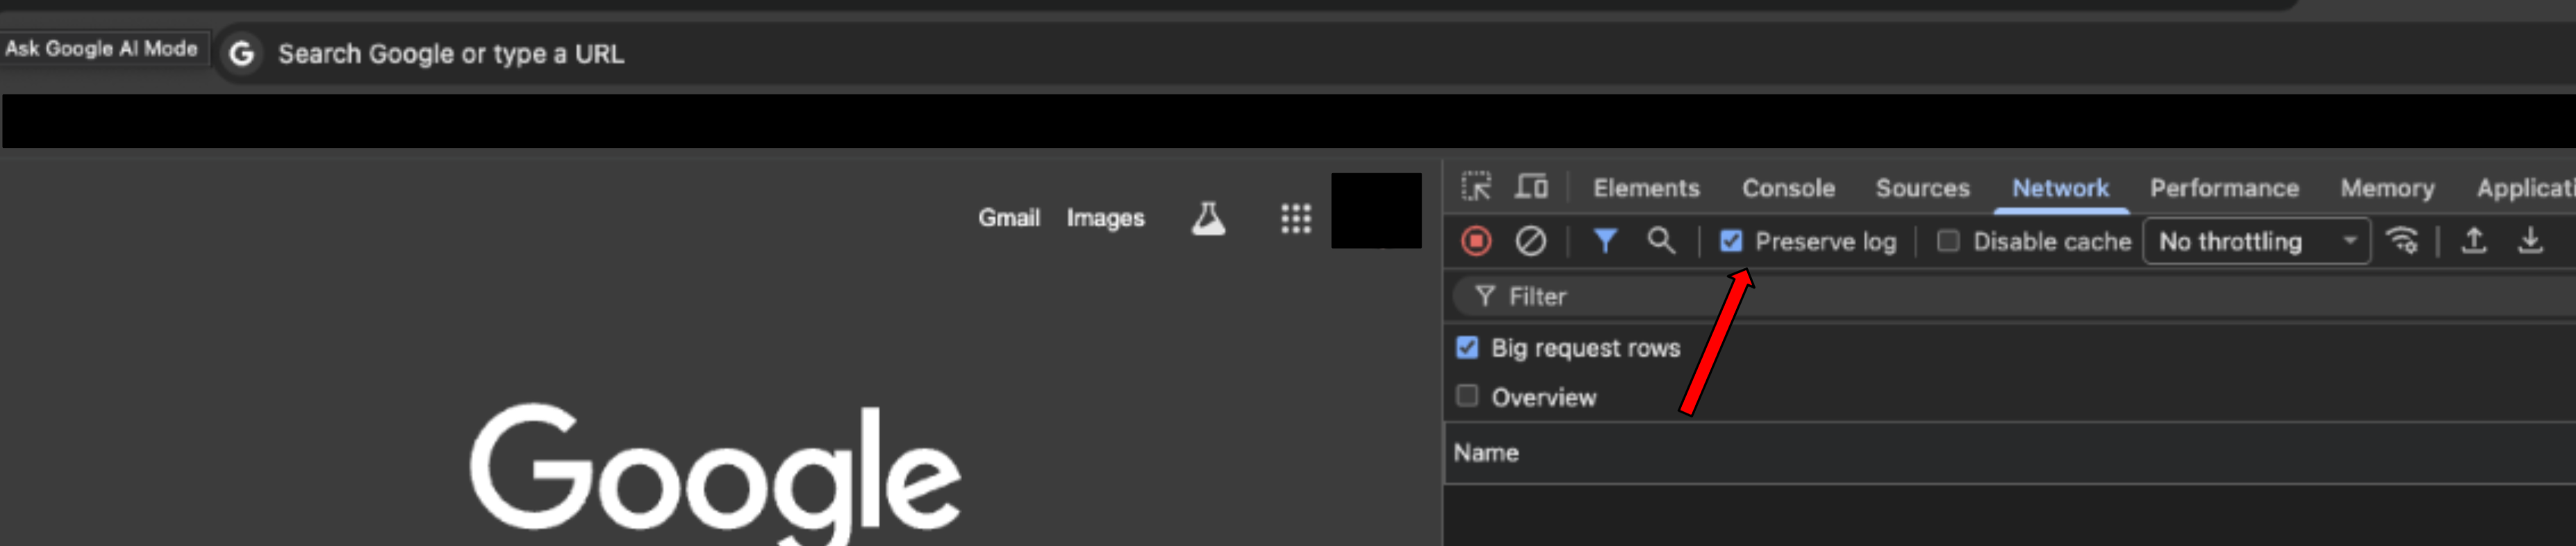
Navigate to the Network tab.
Select the Preserve log box to ensure no data is lost during redirects.
Navigate to your Google SecOps environment URL to initiate the login flow. You will receive this URL through email after you complete Google SecOps setup in Step 5 of Migration stage 1 for SOAR standalone customers. The Subject of the email is
Your Google SecOps instance is ready.
Phase 2: Validate the SAML request to IDP
This step verifies the initial message sent by Google Cloud to your Identity Provider (IDP).
Locate the request: In the Network tab filter bar, search for
saml.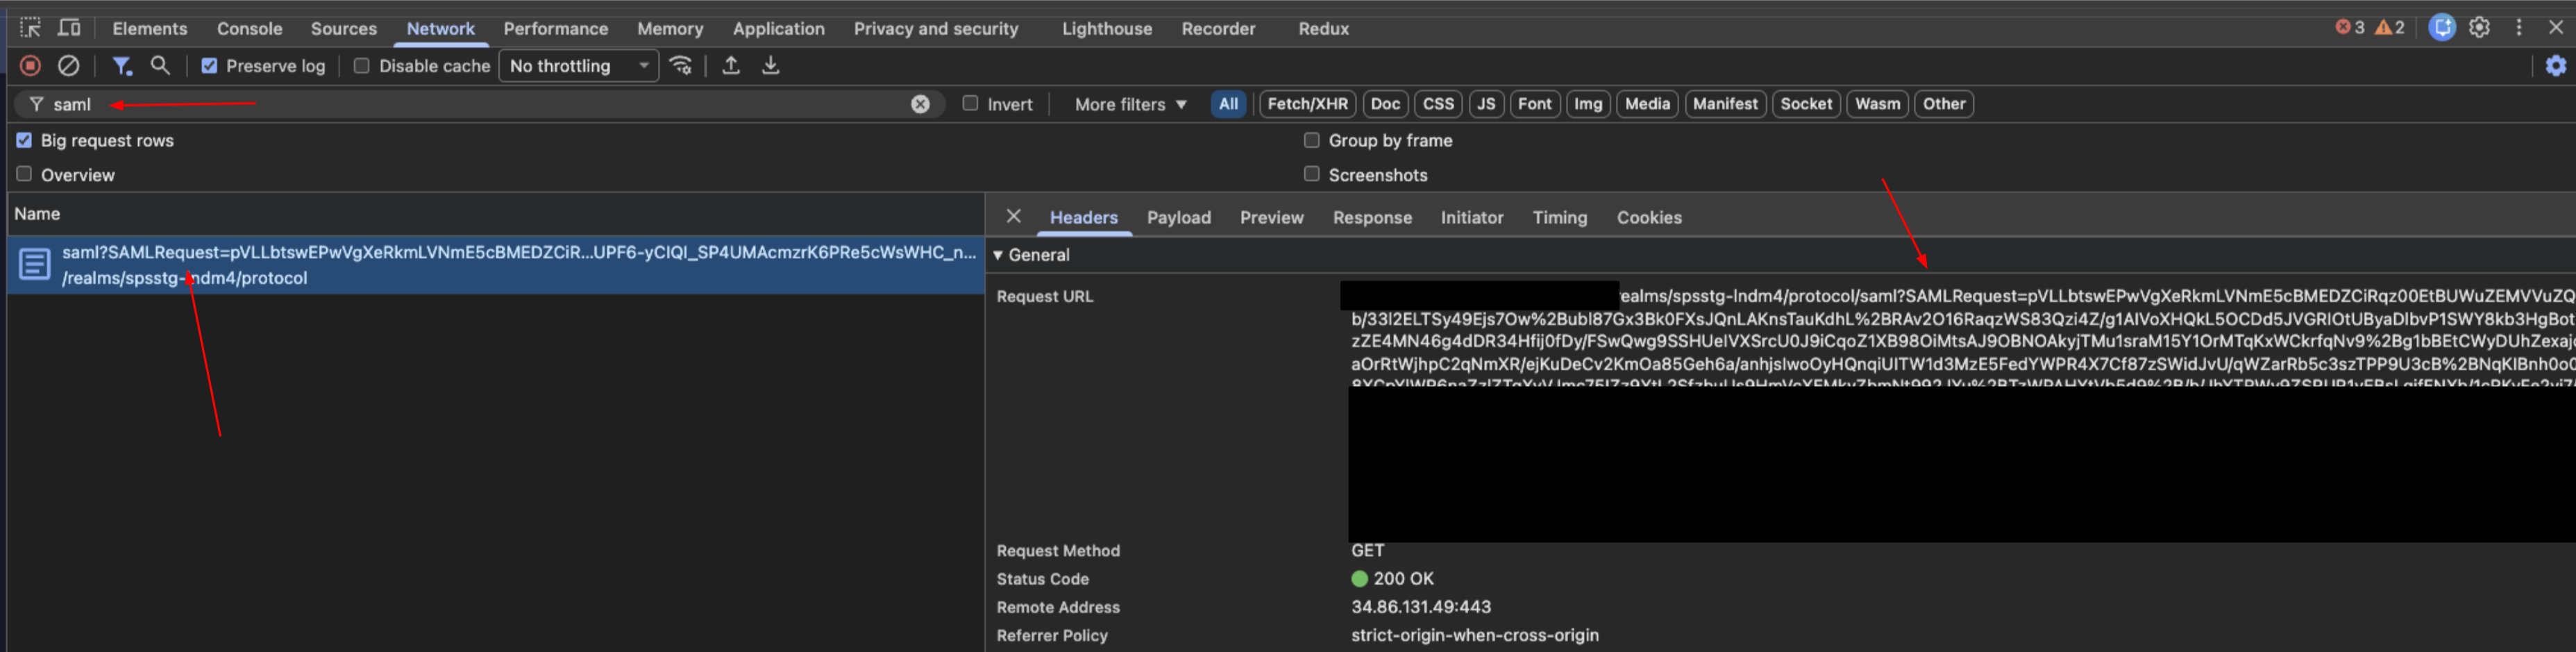
Extract data: Select the request and click the Payload tab. Locate the query string parameter labeled
SAMLRequest.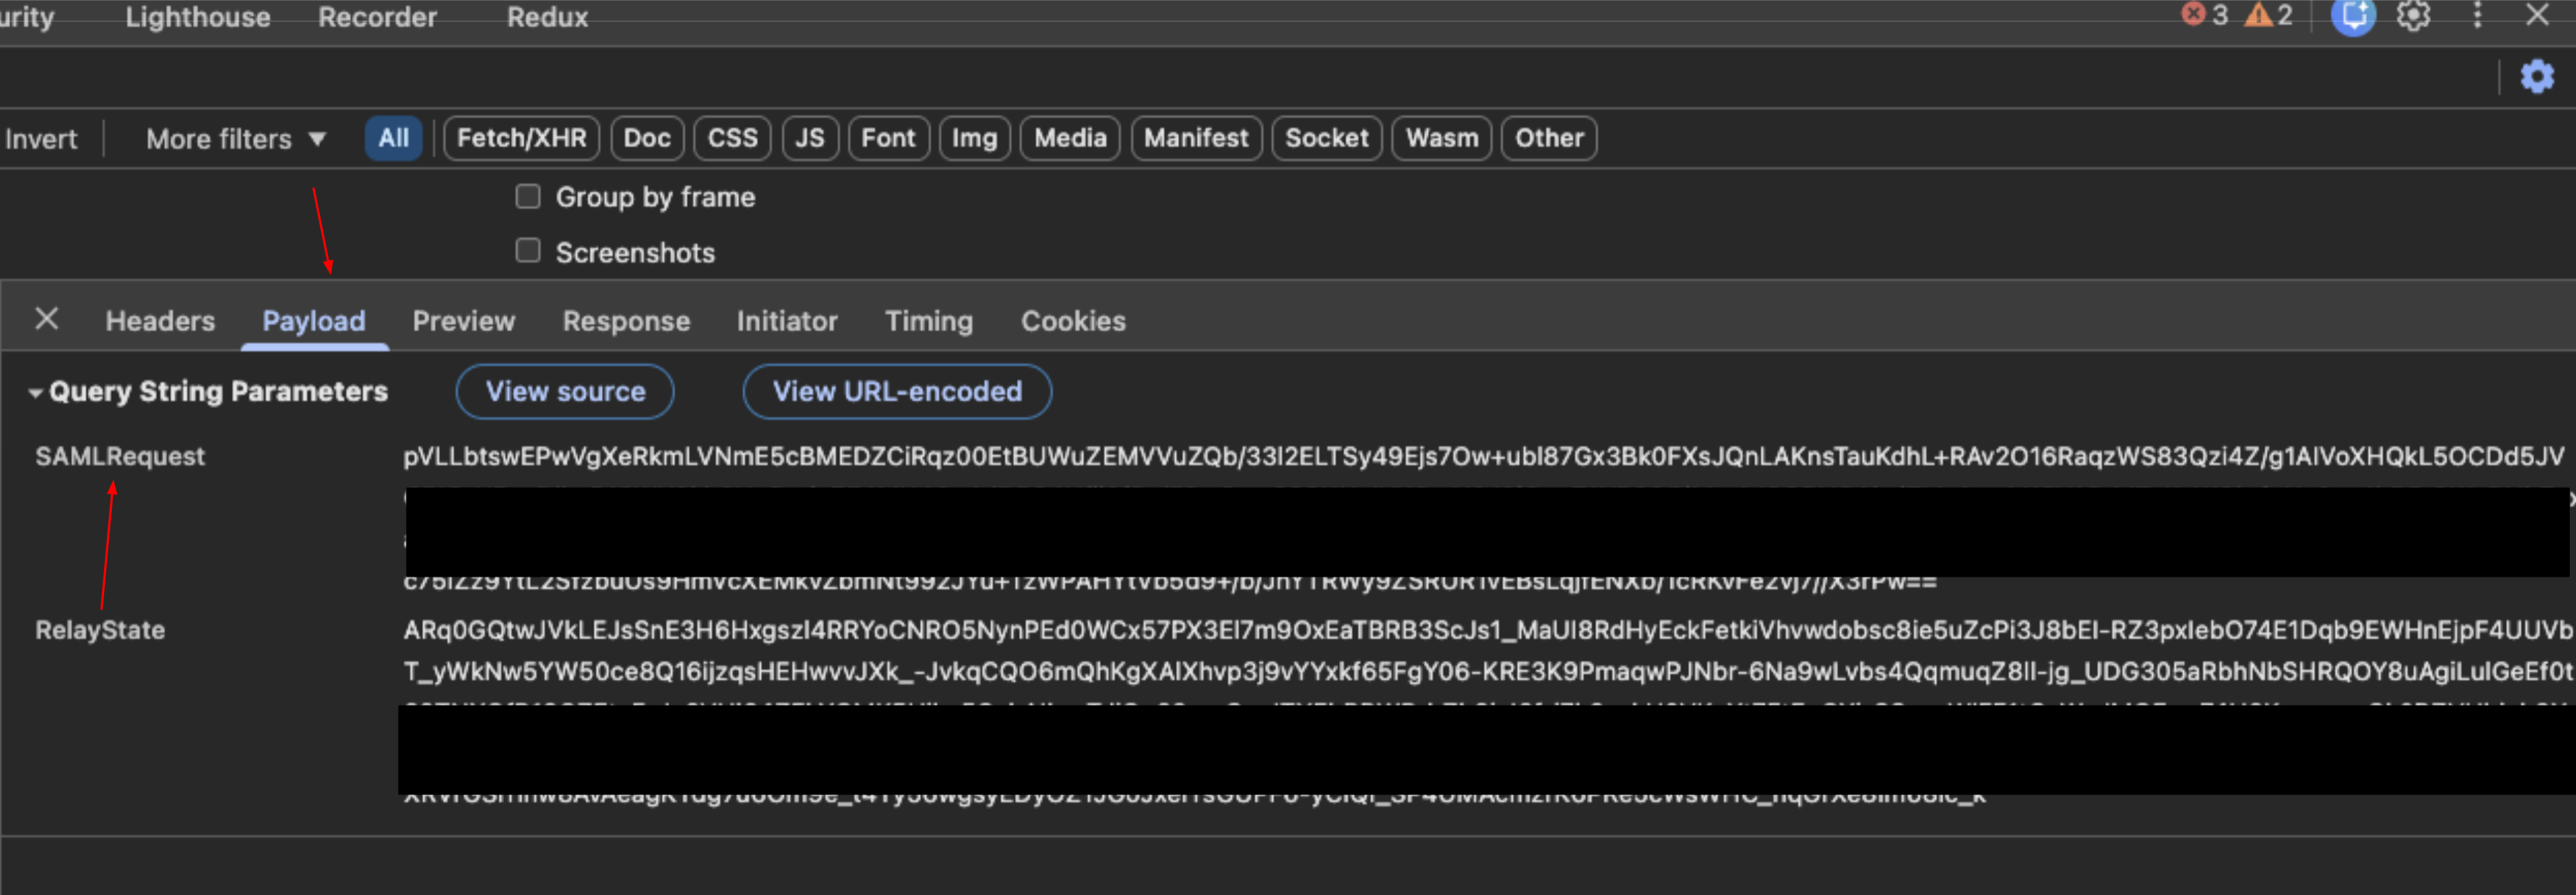
Decode: Copy the request value and paste it into the SAML Validation tool (
samltool.io) to decode it.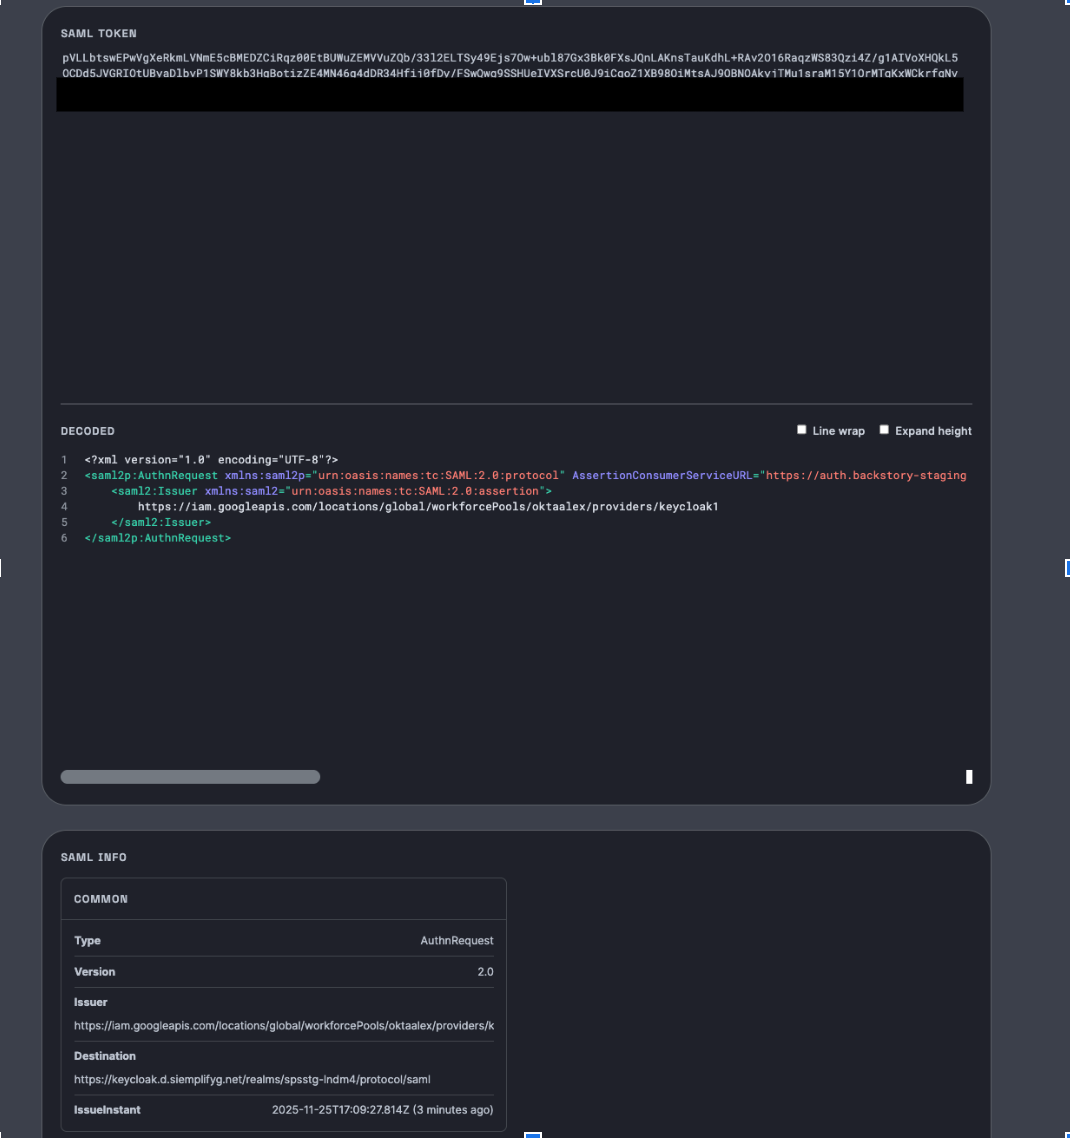
Verification:
- Check the Request Destination.
- Confirm this URL matches the configuration settings within your IDP.
Phase 3: Validate the SAML response from IDP
This step verifies the attributes returned by the IDP to Google Cloud after authentication.
Locate the response: In the Network tab filter bar, search for
signin-callback.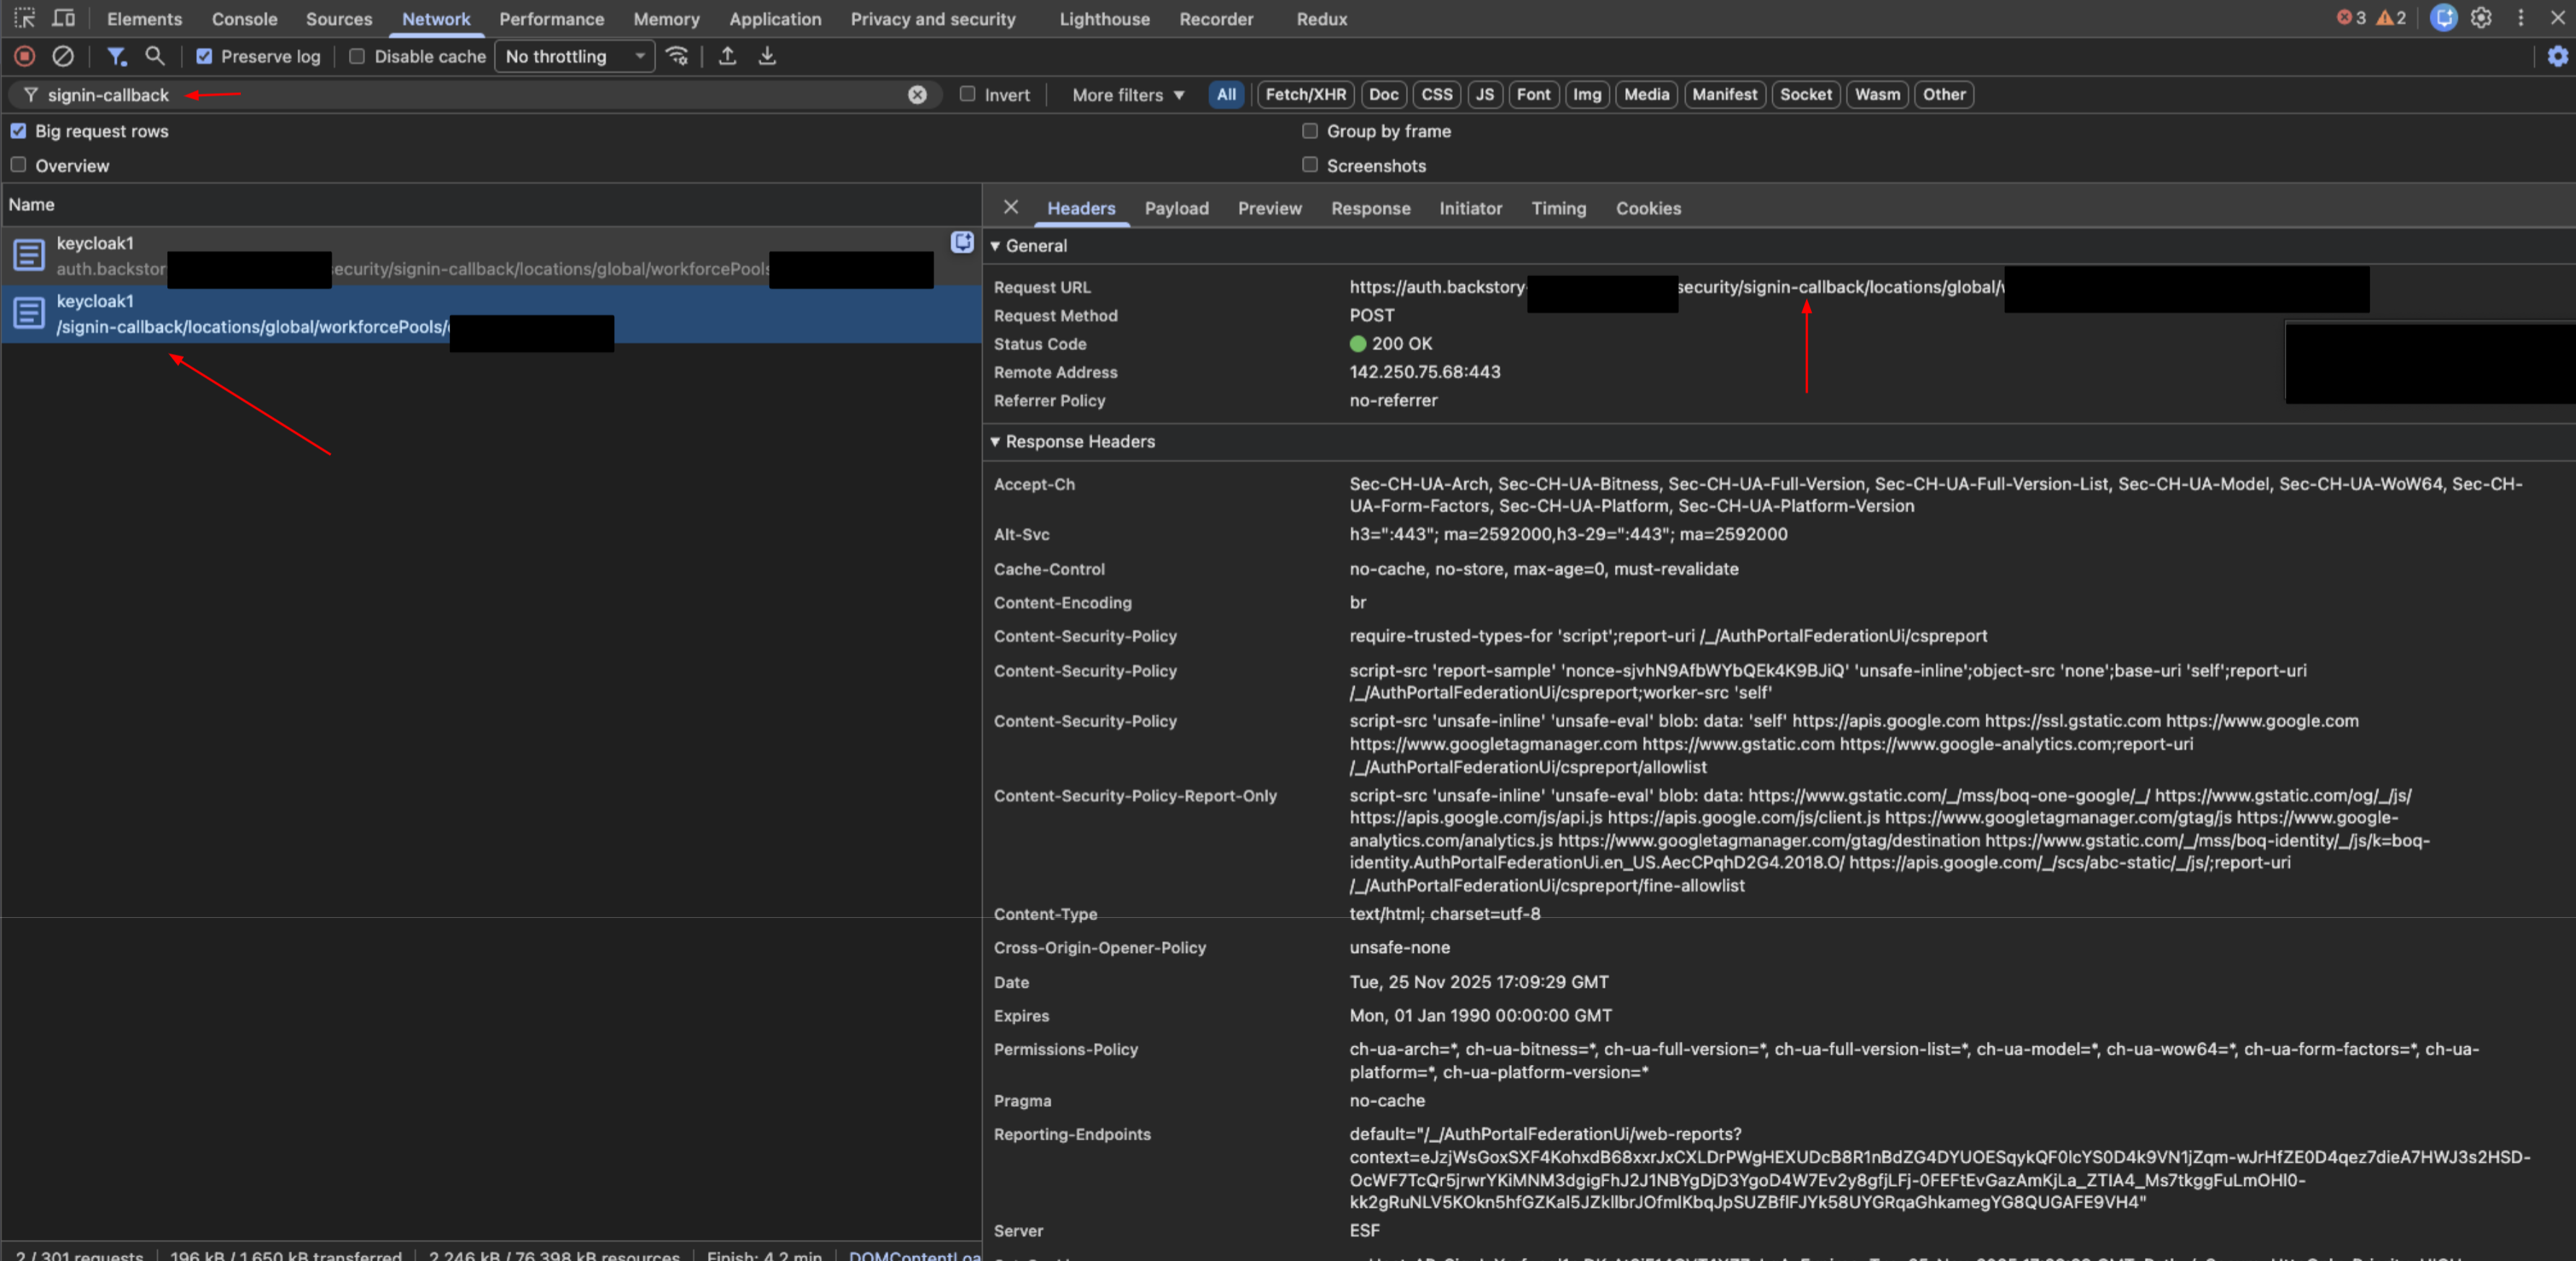
Extract data: Select the request and click the Payload tab. Locate the
SAMLResponsedata.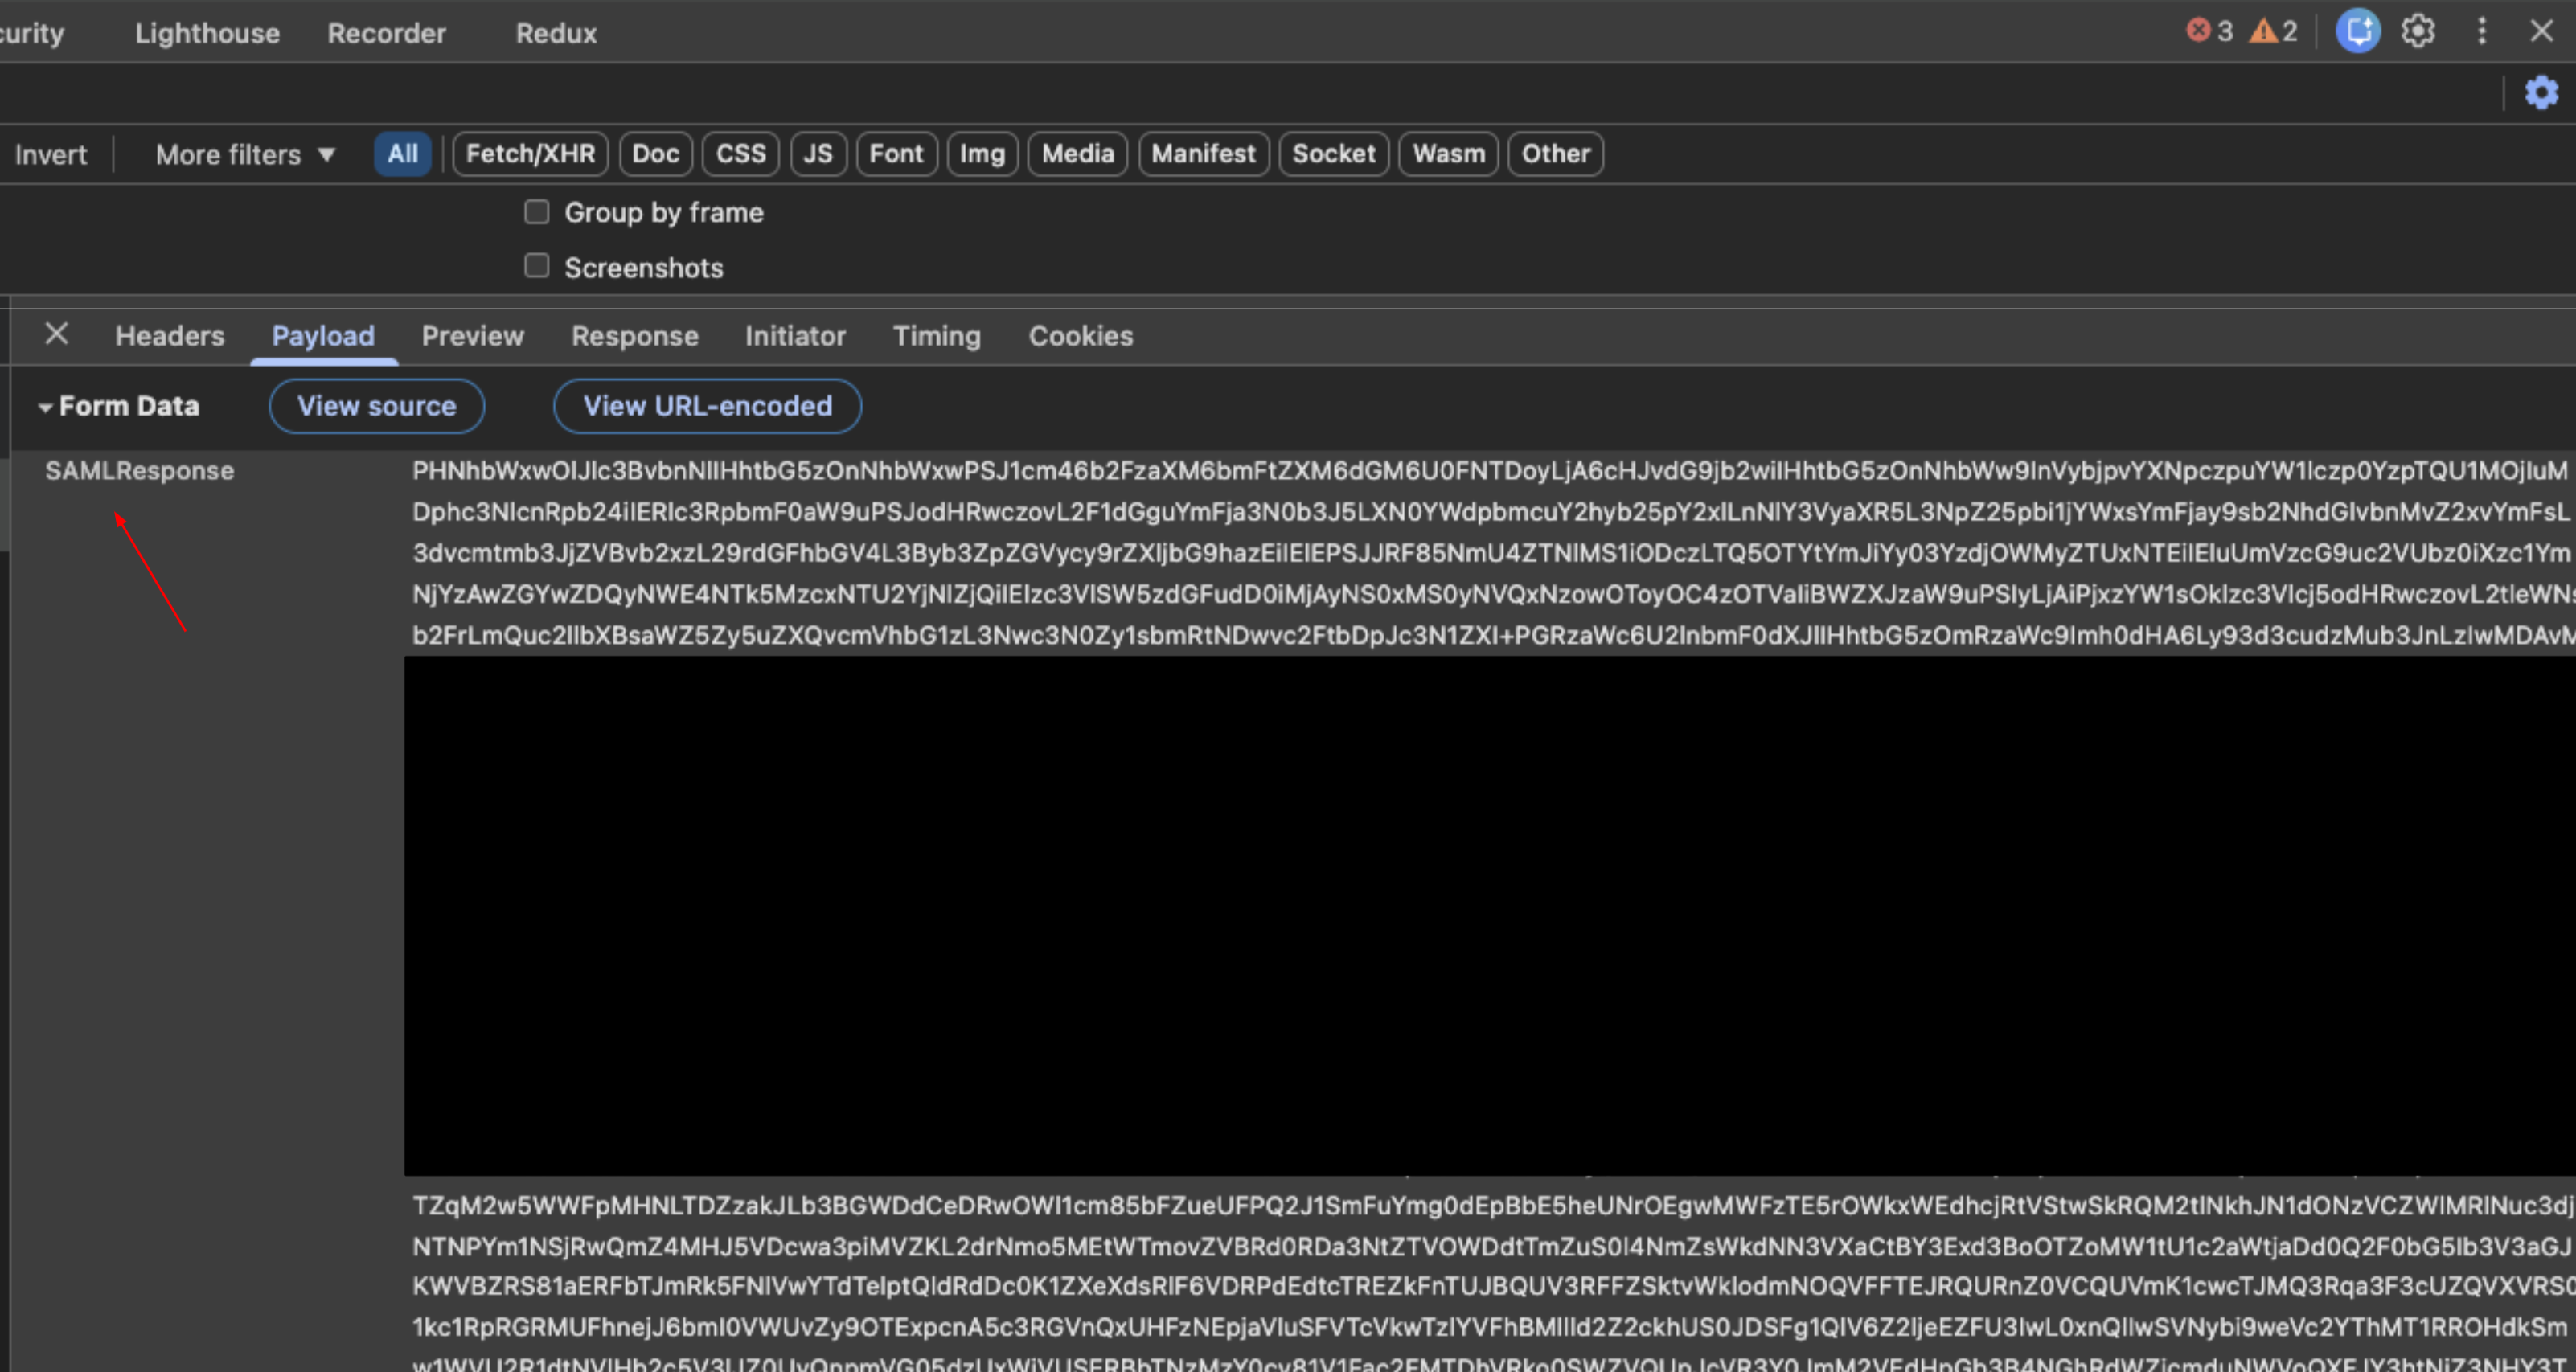
Decode: Copy the response value and paste it into the SAML Validation tool.
Verification:
- Review the returned claims (attributes) such as
groups,first name,last name, andemail. - Critical: Ensure these attributes match the configuration in the Workforce pool settings in Google Cloud.
Confirm the values are correct for the specific user attempting to log in.
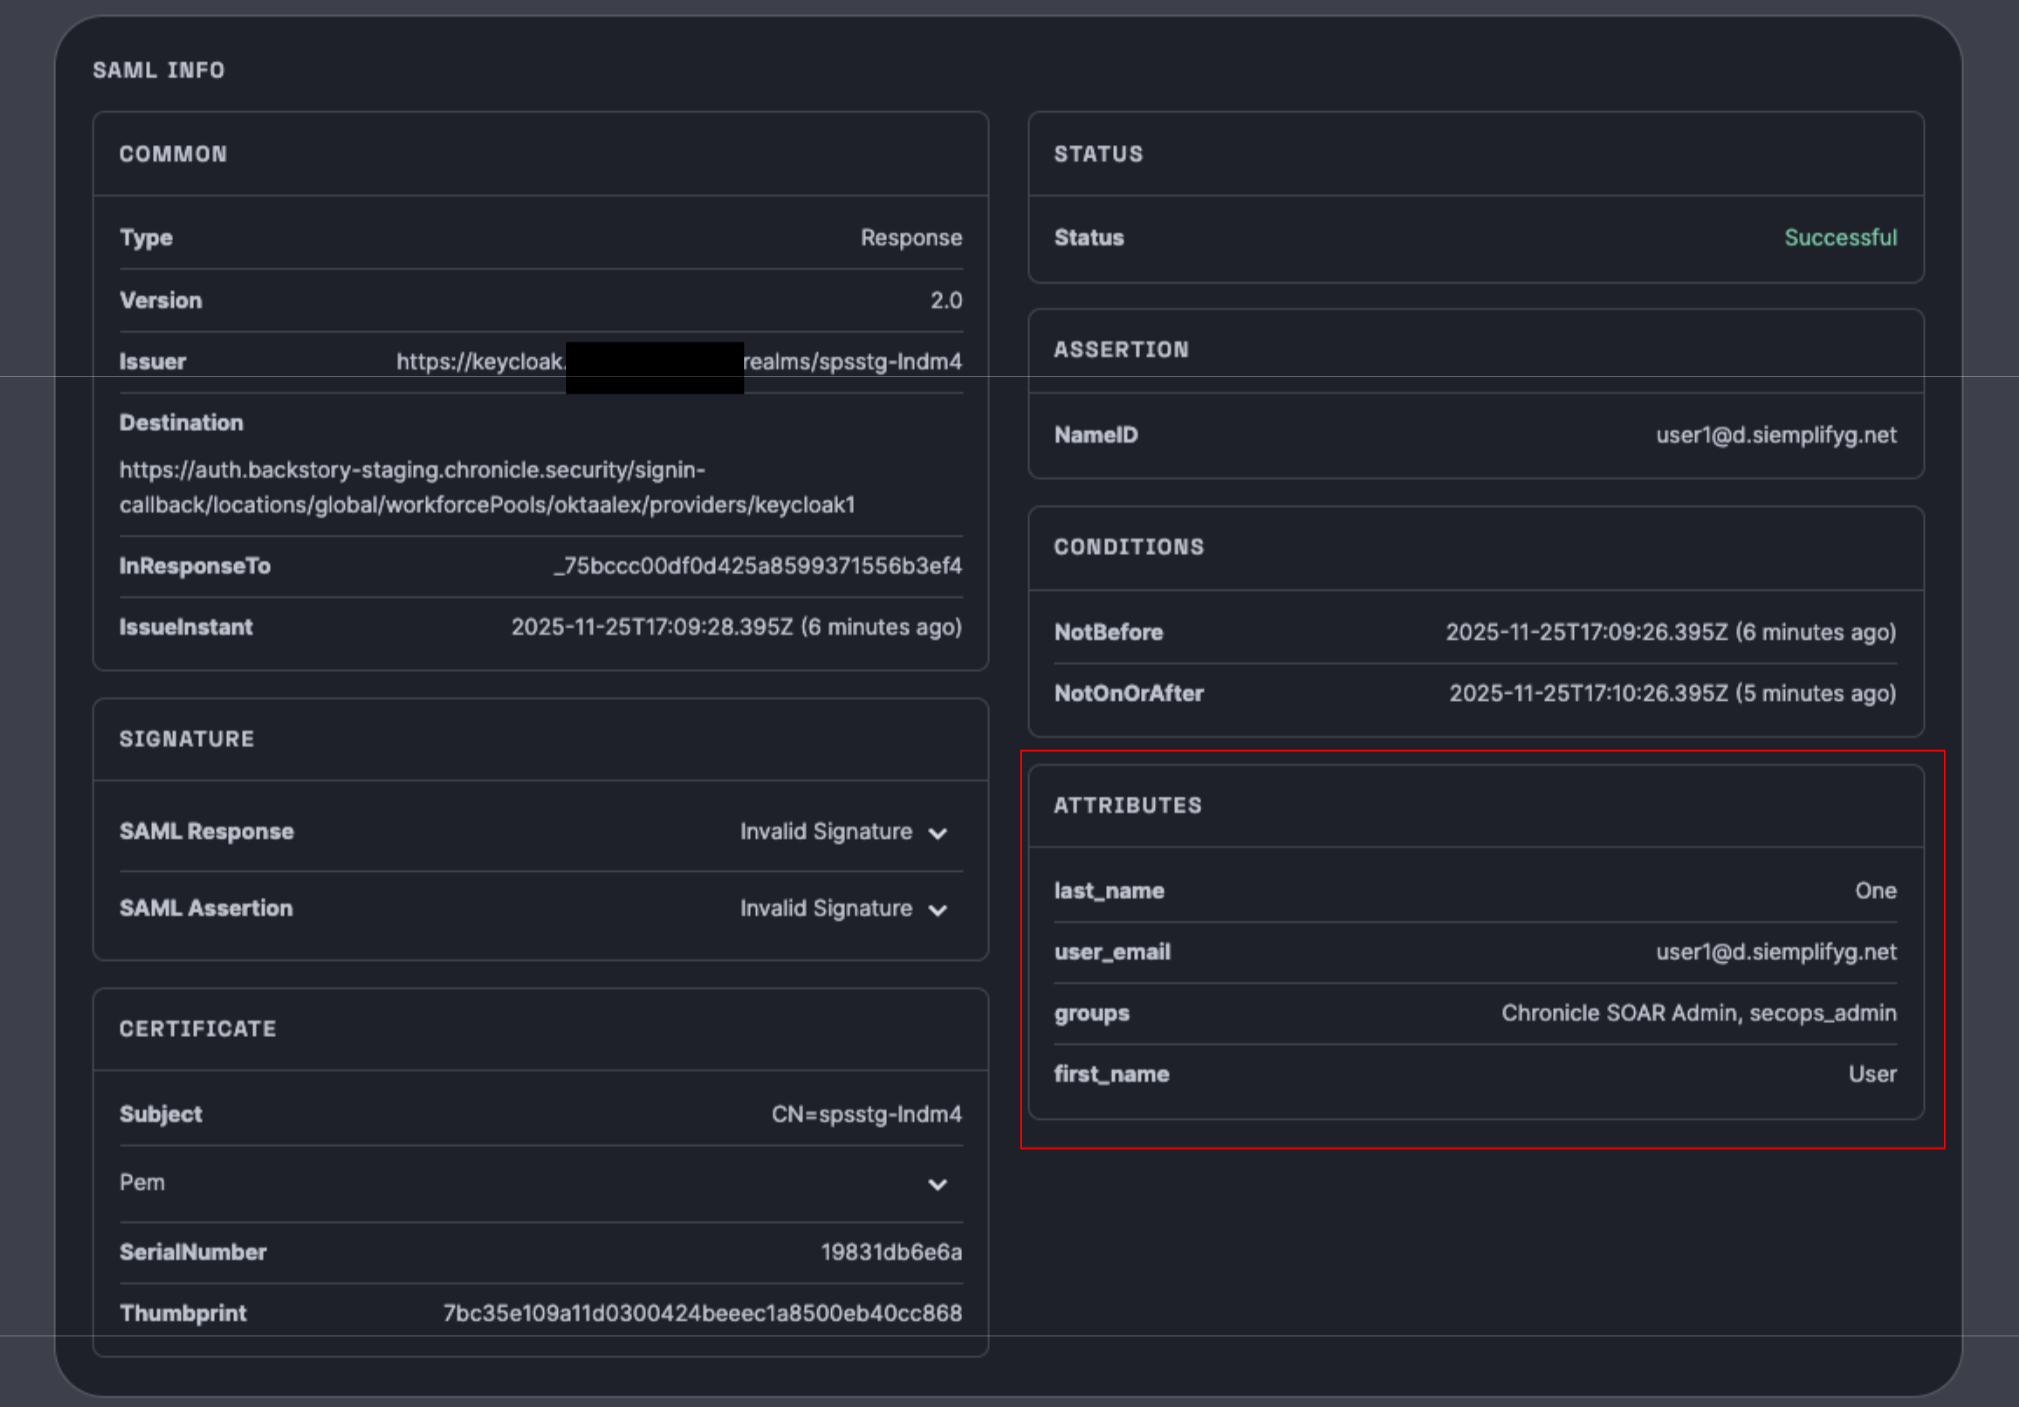
- Review the returned claims (attributes) such as
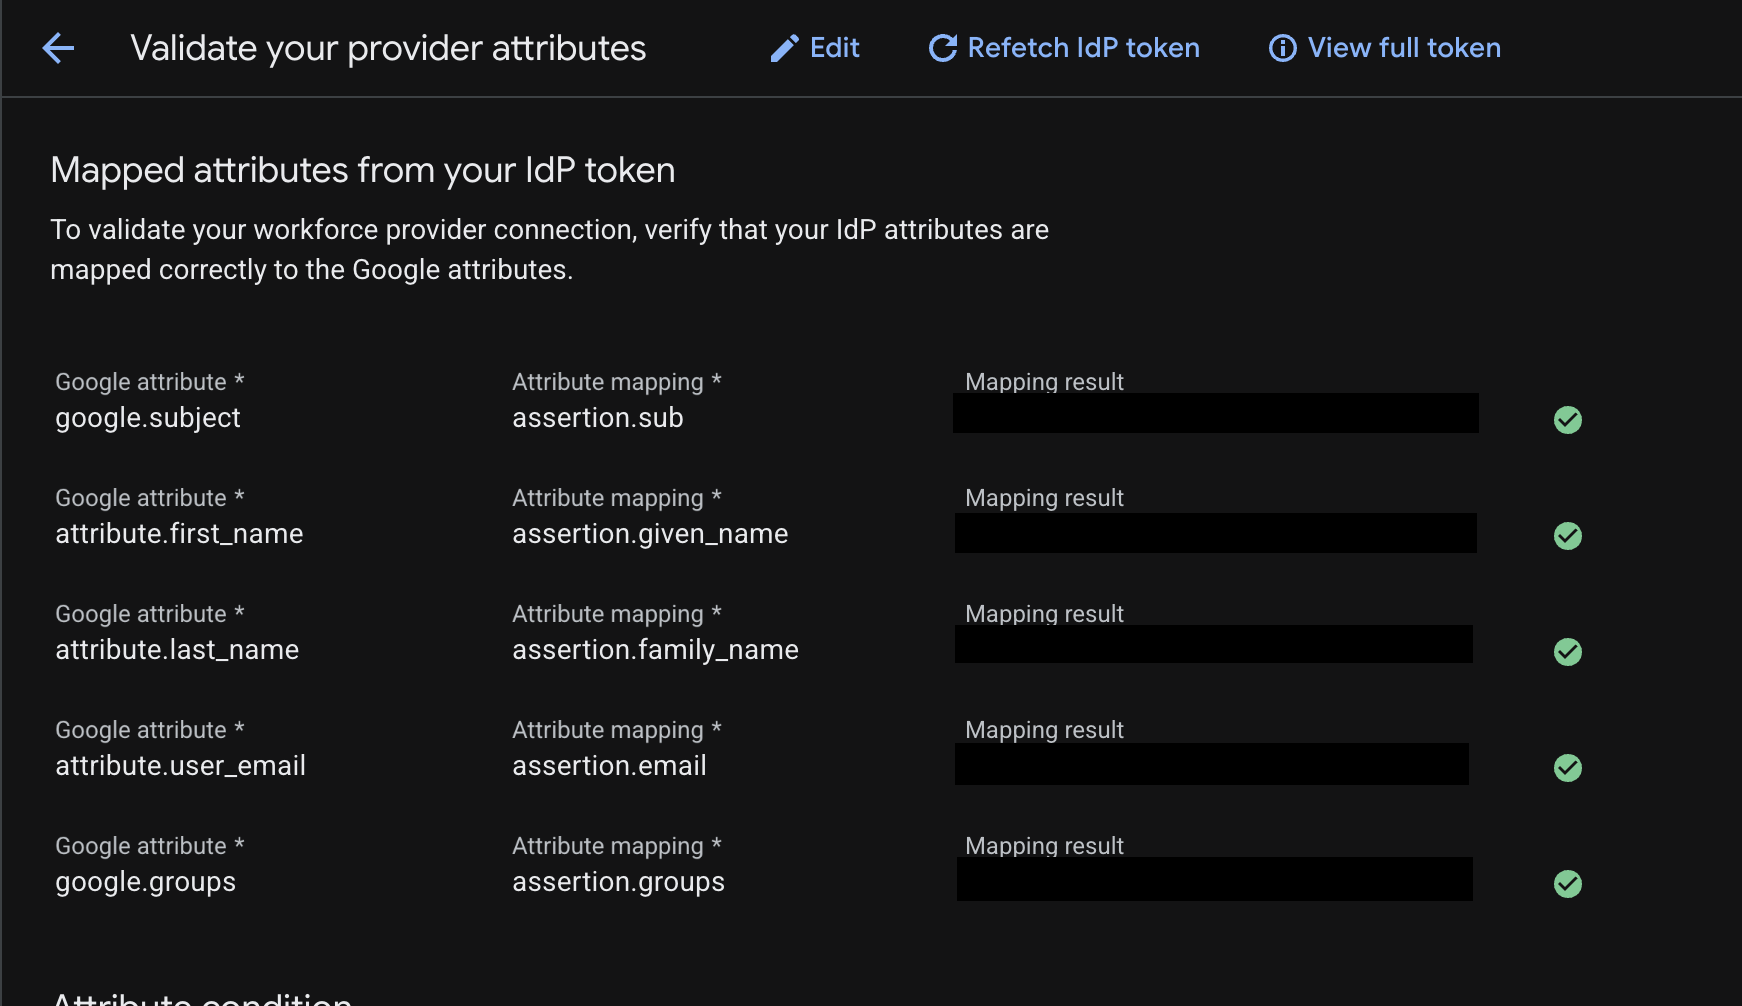
The following image shows an attribute mapping:
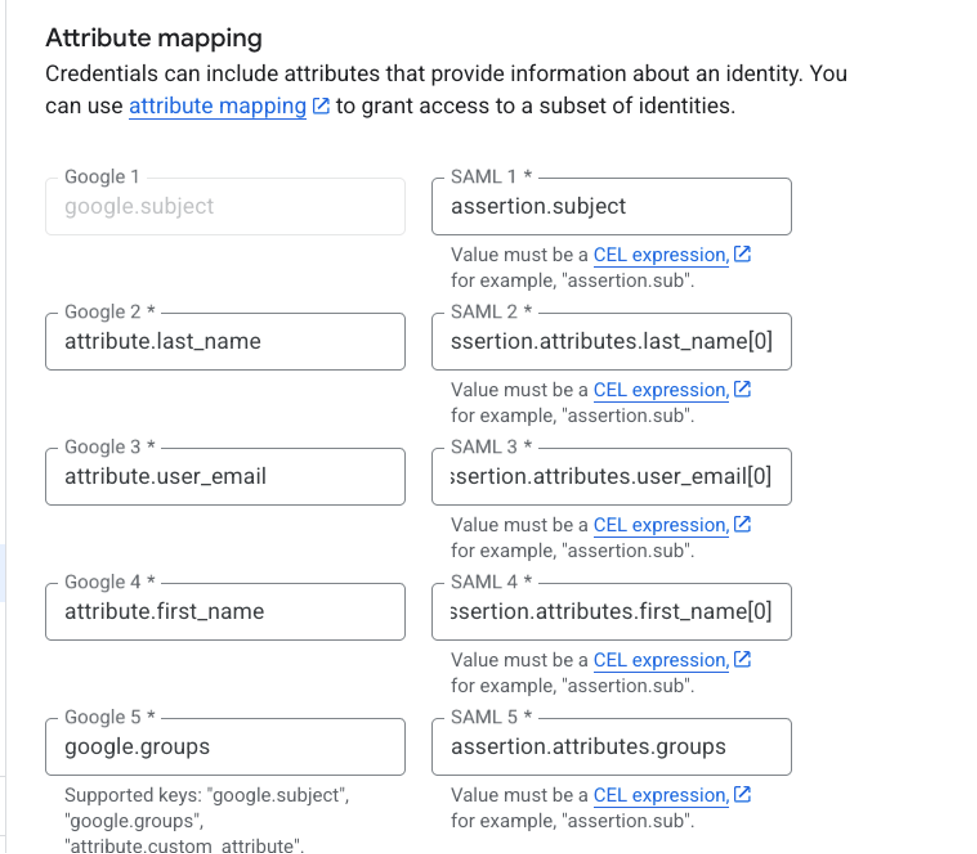
The mapping in the image is as follows:
google.subject = assertion.subjectattribute.last_name = assertion.attributes.last_name[0]attribute.user_email = assertion.attributes.user_email[0]attribute.first_name = assertion.attributes.first_name[0]google.groups = assertion.attributes.groups
The left part is always the same; it's the Google syntax. The right side is according to the claim Attribute keys shown in the SAML response.
The [0] is critical for the specific attributes stated (last_name, user_email , first_name), and not relevant for subject and groups.
Phase 4: Validate the Google SecOps authentication
This step verifies whether Google Cloud is authenticating the user to log in to Google SecOps SOAR.
Locate the token in the user's browser: In the Network tab filter bar, search for the endpoint
auth/siem.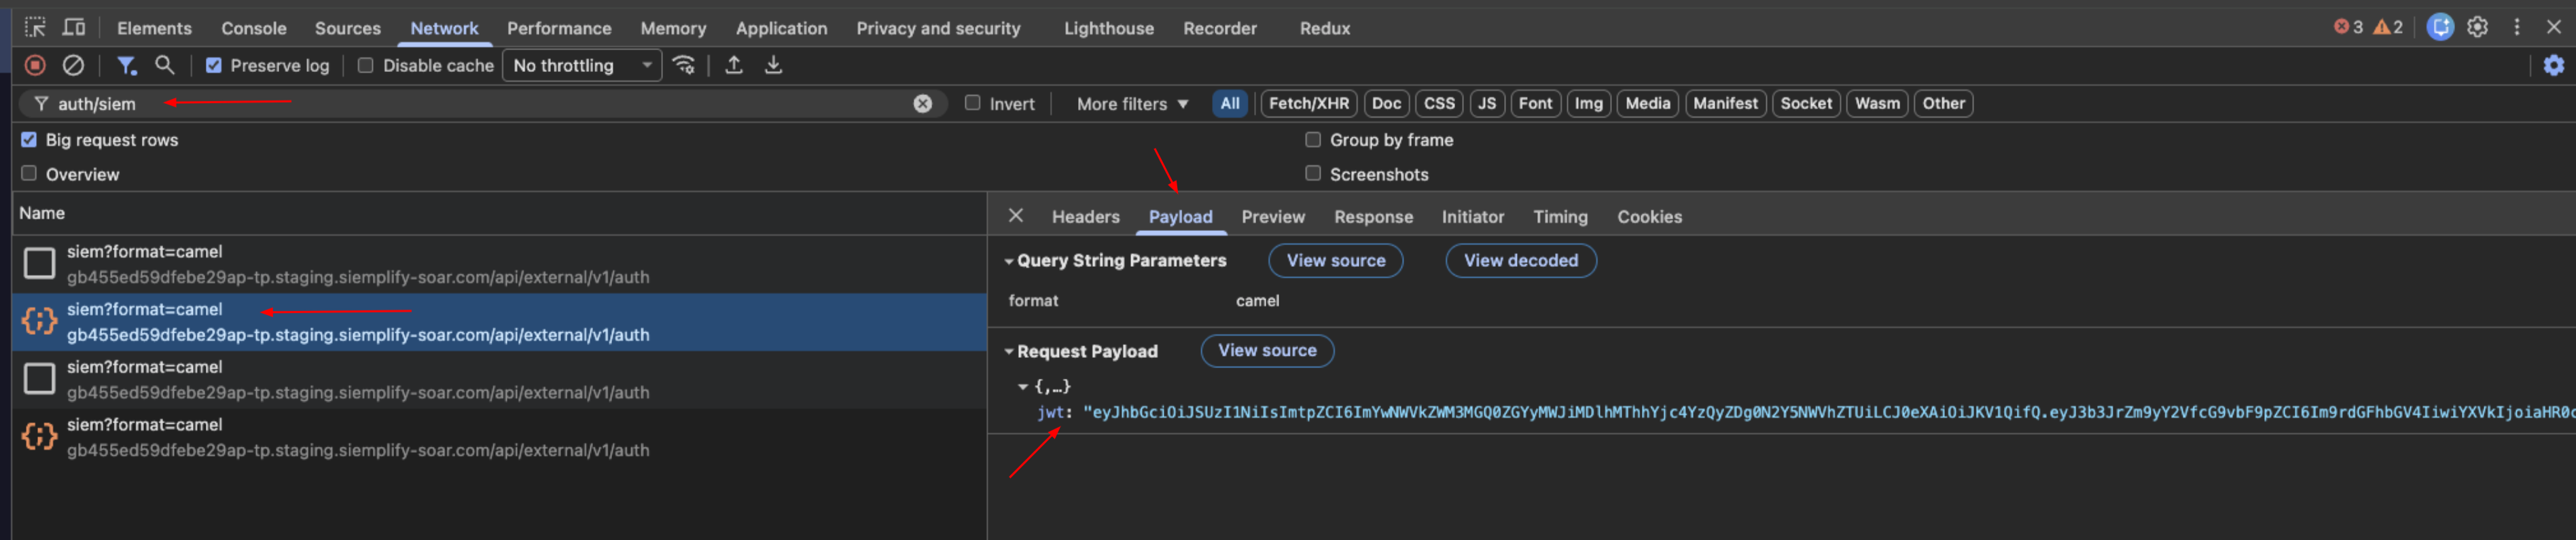
Extract data: Select the request and view the Payload tab. Locate the
jwtstring.Decode: Copy the JWT string and paste it into the JWT Inspection tool (jwt.io).
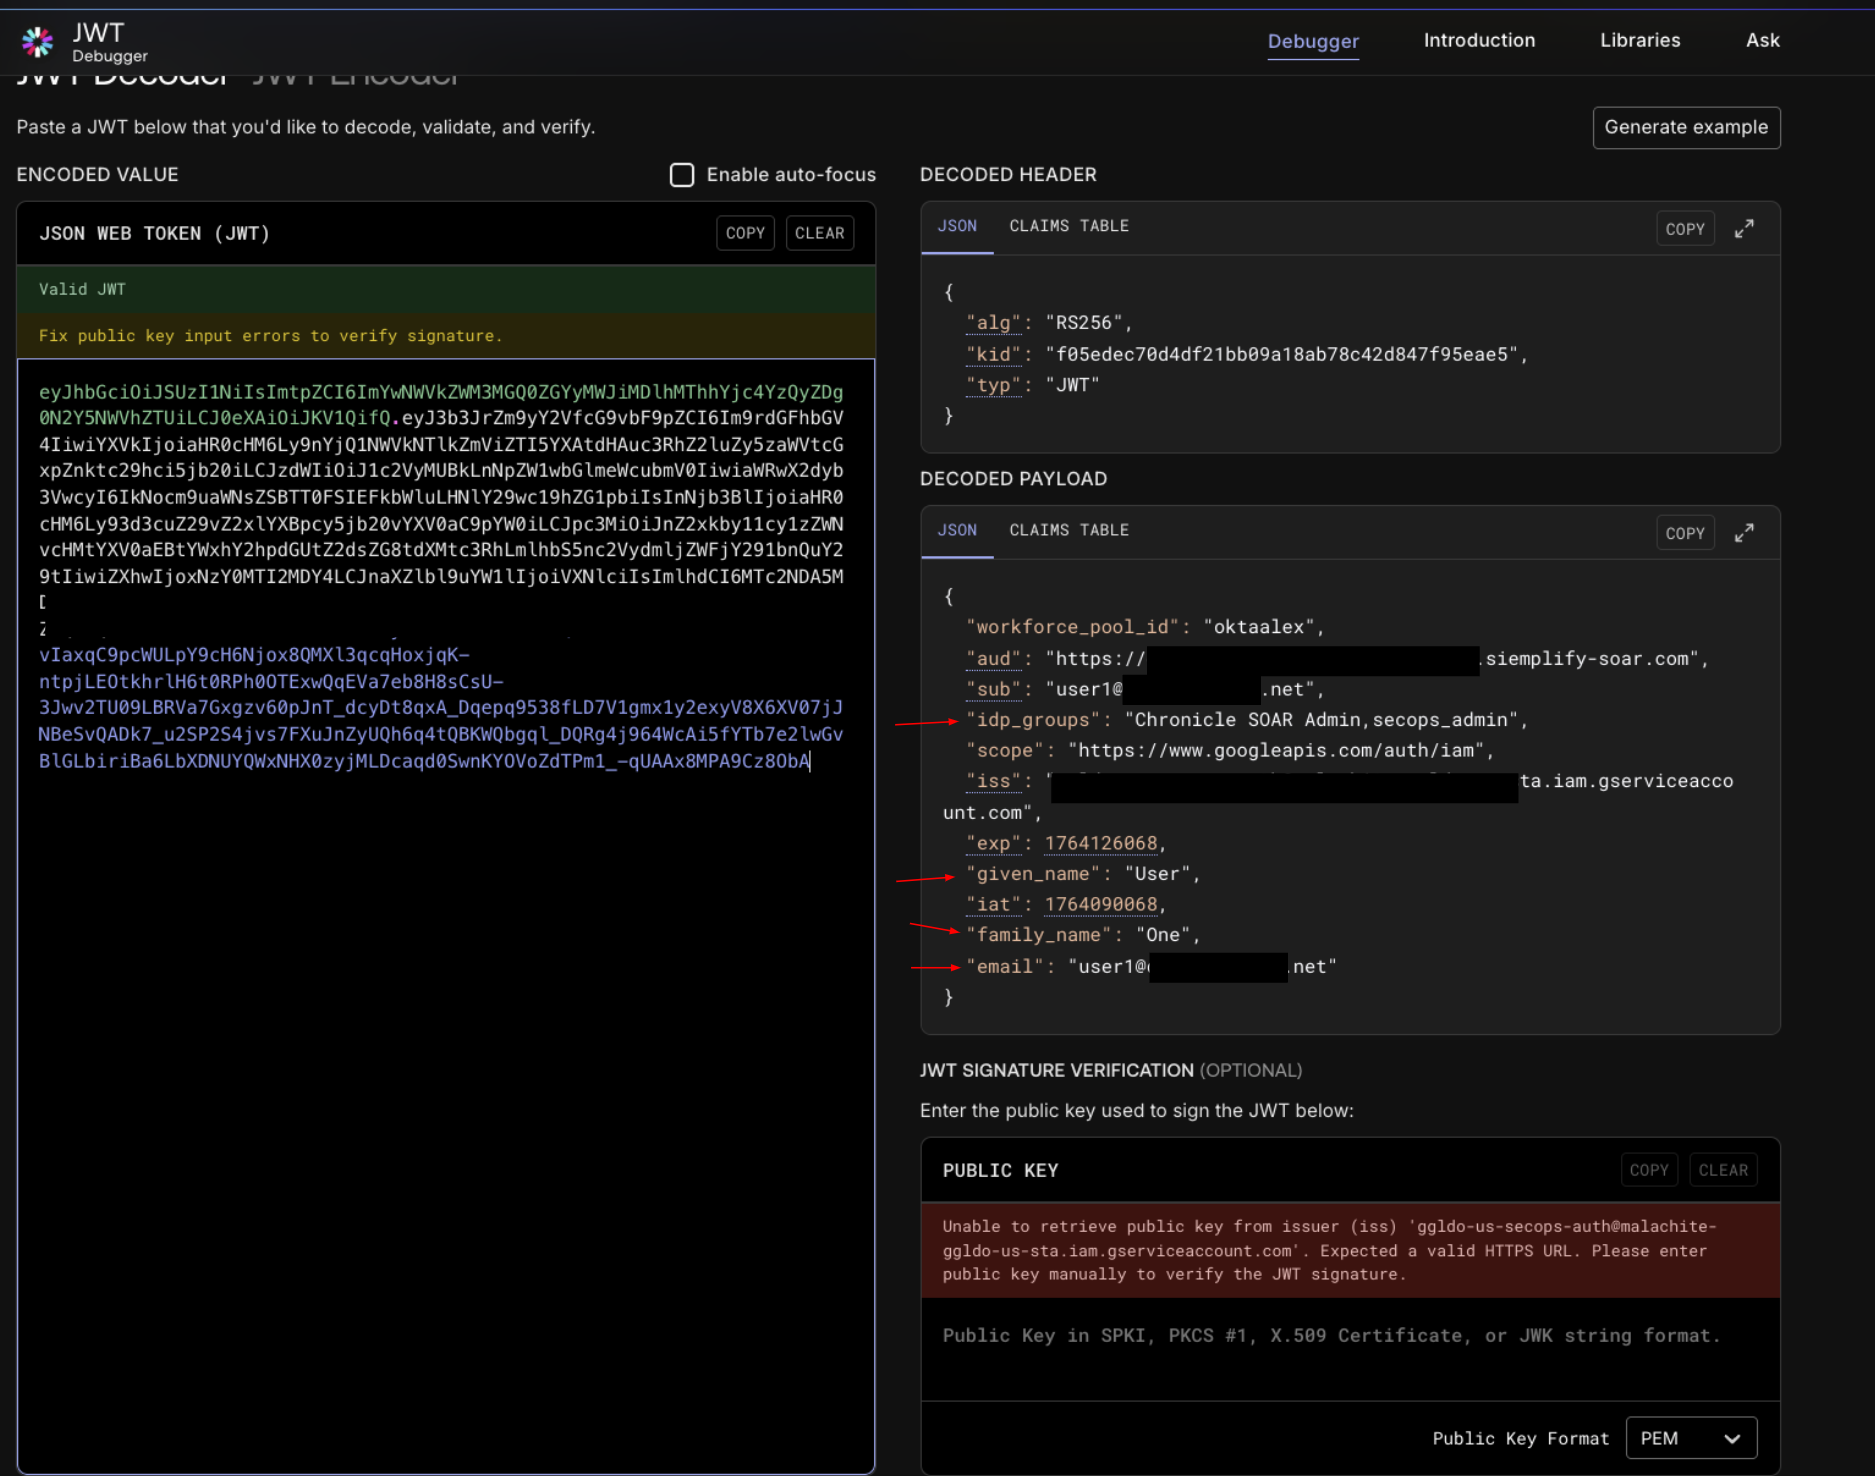
Verification:
- Compare the decoded claims for
given_name,family_name,email, andidpgroups. - Match confirmation: These values must exactly match the attributes validated in Phase 3 (SAML Response).
- If the values match and you still don't have access, then check the roles assignment in IAM. Make sure all of your users are assigned one of the Chronicle predefined roles by using the correct principal format for your Identity setup (Workforce Identity Federation or Cloud Identity for Google Managed Accounts).
- Compare the decoded claims for
Phase 5: Validate SOAR permissions access
This step confirms the system assigns permissions in SOAR correctly through the platform Group Mapping page.
Administrators access SOAR automatically because the Group Mapping page enables default access.
You can validate the group access for your users by adding a few IDP group mappings in this new SOAR instance. New instances have an empty Group Mapping page by default. To validate group access for other users, add IDP group mappings to the new SOAR instance, complete the following steps:
- Copy group mappings from the Group Mappings page in your existing SOAR instance.
- Request a user in the IDP group access the new Google SecOps URL.
If the user can't access SOAR, use these troubleshooting steps:
a. Inspect the response: Open the
auth/siemrequest from Phase 4 and select the Preview tab.b. Check permissions: Locate the
permissionsobject within the JSON response.
Optional: To save time, copy these mappings to your existing Google SecOps instance at Settings > Advanced > Group mapping.
OIDC flow and troubleshooting
This section provides an overview of the OIDC authentication process and outlines a systematic approach for diagnosing and resolving common integration issues.
Authentication workflow architecture
Understanding the request flow is critical for isolating any failure points. The following diagram illustrates the sequential path of a successful login.

Step-by-step OIDC troubleshooting procedure
To diagnose and trace the OIDC authentication process effectively, you can use browser developer tools and online JWT decoders.
- JWT Inspection: https://www.jwt.io/
- Purpose: Used to inspect the claims and contents of JSON Web Tokens (JWTs).
Phase 1: Environment preparation
Before you begin, make sure your browser environment is ready to capture network by completing the following steps:
- Open a new blank browser tab or in an incognito window.
Open Developer Tools using the shortcut for your operating system:
- Windows: Press F12
- Linux: Press Ctrl + Shift + I
- macOS: Press Cmd + Option + I
Navigate to the Network tab.
Select the Preserve log box to ensure no data is lost during redirects.
Navigate to your Google SecOps environment URL to initiate the login flow. You will receive this URL through email after you complete Google SecOps setup in Step 5 of Migration stage 1 for SOAR standalone customers. The Subject of the email is
YourGoogle SecOps instance is ready.
Phase 2: Validate the authorization request to an OIDC provider
This step verifies the initial redirection from Google Cloud to your OpenID Connect Provider (IdP).
Locate the Request: In the Network tab, look for the initial redirect to your OIDC provider's authorization endpoint. The URL typically contains parameters like
client_id,redirect_uri,scope,response_type, andstate.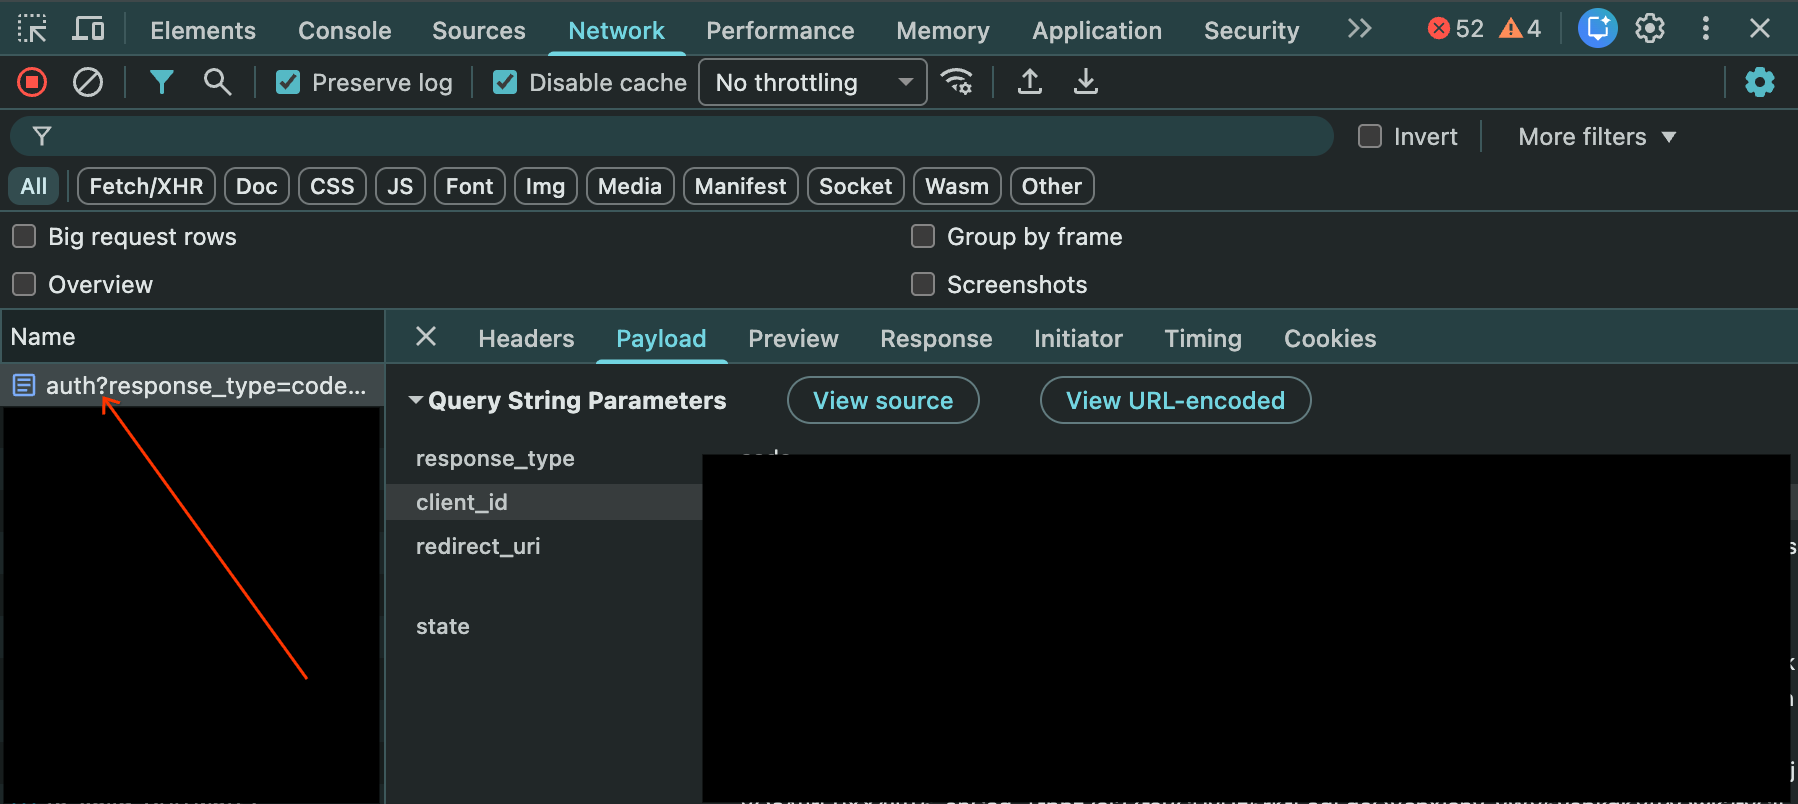
Verification:
- Confirm the
client_idmatches the one configured in your OIDC provider. - Make sure the
redirect_uriexactly matcheshttps://auth.backstory.chronicle.security/signin-callback/locations/global/workforcePools/POOL_ID/provider/PROVIDER_IDreplacingPOOL_IDandPROVIDER_IDwith your pool and provider from Workforce Identity Federation. - Check that the
response_typeis set to code. - Note the scope parameter, which should include openid and any other scopes required to release the necessary claims (for example, email, profile).
- Confirm the
Phase 3: Validate the callback and token exchange
This step verifies the IdP's response back to Google Cloud.
Locate the Callback: In the Network tab, find the request to the signin-callback URL: (
.../signin-callback/...).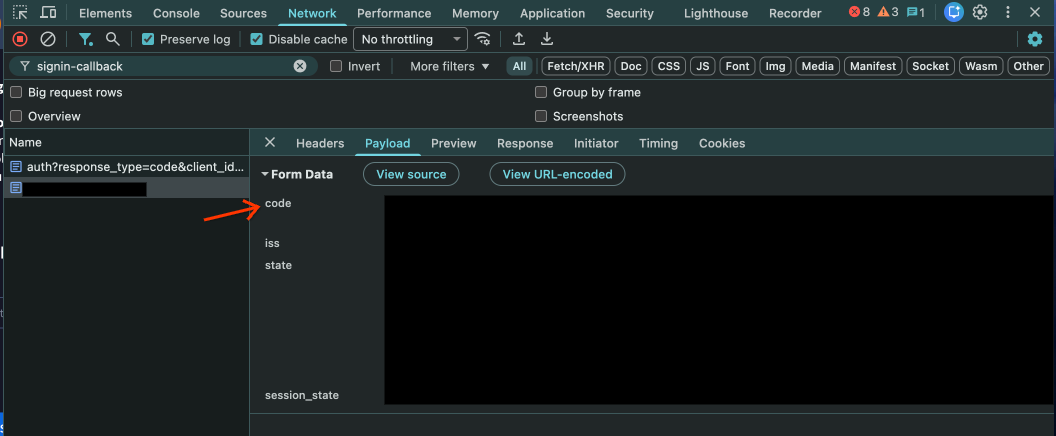
Check Data: Check the URL parameters of this request. It should contain a code parameter provided by your OIDC IdP.
Behind the Scenes: Workforce Identity Federation exchanges this code for tokens (ID Token, Access Token) from the OIDC provider's token endpoint. Errors at this stage are often visible in Cloud Logging for Workforce Identity Federation.
- Verify the attributes propagation and full token: To verify that your attribute mapping in Workforce Identity Federation produces the expected results:
- Add the Redirect URI, provided in the Workforce Identity Federation provider configuration, to your provider's redirect URIs (for example, https://auth.cloud.google/signin-callback/locations/global/workforcePools/POOL_ID/providers/PROVIDER_ID).
- Go to your Workforce Identity Federation provider to debug the IdP token. You can also check the full token. For more information, see Verify your product configuration.

- Verify the attributes propagation and full token: To verify that your attribute mapping in Workforce Identity Federation produces the expected results:
Phase 4: Validate the Google SecOps authentication
This step verifies whether Google Cloud is authenticating the user to log in to Google SecOps SOAR.
Locate the token in the user's browser: In the Network tab filter bar, search for the endpoint
auth/siem.Extract data: Select the request and view the Payload tab. Locate the
jwtstring.Decode: Copy the JWT string and paste it into the JWT Inspection tool (jwt.io).
Verification:
- Compare the decoded claims for
sub,given_name,family_name,email, andidpgroups. - Match confirmation: These values must correspond to the attributes
released by your OIDC provider and how they are mapped in the Workforce Identity Federation
Attribute Mappings. For example,
attribute.first_namein Google Cloud should map togiven_namein the JWT. - IAM Roles: If the claims are correct but access is denied with a message
like
Cannot Authenticate user, because user does not have access to the GCP project...,check the IAM role assignments. Ensure the user's groups (idp_groupsin the JWT) are granted the necessary roles using the correctprincipalSetformat (for example,principalSet://iam.googleapis.com/locations/global/workforcePools/POOL_ID/group/IDP_GROUP_NAME).
- Compare the decoded claims for
Phase 5: Validate SOAR permissions access
This step confirms the system assigns permissions in SOAR correctly through the platform Group Mapping page.
Administrators access SOAR automatically because the Group Mapping page enables default access.
You can validate the group access for your users by adding a few IDP group mappings in this new SOAR instance. New instances have an empty Group Mapping page by default. To validate group access for other users, add IDP group mappings to the new SOAR instance, complete the following steps:
- Copy group mappings from the Group Mappings page in your existing SOAR instance.
- Request a user in the IDP group access the new Google SecOps URL.
If the user can't access SOAR, use these troubleshooting steps:
a. Inspect the response: Open the
auth/siemrequest from Phase 4 and select the Preview tab.b. Check permissions: Locate the
permissionsobject within the JSON response.
Optional: To save time, copy these mappings to your existing Google SecOps instance at Settings > Advanced > Group mapping.
Common OIDC Errors:
invalid_redirect_urifrom IdP: Make sure the Redirect URI configured in your IdP exactly matches:https://auth.backstory.chronicle.security/signin-callback/locations/global/workforcePools/POOL_ID/provider/PROVIDER_IDreplacingPOOL_IDandPROVIDER_IDwith your pool and provider from Workforce Identity Federation. Even a trailing slash orhttpvshttpsmismatch will trigger this.Missing Claims in JWT:
IdP Side: Verify that the OIDC client is configured to release the required claims (that are mapped in the WIF such as
sub,groups,email,given_name,family_name) in the ID token.WIF Side: Make sure these incoming claims are correctly mapped in the WIF Attribute Mapping section (for example, google.groups=assertion.groups). If a claim is present in the token but not mapped in WIF, the SOAR platform may fail to authorize the user. To verify that your attribute mapping produces the expected results, see Verify your provider configuration.
Group mappings after the migration
Group mapping remain crucial in Google SecOps after the migration is completed
After the migration, the migrated instance retains the group mappings. They serve as the basis for determining user access to SOAR. You must make sure that every user is mapped in this page in order to access Google SecOps. See Access an instance for more information.
Need more help? Get answers from Community members and Google SecOps professionals.