

This page applies to Apigee and Apigee hybrid.
View
Apigee Edge documentation.

This page describes how to connect the Apigee Extension Processor to an Agent Gateway, so that Apigee policies are applied to the calls an AI agent makes to its model, its tools, and the Model Context Protocol (MCP) servers it uses—without changing the agent.
An Agent Gateway is the network entry and exit point for an agent's traffic. It isn't a load balancer, so it doesn't use a traffic extension. Instead, the gateway delegates authorization to an authorization extension, and you configure the Extension Processor as that extension. Once connected, the gateway sends each agent request and response to Apigee for processing, and Apigee returns a verdict.
The following figure shows the resources you create on this page, and the path a single agent request takes through them:
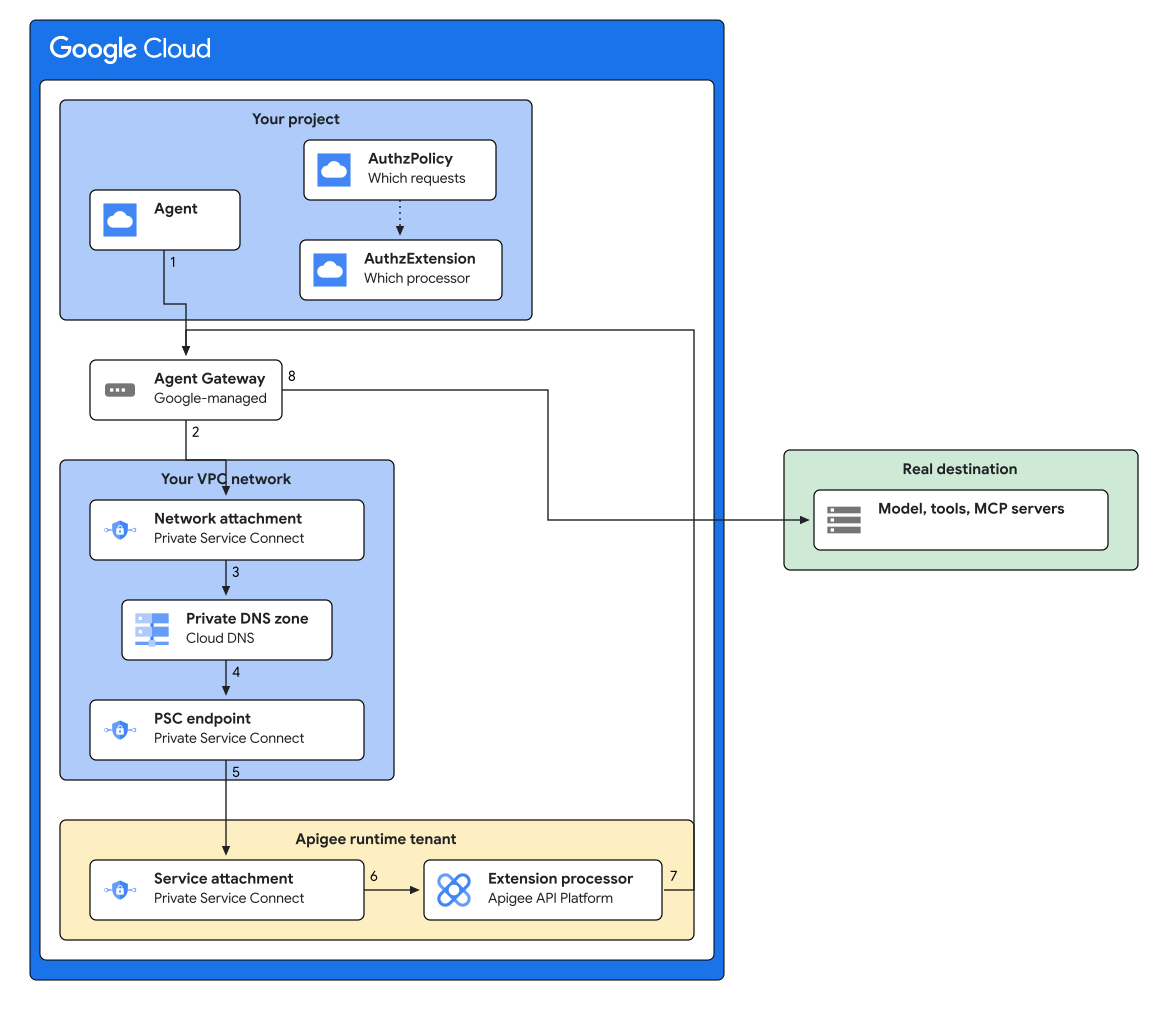
In figure 1, a request is handled as follows:
- The agent makes an ordinary HTTPS request to its model, a tool, or an MCP server. The agent is bound to the gateway when it is created, and needs no changes.
- The gateway holds the request and calls the authorization extension for a verdict.
- The callout leaves through the network attachment, so it originates inside your VPC network.
- Your private DNS zone resolves the callout hostname to the internal IP address of the Private Service Connect endpoint.
- The endpoint forwards the callout to the service attachment of your Apigee instance.
- The environment group routes the callout by its hostname to the no-target proxy, where your policies run.
- The proxy returns a verdict to the gateway. Apigee never forwards the agent's traffic—the proxy has no target.
- If the verdict allows the request, the gateway sends the original request on to its destination.
The AuthzPolicy and AuthzExtension in figure 1 are configuration
rather than traffic: the policy attaches the extension to the gateway, and the extension names
the Extension Processor proxy that runs. You create both in
Configure the authorization extension.
To connect the Extension Processor to a load balancer instead, see Get started with the Apigee Extension Processor.
The following sections guide you through the steps:
- Configure the Apigee Extension Processor.
- Connect the Agent Gateway to Apigee.
- Configure the authorization extension.
- Verify the connection.
Before you begin
Before you begin, complete the following tasks:
- Sign in to your Google Cloud account. If you're new to Google Cloud, create an account to evaluate how our products perform in real-world scenarios. New customers also get $300 in free credits to run, test, and deploy workloads.
-
In the Google Cloud console, on the project selector page, select or create a Google Cloud project.
Roles required to select or create a project
- Select a project: Selecting a project doesn't require a specific IAM role—you can select any project that you've been granted a role on.
-
Create a project: To create a project, you need the Project Creator role
(
roles/resourcemanager.projectCreator), which contains theresourcemanager.projects.createpermission. Learn how to grant roles.
-
Verify that billing is enabled for your Google Cloud project.
Enable the Apigee, Compute Engine, Network Services, Network Security, and Cloud DNS APIs.
Roles required to enable APIs
To enable APIs, you need the
serviceusage.services.enablepermission. If you created the project, then you likely already have this permission through the Owner role (roles/owner). Otherwise, you can get this permission through the Service Usage Admin role (roles/serviceusage.serviceUsageAdmin). Learn how to grant roles.-
In the Google Cloud console, on the project selector page, select or create a Google Cloud project.
Roles required to select or create a project
- Select a project: Selecting a project doesn't require a specific IAM role—you can select any project that you've been granted a role on.
-
Create a project: To create a project, you need the Project Creator role
(
roles/resourcemanager.projectCreator), which contains theresourcemanager.projects.createpermission. Learn how to grant roles.
-
Verify that billing is enabled for your Google Cloud project.
Enable the Apigee, Compute Engine, Network Services, Network Security, and Cloud DNS APIs.
Roles required to enable APIs
To enable APIs, you need the
serviceusage.services.enablepermission. If you created the project, then you likely already have this permission through the Owner role (roles/owner). Otherwise, you can get this permission through the Service Usage Admin role (roles/serviceusage.serviceUsageAdmin). Learn how to grant roles.Install the Google Cloud CLI.
After you install the Google Cloud CLI, run the
gcloud components updatecommand to get the latest gcloud components.Provision an Apigee instance, if you have not already done so.
In the Google Cloud console, go to the Apigee Instances page.
Deploy an Agent Gateway in the same region as your Apigee instance, with
governedAccessPathset toAGENT_TO_ANYWHEREso that the gateway governs the agent's outbound traffic. For more information, see Configure Agent Gateway.You update this gateway's network configuration later, in Update the Agent Gateway, after the DNS zone exists.
Confirm that you have a VPC and subnet that both the Agent Gateway and the Private Service Connect endpoint can use.
Required roles
To get the permissions that you need to connect the Apigee Extension Processor to an Agent Gateway, ask your administrator to grant you the following IAM roles:
-
Create and manage Apigee resources:
Apigee Org Admin (
roles/apigee.admin) on organization -
Create and manage service extensions:
Service Extensions Admin (
roles/networkservices.serviceExtensionsAdmin) on organization -
Create and manage authorization policies:
Network Security Admin (
roles/networksecurity.admin) on organization -
Create and manage networking resources, including Private Service Connect endpoints and DNS:
Compute Network Admin (
roles/compute.networkAdmin) on organization
For more information about granting roles, see Manage access to projects, folders, and organizations.
You might also be able to get the required permissions through custom roles or other predefined roles.
Set environment variables
Set the following environment variables to identify the resources you created in Before you begin. Each later section on this page defines the additional variables it needs, at the point where you create the resource they name.
export PROJECT_ID=PROJECT_IDexport ORG_NAME=$PROJECT_IDexport REGION=REGIONexport INSTANCE=INSTANCEexport VPC_NETWORK_NAME=VPC_NETWORK_NAMEexport SUBNET=SUBNETexport GATEWAY=GATEWAY
Where:
PROJECT_IDis the ID of the project that contains your Apigee instance.REGIONis the Google Cloud region of your Apigee instance.INSTANCEis the name of your Apigee instance.VPC_NETWORK_NAMEandSUBNETare the VPC network and subnet that the Agent Gateway and the Private Service Connect endpoint use.GATEWAYis the name of the Agent Gateway you deployed.
To confirm that the environment variables are set correctly, run the following command and review the output:
echo $PROJECT_ID $ORG_NAME $REGION $INSTANCE $VPC_NETWORK_NAME $SUBNET $GATEWAY
Choose the callout hostname
The gateway reaches Apigee at a private hostname that you choose. You choose it now, before creating anything, because the first resource you create—the Apigee environment group—uses it as its hostname, while the DNS zone that resolves it is not created until Create a private DNS zone.
export DNS_DOMAIN=DNS_DOMAINexport EXTPROC_HOST=apigee-extproc.$DNS_DOMAIN
Where DNS_DOMAIN is a private DNS domain that does not have to be
resolvable on the public internet, written without a trailing dot, for example
internal.example.com. This gives an EXTPROC_HOST of
apigee-extproc.internal.example.com. You can use a label other than
apigee-extproc, as long as the hostname stays inside
DNS_DOMAIN.
Configure an authentication token
export TOKEN=$(gcloud auth print-access-token)echo $TOKEN
Configure the Apigee Extension Processor
Name the Apigee resources that this section creates:
export EXTPROC_ENV=EXTPROC_ENVexport EXTPROC_ENVGROUP=EXTPROC_ENVGROUPexport PROXY_NAME=PROXY_NAME
Where:
EXTPROC_ENVandEXTPROC_ENVGROUPare names you choose for an Apigee environment and environment group dedicated to the Extension Processor, for exampleextproc-envandextproc-envgroup. Each name must be 2 to 32 characters of lowercase letters, numbers or hyphens, must begin with a letter, and cannot end with a hyphen. The environment name must differ from every other environment name in your organization.PROXY_NAMEis a name you choose for the Extension Processor proxy, for exampleextproc-authz.
The Apigee side of the configuration is the same as for a load balancer. Follow Configure the Apigee Extension Processor in the quickstart to:
- Create an Apigee environment with the property
apigee-service-extension-enabledset totrue, attach it to your instance, and create an environment group whose hostname is$EXTPROC_HOST. - Create and deploy a no-target Extension Processor proxy to that environment.
Then list the deployments in the environment:
curl -s -H "Authorization: Bearer $TOKEN" \
  "https://apigee.googleapis.com/v1/organizations/$ORG_NAME/environments/$EXTPROC_ENV/deployments"
The environment can have more than one proxy deployed, so in the response, find the entry whose
apiProxy is $PROXY_NAME and note its revision.
You can review the proxy in the Google Cloud console:
Set the following variable to that revision, which you need in Verify the connection:
export REVISION=REVISION
Connect the Agent Gateway to Apigee
The gateway reaches Apigee over a
Private Service Connect endpoint in your
VPC, which it finds by resolving $EXTPROC_HOST on a private DNS zone.
Find the service attachment
Find the service attachment of your Apigee instance:
curl -s -H "Authorization: Bearer $TOKEN" \
  "https://apigee.googleapis.com/v1/organizations/$ORG_NAME/instances"
Set the following variable to the serviceAttachment value of the instance in your
region:
export SERVICE_ATTACHMENT=SERVICE_ATTACHMENT
Create a network attachment
The Agent Gateway egresses into your VPC through a network attachment. Choose a
name for it, for example agent-gateway-attachment, and create it:
export NETWORK_ATTACHMENT=NETWORK_ATTACHMENTgcloud compute network-attachments create $NETWORK_ATTACHMENT \ --region=$REGION --subnets=$SUBNET --connection-preference=ACCEPT_AUTOMATIC
Create the Private Service Connect endpoint
Reserve an internal IP address and create the Private Service Connect endpoint:
gcloud compute addresses create apigee-extproc-psc-ip \ --region=$REGION --subnet=$SUBNET --purpose=GCE_ENDPOINTgcloud compute forwarding-rules create apigee-extproc-psc-endpoint \ --region=$REGION --network=$VPC_NETWORK_NAME \ --address=apigee-extproc-psc-ip \ --target-service-attachment=$SERVICE_ATTACHMENT
In the Google Cloud console, go to the Private Service Connect page.
Confirm that the endpoint reports pscConnectionStatus: ACCEPTED, and set the
following variable to its IP address:
gcloud compute forwarding-rules describe apigee-extproc-psc-endpoint \ --region=$REGION --format="value(pscConnectionStatus,IPAddress)"export PSC_IP=PSC_IP
If the status is PENDING, your project is not in the Apigee instance's
consumerAcceptList, and the connection cannot be accepted.
Create a private DNS zone
Create a private DNS zone for $DNS_DOMAIN and an A record that
resolves $EXTPROC_HOST to the endpoint's IP address:
gcloud dns managed-zones create extproc-zone \ --dns-name=$DNS_DOMAIN. --visibility=private --networks=$VPC_NETWORK_NAME \ --description="Apigee extension processor callout host"gcloud dns record-sets create $EXTPROC_HOST. --type=A --ttl=300 \ --rrdatas=$PSC_IP --zone=extproc-zone
Update the Agent Gateway
Update the Agent Gateway from Before you begin so that it egresses through your network attachment and can resolve the zone you created.
Export the current configuration:
gcloud network-services agent-gateways export $GATEWAY \
    --location=$REGION --destination=agent-gateway.yaml
In
agent-gateway.yaml, add the followingnetworkConfigblock, replacing each placeholder with the value of the corresponding environment variable. The file is edited directly, so shell variables are not substituted here:networkConfig: egress: networkAttachment: projects/PROJECT_ID/regions/REGION/networkAttachments/NETWORK_ATTACHMENT dnsPeeringConfig: domains: [ DNS_DOMAIN. ] targetProject: PROJECT_ID targetNetwork: projects/PROJECT_ID/global/networks/VPC_NETWORK_NAME
Leave the rest of the file, including
googleManaged.governedAccessPath,protocolsandregistries, as exported.Import the edited configuration:
gcloud network-services agent-gateways import $GATEWAY \
    --location=$REGION --source=agent-gateway.yaml
For the full set of Agent Gateway fields, see Configure Agent Gateway.
Configure the authorization extension
Two resources connect the gateway to your Extension Processor proxy: an authorization extension that points at Apigee, and an authorization policy that attaches the extension to the gateway.
Create the authorization extension
Choose a name for the authorization extension, for example apigee-authz-extension.
The metadata fields select which Apigee proxy runs and whether the message
bodies are sent to it:
export AUTHZ_EXT=AUTHZ_EXTcat > authz-extension.yaml <<EOF name: projects/$PROJECT_ID/locations/$REGION/authzExtensions/$AUTHZ_EXT authority: $EXTPROC_HOST service: $EXTPROC_HOST timeout: 5s metadata: apigee-extension-processor: $PROXY_NAME apigee-request-body: 'true' apigee-response-body: 'true' EOFgcloud service-extensions authz-extensions import $AUTHZ_EXT \ --source=authz-extension.yaml --location=$REGION
Where:
apigee-extension-processorselects the Extension Processor proxy that processes the traffic.apigee-request-bodyandapigee-response-bodymake the request and response bodies available in the proxy asrequest.contentandresponse.content. Without them, policies that inspect the payload find nothing.
Create the authorization policy
Choose a name for the authorization policy, for example
apigee-content-authz-policy. The policy attaches the extension to the gateway and
determines which traffic is sent to Apigee:
export AUTHZ_POLICY=AUTHZ_POLICYcat > authz-policy.yaml <<EOF name: projects/$PROJECT_ID/locations/$REGION/authzPolicies/$AUTHZ_POLICY action: CUSTOM policyProfile: CONTENT_AUTHZ customProvider: authzExtension: resources: - projects/$PROJECT_ID/locations/$REGION/authzExtensions/$AUTHZ_EXT httpRules: - to: operations: - paths: - prefix: "/" target: resources: - projects/$PROJECT_ID/locations/$REGION/agentGateways/$GATEWAY EOFgcloud beta network-security authz-policies import $AUTHZ_POLICY \ --source=authz-policy.yaml --location=$REGION
Use policyProfile: CONTENT_AUTHZ so that the message bodies are inspected.
A REQUEST_AUTHZ policy evaluates request headers only.
Verify the connection
To generate traffic, you need an agent whose egress is governed by this gateway. An agent is
bound to a gateway when the agent is created, by setting its Agent Gateway
configuration to $GATEWAY; you cannot exercise the connection with a direct HTTP
request to the gateway. For more information, see
Configure
Agent Gateway.
Start an Apigee debug session on the Extension Processor proxy, then send one request through the agent:
curl -s -X POST -H "Authorization: Bearer $TOKEN" -H "Content-Type: application/json" \
  "https://apigee.googleapis.com/v1/organizations/$ORG_NAME/environments/$EXTPROC_ENV/apis/$PROXY_NAME/revisions/$REVISION/debugsessions?timeout=600" \
  -d '{"count":15,"tracesize":5120,"filter":"(request.uri Like \"*generateContent*\")"}'
In the captured transactions, confirm that:
- the request URL is the address the agent called, such as the model endpoint or a tool host, rather than an Apigee base path;
request.contentandresponse.contentare populated, which confirms that the body metadata on the authorization extension is working.
If no transactions appear, check that the environment group hostname, the DNS record, and the
extension's authority and service fields are all
$EXTPROC_HOST, that the
Private Service Connect endpoint reports ACCEPTED, and that the
gateway's governedAccessPath is AGENT_TO_ANYWHERE.
What's next
- Read the Apigee Extension Processor overview.
- Get started with the Apigee Extension Processor on a load balancer.