
This page applies to Apigee, but not to Apigee hybrid.
View
Apigee Edge documentation.

This page describes how to use the Apigee Discovery proxy to make your APIs available to Model Context Protocol (MCP) clients in agentic applications as MCP tools.
Before you begin
Before you begin, complete the following tasks:
- Sign in to your Google Cloud account. If you're new to Google Cloud, create an account to evaluate how our products perform in real-world scenarios. New customers also get $300 in free credits to run, test, and deploy workloads.
-
In the Google Cloud console, on the project selector page, select or create a Google Cloud project.
Roles required to select or create a project
- Select a project: Selecting a project doesn't require a specific IAM role—you can select any project that you've been granted a role on.
-
Create a project: To create a project, you need the Project Creator role
(
roles/resourcemanager.projectCreator), which contains theresourcemanager.projects.createpermission. Learn how to grant roles.
-
Verify that billing is enabled for your Google Cloud project.
-
In the Google Cloud console, on the project selector page, select or create a Google Cloud project.
Roles required to select or create a project
- Select a project: Selecting a project doesn't require a specific IAM role—you can select any project that you've been granted a role on.
-
Create a project: To create a project, you need the Project Creator role
(
roles/resourcemanager.projectCreator), which contains theresourcemanager.projects.createpermission. Learn how to grant roles.
-
Verify that billing is enabled for your Google Cloud project.
- Confirm that you have an Apigee organization provisioned. The MCP Discovery proxy is available for Subscription, Pay-as-you-go and evaluation organizations. For more information, see Introduction to provisioning.
- Confirm that you have an Apigee API hub instance provisioned in your Google Cloud project. For more information, see Provision API hub in the Google Cloud console. You can confirm that the API hub service is enabled by checking the Hub page in the Google Cloud console.
- Confirm that an Apigee instance is attached to your API hub service. The MCP Discovery proxy is not supported for use with Apigee Edge for Public cloud or Apigee Edge for Private Cloud plugin instances in API hub. For more information, see Attach a runtime project. You can check the status of runtime project attachment on the Project associations tab of the Settings page in the Google Cloud console.
Required roles
To get the permissions that
you need to create and deploy an MCP Discovery Proxy,
ask your administrator to grant you the
Apigee Admin (roles/apigee.admin) IAM role on the service account you use to deploy Apigee proxies.
For more information about granting roles, see Manage access to projects, folders, and organizations.
You might also be able to get the required permissions through custom roles or other predefined roles.
Enable APIs
Enable the Apigee API.
Roles required to enable APIs
To enable APIs, you need the Service Usage Admin IAM
role (roles/serviceusage.serviceUsageAdmin), which
contains the serviceusage.services.enable permission. Learn how to grant
roles.
Set environment variables
In the Google Cloud project that contains your Apigee instance, use the following command to set environment variables:
export PROJECT_ID=PROJECT_IDexport REGION=REGIONexport RUNTIME_HOSTNAME=RUNTIME_HOSTNAME
Where:
PROJECT_IDis the ID of the project with your Apigee instance.REGIONis the Google Cloud region of your Apigee instance.RUNTIME_HOSTNAMEis the hostname of your Apigee runtime.
To confirm that the environment variables are set correctly, run the following command and review the output:
echo $PROJECT_ID $REGION $RUNTIME_HOSTNAME
Set the project
Set the Google Cloud project in your development environment:
gcloud auth logingcloud config set project $PROJECT_ID
Overview
To expose your APIs as MCP tools using Apigee, you create and deploy a new Apigee proxy using the MCP Discovery Proxy template. After your proxy is deployed, you can create an API product to bundle the MCP API operations in your proxy into an API product. As an API product, your API operations/tools are discoverable by MCP clients through integration into API hub.
The following sections describe the steps to create and deploy an MCP Discovery Proxy, create an API product, and list available tools:
- Create an OpenAPI 3.0.x specification describing your API operations.
- Create an MCP Discovery Proxy.
- (Optional) Add a security policy to the MCP Discovery Proxy.
- Deploy the MCP Discovery Proxy.
- (Optional) Initialize your MCP server.
- List available tools.
Create an OpenAPI 3.0.x specification describing your API operations
Before you create and deploy your MCP Discovery Proxy, you need to create an OpenAPI 3.0.x specification that describes the API operations that you want to expose as MCP tools. MCP in Apigee supports the following OpenAPI versions:
- 3.0.0
- 3.0.1
- 3.0.2
- 3.0.3
This quickstart uses a sample OpenAPI 3.0.x specification with three API operations:
GET /artists: Returns a list of artists.POST /artists: Lets a user post a new artist.GET /artists/{username}: Obtain information about an artist from his or her unique username.
To create the OpenAPI 3.0.x specification, do the following:
- Create a new
mcp-quickstart-openapi.yamlfile in theoasdirectory of your API proxy bundle. - Add the following content to the file:
# mcp-quickstart-openapi.yaml
---
openapi: 3.0.3
info:
  title: Cymbal Group Products API
  description: This is the official API for managing the artists for Cymbal Group Products.
  version: 1.0.0
servers:
  - url: https://cymbal.products.com
    description: Cymbal Group Production Server
  - url: https://internal.products.com
    description: Cymbal Group internal Server
paths:
  /artists:
    get:
      description: Returns a list of artists
      operationId: listArtists
      parameters:
        - name: limit
          in: query
          description: Limits the number of items on a page
          schema:
            type: integer
        - name: offset
          in: query
          description: Specifies the page number of the artists to be displayed
          schema:
            type: integer
      responses:
        "200":
          description: An array of artists
          content:
            application/json:
              schema:
                type: array
                items:
                  $ref: "#/components/schemas/Artist"
    post:
      summary: Create a new artist
      operationId: createArtist
      tags:
        - artists
      requestBody:
        description: The artist to create.
        required: true
        content:
          application/json:
            schema:
              $ref: "#/components/schemas/Artist"
      responses:
        "201":
          description: The newly created artist profile
          content:
            application/json:
              schema:
                $ref: "#/components/schemas/Artist"
        "400":
          description: Invalid username supplied
  /artists/{username}:
    get:
      summary: Info for a specific artist
      operationId: showArtistByUsername
      tags:
        - artists
      parameters:
        - name: username
          in: path
          required: true
          description: The username of the artist to retrieve
          schema:
            type: string
      responses:
        "200":
          description: Expected response to a valid request
          content:
            application/json:
              schema:
                $ref: "#/components/schemas/Artist"
        "404":
          description: Artist not found
components:
  securitySchemes:
    bearerAuth:
      type: http
      scheme: bearer
    oauth2:
      type: oauth2
      flows:
        authorizationCode:
          authorizationUrl: /oauth/authorize
          tokenUrl: /oauth/token
          scopes:
            artists.read: Grants read access
            artists.write: Grants write access
  schemas:
    Artist:
      type: object
      required:
        - id
      properties:
        id:
          type: string
          format: uuid
          description: Unique identifier for the artist
Hostname matching requirement
It is critical that the value of the hostname in the servers.url field of the OpenAPI specification is an exact match for the environment group hostname
of the Apigee environment where the MCP Discovery Proxy is deployed.
This match is required for the tools/list and tools/call calls to function correctly.
The following table shows the hostname configuration in the OpenAPI specification and the corresponding hostname configuration in the Apigee environment group:
| Component | Required Configuration | Example Value | Supporting Information |
|---|---|---|---|
| Apigee Environment Group | Hostnames must be configured in the environment group. | cymbal.products.com, internal.products.com |
Environment groups enable routing to a group of environments using a hostname. |
| OpenAPI Specification | The value of the servers.url field of the OpenAPI specification must be an exact match for the environment group hostname
of the Apigee environment where the MCP Discovery Proxy is deployed. |
https://cymbal.products.com |
If the servers.url host name does not match the hostname of the environment group corresponding
to the Apigee environment where the MCP Discovery Proxy is deployed, you will get an error when deploying the proxy. |
Create an MCP Discovery Proxy
Now that you have an OpenAPI 3.0.x specification defining your API operations, you can create a new API proxy using the MCP Discovery Proxy template.
To create an MCP Discovery Proxy:
- Go to the API proxies page in the Google Cloud console.
- Click the + Create to open the Create API proxy pane.
- In the Proxy template box, select MCP Discovery Proxy.
- In the Proxy details section, enter the following details:
- Proxy name: a name for your proxy.
- Description (Optional ): a description for your proxy. For example,
My first MCP Discovery Proxy.
- Click Next.
- In the OpenAPI specs section, use the file browser to select the OpenAPI 3.0.x file that you created in the previous step.
- Click Next.
- In the Deploy (optional) section, you can skip the deployment of your proxy for now. Click Next.
- Click Create.
You can view the proxy's target and server endpoints by clicking View in the Endpoint summary column of the Revisions table. The Revision endpoint summary for the proxy revision you select displays the following information:
- Proxy endpoints: In this example, the
defaultproxy endpoint with a base path of/mcpdisplays. If additional hostnames or environment groups are added to the proxy, those will also display here. - Target endpoints: In this example, the
defaulttarget connection is set toORG_NAME.mcp.apigee.internal, whereORG_NAMEis the name of your Apigee organization. The targetmcp.apigee.internalis also supported for backward compatibility.
(Optional) Add a security policy to the MCP Discovery Proxy
Before deploying your MCP Discovery Proxy, you can add security policies to enforce security requirements. We recommend that you secure access to your MCP Discovery Proxy using Oauth tokens or an API key.
This section describes how to add an OAuthV2 policy to the MCP Discovery Proxy. This ensures that all requests to the MCP Discovery Proxy are authenticated and authorized. If you want to use an API key instead, see Secure an API by requiring API keys for the recommended steps.
To configure token verification, place an OAuthV2 policy with the VerifyAccessToken operation at the very beginning of the API proxy flow (the beginning of the ProxyEndpoint Preflow). If placed there, access tokens are verified before any other processing takes place, and if a token is rejected, Apigee stops processing and returns an error to the client.
To add the VerifyAccessToken policy:
- In the proxy details page, click the Develop tab.
- Under Proxy endpoints, click default, and then click PreFlow.
In the proxy flow editor, click Add policy step.
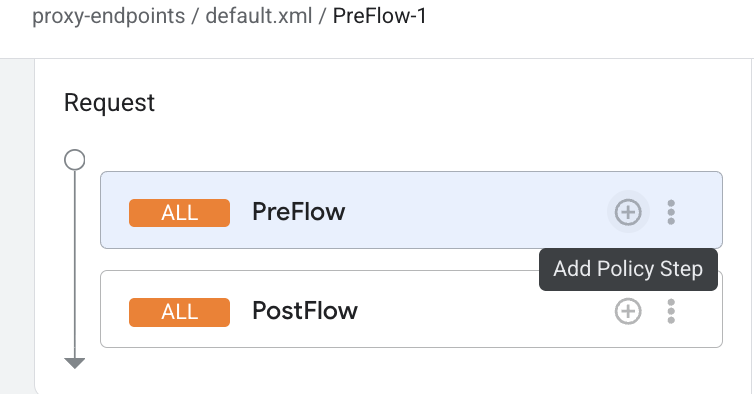
- In the Add policy step dialog, select Create new policy.
- From the policy list, under Security, select OAuth v2.0.
- Optionally, change the policy name and display name. For example, for better readability, you might change the Display name and Name both to VerifyAccessToken.
- Click Add.
Deploy the MCP Discovery Proxy
To deploy the MCP Discovery Proxy:
- Click Deploy to open the Deploy API proxy pane.
- The Revision field should be set to 1. If not, click 1 to select it.
- In the Environment list, select the environment where you want to deploy the proxy. The environment must be a Comprehensive environment.
- Enter the Service account you created in an earlier step.
- Click Deploy.
When you click Deploy, Apigee begins deploying the proxy and provisioning downstream components. During this time, which may take several minutes, the UI will show a Provisioning status for the deployment.
When the process is complete, the status changes to Deployed and the proxy is ready to handle traffic.
After the proxy is deployed, confirm that the value of the hostname in the servers.url field of the OpenAPI specification is an exact match for the environment group hostname
of the Apigee environment where the MCP Discovery Proxy is deployed.
Discover MCP tools in API hub
Once your MCP Discovery Proxy is deployed, its API operations are automatically ingested into API hub and made discoverable as MCP tools.
To view your MCP tools in API hub:
- In the Google Cloud console, go to the API Hub > APIs page.
- Click Filter and select Style > MCP, then click Apply.
- Your deployed MCP proxy should appear in the list. The API Hub ingestion pipeline automatically maps the paths defined in your OpenAPI specification to individual MCP tools listed in the hub.
Developers in your organization can now use filters or Semantic Search in API Hub to find relevant MCP tools using natural language queries.
Initialize your MCP server
In this step, you send a request to your MCP endpoint to initialize your MCP server and confirm that it is working as expected.
To initialize and test your MCP server, send the following request to your MCP endpoint:
curl -X POST "https://MCP_ENDPOINT_URL/mcp" \
  -H "Content-Type: application/json" \
  -d '{
        "jsonrpc": "2.0",
        "id": 1,
        "method": "initialize",
        "params": {
          "protocolVersion": "MCP_PROTOCOL_VERSION"
        }
      }' \
  -H "Authorization: Bearer TOKEN"
Replace the following:
MCP_ENDPOINT_URL: your MCP endpoint base URI. For example,cymbal.products.com.MCP_PROTOCOL_VERSION: the MCP protocol version. For example,2025-11-25. See Version Negotiation in the MCP specification for more information.- (Optional)
TOKEN: OAuth 2.0 access token
A successful response looks similar to the following:
{
"id":1,
"jsonrpc":"2.0",
"result":
  {
    "capabilities":
    {
      "tools":
      {
        "listChanged":false
      }
    },
    "protocolVersion":"2025-11-25",
    "serverInfo":
      {
        "name":"cymbal.products.com",
        "version":"1.0.0"
      }
    }
  }
List available MCP tools
In this step, you send a request to the tools/list method to confirm the list of tools available in your MCP endpoint.
Send a request to the tools/list method for your Apigee proxy:
curl -X POST "https://MCP_ENDPOINT_URL/mcp" \
  -H "Content-Type: application/json" \
  -H "MCP-Protocol-Version: MCP_PROTOCOL_VERSION" \
  -d '{
        "jsonrpc": "2.0",
        "id": 1,
        "method": "tools/list",
        "params": {}
      }' \
  -H "Authorization: Bearer TOKEN"
Replace the following:
MCP_ENDPOINT_URL: your MCP endpoint base URI. For example,cymbal.products.com.MCP_PROTOCOL_VERSION: the MCP protocol version. For example,2025-11-25. See Protocol version header in the MCP specification for more information.- (Optional)
TOKEN: OAuth 2.0 access token
The method returns all the tools that the MCP endpoint supports. A successful response looks similar to the following:
{
  "id": 1,
  "jsonrpc": "2.0",
  "result": {
    "tools": [
      {
        "description": "Returns a list of artists",
        "inputSchema": {
          "properties": {
            "id": {
              "description": "Unique identifier for the artist",
              "format": "uuid",
              "type": "string"
            }
          },
          "type": "object"
        },
        "name": "listArtists"
      },
      {
        "description": "Create a new artist",
        "inputSchema": {
          "properties": {
            "id": {
              "description": "Unique identifier for the artist",
              "format": "uuid",
              "type": "string"
            }
          },
          "type": "object"
        },
        "name": "createArtist"
      },
      {
        "description": "Info for a specific artist",
        "inputSchema": {
          "properties": {
            "id": {
              "description": "Unique identifier for the artist",
              "format": "uuid",
              "type": "string"
            }
          },
          "type": "object"
        },
        "name": "showArtistByUsername"
      }
    ]
  }
}
Now that your endpoint is initialized, your MCP tools are discoverable by developers and agents using your API product.
Monitoring and analytics
You can monitor MCP traffic and view tool-level metrics using Apigee Analytics.
Apigee Analytics allows you to filter metrics to distinguish between standard API traffic and
MCP-specific traffic, and to see usage volume for tools/list versus
tools/call requests. For more information, see
Monitor and analyze MCP traffic in Apigee.