Creazione di richieste API e gestione delle risposte

Questo documento descrive come creare richieste API e gestire le risposte dell'API dall'API Compute Engine. Spiega come:

  • Crea un corpo della richiesta.
  • Determina gli URI delle risorse necessari per una richiesta.
  • Gestisci le risposte dell'API.
  • Determina se una richiesta API è andata a buon fine.

Questo documento non descrive come eseguire l'autenticazione all'API. Per scoprire come autenticarti all'API, leggi Esegui l'autenticazione in Compute Engine.

Prima di iniziare

Creazione di una richiesta API

L'API Compute Engine prevede che le richieste API siano in formato JSON. Per effettuare una richiesta API, puoi effettuare una richiesta HTTP diretta utilizzando strumenti come curl o httplib2 oppure puoi utilizzare una delle librerie client disponibili.

Quando effettui una richiesta API che richiede un corpo della richiesta, ad esempio una richiesta POST, UPDATE o PATCH, il corpo della richiesta contiene le proprietà delle risorse che vuoi impostare in questa richiesta. Ad esempio, il seguente comando curl invia una richiesta POST all'URI della risorsa Instances. La richiesta crea un'istanza con le proprietà definite nel corpo della richiesta. Il corpo della richiesta è indicato dal flag -d:

curl -X POST -H "Authorization: Bearer [OAUTH_TOKEN]" -H "Content-Type: application/json" \
https://compute.googleapis.com/compute/v1/projects/PROJECT_ID/zones/ZONE/instances -d \
'{
  "disks":[
    {
      "boot":"true",
      "initializeParams":{
        "sourceImage":"https://www.googleapis.com/compute/v1/projects/debian-cloud/global/images/debian-10-buster-v20210122"
      }
    }
  ],
  "machineType":"https://www.googleapis.com/compute/v1/projects/PROJECT_ID/zones/ZONE/machineTypes/e2-standard-2",
  "name":"VM_NAME",
  "networkInterfaces":[
    {
      "accessConfigs":[
        {
          "name":"external-nat",
          "type":"ONE_TO_ONE_NAT"
        }
      ],
      "network":"https://www.googleapis.com/compute/v1/projects/PROJECT_ID/global/networks/default"
    }
  ]
}'

L'URI dell'immagine ha un ID progetto diverso (debian-cloud) dal tuo ID progetto perché le immagini appartengono a progetti diversi, a seconda del tipo di immagine. Ad esempio, tutte le immagini Debian disponibili pubblicamente offerte da Compute Engine sono ospitate nel progetto debian-cloud.

Quando fai riferimento a un'altra risorsa, utilizza l'URI della risorsa completo. Ad esempio, la proprietà network utilizza un URI completo per la rete default.

Esempi di richieste API

Python

from __future__ import annotations

import re
import sys
from typing import Any
import warnings

from google.api_core.extended_operation import ExtendedOperation
from google.cloud import compute_v1


def get_image_from_family(project: str, family: str) -> compute_v1.Image:
    """
    Retrieve the newest image that is part of a given family in a project.

    Args:
        project: project ID or project number of the Cloud project you want to get image from.
        family: name of the image family you want to get image from.

    Returns:
        An Image object.
    """
    image_client = compute_v1.ImagesClient()
    # List of public operating system (OS) images: https://cloud.google.com/compute/docs/images/os-details
    newest_image = image_client.get_from_family(project=project, family=family)
    return newest_image


def disk_from_image(
    disk_type: str,
    disk_size_gb: int,
    boot: bool,
    source_image: str,
    auto_delete: bool = True,
) -> compute_v1.AttachedDisk:
    """
    Create an AttachedDisk object to be used in VM instance creation. Uses an image as the
    source for the new disk.

    Args:
         disk_type: the type of disk you want to create. This value uses the following format:
            "zones/{zone}/diskTypes/(pd-standard|pd-ssd|pd-balanced|pd-extreme)".
            For example: "zones/us-west3-b/diskTypes/pd-ssd"
        disk_size_gb: size of the new disk in gigabytes
        boot: boolean flag indicating whether this disk should be used as a boot disk of an instance
        source_image: source image to use when creating this disk. You must have read access to this disk. This can be one
            of the publicly available images or an image from one of your projects.
            This value uses the following format: "projects/{project_name}/global/images/{image_name}"
        auto_delete: boolean flag indicating whether this disk should be deleted with the VM that uses it

    Returns:
        AttachedDisk object configured to be created using the specified image.
    """
    boot_disk = compute_v1.AttachedDisk()
    initialize_params = compute_v1.AttachedDiskInitializeParams()
    initialize_params.source_image = source_image
    initialize_params.disk_size_gb = disk_size_gb
    initialize_params.disk_type = disk_type
    boot_disk.initialize_params = initialize_params
    # Remember to set auto_delete to True if you want the disk to be deleted when you delete
    # your VM instance.
    boot_disk.auto_delete = auto_delete
    boot_disk.boot = boot
    return boot_disk


def wait_for_extended_operation(
    operation: ExtendedOperation, verbose_name: str = "operation", timeout: int = 300
) -> Any:
    """
    Waits for the extended (long-running) operation to complete.

    If the operation is successful, it will return its result.
    If the operation ends with an error, an exception will be raised.
    If there were any warnings during the execution of the operation
    they will be printed to sys.stderr.

    Args:
        operation: a long-running operation you want to wait on.
        verbose_name: (optional) a more verbose name of the operation,
            used only during error and warning reporting.
        timeout: how long (in seconds) to wait for operation to finish.
            If None, wait indefinitely.

    Returns:
        Whatever the operation.result() returns.

    Raises:
        This method will raise the exception received from `operation.exception()`
        or RuntimeError if there is no exception set, but there is an `error_code`
        set for the `operation`.

        In case of an operation taking longer than `timeout` seconds to complete,
        a `concurrent.futures.TimeoutError` will be raised.
    """
    result = operation.result(timeout=timeout)

    if operation.error_code:
        print(
            f"Error during {verbose_name}: [Code: {operation.error_code}]: {operation.error_message}",
            file=sys.stderr,
            flush=True,
        )
        print(f"Operation ID: {operation.name}", file=sys.stderr, flush=True)
        raise operation.exception() or RuntimeError(operation.error_message)

    if operation.warnings:
        print(f"Warnings during {verbose_name}:\n", file=sys.stderr, flush=True)
        for warning in operation.warnings:
            print(f" - {warning.code}: {warning.message}", file=sys.stderr, flush=True)

    return result


def create_instance(
    project_id: str,
    zone: str,
    instance_name: str,
    disks: list[compute_v1.AttachedDisk],
    machine_type: str = "n1-standard-1",
    network_link: str = "global/networks/default",
    subnetwork_link: str = None,
    internal_ip: str = None,
    external_access: bool = False,
    external_ipv4: str = None,
    accelerators: list[compute_v1.AcceleratorConfig] = None,
    preemptible: bool = False,
    spot: bool = False,
    instance_termination_action: str = "STOP",
    custom_hostname: str = None,
    delete_protection: bool = False,
) -> compute_v1.Instance:
    """
    Send an instance creation request to the Compute Engine API and wait for it to complete.

    Args:
        project_id: project ID or project number of the Cloud project you want to use.
        zone: name of the zone to create the instance in. For example: "us-west3-b"
        instance_name: name of the new virtual machine (VM) instance.
        disks: a list of compute_v1.AttachedDisk objects describing the disks
            you want to attach to your new instance.
        machine_type: machine type of the VM being created. This value uses the
            following format: "zones/{zone}/machineTypes/{type_name}".
            For example: "zones/europe-west3-c/machineTypes/f1-micro"
        network_link: name of the network you want the new instance to use.
            For example: "global/networks/default" represents the network
            named "default", which is created automatically for each project.
        subnetwork_link: name of the subnetwork you want the new instance to use.
            This value uses the following format:
            "regions/{region}/subnetworks/{subnetwork_name}"
        internal_ip: internal IP address you want to assign to the new instance.
            By default, a free address from the pool of available internal IP addresses of
            used subnet will be used.
        external_access: boolean flag indicating if the instance should have an external IPv4
            address assigned.
        external_ipv4: external IPv4 address to be assigned to this instance. If you specify
            an external IP address, it must live in the same region as the zone of the instance.
            This setting requires `external_access` to be set to True to work.
        accelerators: a list of AcceleratorConfig objects describing the accelerators that will
            be attached to the new instance.
        preemptible: boolean value indicating if the new instance should be preemptible
            or not. Preemptible VMs have been deprecated and you should now use Spot VMs.
        spot: boolean value indicating if the new instance should be a Spot VM or not.
        instance_termination_action: What action should be taken once a Spot VM is terminated.
            Possible values: "STOP", "DELETE"
        custom_hostname: Custom hostname of the new VM instance.
            Custom hostnames must conform to RFC 1035 requirements for valid hostnames.
        delete_protection: boolean value indicating if the new virtual machine should be
            protected against deletion or not.
    Returns:
        Instance object.
    """
    instance_client = compute_v1.InstancesClient()

    # Use the network interface provided in the network_link argument.
    network_interface = compute_v1.NetworkInterface()
    network_interface.network = network_link
    if subnetwork_link:
        network_interface.subnetwork = subnetwork_link

    if internal_ip:
        network_interface.network_i_p = internal_ip

    if external_access:
        access = compute_v1.AccessConfig()
        access.type_ = compute_v1.AccessConfig.Type.ONE_TO_ONE_NAT.name
        access.name = "External NAT"
        access.network_tier = access.NetworkTier.PREMIUM.name
        if external_ipv4:
            access.nat_i_p = external_ipv4
        network_interface.access_configs = [access]

    # Collect information into the Instance object.
    instance = compute_v1.Instance()
    instance.network_interfaces = [network_interface]
    instance.name = instance_name
    instance.disks = disks
    if re.match(r"^zones/[a-z\d\-]+/machineTypes/[a-z\d\-]+$", machine_type):
        instance.machine_type = machine_type
    else:
        instance.machine_type = f"zones/{zone}/machineTypes/{machine_type}"

    instance.scheduling = compute_v1.Scheduling()
    if accelerators:
        instance.guest_accelerators = accelerators
        instance.scheduling.on_host_maintenance = (
            compute_v1.Scheduling.OnHostMaintenance.TERMINATE.name
        )

    if preemptible:
        # Set the preemptible setting
        warnings.warn(
            "Preemptible VMs are being replaced by Spot VMs.", DeprecationWarning
        )
        instance.scheduling = compute_v1.Scheduling()
        instance.scheduling.preemptible = True

    if spot:
        # Set the Spot VM setting
        instance.scheduling.provisioning_model = (
            compute_v1.Scheduling.ProvisioningModel.SPOT.name
        )
        instance.scheduling.instance_termination_action = instance_termination_action

    if custom_hostname is not None:
        # Set the custom hostname for the instance
        instance.hostname = custom_hostname

    if delete_protection:
        # Set the delete protection bit
        instance.deletion_protection = True

    # Prepare the request to insert an instance.
    request = compute_v1.InsertInstanceRequest()
    request.zone = zone
    request.project = project_id
    request.instance_resource = instance

    # Wait for the create operation to complete.
    print(f"Creating the {instance_name} instance in {zone}...")

    operation = instance_client.insert(request=request)

    wait_for_extended_operation(operation, "instance creation")

    print(f"Instance {instance_name} created.")
    return instance_client.get(project=project_id, zone=zone, instance=instance_name)

Java

public static Operation startInstance(Compute compute, String instanceName) throws IOException {
  System.out.println("================== Starting New Instance ==================");

  // Create VM Instance object with the required properties.
  Instance instance = new Instance();
  instance.setName(instanceName);
  instance.setMachineType(
      String.format(
          "https://www.googleapis.com/compute/v1/projects/%s/zones/%s/machineTypes/e2-standard-1",
          PROJECT_ID, ZONE_NAME));
  // Add Network Interface to be used by VM Instance.
  NetworkInterface ifc = new NetworkInterface();
  ifc.setNetwork(
      String.format(
          "https://www.googleapis.com/compute/v1/projects/%s/global/networks/default",
          PROJECT_ID));
  List<AccessConfig> configs = new ArrayList<>();
  AccessConfig config = new AccessConfig();
  config.setType(NETWORK_INTERFACE_CONFIG);
  config.setName(NETWORK_ACCESS_CONFIG);
  configs.add(config);
  ifc.setAccessConfigs(configs);
  instance.setNetworkInterfaces(Collections.singletonList(ifc));

  // Add attached Persistent Disk to be used by VM Instance.
  AttachedDisk disk = new AttachedDisk();
  disk.setBoot(true);
  disk.setAutoDelete(true);
  disk.setType("PERSISTENT");
  AttachedDiskInitializeParams params = new AttachedDiskInitializeParams();
  // Assign the Persistent Disk the same name as the VM Instance.
  params.setDiskName(instanceName);
  // Specify the source operating system machine image to be used by the VM Instance.
  params.setSourceImage(SOURCE_IMAGE_PREFIX + SOURCE_IMAGE_PATH);
  // Specify the disk type as Standard Persistent Disk
  params.setDiskType(
      String.format(
          "https://www.googleapis.com/compute/v1/projects/%s/zones/%s/diskTypes/pd-standard",
          PROJECT_ID, ZONE_NAME));
  disk.setInitializeParams(params);
  instance.setDisks(Collections.singletonList(disk));

  // Initialize the service account to be used by the VM Instance and set the API access scopes.
  ServiceAccount account = new ServiceAccount();
  account.setEmail("default");
  List<String> scopes = new ArrayList<>();
  scopes.add("https://www.googleapis.com/auth/devstorage.full_control");
  scopes.add("https://www.googleapis.com/auth/compute");
  account.setScopes(scopes);
  instance.setServiceAccounts(Collections.singletonList(account));

  // Optional - Add a startup script to be used by the VM Instance.
  Metadata meta = new Metadata();
  Metadata.Items item = new Metadata.Items();
  item.setKey("startup-script-url");
  // If you put a script called "vm-startup.sh" in this Google Cloud Storage
  // bucket, it will execute on VM startup.  This assumes you've created a
  // bucket named the same as your PROJECT_ID.
  // For info on creating buckets see:
  // https://cloud.google.com/storage/docs/cloud-console#_creatingbuckets
  item.setValue(String.format("gs://%s/vm-startup.sh", PROJECT_ID));
  meta.setItems(Collections.singletonList(item));
  instance.setMetadata(meta);

  System.out.println(instance.toPrettyString());
  Compute.Instances.Insert insert = compute.instances().insert(PROJECT_ID, ZONE_NAME, instance);
  return insert.execute();
}

Creazione di URI delle risorse

Nell'API Compute Engine, un riferimento a un'altra risorsa Google Cloud è fornito come URI completo:

https://compute.googleapis.com/compute/v1/projects/PROJECT_ID/zones/ZONE/RESOURCE_TYPE/SPECIFIC_RESOURCE

Ogni volta che specifichi un'immagine, un tipo di macchina, una rete o qualsiasi altra risorsa, devi fornire l'URI della risorsa quando utilizzi l'API. Gli strumenti client come Google Cloud CLI e la console Google Cloud nascondono questa complessità e gestiscono la creazione di questi URI delle risorse per te, ma quando interagisci direttamente con l'API, devi creare questi URI delle risorse autonomamente.

Esistono URI delle risorse leggermente diversi per diversi tipi di risorse. Ad esempio, una risorsa di zona ha la specifica zone nell'URI:

https://compute.googleapis.com/compute/v1/projects/PROJECT_ID/zones/ZONE/machineTypes/e2-standard-2

Le risorse regionali sostituiscono la specifica zone con una specifica region:

https://compute.googleapis.com/compute/v1/projects/PROJECT_ID/regions/REGION/addresses/ADDRESS_NAME

Analogamente, le risorse globali hanno la specifica global:

https://compute.googleapis.com/compute/v1/projects/PROJECT_ID/global/images/VM_NAME

L'API Compute Engine accetta anche URI parziali perché il servizio può dedurre informazioni come l'ID progetto. Pertanto, sono accettabili anche le seguenti versioni parziali degli URI precedenti:

zones/ZONE/machineTypes/e2-standard-2
regions/REGION/addresses/ADDRESS_NAME
project/PROJECT_ID/global/images/VM_NAME

Negli URI parziali, sia gli URI a livello di zona che quelli a livello di regione omettevano l'ID progetto, ma non l'URI dell'immagine. Questo perché le immagini disponibili pubblicamente offerte da Compute Engine sono ospitate in altri progetti, come debian-cloud per tutte le immagini Debian e ubuntu-os-cloud per tutte le immagini Ubuntu. Prima di poter utilizzare queste immagini, devi fornire l'ID progetto appropriato. Se ometti l'ID progetto per le immagini, Compute Engine tenta di trovare l'immagine nel tuo progetto e la richiesta non va a buon fine perché l'immagine non esiste.

Tuttavia, se utilizzi un'immagine personalizzata che appartiene al tuo progetto (lo stesso progetto in cui stai creando questa risorsa), puoi omettere la specifica del progetto quando fornisci un URI immagine.

Determinare le proprietà obbligatorie

La documentazione di riferimento dell'API Compute Engine, disponibile per le API v1 e beta, descrive tutte le possibili proprietà che puoi impostare per una risorsa specifica. La documentazione di riferimento distingue tra proprietà modificabili e non modificabili (contrassegnate da un [Output Only] nella descrizione della proprietà), ma per determinare le proprietà obbligatorie per una risorsa, devi esaminare la documentazione specifica per l'attività.

Ad esempio, se stai creando un'istanza, leggi la documentazione Creazione di un'istanza da un'immagine per visualizzare le proprietà API richieste per la richiesta. Se vuoi creare un indirizzo IP esterno statico nell'API, leggi la documentazione relativa agli indirizzi IP esterni statici.

Convalida delle richieste API

Per convalidare le richieste API:

  1. Nella documentazione di riferimento dell'API Compute Engine, trova il metodo chiamato dal tuo codice. Ad esempio, v1/compute.instances.insert.
  2. Nel menu dei contenuti, fai clic su Prova. Si apre la finestra Prova questa API.
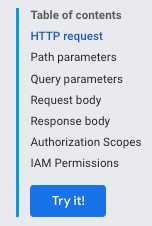
    Il pulsante Prova nel menu dei contenuti.

  3. In Parametri della richiesta, non è necessario fornire un progetto o una zona perché la convalida non richiede l'invio della richiesta.

  4. In Corpo della richiesta, incolla la richiesta.
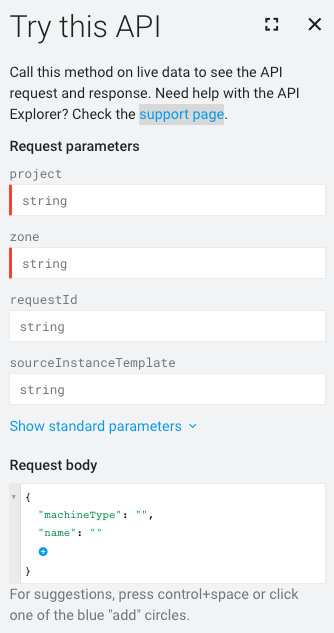
    La finestra Prova questa API, che mostra il campo Corpo della richiesta in cui incollare una richiesta di convalida.

Gli elementi della richiesta in formato non corretto vengono sottolineati in blu. Fai clic su ogni sezione sottolineata per ulteriori informazioni sul problema da risolvere.

Gestione delle risposte API

Se effettui una richiesta che modifica i dati, Compute Engine restituisce un oggetto Operation di cui puoi eseguire il polling per ottenere lo stato delle operazioni per la tua richiesta. La risorsa Operation ha il seguente aspetto:

{
 "kind": "compute#operation",
 "id": "7127550864823803662",
 "name": "operation-1458856416788-52ed27a803e22-1c3bd86a-9e95017b",
 "zone": "https://www.googleapis.com/compute/v1/projects/PROJECT_ID/zones/ZONE",
 "operationType": "insert",
 "targetLink": "https://www.googleapis.com/compute/v1/projects/PROJECT_ID/zones/ZONE/instances/EXAMPLE_VM",
 "targetId": "4132355614508179214",
 "status": "PENDING",
 "user": "user@example.com",
 "progress": 0,
 "insertTime": "2016-03-24T14:53:37.788-07:00",
 "selfLink": "https://www.googleapis.com/compute/v1/projects/PROJECT_ID/zones/ZONE/operations/operation-1458856416788-52ed27a803e22-1c3bd86a-9e95017b"
}

Se la richiesta originale è di modificare una risorsa di zona, ad esempio per creare uno snapshot di un disco o per arrestare un'istanza, Compute Engine restituisce un oggetto zoneOperations. Analogamente, le risorse regionali e globali restituiscono un oggetto regionOperations o globalOperations, rispettivamente. Puoi ottenere lo stato di un'operazione eseguendo una richiesta che utilizza il metodo get o wait per la risorsa Operation specifica e fornendo il name dell'operazione.

La tua richiesta non è completa finché lo stato della risorsa Operation non viene visualizzato come DONE. L'operazione può richiedere un po' di tempo, a seconda della natura della richiesta. Poi, quando lo stato della risorsa Operation torna come DONE, puoi controllare se l'operazione è riuscita e se si sono verificati errori.

Ad esempio, la seguente risposta indica che l'operazione precedente è ora completata, come specificato dallo stato DONE:

endTime: '2016-03-24T14:54:07.119-07:00'
id: '7127550864823803662'
insertTime: '2016-03-24T14:53:37.788-07:00'
kind: compute#operation
name: operation-1458856416788-52ed27a803e22-1c3bd86a-9e95017b
operationType: insert
progress: 100
selfLink: https://compute.googleapis.com/compute/v1/projects/PROJECT_ID/zones/ZONE/operations/operation-1458856416788-52ed27a803e22-1c3bd86a-9e95017b
startTime: '2016-03-24T14:53:38.397-07:00'
status: DONE
targetId: '4132355614508179214'
targetLink: https://compute.googleapis.com/compute/v1/projects/PROJECT_ID/zones/ZONE/instances/EXAMPLE_VM
user: user@example.com
zone: https://compute.googleapis.com/compute/v1/projects/PROJECT_ID/zones/ZONE

Per confermare, invia una richiesta get alla risorsa per verificare che esista e che sia in esecuzione. Ad esempio:

GET /compute/v1/projects/PROJECT_ID/zones/ZONE/instances/EXAMPLE_VM

{
  "cpuPlatform": "Intel Haswell",
  "creationTimestamp": "2016-03-24T14:53:37.170-07:00",
  "disks": [
    ..[snip]..
  "selfLink": "https://www.googleapis.com/compute/v1/projects/PROJECT_ID/zones/ZONE/instances/EXAMPLE_VM",
  "status": "RUNNING",
  "tags": {
    "fingerprint": "42WmSpB8rSM="
  },
  "zone": "https://www.googleapis.com/compute/v1/projects/PROJECT_ID/zones/ZONE"
}

Operazioni di polling

Puoi scrivere del codice per eseguire periodicamente il polling dell'operazione con una richiesta get o wait che viene restituita quando lo stato dell'operazione è DONE.

Con una richiesta get, l'operazione viene restituita immediatamente, indipendentemente dallo stato dell'operazione. Devi eseguire il polling dell'operazione periodicamente per sapere quando è terminata.

Se effettui una richiesta wait, la richiesta viene restituita al termine dell'operazione DONE o se la richiesta si sta avvicinando alla scadenza di 2 minuti. Puoi scegliere di utilizzare wait o get per eseguire il polling delle operazioni, ma il metodo wait offre alcuni vantaggi rispetto al metodo get:

  • Puoi configurare i client in modo che eseguano il polling dello stato dell'operazione meno frequentemente, riducendo l'utilizzo di QPS dell'API Compute Engine.
  • La latenza media tra il momento in cui l'operazione viene completata e il momento in cui il client viene informato del completamento dell'operazione è notevolmente ridotta perché il server risponde non appena l'operazione viene completata.
  • Il metodo fornisce attese limitate. Il metodo attende al massimo il timeout HTTP predefinito (2 minuti) e poi restituisce lo stato corrente dell'operazione, che potrebbe essere DONE o ancora in corso.

Il metodo wait è un'API best-effort. Se il server è sovraccarico, la richiesta potrebbe essere restituita prima di raggiungere la scadenza predefinita o dopo aver atteso solo zero secondi. Inoltre, non è garantito che il metodo venga restituito solo quando l'operazione è DONE. Ad esempio, se la richiesta si avvicina alla scadenza di 2 minuti, il metodo viene restituito anche se l'operazione non è stata completata. Per controllare le tue operazioni, ti consigliamo di utilizzare il metodo wait o get in un ciclo di nuovi tentativi con sospensione tra un tentativo e l'altro per eseguire periodicamente il polling dello stato dell'operazione. L'intervallo massimo di nuovi tentativi non deve superare il periodo di conservazione minimo dell'operazione.

Esempio di polling

Gli esempi riportati di seguito utilizzano il metodo get. Puoi sostituire il metodo get con il metodo wait:

Python

from google.cloud import compute_v1


def wait_for_operation(
    operation: compute_v1.Operation, project_id: str
) -> compute_v1.Operation:
    """
    This method waits for an operation to be completed. Calling this function
    will block until the operation is finished.

    Args:
        operation: The Operation object representing the operation you want to
            wait on.
        project_id: project ID or project number of the Cloud project you want to use.

    Returns:
        Finished Operation object.
    """
    kwargs = {"project": project_id, "operation": operation.name}
    if operation.zone:
        client = compute_v1.ZoneOperationsClient()
        # Operation.zone is a full URL address of a zone, so we need to extract just the name
        kwargs["zone"] = operation.zone.rsplit("/", maxsplit=1)[1]
    elif operation.region:
        client = compute_v1.RegionOperationsClient()
        # Operation.region is a full URL address of a region, so we need to extract just the name
        kwargs["region"] = operation.region.rsplit("/", maxsplit=1)[1]
    else:
        client = compute_v1.GlobalOperationsClient()
    return client.wait(**kwargs)

Java

/**
 * Wait until {@code operation} is completed.
 *
 * @param compute the {@code Compute} object
 * @param operation the operation returned by the original request
 * @param timeout the timeout, in millis
 * @return the error, if any, else {@code null} if there was no error
 * @throws InterruptedException if we timed out waiting for the operation to complete
 * @throws IOException if we had trouble connecting
 */
public static Operation.Error blockUntilComplete(
    Compute compute, Operation operation, long timeout) throws Exception {
  long start = System.currentTimeMillis();
  final long pollInterval = 5 * 1000;
  String zone = getLastWordFromUrl(operation.getZone()); // null for global/regional operations
  String region = getLastWordFromUrl(operation.getRegion());
  String status = operation.getStatus();
  String opId = operation.getName();
  while (operation != null && !status.equals("DONE")) {
    Thread.sleep(pollInterval);
    long elapsed = System.currentTimeMillis() - start;
    if (elapsed >= timeout) {
      throw new InterruptedException("Timed out waiting for operation to complete");
    }
    System.out.println("waiting...");
    if (zone != null) {
      Compute.ZoneOperations.Get get = compute.zoneOperations().get(PROJECT_ID, zone, opId);
      operation = get.execute();
    } else if (region != null) {
      Compute.RegionOperations.Get get = compute.regionOperations().get(PROJECT_ID, region, opId);
      operation = get.execute();
    } else {
      Compute.GlobalOperations.Get get = compute.globalOperations().get(PROJECT_ID, opId);
      operation = get.execute();
    }
    if (operation != null) {
      status = operation.getStatus();
    }
  }
  return operation == null ? null : operation.getError();
}