


バッチ推論は、エンドポイントにモデルをデプロイすることなく、モデルリソースから直接推論をリクエストする非同期リクエストです。
このチュートリアルでは、高可用性 VPN(HA VPN)を使用して、マルチクラウドとオンプレミスのプライベート接続の基盤として機能する 2 つの Virtual Private Cloud ネットワーク間で、バッチ推論リクエストをトレーニング済みモデルに限定公開で送信します。
このチュートリアルは、Gemini Enterprise Agent Platform、Virtual Private Cloud(VPC)、 Google Cloud コンソール、Cloud Shell に精通している企業のネットワーク管理者、データ サイエンティスト、研究者を対象としています。Vertex AI Workbench の使用経験があると役立ちますが、必須ではありません。
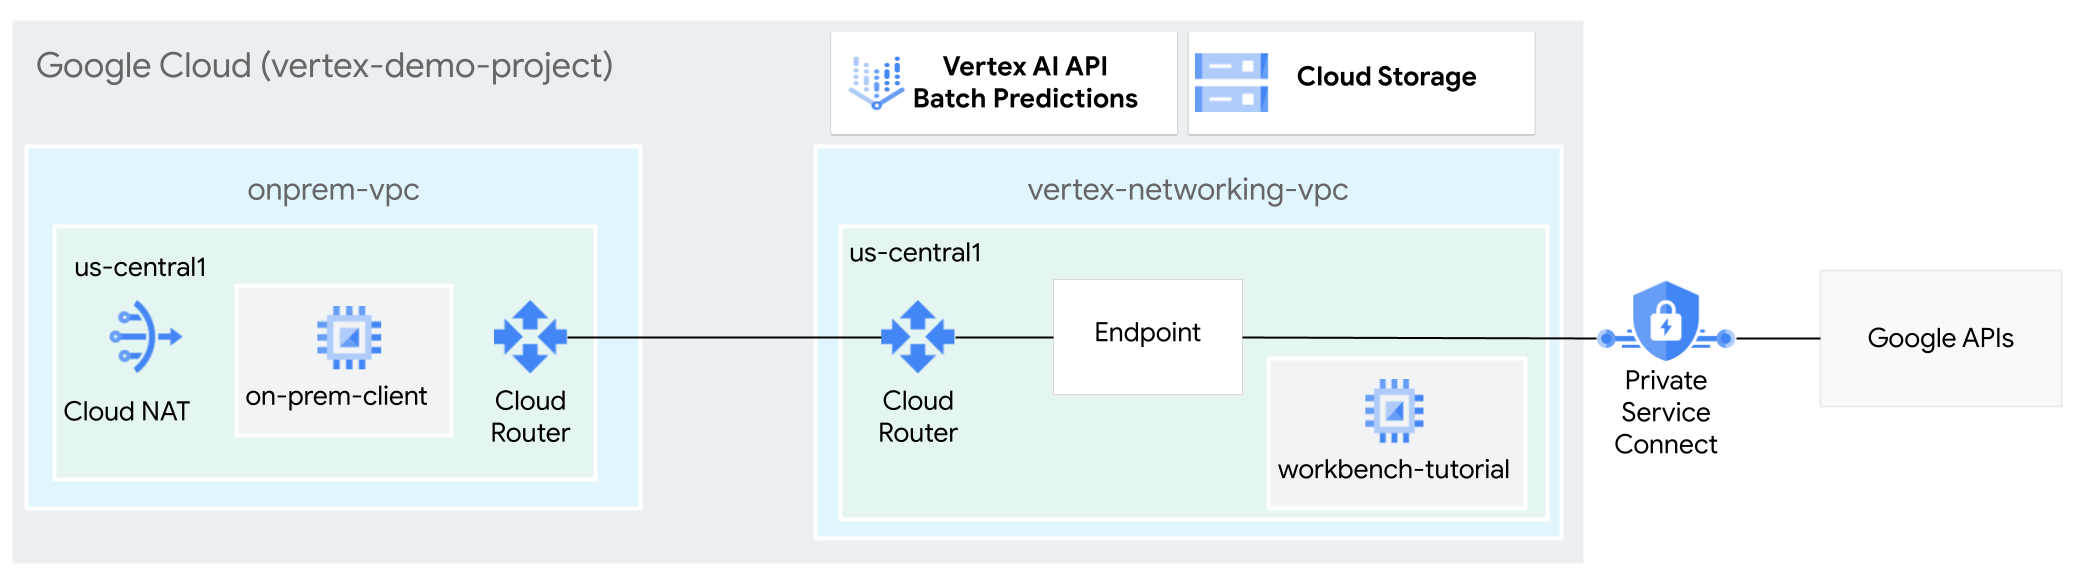
目標
- 上の図のように、2 つの Virtual Private Cloud(VPC)ネットワークを作成します。
- 1 つ(
vertex-networking-vpc)は、バッチ推論のために Google API にアクセスするためのものです。 - もう 1 つ(
onprem-vpc)は、オンプレミス ネットワークを表します。
- 1 つ(
- HA VPN ゲートウェイ、Cloud VPN トンネル、Cloud Router をデプロイして、
vertex-networking-vpcとonprem-vpcに接続します。 - Gemini Enterprise Agent Platform バッチ推論モデルを構築して、Cloud Storage バケットにアップロードします。
- 限定公開のリクエストを Gemini Enterprise Agent Platform バッチ推論 REST API に転送する Private Service Connect(PSC)エンドポイントを作成します。
- Private Service Connect エンドポイントのルートを
onprem-vpcに通知するために、vertex-networking-vpcで Cloud Router のカスタム アドバタイズ モードを構成します。 onprem-vpcに Compute Engine VM インスタンスを作成します。これは、HA VPN 経由でバッチ推論リクエストを非公開で送信するクライアント アプリケーション(on-prem-client)を表します。
費用
このドキュメントでは、課金対象である次の Google Cloudコンポーネントを使用します。
- Cloud NAT
- Cloud Storage
- Cloud VPN
- Compute Engine
- Gemini Enterprise Agent Platform
- Virtual Private Cloud
料金計算ツールを使うと、予想使用量に基づいて費用の見積もりを生成できます。
このドキュメントに記載されているタスクの完了後、作成したリソースを削除すると、それ以上の請求は発生しません。詳細については、クリーンアップをご覧ください。
始める前に
-
Google Cloud コンソールで、プロジェクトの選択ページに移動します。
-
Google Cloud プロジェクトの選択または作成
プロジェクトの選択または作成に必要なロール
- プロジェクトを選択する: プロジェクトの選択に特定の IAM ロールは必要ありません。ロールが付与されているプロジェクトであれば、どのプロジェクトでも選択できます。
-
プロジェクトを作成する: プロジェクトを作成するには、
resourcemanager.projects.create権限を含むプロジェクト作成者ロール(roles/resourcemanager.projectCreator)が必要です。詳しくは、ロールを付与する方法をご覧ください。
- このチュートリアルで説明するコマンドを実行するために、Cloud Shell を開きます。Cloud Shell は Google Cloud のインタラクティブなシェル環境であり、ウェブブラウザからプロジェクトやリソースを管理できます。
- Cloud Shell で現在のプロジェクトを Google Cloud プロジェクト ID に設定してから、同じプロジェクト ID を
projectidシェル変数に保存します。projectid="PROJECT_ID" gcloud config set project ${projectid} - プロジェクト オーナーでない場合は、プロジェクト IAM 管理者(roles/resourcemanager.projectIamAdmin)のロールを付与するようプロジェクト オーナーに依頼してください。このロールは、次のステップで IAM ロールを付与するために必要です。
-
ユーザー アカウントにロールを付与します。次の IAM ロールごとに次のコマンドを 1 回実行します。
    roles/compute.instanceAdmin.v1,
    roles/compute.networkAdmin,
    roles/compute.securityAdmin,
    roles/dns.admin,
    roles/iap.tunnelResourceAccessor,
    roles/notebooks.admin,
    roles/iam.serviceAccountAdmin,
    roles/iam.serviceAccountUser,
    roles/servicedirectory.editor,
    roles/serviceusage.serviceUsageAdmin,
    roles/storage.admin,
    roles/aiplatform.admin,
    roles/aiplatform.user,
    roles/resourcemanager.projectIamAdmin
gcloud projects add-iam-policy-binding PROJECT_ID --member="user:USER_IDENTIFIER" --role=ROLE
次のように置き換えます。
PROJECT_ID: プロジェクト ID。USER_IDENTIFIER: ユーザー アカウントの識別子。例:myemail@example.comROLE: ユーザー アカウントに付与する IAM ロール。
DNS、Artifact Registry、IAM、Compute Engine、Notebooks、Agent Platform の各 API が有効になっていない場合は、有効にします。
API を有効にするために必要なロール
API を有効にするには、
serviceusage.services.enable権限が必要です。プロジェクトを作成した場合は、オーナーロール(roles/owner)を介してこの権限がすでに付与されている可能性があります。それ以外の場合は、Service Usage 管理者ロール(roles/serviceusage.serviceUsageAdmin)を介してこの権限を取得できます。ロールを付与する方法をご覧ください。gcloud services enable dns.googleapis.com
artifactregistry.googleapis.com iam.googleapis.com compute.googleapis.com notebooks.googleapis.com aiplatform.googleapis.com
VPC ネットワークを作成する
このセクションでは、2 つの VPC ネットワークを作成します。1 つはバッチ推論のために Google API にアクセスするためのもので、もう 1 つはオンプレミス ネットワークをシミュレートするためのものです。2 つの VPC ネットワークに、それぞれ Cloud Router と Cloud NAT ゲートウェイを作成します。Cloud NAT ゲートウェイは、外部 IP アドレスを持たない Compute Engine 仮想マシン(VM)インスタンスの送信接続を提供します。
vertex-networking-vpcVPC ネットワークを作成します。gcloud compute networks create vertex-networking-vpc \ --subnet-mode customvertex-networking-vpcネットワークで、プライマリ IPv4 範囲が10.0.1.0/28のサブネットをworkbench-subnetという名前で作成します。gcloud compute networks subnets create workbench-subnet \ --range=10.0.1.0/28 \ --network=vertex-networking-vpc \ --region=us-central1 \ --enable-private-ip-google-accessオンプレミス ネットワーク(
onprem-vpc)をシミュレートするための VPC ネットワークを作成します。gcloud compute networks create onprem-vpc \ --subnet-mode customonprem-vpcネットワークで、プライマリ IPv4 範囲が172.16.10.0/29のサブネットをonprem-vpc-subnet1という名前で作成します。gcloud compute networks subnets create onprem-vpc-subnet1 \ --network onprem-vpc \ --range 172.16.10.0/29 \ --region us-central1
VPC ネットワークが正しく構成されていることを確認する
Google Cloud コンソールで、[VPC ネットワーク] ページの [現在のプロジェクトのネットワーク] タブに移動します。
VPC ネットワークのリストで、2 つのネットワーク(
vertex-networking-vpcとonprem-vpc)が作成されていることを確認します。[現在のプロジェクトのサブネット] タブをクリックします。
VPC サブネットのリストで、
workbench-subnetサブネットとonprem-vpc-subnet1サブネットが作成されていることを確認します。
ハイブリッド接続の構成
このセクションでは、相互に接続する 2 つの HA VPN ゲートウェイを作成します。一つは vertex-networking-vpc VPC ネットワークにあります。もう一つは onprem-vpc VPC ネットワークにあります。各ゲートウェイには、Cloud Router と VPN トンネルのペアが含まれます。
HA VPN ゲートウェイを作成する
Cloud Shell で、
vertex-networking-vpcVPC ネットワークに HA VPN ゲートウェイを作成します。gcloud compute vpn-gateways create vertex-networking-vpn-gw1 \ --network vertex-networking-vpc \ --region us-central1onprem-vpcVPC ネットワークに HA VPN ゲートウェイを作成します。gcloud compute vpn-gateways create onprem-vpn-gw1 \ --network onprem-vpc \ --region us-central1Google Cloud コンソールで、[VPN] ページの [Cloud VPN ゲートウェイ] タブに移動します。
2 つのゲートウェイ(
vertex-networking-vpn-gw1とonprem-vpn-gw1)が作成され、それぞれに 2 つのインターフェース IP アドレスがあることを確認します。
Cloud Router と Cloud NAT ゲートウェイを作成する
2 つの VPC ネットワークに、汎用の Cloud Router とリージョン用の Cloud Router を作成します。それぞれのリージョン用 Cloud Router で、Cloud NAT ゲートウェイを作成します。Cloud NAT ゲートウェイは、外部 IP アドレスを持たない Compute Engine 仮想マシン(VM)インスタンスに送信接続を提供します。
Cloud Shell で、
vertex-networking-vpcVPC ネットワークの Cloud Router を作成します。gcloud compute routers create vertex-networking-vpc-router1 \ --region us-central1\ --network vertex-networking-vpc \ --asn 65001onprem-vpcVPC ネットワークの Cloud Router を作成します。gcloud compute routers create onprem-vpc-router1 \ --region us-central1\ --network onprem-vpc\ --asn 65002vertex-networking-vpcVPC ネットワークにリージョン用の Cloud Router を作成します。gcloud compute routers create cloud-router-us-central1-vertex-nat \ --network vertex-networking-vpc \ --region us-central1リージョン用の Cloud Router で Cloud NAT ゲートウェイを構成します。
gcloud compute routers nats create cloud-nat-us-central1 \ --router=cloud-router-us-central1-vertex-nat \ --auto-allocate-nat-external-ips \ --nat-all-subnet-ip-ranges \ --region us-central1onprem-vpcVPC ネットワークにリージョン用の Cloud Router を作成します。gcloud compute routers create cloud-router-us-central1-onprem-nat \ --network onprem-vpc \ --region us-central1リージョン用の Cloud Router で Cloud NAT ゲートウェイを構成します。
gcloud compute routers nats create cloud-nat-us-central1-on-prem \
  --router=cloud-router-us-central1-onprem-nat \
  --auto-allocate-nat-external-ips \
  --nat-all-subnet-ip-ranges \
  --region us-central1
Google Cloud コンソールで、[Cloud Router] ページに移動します。
[Cloud Router] リストで、次のルーターが作成されていることを確認します。
cloud-router-us-central1-onprem-natcloud-router-us-central1-vertex-natonprem-vpc-router1vertex-networking-vpc-router1
新しい値を表示するには、 Google Cloud コンソールのブラウザタブを更新する必要があります。
[Cloud Router] リストで
cloud-router-us-central1-vertex-natをクリックします。[ルーターの詳細] ページで、
cloud-nat-us-central1Cloud NAT ゲートウェイが作成されていることを確認します。戻る矢印 をクリックして、[Cloud Router] ページに戻ります。
ルーターリストで
cloud-router-us-central1-onprem-natをクリックします。[ルーターの詳細] ページで、
cloud-nat-us-central1-on-premCloud NAT ゲートウェイが作成されていることを確認します。
VPN トンネルを作成する
Cloud Shell で、
vertex-networking-vpcネットワークに VPN トンネル(vertex-networking-vpc-tunnel0)を作成します。gcloud compute vpn-tunnels create vertex-networking-vpc-tunnel0 \ --peer-gcp-gateway onprem-vpn-gw1 \ --region us-central1 \ --ike-version 2 \ --shared-secret [ZzTLxKL8fmRykwNDfCvEFIjmlYLhMucH] \ --router vertex-networking-vpc-router1 \ --vpn-gateway vertex-networking-vpn-gw1 \ --interface 0vertex-networking-vpcネットワークに、vertex-networking-vpc-tunnel1という VPN トンネルを作成します。gcloud compute vpn-tunnels create vertex-networking-vpc-tunnel1 \ --peer-gcp-gateway onprem-vpn-gw1 \ --region us-central1 \ --ike-version 2 \ --shared-secret [bcyPaboPl8fSkXRmvONGJzWTrc6tRqY5] \ --router vertex-networking-vpc-router1 \ --vpn-gateway vertex-networking-vpn-gw1 \ --interface 1onprem-vpcネットワークに、onprem-vpc-tunnel0という VPN トンネルを作成します。gcloud compute vpn-tunnels create onprem-vpc-tunnel0 \ --peer-gcp-gateway vertex-networking-vpn-gw1 \ --region us-central1\ --ike-version 2 \ --shared-secret [ZzTLxKL8fmRykwNDfCvEFIjmlYLhMucH] \ --router onprem-vpc-router1 \ --vpn-gateway onprem-vpn-gw1 \ --interface 0onprem-vpcネットワークに、onprem-vpc-tunnel1という VPN トンネルを作成します。gcloud compute vpn-tunnels create onprem-vpc-tunnel1 \ --peer-gcp-gateway vertex-networking-vpn-gw1 \ --region us-central1\ --ike-version 2 \ --shared-secret [bcyPaboPl8fSkXRmvONGJzWTrc6tRqY5] \ --router onprem-vpc-router1 \ --vpn-gateway onprem-vpn-gw1 \ --interface 1Google Cloud コンソールで、[VPN] ページに移動します。
VPN トンネルのリストで、4 つの VPN トンネルが作成されていることを確認します。
BGP セッションを確立する
Cloud Router は、Border Gateway Protocol(BGP)を使用して、VPC ネットワーク(この場合は vertex-networking-vpc)とオンプレミス ネットワーク(onprem-vpc で表される)間のルートを交換します。Cloud Router で、オンプレミス ルーターのインターフェースと BGP ピアを構成します。インターフェースと BGP ピア構成は、BGP セッションを形成します。このセクションでは、vertex-networking-vpc に 2 つ、onprem-vpc に 2 つの BGP セッションを作成します。
ルーター間のインターフェースと BGP ピアを構成すると、ルートの交換が自動的に開始されます。
vertex-networking-vpc の BGP セッションを確立する
Cloud Shell で、
vertex-networking-vpcネットワークにvertex-networking-vpc-tunnel0用の BGP インターフェースを作成します。gcloud compute routers add-interface vertex-networking-vpc-router1 \ --interface-name if-tunnel0-to-onprem \ --ip-address 169.254.0.1 \ --mask-length 30 \ --vpn-tunnel vertex-networking-vpc-tunnel0 \ --region us-central1vertex-networking-vpcネットワークに、bgp-onprem-tunnel0の BGP ピアを作成します。gcloud compute routers add-bgp-peer vertex-networking-vpc-router1 \ --peer-name bgp-onprem-tunnel0 \ --interface if-tunnel0-to-onprem \ --peer-ip-address 169.254.0.2 \ --peer-asn 65002 \ --region us-central1vertex-networking-vpcネットワークに、vertex-networking-vpc-tunnel1の BGP インターフェースを作成します。gcloud compute routers add-interface vertex-networking-vpc-router1 \ --interface-name if-tunnel1-to-onprem \ --ip-address 169.254.1.1 \ --mask-length 30 \ --vpn-tunnel vertex-networking-vpc-tunnel1 \ --region us-central1vertex-networking-vpcネットワークに、bgp-onprem-tunnel1の BGP ピアを作成します。gcloud compute routers add-bgp-peer vertex-networking-vpc-router1 \ --peer-name bgp-onprem-tunnel1 \ --interface if-tunnel1-to-onprem \ --peer-ip-address 169.254.1.2 \ --peer-asn 65002 \ --region us-central1
onprem-vpc の BGP セッションを確立する
onprem-vpcネットワークに、onprem-vpc-tunnel0の BGP インターフェースを作成します。gcloud compute routers add-interface onprem-vpc-router1 \ --interface-name if-tunnel0-to-vertex-networking-vpc \ --ip-address 169.254.0.2 \ --mask-length 30 \ --vpn-tunnel onprem-vpc-tunnel0 \ --region us-central1onprem-vpcネットワークに、bgp-vertex-networking-vpc-tunnel0の BGP ピアを作成します。gcloud compute routers add-bgp-peer onprem-vpc-router1 \ --peer-name bgp-vertex-networking-vpc-tunnel0 \ --interface if-tunnel0-to-vertex-networking-vpc \ --peer-ip-address 169.254.0.1 \ --peer-asn 65001 \ --region us-central1onprem-vpcネットワークに、onprem-vpc-tunnel1の BGP インターフェースを作成します。gcloud compute routers add-interface onprem-vpc-router1 \ --interface-name if-tunnel1-to-vertex-networking-vpc \ --ip-address 169.254.1.2 \ --mask-length 30 \ --vpn-tunnel onprem-vpc-tunnel1 \ --region us-central1onprem-vpcネットワークに、bgp-vertex-networking-vpc-tunnel1の BGP ピアを作成します。gcloud compute routers add-bgp-peer onprem-vpc-router1 \ --peer-name bgp-vertex-networking-vpc-tunnel1 \ --interface if-tunnel1-to-vertex-networking-vpc \ --peer-ip-address 169.254.1.1 \ --peer-asn 65001 \ --region us-central1
BGP セッションの作成を確認する
Google Cloud コンソールで、[VPN] ページに移動します。
VPN トンネルのリストで、各トンネルの [BGP セッションのステータス] 列の値が「BGP セッションを構成」から「BGP が確立されました」に変更されていることを確認します。新しい値を表示するには、 Google Cloud コンソールのブラウザタブを更新する必要があります。
vertex-networking-vpc の学習されたルートを検証する
Google Cloud コンソールで、[VPC ネットワーク] ページに移動します。
VPC ネットワークのリストで
vertex-networking-vpcをクリックします。[ルート] タブをクリックします。
[リージョン] リストで [us-central1(アイオワ)] を選択し、[表示] をクリックします。
[送信先 IP 範囲] 列で、
onprem-vpc-subnet1サブネットの IP 範囲(172.16.10.0/29)が 2 回表示されていることを確認します。
onprem-vpc の学習されたルートを検証する
戻る矢印 をクリックして、[VPC ネットワーク] ページに戻ります。
VPC ネットワークのリストで
onprem-vpcをクリックします。[ルート] タブをクリックします。
[リージョン] リストで [us-central1(アイオワ)] を選択し、[表示] をクリックします。
[送信先 IP 範囲] 列で、
workbench-subnetサブネットの IP 範囲(10.0.1.0/28)が 2 回表示されていることを確認します。
Private Service Connect コンシューマー エンドポイントを作成する
Cloud Shell で、Google API へのアクセスに使用するコンシューマー エンドポイントの IP アドレスを予約します。
gcloud compute addresses create psc-googleapi-ip \
  --global \
  --purpose=PRIVATE_SERVICE_CONNECT \
  --addresses=192.168.0.1 \
  --network=vertex-networking-vpc
エンドポイントを Google API およびサービスに接続する転送ルールを作成します。
gcloud compute forwarding-rules create pscvertex \
 --global \
 --network=vertex-networking-vpc\
 --address=psc-googleapi-ip \
 --target-google-apis-bundle=all-apis
vertex-networking-vpc のカスタム アドバタイズ ルートを作成する
このセクションでは、vertex-networking-vpc-router1(vertex-networking-vpc の Cloud Router)のカスタム IP 範囲をアドバタイズして、PSC エンドポイントの IP アドレスを onprem-vpc ネットワークにアドバタイズするように、Cloud Router のカスタム アドバタイズ モードを構成します。
Google Cloud コンソールで、[Cloud Router] ページに移動します。
[Cloud Router] リストで
vertex-networking-vpc-router1をクリックします。[ルーターの詳細] ページで、[ 編集] をクリックします。
[アドバタイズされたルート] セクションの [ルート] で、[カスタムルートの作成] を選択します。
[Cloud Router に表示されるすべてのサブネットにアドバタイズする] チェックボックスをオンにして、Cloud Router に利用可能なサブネットのアドバタイジングを継続します。このオプションを有効にすると、デフォルトのアドバタイズ モードでの Cloud Router の動作が模倣されます。
[カスタムルートの追加] をクリックします。
[ソース] で [カスタム IP 範囲] を選択します。
[IP アドレス範囲] には、次の IP アドレスを入力します。
192.168.0.1[説明] には、次のテキストを入力します。
Custom route to advertise Private Service Connect endpoint IP address[完了] をクリックし、[保存] をクリックします。
onprem-vpc がアドバタイズされたルートを学習したことを確認する
Google Cloud コンソールで、[ルート] ページに移動します。
[適用されているルート] タブで、次の操作を行います。
- [ネットワーク] には [
onprem-vpc] を選択します。 - [リージョン] には
us-central1 (Iowa)を選択します。 - [表示] をクリックします。
ルートのリストで、名前が
onprem-vpc-router1-bgp-vertex-networking-vpc-tunnel0およびonprem-vpc-router1-bgp-vfertex-networking-vpc-tunnel1で始まるエントリがあり、その両方の [送信先 IP 範囲] が192.168.0.1であることを確認しますこれらのエントリがすぐに表示されない場合は、数分待ってから、 Google Cloud コンソールのブラウザタブを更新してください。
- [ネットワーク] には [
ユーザー管理のサービス アカウントを使用する VM を onprem-vpc に作成する
このセクションでは、バッチ推論リクエストを送信するオンプレミス クライアント アプリケーションをシミュレートする VM インスタンスを作成します。Compute Engine と IAM のベスト プラクティスに従って、この VM は Compute Engine のデフォルトのサービス アカウントではなく、ユーザー管理のサービス アカウントを使用します。
ユーザーが管理するサービス アカウントを作成する
Cloud Shell で、次のコマンドを実行します。ここで、PROJECT_ID はプロジェクト ID に置き換えます。
projectid=PROJECT_ID gcloud config set project ${projectid}onprem-user-managed-saという名前のサービス アカウントを作成します。gcloud iam service-accounts create onprem-user-managed-sa \ --display-name="onprem-user-managed-sa-onprem-client"サービス アカウントに Agent Platform ユーザー(
roles/aiplatform.user)ロールを割り当てます。gcloud projects add-iam-policy-binding $projectid \ --member="serviceAccount:onprem-user-managed-sa@$projectid.iam.gserviceaccount.com" \ --role="roles/aiplatform.user"サービス アカウントに Storage オブジェクト閲覧者(
storage.objectViewer)ロールを割り当てます。gcloud projects add-iam-policy-binding $projectid \ --member="serviceAccount:onprem-user-managed-sa@$projectid.iam.gserviceaccount.com" \ --role="roles/storage.objectViewer"
on-prem-client VM インスタンスを作成する
作成する VM インスタンスには外部 IP アドレスがなく、インターネット経由の直接アクセスは許可されません。VM への管理者権限を有効にするには、Identity-Aware Proxy(IAP)TCP 転送を使用します。
Cloud Shell で、
on-prem-clientVM インスタンスを作成します。gcloud compute instances create on-prem-client \ --zone=us-central1-a \ --image-family=debian-11 \ --image-project=debian-cloud \ --subnet=onprem-vpc-subnet1 \ --scopes=https://www.googleapis.com/auth/cloud-platform \ --no-address \ --shielded-secure-boot \ --service-account=onprem-user-managed-sa@$projectid.iam.gserviceaccount.com \ --metadata startup-script="#! /bin/bash sudo apt-get update sudo apt-get install tcpdump dnsutils -y"IAP が VM インスタンスに接続できるようにするファイアウォール ルールを作成します。
gcloud compute firewall-rules create ssh-iap-on-prem-vpc \
  --network onprem-vpc \
  --allow tcp:22 \
  --source-ranges=35.235.240.0/20
Agent Platform API への一般公開アクセスを確認する
このセクションでは、dig ユーティリティを使用して、on-prem-client VM インスタンスから Agent Platform API(us-central1-aiplatform.googleapis.com)への DNS ルックアップを実行します。dig の出力から、デフォルトのアクセスでは、Agent Platform API へのアクセスにパブリック VIP のみが使用されていることがわかります。
次のセクションでは、Gemini Enterprise Agent Platform API へのプライベート アクセスを構成します。
Cloud Shell で、IAP を使用して
on-prem-clientVM インスタンスにログインします。gcloud compute ssh on-prem-client \ --zone=us-central1-a \ --tunnel-through-iapon-prem-clientVM インスタンスで、digコマンドを実行します。dig us-central1-aiplatform.googleapis.com次のような
digの出力が表示されるはずです。ここで、ANSWER SECTION の IP アドレスは、パブリック IP アドレスです。; <<>> DiG 9.16.44-Debian <<>> us-central1.aiplatfom.googleapis.com ;; global options: +cmd ;; Got answer: ;; ->>HEADER<<- opcode: QUERY, status: NOERROR, id: 42506 ;; flags: qr rd ra; QUERY: 1, ANSWER: 16, AUTHORITY: 0, ADDITIONAL: 1 ;; OPT PSEUDOSECTION: ; EDNS: version: 0, flags:; udp: 512 ;; QUESTION SECTION: ;us-central1.aiplatfom.googleapis.com. IN A ;; ANSWER SECTION: us-central1.aiplatfom.googleapis.com. 300 IN A 173.194.192.95 us-central1.aiplatfom.googleapis.com. 300 IN A 142.250.152.95 us-central1.aiplatfom.googleapis.com. 300 IN A 172.217.219.95 us-central1.aiplatfom.googleapis.com. 300 IN A 209.85.146.95 us-central1.aiplatfom.googleapis.com. 300 IN A 209.85.147.95 us-central1.aiplatfom.googleapis.com. 300 IN A 142.250.125.95 us-central1.aiplatfom.googleapis.com. 300 IN A 142.250.136.95 us-central1.aiplatfom.googleapis.com. 300 IN A 142.250.148.95 us-central1.aiplatfom.googleapis.com. 300 IN A 209.85.200.95 us-central1.aiplatfom.googleapis.com. 300 IN A 209.85.234.95 us-central1.aiplatfom.googleapis.com. 300 IN A 142.251.171.95 us-central1.aiplatfom.googleapis.com. 300 IN A 108.177.112.95 us-central1.aiplatfom.googleapis.com. 300 IN A 142.250.128.95 us-central1.aiplatfom.googleapis.com. 300 IN A 142.251.6.95 us-central1.aiplatfom.googleapis.com. 300 IN A 172.217.212.95 us-central1.aiplatfom.googleapis.com. 300 IN A 74.125.124.95 ;; Query time: 8 msec ;; SERVER: 169.254.169.254#53(169.254.169.254) ;; WHEN: Wed Sep 27 04:10:16 UTC 2023 ;; MSG SIZE rcvd: 321
Agent Platform API へのプライベート アクセスを構成して確認する
このセクションでは、バッチ推論リクエストを送信するときに PSC エンドポイントにリダイレクトされるように、Agent Platform API へのプライベート アクセスを構成します。PSC エンドポイントは、これらの非公開リクエストを Gemini Enterprise Agent Platform バッチ推論 REST API に転送します。
PSC エンドポイントを指すように /etc/hosts ファイルを更新する
このステップでは、/etc/hosts ファイルに、パブリック サービス エンドポイント(us-central1-aiplatform.googleapis.com)に送信されたリクエストを PSC エンドポイント(192.168.0.1)にリダイレクトする行を追加します。
on-prem-clientVM インスタンスで、テキスト エディタ(vimやnanoなど)を使用して/etc/hostsファイルを開きます。sudo vim /etc/hosts次の行をファイルに追加します。
192.168.0.1 us-central1-aiplatform.googleapis.comこの行では、PSC エンドポイントの IP アドレス(
192.168.0.1)を Gemini Enterprise Agent Platform Google API の完全修飾ドメイン名(us-central1-aiplatform.googleapis.com)に割り当てています。編集されたファイルは、次のようになります。
127.0.0.1       localhost
::1             localhost ip6-localhost ip6-loopback
ff02::1         ip6-allnodes
ff02::2         ip6-allrouters

192.168.0.1 us-central1-aiplatform.googleapis.com  # Added by you
172.16.10.6 on-prem-client.us-central1-a.c.vertex-genai-400103.internal on-prem-client  # Added by Google
169.254.169.254 metadata.google.internal  # Added by Google
次のようにファイルを保存します。
vimを使用している場合は、Escキーを押してから、「:wq」と入力してファイルを保存し、終了します。nanoを使用している場合は、「Control+O」と入力してEnterを押してファイルを保存し、「Control+X」と入力して終了します。
次のように Gemini Enterprise Agent Platform エンドポイントに ping を送信します。
ping us-central1-aiplatform.googleapis.compingコマンドでは、次の出力が返されます。192.168.0.1は、PSC エンドポイントの IP アドレスです。PING us-central1-aiplatform.googleapis.com (192.168.0.1) 56(84) bytes of data.「
Control+C」と入力してpingを終了します。「
exit」と入力してon-prem-clientVM インスタンスを終了します。
Vertex AI Workbench 用のユーザー管理のサービス アカウントを vertex-networking-vpc に作成する
このセクションでは、Vertex AI Workbench インスタンスへのアクセスを制御するために、ユーザー管理のサービス アカウントを作成し、サービス アカウントに IAM ロールを割り当てます。インスタンスを作成するときに、サービス アカウントを指定します。
Cloud Shell で、次のコマンドを実行します。ここで、PROJECT_ID はプロジェクト ID に置き換えます。
projectid=PROJECT_ID gcloud config set project ${projectid}workbench-saという名前のサービス アカウントを作成します。gcloud iam service-accounts create workbench-sa \ --display-name="workbench-sa"サービス アカウントに Agent Platform ユーザー(
roles/aiplatform.user)の IAM ロールを割り当てます。gcloud projects add-iam-policy-binding $projectid \ --member="serviceAccount:workbench-sa@$projectid.iam.gserviceaccount.com" \ --role="roles/aiplatform.user"サービス アカウントに BigQuery ユーザー(
roles/bigquery.user)の IAM ロールを割り当てます。gcloud projects add-iam-policy-binding $projectid \ --member="serviceAccount:workbench-sa@$projectid.iam.gserviceaccount.com" \ --role="roles/bigquery.user"サービス アカウントにストレージ管理者(
roles/storage.admin)の IAM ロールを割り当てます。gcloud projects add-iam-policy-binding $projectid \ --member="serviceAccount:workbench-sa@$projectid.iam.gserviceaccount.com" \ --role="roles/storage.admin"サービス アカウントに ログ閲覧者(
roles/logging.viewer)の IAM ロールを割り当てます。gcloud projects add-iam-policy-binding $projectid \ --member="serviceAccount:workbench-sa@$projectid.iam.gserviceaccount.com" \ --role="roles/logging.viewer"
Agent Platform Workbench インスタンスを作成する
Cloud Shell で、
workbench-saサービス アカウントを指定して Agent Platform Workbench インスタンスを作成します。gcloud workbench instances create workbench-tutorial \ --vm-image-project=deeplearning-platform-release \ --vm-image-family=common-cpu-notebooks \ --machine-type=n1-standard-4 \ --location=us-central1-a \ --subnet-region=us-central1 \ --shielded-secure-boot=True \ --subnet=workbench-subnet \ --disable-public-ip \ --service-account-email=workbench-sa@$projectid.iam.gserviceaccount.comGoogle Cloud コンソールで、[Gemini Enterprise Agent Platform Workbench] ページの [インスタンス] タブに移動します。
Agent Platform Workbench インスタンス名(
workbench-tutorial)の横にある [JupyterLab を開く] をクリックします。Agent Platform Workbench インスタンスで JupyterLab が開きます。
[File] > [New] > [Notebook] の順に選択します。
[Select Kernel] メニューから [Python 3 (Local)] を選択し、[Select] をクリックします。
新しいノートブックが開き、コードを入力するデフォルトのコードセルが表示されます。
[ ]:の後にテキスト フィールドが続いている形式です。テキスト フィールドにコードを貼り付けます。Agent Platform SDK for Python をインストールするには、次のコードをセルに貼り付け、[ Run the selected cells and advance] をクリックします。
!pip3 install --upgrade google-cloud-bigquery scikit-learn==1.2このステップと以下の各ステップでは、[ Insert a cell below] を選択し、コードをセルに貼り付けて、[ Run selected cells and advance] をクリックします。
この Jupyter ランタイムで新しくインストールされたパッケージを使用するには、ランタイムを再起動する必要があります。
# Restart kernel after installs so that your environment can access the new packages
import IPython

app = IPython.Application.instance()
app.kernel.do_shutdown(True)
JupyterLab ノートブックで次の環境変数を設定します。PROJECT_ID は、実際のプロジェクト ID に置き換えます。
# set project ID and location
PROJECT_ID = "PROJECT_ID"
REGION = "us-central1"
トレーニング ジョブのステージング用に Cloud Storage バケットを作成します。
BUCKET_NAME = f"{PROJECT_ID}-ml-staging"
BUCKET_URI = f"gs://{BUCKET_NAME}"
!gcloud storage buckets create {BUCKET_URI} --location={REGION} --project={PROJECT_ID}
トレーニング データを準備する
このセクションでは、推論モデルのトレーニングに使用するデータを準備します。
JupyterLab ノートブックで、BigQuery クライアントを作成します。
from google.cloud import bigquery
bq_client = bigquery.Client(project=PROJECT_ID)
BigQuery の
ml_datasets一般公開データセットからデータを取得します。DATA_SOURCE = "bigquery-public-data.ml_datasets.census_adult_income" # Define the SQL query to fetch the dataset query = f""" SELECT * FROM `{DATA_SOURCE}` LIMIT 20000 """ # Download the dataset to a dataframe df = bq_client.query(query).to_dataframe() df.head()sklearnライブラリを使用して、トレーニングとテスト用にデータを分割します。from sklearn.model_selection import train_test_split # Split the dataset X_train, X_test = train_test_split(df, test_size=0.3, random_state=43) # Print the shapes of train and test sets print(X_train.shape, X_test.shape)トレーニング データフレームとテスト データフレームをステージング バケットの CSV ファイルにエクスポートします。
X_train.to_csv(f"{BUCKET_URI}/train.csv",index=False, quoting=1, quotechar='"')
X_test[[i for i in X_test.columns if i != "income_bracket"]].iloc[:20].to_csv(f"{BUCKET_URI}/test.csv",index=False,quoting=1, quotechar='"')
トレーニング アプリケーションを準備する
このセクションでは、Python トレーニング アプリケーションを作成してビルドし、ステージング バケットに保存します。
JupyterLab ノートブックで、トレーニング アプリケーション ファイル用の新しいフォルダを作成します。
!mkdir -p training_package/trainerJupyterLab のナビゲーション メニューに
training_packageというフォルダが表示されます。モデルをトレーニングしてファイルにエクスポートするための特徴、ターゲット、ラベル、ステップを定義します。
%%writefile training_package/trainer/task.py
from sklearn.ensemble import RandomForestClassifier
from sklearn.feature_selection import SelectKBest
from sklearn.pipeline import FeatureUnion, Pipeline
from sklearn.preprocessing import LabelBinarizer
import pandas as pd
import argparse
import joblib
import os

TARGET = "income_bracket"
# Define the feature columns that you use from the dataset
COLUMNS = (
  "age",
  "workclass",
  "functional_weight",
  "education",
  "education_num",
  "marital_status",
  "occupation",
  "relationship",
  "race",
  "sex",
  "capital_gain",
  "capital_loss",
  "hours_per_week",
  "native_country",
)

# Categorical columns are columns that have string values and
# need to be turned into a numerical value to be used for training
CATEGORICAL_COLUMNS = (
  "workclass",
  "education",
  "marital_status",
  "occupation",
  "relationship",
  "race",
  "sex",
  "native_country",
)

# load the arguments
parser = argparse.ArgumentParser()
parser.add_argument('--training-dir', dest='training_dir', default=os.getenv('AIP_MODEL_DIR'), type=str,help='get the staging directory')
args = parser.parse_args()

# Load the training data
X_train = pd.read_csv(os.path.join(args.training_dir,"train.csv"))
# Remove the column we are trying to predict ('income-level') from our features list
# Convert the Dataframe to a lists of lists
train_features = X_train.drop(TARGET, axis=1).to_numpy().tolist()
# Create our training labels list, convert the Dataframe to a lists of lists
train_labels = X_train[TARGET].to_numpy().tolist()

# Since the census data set has categorical features, we need to convert
# them to numerical values. We'll use a list of pipelines to convert each
# categorical column and then use FeatureUnion to combine them before calling
# the RandomForestClassifier.
categorical_pipelines = []

# Each categorical column needs to be extracted individually and converted to a numerical value.
# To do this, each categorical column will use a pipeline that extracts one feature column via
# SelectKBest(k=1) and a LabelBinarizer() to convert the categorical value to a numerical one.
# A scores array (created below) will select and extract the feature column. The scores array is
# created by iterating over the COLUMNS and checking if it is a CATEGORICAL_COLUMN.
for i, col in enumerate(COLUMNS):
   if col in CATEGORICAL_COLUMNS:
      # Create a scores array to get the individual categorical column.
      # Example:
      #  data = [39, 'State-gov', 77516, 'Bachelors', 13, 'Never-married', 'Adm-clerical',
      #         'Not-in-family', 'White', 'Male', 2174, 0, 40, 'United-States']
      #  scores = [0, 1, 0, 0, 0, 0, 0, 0, 0, 0, 0, 0, 0, 0]
      #
      # Returns: [['Sate-gov']]
      scores = []
      # Build the scores array
      for j in range(len(COLUMNS)):
         if i == j:  # This column is the categorical column we want to extract.
            scores.append(1)  # Set to 1 to select this column
         else:  # Every other column should be ignored.
            scores.append(0)
      skb = SelectKBest(k=1)
      skb.scores_ = scores
      # Convert the categorical column to a numerical value
      lbn = LabelBinarizer()
      r = skb.transform(train_features)
      lbn.fit(r)
      # Create the pipeline to extract the categorical feature
      categorical_pipelines.append(
         (
            "categorical-{}".format(i),
            Pipeline([("SKB-{}".format(i), skb), ("LBN-{}".format(i), lbn)]),
         )
      )

# Create pipeline to extract the numerical features
skb = SelectKBest(k=6)
# From COLUMNS use the features that are numerical
skb.scores_ = [1, 0, 1, 0, 1, 0, 0, 0, 0, 0, 1, 1, 1, 0]
categorical_pipelines.append(("numerical", skb))

# Combine all the features using FeatureUnion
preprocess = FeatureUnion(categorical_pipelines)

# Create the classifier
classifier = RandomForestClassifier()

# Transform the features and fit them to the classifier
classifier.fit(preprocess.transform(train_features), train_labels)

# Create the overall model as a single pipeline
pipeline = Pipeline([("union", preprocess), ("classifier", classifier)])

# Save the model pipeline
joblib.dump(pipeline, os.path.join(args.training_dir,"model.joblib"))
各サブディレクトリに
__init__.pyファイルを作成し、パッケージにします。!touch training_package/__init__.py !touch training_package/trainer/__init__.pyPython パッケージの設定スクリプトを作成します。
%%writefile training_package/setup.py from setuptools import find_packages from setuptools import setup setup( name='trainer', version='0.1', packages=find_packages(), include_package_data=True, description='Training application package for census income classification.' )sdistコマンドを使用して、トレーニング アプリケーションのソース ディストリビューションを作成します。!cd training_package && python setup.py sdist --formats=gztarPython パッケージをステージング バケットにコピーします。
!gcloud storage cp training_package/dist/trainer-0.1.tar.gz $BUCKET_URI/ステージング バケットに次の 3 つのファイルがあることを確認します。
!gcloud storage ls $BUCKET_URI出力は次のようになります。
gs://$BUCKET_NAME/test.csv
gs://$BUCKET_NAME/train.csv
gs://$BUCKET_NAME/trainer-0.1.tar.gz
モデルのトレーニング
このセクションでは、カスタム トレーニング ジョブを作成して実行して、モデルをトレーニングします。
JupyterLab ノートブックで、次のコマンドを実行してカスタム トレーニング ジョブを作成します。
!gcloud ai custom-jobs create --display-name=income-classification-training-job \
   --project=$PROJECT_ID \
   --worker-pool-spec=replica-count=1,machine-type='e2-highmem-2',executor-image-uri='us-docker.pkg.dev/vertex-ai/training/sklearn-cpu.1-0:latest',python-module=trainer.task \
   --python-package-uris=$BUCKET_URI/trainer-0.1.tar.gz \
   --args="--training-dir","/gcs/$BUCKET_NAME" \
   --region=$REGION
出力は次のようになります。各カスタム ジョブ パスの最初の番号はプロジェクト番号(PROJECT_NUMBER)、2 番目の番号はカスタムジョブ ID(CUSTOM_JOB_ID)です。次のステップで使用できるように、これらの番号をメモしておきます。
Using endpoint [https://us-central1-aiplatform.googleapis.com/]
CustomJob [projects/721032480027/locations/us-central1/customJobs/1100328496195960832] is submitted successfully.

Your job is still active. You may view the status of your job with the command

$ gcloud ai custom-jobs describe projects/721032480027/locations/us-central1/customJobs/1100328496195960832

or continue streaming the logs with the command

$ gcloud ai custom-jobs stream-logs projects/721032480027/locations/us-central1/customJobs/1100328496195960832
カスタム トレーニング ジョブを実行し、ジョブの実行中にはログをストリーミングして進行状況を表示します。
!gcloud ai custom-jobs stream-logs projects/PROJECT_NUMBER/locations/us-central1/customJobs/CUSTOM_JOB_ID次の値を置き換えます。
- PROJECT_NUMBER: 前のコマンドの出力から取得したプロジェクト番号
- CUSTOM_JOB_ID: 前のコマンドの出力から取得したカスタムジョブ ID
カスタム トレーニング ジョブが実行中です。完了には、約 10 分かかります。
ジョブが完了したら、ステージング バケットから Gemini Enterprise Agent Platform Model Registry にモデルをインポートできます。
モデルをインポートする
カスタム トレーニング ジョブでは、トレーニング済みのモデルをステージング バケットにアップロードします。ジョブが完了すると、バケットから Gemini Enterprise Agent Platform Model Registry にモデルをインポートできます。
JupyterLab ノートブックで、次のコマンドを実行してモデルをインポートします。
!gcloud ai models upload --container-image-uri="us-docker.pkg.dev/vertex-ai/prediction/sklearn-cpu.1-2:latest" \
   --display-name=income-classifier-model \
   --artifact-uri=$BUCKET_URI \
   --project=$PROJECT_ID \
   --region=$REGION
次のように、プロジェクト内の Gemini Enterprise Agent Platform モデルを一覧表示します。
!gcloud ai models list --region=us-central1出力は次のようになります。2 つ以上のモデルがリストされている場合、リストの最初のモデルが最後にインポートしたモデルです。
MODEL_ID 列の値をメモします。バッチ推論リクエストの作成に必要です。
Using endpoint [https://us-central1-aiplatform.googleapis.com/]
MODEL_ID             DISPLAY_NAME
1871528219660779520  income-classifier-model
または、次のようにプロジェクト内のモデルを一覧表示することもできます。
Google Cloud コンソールの [Agent Platform] セクションで、[Gemini Enterprise Agent Platform Model Registry] ページに移動します。
Gemini Enterprise Agent Platform の [Model Registry] ページに移動
モデル ID やモデルのその他の詳細を表示するには、モデル名をクリックして、[バージョンの詳細] タブをクリックします。
モデルからバッチ推論を取得する
これで、モデルからバッチ推論をリクエストできるようになりました。バッチ推論リクエストは on-prem-client VM インスタンスから行われます。
バッチ推論リクエストを作成する
このステップでは、ssh を使用して on-prem-client VM インスタンスにログインします。VM インスタンスで、request.json という名前のテキスト ファイルを作成します。このファイルには、バッチ推論を取得するためにモデルに送信するサンプル curl リクエストのペイロードが含まれます。
Cloud Shell で、次のコマンドを実行します。ここで、PROJECT_ID はプロジェクト ID に置き換えます。
projectid=PROJECT_ID gcloud config set project ${projectid}sshを使用してon-prem-clientVM インスタンスにログインします。gcloud compute ssh on-prem-client \ --project=$projectid \ --zone=us-central1-aon-prem-clientVM インスタンスで、vimやnanoなどのテキスト エディタを使用して、次のテキストを含むrequest.jsonという名前の新しいファイルを作成します。{ "displayName": "income-classification-batch-job", "model": "projects/PROJECT_ID/locations/us-central1/models/MODEL_ID", "inputConfig": { "instancesFormat": "csv", "gcsSource": { "uris": ["BUCKET_URI/test.csv"] } }, "outputConfig": { "predictionsFormat": "jsonl", "gcsDestination": { "outputUriPrefix": "BUCKET_URI" } }, "dedicatedResources": { "machineSpec": { "machineType": "n1-standard-4", "acceleratorCount": "0" }, "startingReplicaCount": 1, "maxReplicaCount": 2 } }次の値を置き換えます。
- PROJECT_ID: プロジェクト ID
- MODEL_ID: モデルのモデル ID
- BUCKET_URI: モデルをステージングしたストレージ バケットの URI
次のコマンドを実行して、バッチ推論リクエストを送信します。
curl -X POST \
   -H "Authorization: Bearer $(gcloud auth print-access-token)" \
   -H "Content-Type: application/json; charset=utf-8" \
   -d @request.json \
   "https://us-central1-aiplatform.googleapis.com/v1/projects/PROJECT_ID/locations/us-central1/batchPredictionJobs"
PROJECT_ID は、実際のプロジェクト ID に置き換えます。
レスポンスに次の行が表示されます。
"state": "JOB_STATE_PENDING"バッチ推論ジョブが非同期で実行中です。実行には約 20 分かかります。
Google Cloud コンソールの Agent Platform セクションで、[バッチ予測] ページに移動します。
バッチ推論ジョブの実行中は、ステータスは
Runningになります。完了すると、ステータスはFinishedに変わります。バッチ推論ジョブの名前(
income-classification-batch-job)をクリックし、詳細ページの [エクスポート ロケーション] リンクをクリックして、Cloud Storage でバッチジョブの出力ファイルを表示します。別の方法としては、(Cloud Storage で予測出力を表示します)アイコン([最終更新日] 列と (操作)メニューの間)をクリックします。
prediction.results-00000-of-00002またはprediction.results-00001-of-00002のファイルリンクをクリックし、[認証済み URL] リンクをクリックしてファイルを開きます。バッチ推論ジョブの出力は次のようになります。
{"instance": ["27", " Private", "391468", " 11th", "7", " Divorced", " Craft-repair", " Own-child", " White", " Male", "0", "0", "40", " United-States"], "prediction": " <=50K"}
{"instance": ["47", " Self-emp-not-inc", "192755", " HS-grad", "9", " Married-civ-spouse", " Machine-op-inspct", " Wife", " White", " Female", "0", "0", "20", " United-States"], "prediction": " <=50K"}
{"instance": ["32", " Self-emp-not-inc", "84119", " HS-grad", "9", " Married-civ-spouse", " Craft-repair", " Husband", " White", " Male", "0", "0", "45", " United-States"], "prediction": " <=50K"}
{"instance": ["32", " Private", "236543", " 12th", "8", " Divorced", " Protective-serv", " Own-child", " White", " Male", "0", "0", "54", " Mexico"], "prediction": " <=50K"}
{"instance": ["60", " Private", "160625", " HS-grad", "9", " Married-civ-spouse", " Prof-specialty", " Husband", " White", " Male", "5013", "0", "40", " United-States"], "prediction": " <=50K"}
{"instance": ["34", " Local-gov", "22641", " HS-grad", "9", " Never-married", " Protective-serv", " Not-in-family", " Amer-Indian-Eskimo", " Male", "0", "0", "40", " United-States"], "prediction": " <=50K"}
{"instance": ["32", " Private", "178623", " HS-grad", "9", " Never-married", " Other-service", " Not-in-family", " Black", " Female", "0", "0", "40", " ?"], "prediction": " <=50K"}
{"instance": ["28", " Private", "54243", " HS-grad", "9", " Divorced", " Transport-moving", " Not-in-family", " White", " Male", "0", "0", "60", " United-States"], "prediction": " <=50K"}
{"instance": ["29", " Local-gov", "214385", " 11th", "7", " Divorced", " Other-service", " Unmarried", " Black", " Female", "0", "0", "20", " United-States"], "prediction": " <=50K"}
{"instance": ["49", " Self-emp-inc", "213140", " HS-grad", "9", " Married-civ-spouse", " Exec-managerial", " Husband", " White", " Male", "0", "1902", "60", " United-States"], "prediction": " >50K"}
クリーンアップ
このチュートリアルで使用したリソースについて、 Google Cloud アカウントに課金されないようにするには、リソースを含むプロジェクトを削除するか、プロジェクトを維持して個々のリソースを削除します。
Google Cloud コンソールで個々のリソースを削除するには、次の操作を行います。
次のようにバッチ推論ジョブを削除します。
Google Cloud コンソールの Agent Platform セクションで、[バッチ予測] ページに移動します。
バッチ推論ジョブの名前(
income-classification-batch-job)の横にある (操作)メニューをクリックし、[バッチ予測ジョブを削除] を選択します。
次のようにモデルを削除します。
Google Cloud コンソールの [Agent Platform] セクションで、[Model Registry] ページに移動します。
モデルの名前(
income-classifier-model)の横にある (操作)メニューをクリックし、[モデルを削除] を選択します。
次のように Agent Platform Workbench インスタンスを削除します。
Google Cloud コンソールの [Gemini Enterprise Agent Platform] セクションで、[ワークベンチ] ページの [インスタンス] タブに移動します。
workbench-tutorialAgent Platform Workbench インスタンスを選択して、削除アイコン をクリックします。
次の手順で Compute Engine VM インスタンスを削除します。
Google Cloud コンソールで、[Compute Engine] ページに移動します。
on-prem-clientVM インスタンスを選択し、削除アイコン をクリックします。
次の手順で VPN トンネルを削除します。
Google Cloud コンソールで、[VPN] ページに移動します。
[VPN] ページで、[Cloud VPN トンネル] タブをクリックします。
VPN トンネルのリストで、このチュートリアルで作成した 4 つの VPN トンネルを選択し、削除アイコン をクリックします。
次の手順で HA VPN ゲートウェイを削除します。
[VPN] ページで、[Cloud VPN ゲートウェイ] タブをクリックします。
VPN ゲートウェイのリストで
onprem-vpn-gw1をクリックします。[Cloud VPN ゲートウェイの詳細] ページで、VPN ゲートウェイの削除アイコン をクリックします。
必要に応じて、矢印 をクリックして VPN ゲートウェイのリストに戻り、
vertex-networking-vpn-gw1をクリックします。[Cloud VPN ゲートウェイの詳細] ページで、VPN ゲートウェイの削除アイコン をクリックします。
次の手順で Cloud Router を削除します。
[Cloud Router] ページに移動します。
Cloud Router のリストで、このチュートリアルで作成した 4 つのルーターを選択します。
削除アイコン をクリックして、ルーターを削除します。
これにより、Cloud Router に接続されている 2 つの Cloud NAT ゲートウェイも削除されます。
次の手順で
vertex-networking-vpcVPC ネットワークのpscvertex転送ルールを削除します。[ロード バランシング] ページの [フロントエンド] タブに移動します。
転送ルールのリストで
pscvertexをクリックします。[転送ルールの詳細] ページで、削除アイコン をクリックします。
次の手順で VPC ネットワークを削除します。
[VPC ネットワーク] ページに移動します。
VPC ネットワークのリストで
onprem-vpcをクリックします。[VPC ネットワークの詳細] ページで、VPC ネットワークを削除アイコン をクリックします。
ネットワークを削除すると、そのサブネットワーク、ルート、ファイアウォール ルールも削除されます。
VPC ネットワークのリストで
vertex-networking-vpcをクリックします。[VPC ネットワークの詳細] ページで、VPC ネットワークを削除アイコン をクリックします。
次のようにストレージ バケットを削除します。
Google Cloud コンソールで、[Cloud Storage] ページに移動します。
ストレージ バケットを選択して、削除アイコン をクリックします。
次のように、
workbench-saサービス アカウントとonprem-user-managed-saサービス アカウントを削除します。[サービス アカウント] ページに移動します。
onprem-user-managed-saサービス アカウントとworkbench-saサービス アカウントを選択し、(削除)をクリックします。
次のステップ
- Gemini Enterprise Agent Platform のエンドポイントとサービスにアクセスするためのエンタープライズ ネットワーキング オプションについて学習する。
- Private Service Connect の仕組みと、大きなパフォーマンス上のメリットが得られる理由を確認する。
- VPC Service Controls を使用して安全な境界を作成する方法を確認して、オンライン推論エンドポイントで Gemini Enterprise Agent Platform と他の Google API へのアクセスを許可または拒否する。
- 大規模な環境と本番環境で
/etc/hostsファイルを更新せずに DNS 転送ゾーンを使用する方法と理由を確認する。