

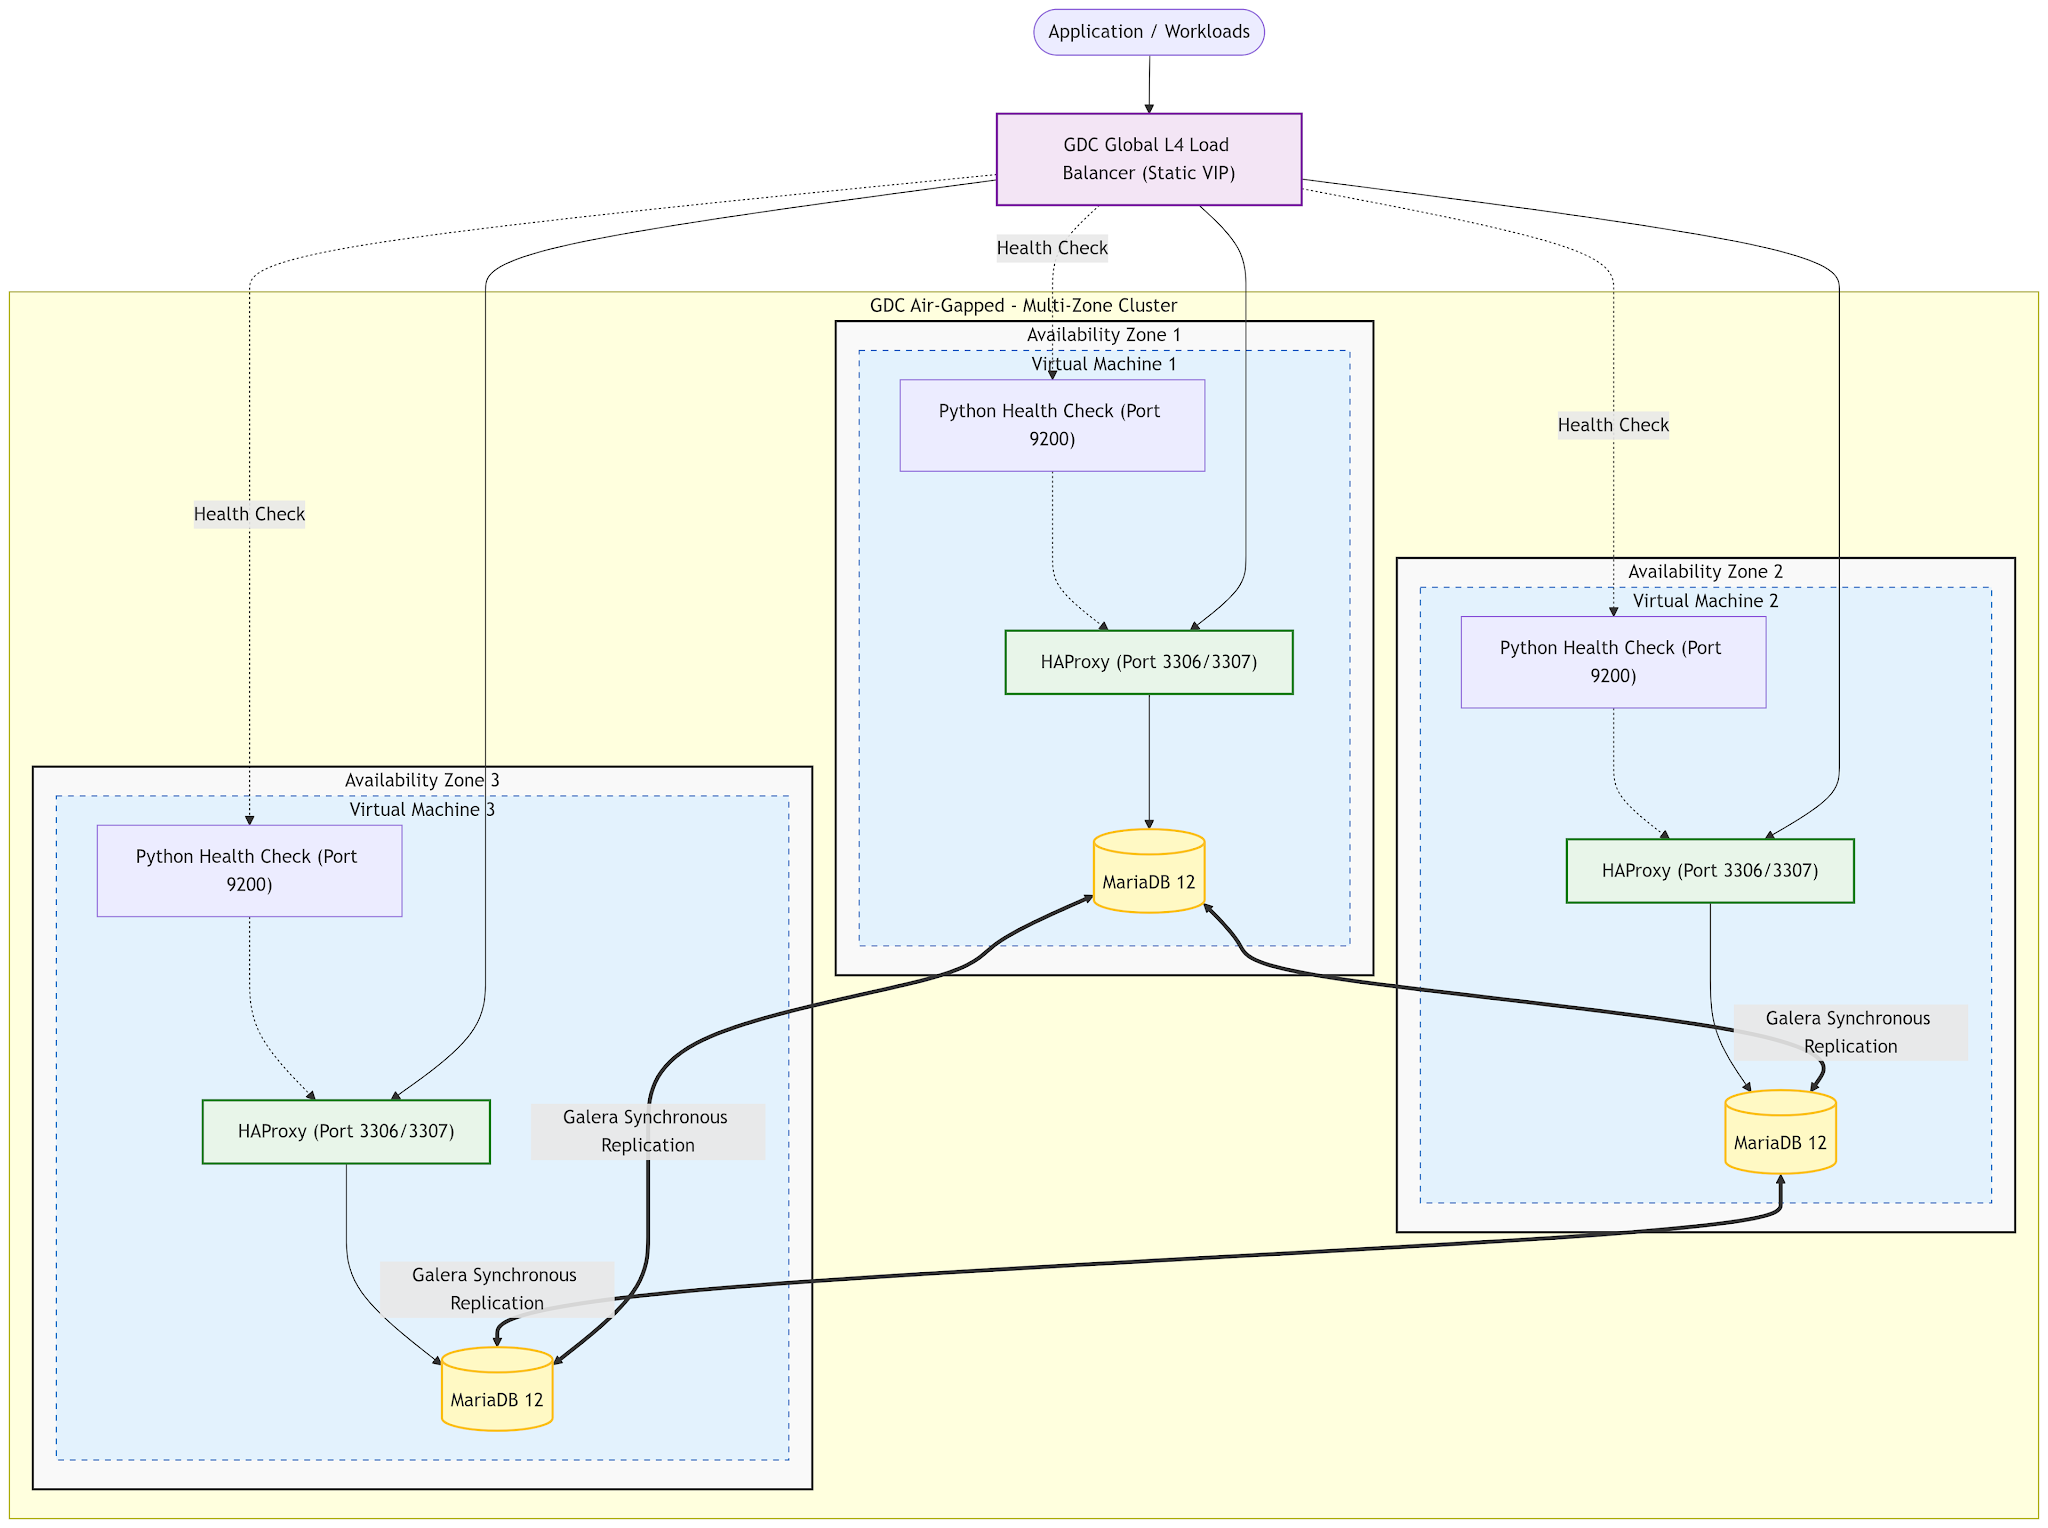
This guide provides a comprehensive, step-by-step tutorial for deploying a highly available MariaDB 12 cluster across three availability zones in a Google Distributed Cloud (GDC) air-gapped environment. This architecture leverages Galera for synchronous multi-master clustering, HAProxy for intelligent connection routing, and a lightweight Python health check service to manage node state. By strictly utilizing Virtual Machines (VMs), this implementation overtly bypasses the current GDC air-gapped limitations regarding cross-zone Kubernetes stretch clusters, ensuring full multi-zone resiliency without risking data loss.
This is the architecture diagram:
Before you begin
Deploy VMs
Follow Create and start a VM instance to create 3 Virtual Machines in the 3 available zones.
Configure your local environment to SSH the VMs with a key pair: Connect to a VM
This will be needed for manually SCP the packages: Transfer files
For verification we used Ubuntu 22.04 OS, and n3-standard-2-gdc machine type.
For a production environment, use a machine type with more resources.
Obtain the IPs of the VMs using:
VM_NAME=$1

if [[ -z "$VM_NAME" ]]; then
  echo "Error: VM_NAME must be provided."
  echo "Usage: $0 <VM_NAME>"
  exit 1
fi

# 1. Get External IP from 'instances list'
EXT_IP=$(gdcloud compute instances list | awk -v vm="${VM_NAME}" '$1 == vm {print $5}')

if [[ -z "$EXT_IP" ]]; then
  echo "Error: Could not find VM '${VM_NAME}' in the instance list."
  exit 1
fi

INTERNAL_IP=$(gdcloud compute instances describe "${VM_NAME}" | awk '/^status:/ {in_status=1} in_status && /- [0-9]+\.[0-9]+\.[0-9]+\.[0-9]+/ {print $2; exit}' | cut -d'/' -f1)

if [[ -z "$INTERNAL_IP" ]]; then
  INTERNAL_IP="<Not assigned or not found>"
fi

echo "${VM_NAME}"
echo "External IP: ${EXT_IP}"
echo "Internal IP: ${INTERNAL_IP}"
Configure environment variables
Throughout this guide, you will use the following environment variables. Set them in your local workstation shell session:
export PROJECT_ID="your-project-id"
export VM1_NAME="db-node-1"
export VM2_NAME="db-node-2"
export VM3_NAME="db-node-3"
export VM1_IP="10.0.1.245" # Zone 1
export VM2_IP="10.0.1.241" # Zone 2
export VM3_IP="10.0.1.242" # Zone 3
Network configuration (Project Network Policy)
In case you need to reach the DB outside the project or outside the organization, remember to set up the PNP (Project Network Policy) accordingly.
Follow the sections of PNP Overview depending on the use case.
Air-gapped software preparation
Since the target VMs do not have internet access, you must download the artifacts on a connected workstation first.
Download packages via Docker
Run the following from your local workstation using an Ubuntu Docker container:
mkdir -p ./packages
docker run --rm -v "$(pwd)/packages:/packages" ubuntu:22.04 bash -c "
  apt-get update
  apt-get install curl
  curl -LsS https://r.mariadb.com/downloads/mariadb_repo_setup | bash
  apt-get update
  cd packages
  PACKAGES='mariadb-server mariadb-client mariadb-common mysql-common'
  apt-get download \$(apt-cache depends --recurse --no-recommends --no-suggests --no-conflicts --no-breaks --no-replaces --no-enhances --no-pre-depends \${PACKAGES} | grep '^\w')
  apt-get download libpam-modules-bin
"
Transfer and install
Upload the downloaded .deb files to /tmp/packages/ on all 3 VMs and install
them:
# From local workstation
scp ./packages/*.deb ${VM1_IP}:/tmp/packages/
scp ./packages/*.deb ${VM2_IP}:/tmp/packages/
scp ./packages/*.deb ${VM3_IP}:/tmp/packages/

# On each VM, run:
sudo apt update
sudo dpkg -i /tmp/packages/*.deb
Make sure the dpkg returns no errors. If it does, check the logs to see what
deb packages you may be missing and include them in the download.
MariaDB and Galera initialization
Configure Galera on all VMs
First stop mariadb server:
sudo systemctl stop mariadb
To prevent port conflicts with HAProxy (which will own 3306), change the
MariaDB default port to 3308. Edit /etc/mysql/mariadb.conf.d/60-galera.cnf
on all VMs:
[mysqld]
bind-address = 0.0.0.0
port = 3308
binlog_format = ROW
default-storage-engine = innodb
innodb_autoinc_lock_mode = 2

# Galera Provider Configuration
wsrep_on = ON
wsrep_provider = /usr/lib/galera/libgalera_smm.so
wsrep_cluster_name = "mariadb-ha-cluster"
wsrep_cluster_address = "gcomm://${VM1_IP},${VM2_IP},${VM3_IP}" # explicitly set the IPs, do not leave bash syntax / environment variable
wsrep_sst_method = rsync

# Node-specific (Update per VM)
wsrep_node_address = "${VM1_IP}" # explicitly set the IPs, do not leave bash syntax / environment variable. Change for VM 2 and VM 3
wsrep_node_name = "db-node-1"     # Change for VM 2 and VM 3
Bootstrap the cluster
On VM 1 ONLY, initialize the new cluster:
sudo galera_new_cluster
Join replicas
Once VM 1 is successfully running, start the MariaDB service on VM 2 and VM 3 sequentially:
sudo systemctl start mariadb
Note: Wait for each node to fully sync before starting the next.
Verify that HA DB is up and running
On any VM run:
sudo mariadb
And then:
MariaDB [(none)]> SHOW STATUS LIKE 'wsrep_cluster_size';
+--------------------+-------+
| Variable_name      | Value |
+--------------------+-------+
| wsrep_cluster_size | 3     |
+--------------------+-------+
1 row in set (0.001 sec)
The expected value is 3.
The Python health check
We will use Python's built-in http.server library and wrap it in a systemd
service so it runs automatically in the background on port 9200.
Create DB user
In one VM run:
CREATE USER 'clustercheck_user'@'localhost' IDENTIFIED BY 'clustercheck_password';
FLUSH PRIVILEGES;
Create the Python script
On all 3 VMs, create the script /usr/local/bin/clustercheck.py:
sudo nano /usr/local/bin/clustercheck.py
Paste this exact code:
#!/usr/bin/env python3
import mysql.connector
from http.server import BaseHTTPRequestHandler, HTTPServer

class HealthHandler(BaseHTTPRequestHandler):
    def do_GET(self):
        try:
            # Connect to backend MariaDB port 3308
            db = mysql.connector.connect(user='clustercheck_user', password='clustercheck_password', host='127.0.0.1', port=3308)
            cursor = db.cursor()
            cursor.execute("SHOW GLOBAL STATUS LIKE 'wsrep_local_state_comment'")
            state = cursor.fetchone()

            # Galera 'Synced' state means the node is fully healthy
            if state == 'Synced':
                self.send_response(200)
                self.end_headers()
                self.wfile.write(b"Node is Healthy and Synced.\n")
            else:
                self.send_response(503)
                self.end_headers()
                self.wfile.write(b"Node is unavailable.\n")
        except Exception as e:
            self.send_response(503)
            self.end_headers()

HTTPServer(('0.0.0.0', 9200), HealthHandler).serve_forever()
Make it executable:
sudo chmod +x /usr/local/bin/clustercheck.py
Create the systemd service
Create a service file to manage the Python script:
sudo nano /etc/systemd/system/clustercheck.service
Paste this configuration:
[Unit]
Description=MariaDB Galera Health Check
After=network.target mariadb.service

[Service]
Type=simple
User=root
ExecStart=/usr/local/bin/clustercheck.py
Restart=always

[Install]
WantedBy=multi-user.target
Enable and start the service:
sudo systemctl daemon-reload
sudo systemctl enable --now clustercheck.service
You can test it locally by running curl -i http://127.0.0.1:9200.
HAProxy configuration
Do the same procedure to get the haproxy packages and upload them in the VMs.
Then, configure the HAProxy config file on each node to handle traffic routing.
Configure HAProxy
Edit /etc/haproxy/haproxy.cfg on all VMs:
global
    log /dev/log local0
    user haproxy
    group haproxy
    daemon

defaults
    log global
    mode tcp
    option tcplog
    timeout connect 5000ms
    timeout client  50000ms
    timeout server  50000ms

# Write Port (Active/Backup)
listen galera_write
    bind *:3306
    mode tcp
    option httpchk GET /
    http-check expect status 200
    server db-node-1 10.0.1.245:3308 check port 9200
    server db-node-2 10.0.1.241:3308 check port 9200 backup
    server db-node-3 10.0.1.242:3308 check port 9200 backup

# Read Port (Round-Robin)
listen galera_read
    bind *:3307
    mode tcp
    balance roundrobin
    option httpchk GET /
    http-check expect status 200
    server db-node-1 10.0.1.245:3308 check port 9200
    server db-node-2 10.0.1.241:3308 check port 9200
    server db-node-3 10.0.1.242:3308 check port 9200
Important: Change the IPs and names to match yours.
Restart nodes one by one to safely apply changes:
sudo systemctl restart haproxy
sudo systemctl enable haproxy
Verify HAProxy routing behavior
Run the following commands to guarantee HAProxy is processing reads and writes according to our active/backup topology.
Verify Write Routing (Active/Backup): HAProxy is configured to send all port
3306traffic strictly to Node 1, unless Node 1 is dead. Run this command 3 or 4 times in a row from the terminal of VM 2 or VM 3:mysql -h 127.0.0.1 -P 3306 -u clustercheck_user -pclustercheck_password -e "SELECT @@hostname;"Expected Result: Every single time you run it, it should return the hostname of Node 1 (e.g.,
db-node-1). Even though you are querying the local HAProxy on VM 2 or 3, it is correctly forwarding the write connection across the network to Node 1.Verify Read Routing (Round-Robin): HAProxy is configured to distribute port
3307traffic evenly across all fully synced nodes. Run this command 3 or 4 times in a row:mysql -h 127.0.0.1 -P 3307 -u clustercheck_user -pclustercheck_password -e "SELECT @@hostname;"Expected Result: The output should cycle evenly through the hostnames of your cluster (e.g.,
db-node-1, thendb-node-2, thendb-node-3).
Global load balancer setup
Provide a single, stable Virtual IP (VIP) for your applications using the GDC Global L4 Load Balancer. Follow Configure internal global load balancers to setup the internal global L4 load balancer and setup your VMs to be the target of it: Setup VMs as load balancer target.
Automated failover testing
This is the most critical test. You need to prove that if a node crashes, the Python script catches it and HAProxy instantly reroutes the traffic.
Step A: Simulate a failure on Node 1: SSH into Node 1 and completely stop the database:
sudo systemctl stop mariadbStep B: Test the Write Port again: From VM 2 or VM 3, run the write test again:
mysql -h 127.0.0.1 -P 3306 -u clustercheck_user -pclustercheck_password -e "SELECT @@hostname;"Expected Result: It should instantly return Node 2 (
db-node-2). HAProxy realized Node 1 was dead via the Python script and promoted the first backup server.Step C: Test the Read Port again: Run the read test multiple times:
mysql -h 127.0.0.1 -P 3307 -u clustercheck_user -pclustercheck_password -e "SELECT @@hostname;"Expected Result: It should only cycle between Node 2 and Node 3. Node 1 has been completely removed from the rotation.
Step D: Recover and Verify Failback: Start MariaDB back up on Node 1:
sudo systemctl start mariadbWait a few seconds for it to sync (state 4), then run the Write test (Port 3306) one last time. HAProxy should automatically detect that Node 1 is healthy again and steal the write traffic back from Node 2.