
This document explains how to renew Unified Extensible Firmware Interface (UEFI) Secure Boot certificates on a virtual machine (VM) in Google Distributed Cloud (GDC) air-gapped.
UEFI Secure Boot is a security feature that ensures VM systems run authentic software by verifying the digital signature of all boot components. If verification fails, Secure Boot stops the VM boot process.
Microsoft uses security certificates to support Secure Boot across various operating systems. Some Secure Boot certificates are nearing their expiration date. To avoid system disruption, you must renew these certificates.
This document is for developers in platform administrator or application operator groups that configure Secure Boot on VMs in a Distributed Cloud environment. For more information, see Audiences for GDC air-gapped documentation.
Before you begin
All commands for Distributed Cloud use the gdcloud or kubectl CLI, and require an operating system (OS) environment. Ensure you download, install, and configure
the gdcloud CLI.
Get the kubeconfig file
To run commands against the management API server, ensure you have the following resources:
Sign in and generate the kubeconfig file for the management API server if you don't have one.
Use the path to the kubeconfig file of the management API server to replace
MANAGEMENT_API_SERVERin these instructions.
Request IAM roles
To update Secure Boot certificates on your VM, contact your Project IAM Admin to
request the Project VirtualMachine Admin (project-vm-admin) role.
All VM roles must bind to the namespace of the project where the VM resides. Follow the steps to verify your access.
Secure Boot certificates
All Secure Boot certificates have an expiration date. VMs with expired certificates will boot normally until you install the first security update for Windows Boot Manager or Linux shim. After any of those updates, the VM will fail to boot until you update the expired certificate.
Expiring certificates
The following table describes the final expiration date for the old Secure Boot certificates:
| Certificate name | Certifcate expiration date |
|---|---|
| Microsoft Corporation KEK CA 2011 | June 26, 2026 |
| Microsoft UEFI CA 2011 | June 26, 2026 |
| Microsoft Windows Production PCA 2011 | October 19, 2026 |
New certificates
The following table describes the final expiration date for the new Secure Boot certificates:
| Certificate name | Certifcate expiration date |
|---|---|
| Microsoft UEFI CA 2023 | May 2, 2038 |
| Microsoft Corporation KEK 2K CA 2023 | May 2, 2038 |
| Microsoft Option ROM UEFI CA 2023 | May 2, 2038 |
| Windows UEFI CA 2023 | May 2, 2053 |
Certificate renewal process
To perform a Secure Boot certificate renewal on a VM, you must opt-in using annotations and a controlled update. All new VMs created with old or new images after the update will have both certificates installed and will boot successfully.
Identify VMs and apply annotation
Identify affected VMs within a namespace or project. Once identified, apply the update annotation to the affected VM instances.
Use
kubectlto check theenableSecureBootstatus:kubectl --kubeconfig MANAGEMENT_API_SERVER get vms --all-namespaces -o \ custom-columns="NAMESPACE:.metadata.namespace,NAME:.metadata.name,SECURE_BOOT:.spec.shieldConfig.enableSecureBoot"Apply the annotation to the VM custom resource to mark the VM as ready for update. This enrolls certificates during the next VM reboot:
kubectl --kubeconfig MANAGEMENT_API_SERVER annotate virtualmachine VM_NAME -n VM_NAMESPACE virtualmachine.gdc.goog/enable-microsoft-2023-sbcert="true" --overwriteReplace the following variables:
VM_NAME:The name of the VM instance.VM_NAMESPACE: The name of the namespace where the VM resides.
Bulk apply the annotation to all VMs in a project:
kubectl --kubeconfig MANAGEMENT_API_SERVER annotate virtualmachine --all -n VM_NAMESPACE virtualmachine.gdc.goog/enable-microsoft-2023-sbcert="true" --overwriteYou can bulk apply the annotation label across all VMs in an organization as long as disk encryption isn't in use.
At the project-level, project owners can apply the label individually to eligible VMs.
To apply your changes, restart your VM:
kubectl --kubeconfig MANAGEMENT_API_SERVER patch VirtualMachine VM_NAME -n VM_NAMESPACE -p '{"spec":{"runningState":"Stopped"}}' --type=merge

kubectl --kubeconfig MANAGEMENT_API_SERVER patch VirtualMachine VM_NAME -n VM_NAMESPACE -p '{"spec":{"runningState":"Running"}}' --type=merge
Special Handling: BitLocker & FDE
You must perform the following tasks:
- Temporarily disable BitLocker, LUKS or any similar encryption solution.
- Ensure recovery keys are readily available and backups are current.
- Apply the Secure Boot update annotation mentioned in step 2 of the certificate renewal process section.
- Reboot the VM to enroll certificates.
- Re-enable BitLocker, LUKS, or FDE after you verify the update.
Disable BitLocker
Before applying the "virtualmachine.gdc.goog/enable-microsoft-2023-sbcert"
annotation, you must disable BitLocker on your VM. This requires
disk decryption. Wait for the decryption process to complete before applying the
annotation.
Use the following script to disable BitLocker:
disable_bitlocker.ps1
   # Log start time
   Add-Content -Path C:\disable_bitlocker_log.txt -Value "Script started at $(Get-Date)"

   # Get all BitLocker volumes
   $BitLockerVolumes = Get-BitLockerVolume

   if ($BitLockerVolumes) {
       foreach ($Volume in $BitLockerVolumes) {
           Add-Content -Path C:\disable_bitlocker_log.txt -Value "Processing volume: $($Volume.MountPoint)"
           if ($Volume.ProtectionStatus -eq 'On') {
               Add-Content -Path C:\disable_bitlocker_log.txt -Value "Disabling BitLocker on $($Volume.MountPoint)"
               try {
                   Disable-BitLocker -MountPoint $Volume.MountPoint -ErrorAction Stop
                   Add-Content -Path C:\disable_bitlocker_log.txt -Value "Successfully initiated BitLocker disable on $($Volume.MountPoint). Decryption may take time."
               } catch {
                   Add-Content -Path C:\disable_bitlocker_log.txt -Value "ERROR disabling BitLocker on $($Volume.MountPoint): $($_.Exception.Message)"
               }
           } else {
               Add-Content -Path C:\disable_bitlocker_log.txt -Value "BitLocker is already Off or Unprotected on $($Volume.MountPoint)"
           }
       }
   } else {
       Add-Content -Path C:\disable_bitlocker_log.txt -Value "No BitLocker volumes found."
   }

   # Log end time
   Add-Content -Path C:\disable_bitlocker_log.txt -Value "Script finished at $(Get-Date)"
Add the disable_bitlocker.ps1 script to a VM startup script
To disable BitLocker on VM restart, you can run this script in a running VM, or add it to your startup script. Follow the steps to use this script as startup script.
Base Encode the script and create a kubernetes secret:
# Encode the script
B64_SCRIPT=$(base64 -w 0 disable_bitlocker.ps1)

# Create Secret YAML
cat <<EOF > disable_bitlocker_secret.yaml
apiVersion: v1
kind: Secret
metadata:
  name: disable-bitlocker-script
  namespace: VM_NAMESPACE
type: Opaque
data:
  script: $B64_SCRIPT
EOF

# Apply the Secret to the GDCer
kubectl --kubeconfig MANAGEMENT_API_SERVER -f disable_bitlocker_secret.yaml
Patch the VM CR to add the
disable-bitlocker.ps1script to the startup scriptspecfield:spec: # ... other existing spec fields ... osType: Windows startupScripts: - name: disable-bitlocker-ps1 # Note the -ps1 suffix scriptSecretRef: name: disable-bitlocker-scriptRestart the VM:
Stop the VM:
kubectl --kubeconfig MANAGEMENT_API_SERVER patch VirtualMachine VM_NAME -n VM_NAMESPACE -p '{"spec":{"runningState":"Stopped"}}' --type=mergeStart the VM:
kubectl --kubeconfig MANAGEMENT_API_SERVER patch VirtualMachine <vm-name> -n VM_NAMESPACE -p '{"spec":{"runningState":"Running"}}' --type=merge
Check the BitLocker status
To verify that the volume is fully decrypted before proceeding, check the BitLocker status using either one of the following PowerShell commands.
Check the status of all drives:
Get-BitLockerVolume
Check the status of a specific drive:
Get-BitLockerVolume -MountPoint "C:"
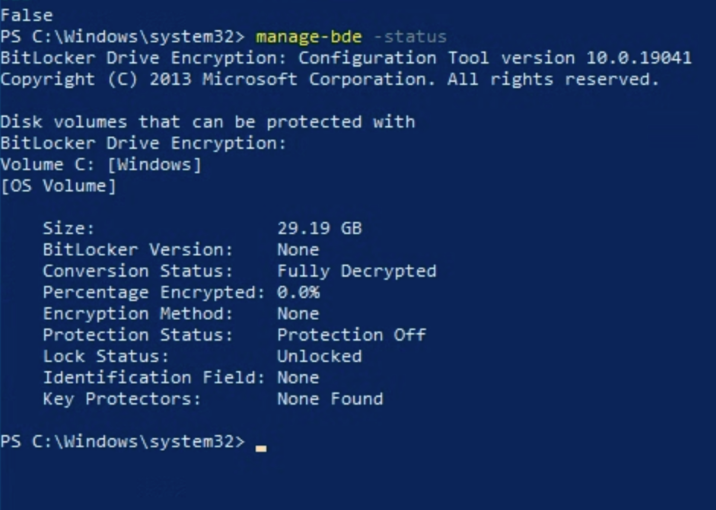
Alternatively, you can check the status of all drives using the manage-bde
command:
manage-bde -status
The output of a disabled BitLocker looks similar to the following image:
Optional: Verification
If you want to verify the certificates present on your VM, follow the steps for your corresponding OS:
Linux
Use
mokutilto verify Secure Boot is enabled on your machine:user@vm1:~$ mokutil --sb-stateIf Secure Boot is enabled, the output looks similar to the following:
SecureBoot enabledUse the appropriate flag with the
mokutilcommand, and narrow your search to the specific certificate year usinggrep.2023 certificates:
user@vm1:~$ mokutil --kek | grep 2023The output is similar to the following:
    Not Before: Mar  2 20:21:35 2023 GMT
    Subject: C=US, O=Microsoft Corporation, CN=Microsoft Corporation KEK 2K CA 2023
user@vm1:~$ mokutil --db | grep 2023The output is similar to the following:
    Not Before: Jun 13 19:21:47 2023 GMT
    Subject: C=US, O=Microsoft Corporation, CN=Microsoft UEFI CA 2023
    Not Before: Jun 13 18:58:29 2023 GMT
    Subject: C=US, O=Microsoft Corporation, CN=Windows UEFI CA 2023
2011 certificates:
user@vm1:~$ mokutil --kek | grep 2011The output is similar to the following:
    Not Before: Jun 24 20:41:29 2011 GMT
    Subject: C=US, ST=Washington, L=Redmond, O=Microsoft Corporation, CN=Microsoft Corporation KEK CA 2011
user@vm1:~$ mokutil --db | grep 2011The output is similar to the following:
    Not Before: Oct 19 18:41:42 2011 GMT
    Subject: C=US, ST=Washington, L=Redmond, O=Microsoft Corporation, CN=Microsoft Windows Production PCA 2011
    Not Before: Jun 27 21:22:45 2011 GMT
    Subject: C=US, ST=Washington, L=Redmond, O=Microsoft Corporation, CN=Microsoft Corporation UEFI CA 2011
Windows
Verify Secure Boot certificates are present on the system:
PS C:\Windows\system32> Confirm-SecureBootUEFIIf the certificate is present on your machine, the output is
True.Use the
-matchflag to append the command with the applicable certificate year:PS C:\Windows\system32> [System.Text.Encoding]::ASCII.GetString((Get-SecureBootUEFI KEK).bytes) -match "2023" PS C:\Windows\system32> [System.Text.Encoding]::ASCII.GetString((Get-SecureBootUEFI KEK).bytes) -match "2011" PS C:\Windows\system32> [System.Text.Encoding]::ASCII.GetString((Get-SecureBootUEFI db).bytes) -match "2011" PS C:\Windows\system32> [System.Text.Encoding]::ASCII.GetString((Get-SecureBootUEFI db).bytes) -match "2023"
Troubleshoot renewal issues
If renewal issues occur on an existing VM, rollback your changes by adding an annotation to the VM CR. The VM will boot with its previous, older certificates.
Rollback changes
Add the following annotation to your VM custom resource:
Annotation:
kubectl --kubeconfig MANAGEMENT_API_SERVER annotate virtualmachine VM_NAME -n VM_NAMESPACE virtualmachine.gdc.goog/recover-efi-backup="true" --overwriteRestart VM to recover back older certificates.
Stop the VM:
kubectl --kubeconfig MANAGEMENT_API_SERVER patch VirtualMachine VM_NAME -n VM_NAMESPACE -p '{"spec":{"runningState":"Stopped"}}' --type=mergeStart the VM:
kubectl --kubeconfig MANAGEMENT_API_SERVER patch VirtualMachine VM_NAME -n VM_NAMESPACE -p '{"spec":{"runningState":"Running"}}' --type=merge