

Google Distributed Cloud (GDC) air-gapped provides a built-in managed Layer 4 (L4) load balancer, but many enterprise applications require advanced Layer 7 (L7) capabilities, such as host-based routing, centralized TLS management, and complex traffic splitting. Historically, this is accomplished using the Ingress API, which is now considered feature-frozen in the Kubernetes community.
This reference architecture provides a self-managed Layer 7 load balancing solution. By deploying the popular NGINX Gateway Fabric open source controller on a GDC Standard Cluster, customers can seamlessly route L7 traffic to hybrid environments. This architecture uses TLS Termination (HTTPRoute) to route traffic based on Server Name Indication (SNI) to both built-in containerized pods and applications hosted on external Virtual Machines.
Architecture
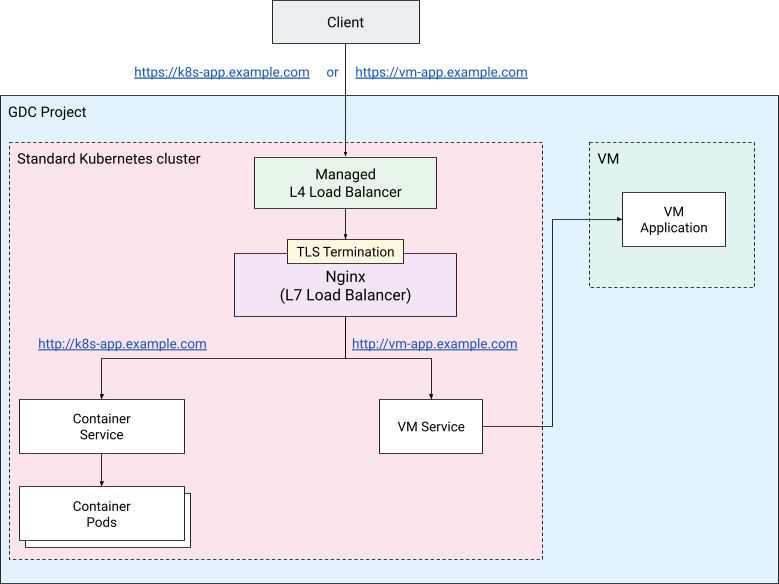
The key components of the solution include:
- Client: An entity initiating HTTPS requests to interact with the applications.
- GDC Standard Cluster: GDC provides a built-in way to create Kubernetes Vanilla Clusters. In this solution, the cluster will host the L7 LB and its controllers, along with the workloads and healess service for external VMs
- GDC L4 Load Balancer: The built-in L4 load balancer serving as the entry point, distributing TCP/443 traffic directly to the Kubernetes Pods running the Gateway controllers.
- Gateway Controllers: NGINX operators running in the Standard Cluster.
They monitor Gateway API resources (like
GatewayandHTTPRoute) and dynamically update the underlying proxies. Nginx Gateway Fabric will be used for the solution. - Gateway (with HTTPRoute): Standardized Kubernetes resources defining the physical listening port (443) and the SNI-based host routing rules with TLS Termination.
- Containerized Workload (Pods): A standard Kubernetes Deployment exposed
internally with a regular Kubernetes
Service. - VM-based Workload (External): A workload hosted on an external VM on the
project network, exposed to the proxy with a headless Kubernetes
Serviceand a custom endpoint containing the VM's direct IP. - Harbor Registry: A private container registry used to store and serve the proxy and application images in the air-gapped environment.
In the Standard Cluster, you create four namespaces:
The
nginx-gatewaynamespace that hosts the Nginx Gateway Fabric resources: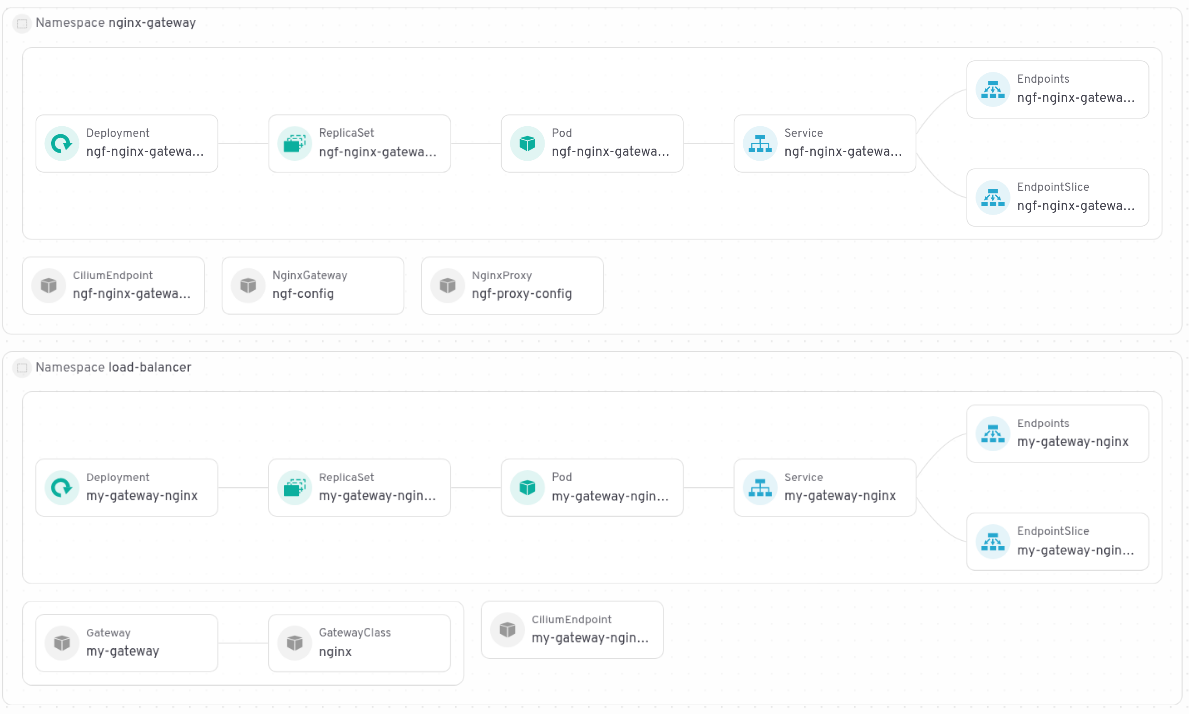
The
load-balancernamespace that hosts theGatewayresources: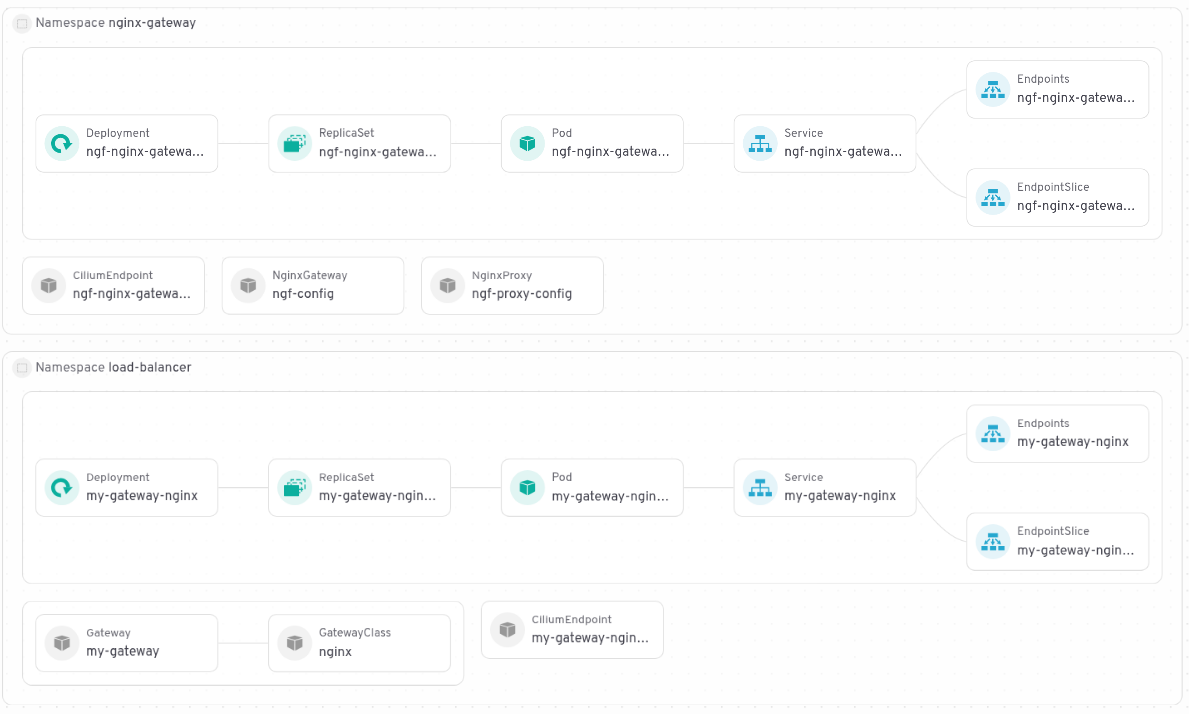
The
vm-appnamespace hosts the external VM IPvm-app, a headless service, anEndpointSlicethat points at the external IP, and anHTTPRoutefor theGateway: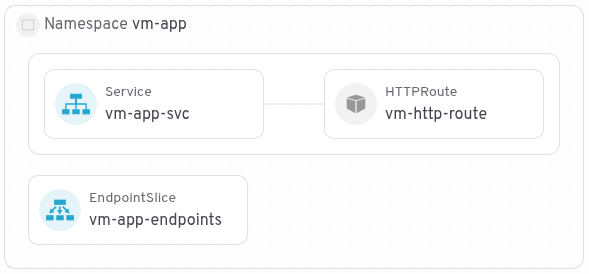
The
hello-appnamespace hosts theDeployment, aService, aHTTPRoute, and aGatewayfor the demo container workload: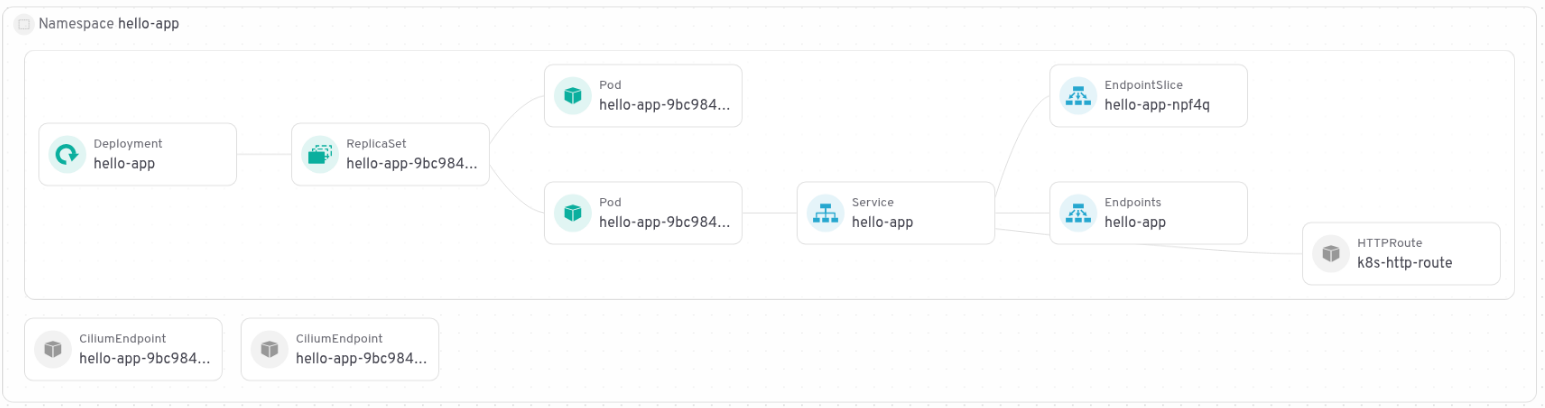
Before you begin
Before deploying this solution, ensure you have the following prerequisites in place:
- Software needed: helm, docker, kubectl
CLI login and local setup: Download gdcloud CLI from the GDC console and set up your environment locally.
export USER_NAME="USER_NAME"
export PROJECT_ID="PROJECT_ID"
export ZONE="ZONE"
export ORG_NAME="ORG_NAME"
export GDCH_URL="GDC_URL"

gdcloud components install gdcloud-k8s-auth-plugin

gdcloud config set core/organization_console_url \
  https://console.$ORG_NAME.$ZONE.$GDC_URL
gdcloud config set core/zone $ZONE
gdcloud config set core/project ${PROJECT_ID}

gdcloud auth login # use --login-config-cert option in case of TLS error
Project Setup: Create a project in your GDC air-gapped environment to hold the resources.
gdcloud projects create $PROJECT_IDIAM Roles: Grant your user the Cluster Admin and Standard Cluster Admin roles to manage Kubernetes resources, and the Harbor Instance Admin role to push images.
# Grant standard cluster and cluster admin roles
gdcloud projects add-iam-policy-binding ${PROJECT_ID} \
  --member="user:${USER_NAME}" \
  --role=cluster-admin

gdcloud projects add-iam-policy-binding ${PROJECT_ID} \
  --member="user:${USER_NAME}" \
  --role=standard-cluster-admin

# Grant Harbor instance admin role
gdcloud projects add-iam-policy-binding ${PROJECT_ID} \
  --member="user:${USER_NAME}" \
  --role=harbor-instance-admin
Create a standard cluster
This section guides you through the process of setting up a standard Kubernetes cluster within your GDC air-gapped environment. A standard cluster provides a flexible and robust foundation for deploying various workloads, including the Nginx Gateway Controller, and your custom applications. The following steps will ensure your cluster is properly configured and accessible for subsequent deployments.
Identify the available virtual machine image types by running:
gdcloud compute machine-types listSelect an appropriate machine type for your cluster worker nodes. For this tutorial, a machine type with at least 4 vCPUs is recommended.
export MACHINE_TYPE="MACHINE_TYPE"Get the management API server kubeconfig and set an alias:
export CLUSTER_NAME="CLUSTER_NAME"

KUBECONFIG=kubeconfig-admin.yaml gdcloud clusters \
  get-credentials ${ORG_NAME}-admin

alias km="kubectl --kubeconfig kubeconfig-admin.yaml"
Create a standard cluster with 2 worker nodes:
km create -f - <<EOF
apiVersion: cluster.gdc.goog/v1
kind: Cluster
metadata:
  name: ${CLUSTER_NAME}
  namespace: ${PROJECT_ID}
spec:
  nodePools:
  - machineTypeName: ${MACHINE_TYPE}
    nodeCount: 2
    name: ${CLUSTER_NAME}-node-pool
EOF
For more details on available options, refer to the documentation.
Standard cluster creation can take up to 60 minutes to complete. To check the status, use the following command:
km get clusters/${CLUSTER_NAME} \
  -n ${PROJECT_ID} \
  --watch
Once the cluster is ready, the output should show a state of Running, like this:
NAME         STATE     K8S VERSION
my-cluster   Running   1.30.12-gke.300
After the cluster is ready, retrieve its credentials:
KUBECONFIG=kubeconfig-${CLUSTER_NAME}.yaml gdcloud clusters \
  get-credentials ${CLUSTER_NAME} \
  --standard \
  --project ${PROJECT_ID} \
  --zone ${ZONE}
Create an alias to keep
kubectlcommands more concise in the rest of this guide. This alias will be used to interact with the standard cluster:alias kk="kubectl --kubeconfig kubeconfig-${CLUSTER_NAME}.yaml"Create namespaces for the controller, the "hello-app" demo containerized app, and the VM-based demo app:
kk create namespace load-balancer
kk create namespace hello-app
kk create namespace vm-app
Create and integrate Harbor Registry
Harbor is a container image registry with built-in support in GDC air-gapped. This section guides you through the steps to integrate a Harbor Registry with your standard cluster, including configuring credentials and secrets to enable secure pulling and pushing of images.
- Create a Harbor instance in your project.
- Create a Harbor project in your Harbor instance.
Set environment variables:
export HARBOR_INSTANCE_NAME="HARBOR_INSTANCE_NAME"
export HARBOR_INSTANCE_URL="HARBOR_INSTANCE_URL"
export HARBOR_PROJECT="HARBOR_INSTANCE_PROJECT"
export IMAGE_PULL_SECRET_NAME="harbor-secret"
Sign in to the Harbor instance using a robot account:
docker --config=./docker login ${HARBOR_INSTANCE_URL}Create the secrets in the standard cluster:
kk create secret docker-registry ${IMAGE_PULL_SECRET_NAME} \
  --from-file=.dockerconfigjson=./docker/config.json \
  -n load-balancer

kk create secret docker-registry ${IMAGE_PULL_SECRET_NAME} \
  --from-file=.dockerconfigjson=./docker/config.json \
  -n hello-app
Deploy demo containerized app
This section details the deployment of a demo containerized application
(hello-app) within your GDC air-gapped Kubernetes
cluster. You will create the necessary Kubernetes Deployment and Service
resources to run the hello-app and expose it internally within the cluster,
preparing it for access using the L7 load balancer.
Upload a sample image for the demo containerized app into Harbor:
docker pull gcr.io/google-samples/hello-app:1.0 \
  --platform linux/amd64
docker tag gcr.io/google-samples/hello-app:1.0 \
  ${HARBOR_INSTANCE_URL}/${HARBOR_PROJECT}/hello-app:1.0
docker --config=./docker push \
  ${HARBOR_INSTANCE_URL}/${HARBOR_PROJECT}/hello-app:1.0
Deploy the following manifest in the standard cluster:
cat << EOF > hello-app.yaml
apiVersion: apps/v1
kind: Deployment
metadata:
  name: hello-app
  namespace: hello-app
spec:
  replicas: 2
  selector:
    matchLabels:
      app: hello-app
  template:
    metadata:
      labels:
        app: hello-app
    spec:
      containers:
      - name: hello-server
        image: ${HARBOR_INSTANCE_URL}/${HARBOR_PROJECT}/hello-app:1.0
        ports:
        - containerPort: 8080
      imagePullSecrets:
      - name: ${IMAGE_PULL_SECRET_NAME}
---
apiVersion: v1
kind: Service
metadata:
  name: hello-app
  namespace: hello-app
spec:
  type: ClusterIP
  selector:
    app: hello-app
  ports:
    - protocol: TCP
      port: 80
      targetPort: 8080
EOF

kk apply -f hello-app.yaml
Then verify that the deployment and the service are there:
kk get svc,deploy -n hello-app
Deploy demo app in a VM
This section details the deployment of a demo application within a virtual machine (VM) outside your Kubernetes cluster. By setting up an HTTP server on a VM, you'll simulate an external application that the load balancer can expose, demonstrating its capability to manage traffic to resources both inside and outside the cluster.
First, create a VM for the demo app
- Open the GDC console in your web browser.
- Select the same project as where you created your standard Kubernetes cluster.
- Open the menu then click Virtual machines.
- Click Create Instance.
- Give the VM the name
vm-workload. A 2 vCPU image is enough for the example. - For the boot disk image, select an Ubuntu 22.04 distribution, which comes with Python pre-installed.
- Click Create.
- Wait a few minutes until the VM becomes ready.
- Establish an SSH connection to the VM:
- In the GDC console, click the VM.
- Click Connect with SSH.
After you're connected to SSH console, run the following:
mkdir ~/simple-server
cd ~/simple-server
echo 'Welcome to my VM!' > index.html
python3 -m http.server --bind 0.0.0.0 8080 &
To route traffic to a VM, create a headless Service (without selectors). This
will be manually mapped to the VM's internal IP address using an EndpointSlice
resource.
kk apply -f - <<EOF
apiVersion: v1
kind: Service
metadata:
  name: vm-app-svc
  namespace: vm-app
spec:
  ports:
  - protocol: TCP
    port: 443
    targetPort: 443
EOF
Get the IP address of vm-workload VM by running
gdcloud compute instances list --project ${PROJECT_ID} \
  | grep workload-vm | awk '{print $3}'
The output will be the IP address of the VM that will be needed to set up the EndpointSlice resource.
Create the resource EndpointSlice that will connect to the VM-app
selector-less Service and address the IP of the VM to which the traffic should
be routed.
apiVersion: discovery.k8s.io/v1
kind: EndpointSlice
metadata:
  name: vm-app-endpoints
  namespace: vm-app
  labels:
    kubernetes.io/service-name: vm-app-svc
addressType: IPv4
ports:
  - port: 8080
endpoints:
  - addresses:
    - "VM_IP"
    conditions:
      ready: true
Create self-signed certificates
This section guides you through the process of generating self-signed TLS certificates for your applications. This guide uses self-signed certificates for convenience, but in production environments, you must use production-grade certificates, as described in Optional: Use production-ready certificates. These certificates are crucial for enabling HTTPS termination at the Nginx Gateway, ensuring encrypted communication between clients and the load balancer for both containerized and VM-based workloads.
Create a certificate for the containerized app:
openssl req -x509 -newkey rsa:2048 -nodes \
  -keyout tls-containerized.key \
  -out tls-containerized.crt \
  -subj "/CN=k8s-app.example.com" \
  -days 365

kk create secret tls tls-containerized \
  --namespace load-balancer \
  --key tls-containerized.key \
  --cert tls-containerized.crt

kk create secret tls tls-containerized \
  --namespace hello-app \
  --key tls-containerized.key \
  --cert tls-containerized.crt
Create a certificate for the VM app:
openssl req -x509 -newkey rsa:2048 -nodes \
  -keyout tls-vm.key \
  -out tls-vm.crt \
  -subj "/CN=vm-app.example.com" \
  -days 365

kk create secret tls tls-vm \
  --namespace load-balancer \
  --key tls-vm.key \
  --cert tls-vm.crt

kk create secret tls tls-vm \
  --namespace vm-app \
  --key tls-vm.key \
  --cert tls-vm.crt
Deploy NGINX
This section outlines the steps to deploy the Nginx Gateway Controller, including installing the Gateway API Custom Resource Definitions (CRDs), setting up Nginx Gateway Fabric using Helm, and verifying the installation within your standard cluster. This prepares the infrastructure for advanced Layer 7 routing.
Install the Gateway API CRDs
The Gateway API requires Custom Resource Definitions (CRDs) to be installed in the cluster before deploying the controller. We will use the official experimental custom resource definitions (CRD) from the Gateway API project (version 1.2.0 is used for this guide).
Install the experimental CRDs:
kk apply -f https://github.com/kubernetes-sigs/gateway-api/releases/download/v1.2.0/experimental-install.yamlVerify the CRDs are installed successfully by running
kk get crd
gateways.gateway.networking.k8s.io
.
Install NGINX Gateway Fabric
Deploy the NGINX Gateway Fabric controller using Helm. This controller will watch Gateway API resources and configure NGINX to handle the traffic.
Set the NGINX image tag:
helm template nfg oci://ghcr.io/nginx/charts/nginx-gateway-fabric | grep "image:" # get the tag of the nginx-gateway-fabric (in following case 2.4.2)

export NGINX_TAG="2.4.2"
Pull the NGINX Gateway Fabric and NGINX images, then push them to your Harbor registry:
docker pull ghcr.io/nginx/nginx-gateway-fabric:${NGINX_TAG}
docker tag ghcr.io/nginx/nginx-gateway-fabric:${NGINX_TAG} \
  ${HARBOR_INSTANCE_URL}/${HARBOR_PROJECT}/nginx-gateway-fabric:${NGINX_TAG}
docker --config=./docker push \
  ${HARBOR_INSTANCE_URL}/${HARBOR_PROJECT}/nginx-gateway-fabric:${NGINX_TAG}

docker pull nginx:1.27.3
docker tag nginx:1.27.3 \
  ${HARBOR_INSTANCE_URL}/${HARBOR_PROJECT}/nginx:1.27.3
docker --config=./docker push \
  ${HARBOR_INSTANCE_URL}/${HARBOR_PROJECT}/nginx:1.27.3
Create the
nginx-gatewaynamespace and add the Harbor image pull secret:kk create namespace nginx-gateway kk create secret docker-registry ${IMAGE_PULL_SECRET_NAME} \ --from-file=.dockerconfigjson=./docker/config.json \ -n nginx-gatewayDeploy NGINX Gateway Fabric with Helm, pointing to the images in your Harbor registry:
KUBECONFIG=kubeconfig-${CLUSTER_NAME}.yaml helm upgrade --install ngf \
  oci://ghcr.io/nginx/charts/nginx-gateway-fabric \
  --create-namespace -n nginx-gateway \
  --set nginxGateway.image.tag="${NGINX_TAG}" \
  --set nginxGateway.image.repository="${HARBOR_INSTANCE_URL}/${HARBOR_PROJECT}/nginx-gateway-fabric" \
  --set nginx.image.repository="${HARBOR_INSTANCE_URL}/${HARBOR_PROJECT}/nginx" \
  --set nginxGateway.serviceAccount.imagePullSecret="${IMAGE_PULL_SECRET_NAME}" \
  --set nginx.imagePullSecret="${IMAGE_PULL_SECRET_NAME}"
The Kubernetes deployment securely pulls images from Harbor using the provided secret (
${IMAGE_PULL_SECRET_NAME}), which contains the Harbor robot account's credentials.Verify that the
GatewayClassresources are accepted:kk get gatewayclassYou should see
nginxlisted withACCEPTED = True.
Create the Gateway instance
Define the logical load balancer instance listening on port 443. We will
configure it for Terminate mode, meaning the Gateway will perform TLS
termination and decrypt the traffic before passing it through.
Create and apply gateway.yaml:
cat << EOF > gateway.yaml
apiVersion: gateway.networking.k8s.io/v1
kind: Gateway
metadata:
  name: my-gateway
  namespace: load-balancer
spec:
  gatewayClassName: nginx
  listeners:
  - name: https-k8s-workload
    hostname: "k8s-app.example.com"
    port: 443
    protocol: HTTPS
    allowedRoutes:
      namespaces:
        from: All
    tls:
      mode: Terminate
      certificateRefs:
      - kind: Secret
        name: tls-containerized
  - name: https-vm-workload
    hostname: "vm-app.example.com"
    port: 443
    protocol: HTTPS
    allowedRoutes:
      namespaces:
        from: All
    tls:
      mode: Terminate
      certificateRefs:
      - kind: Secret
        name: tls-vm
EOF

kk apply -f gateway.yaml
Verify the Gateway is deployed successfully by checking if PROGRAMMED is
True:
kk get gateway my-gateway --n load-balancer
Verify that a managed GDC L4 load balancer has been deployed as a Service alongside the Gateway
kk get services -n load-balancer
Check that the Nginx service is created and configured, the output should look like this:
NAME               TYPE           CLUSTER-IP      EXTERNAL-IP    PORT(S)         AGE
my-gateway-nginx   LoadBalancer   10.252.19.148   10.200.32.43   443:30649/TCP   45h
Define the L7 routing logic (HTTPRoute)
Bind HTTPRoutes to your Gateway to define how traffic should be distributed
based on the requested hostname (SNI).
Create and apply routing.yaml:
cat << EOF > routing.yaml
apiVersion: gateway.networking.k8s.io/v1
kind: HTTPRoute
metadata:
  name: k8s-http-route
  namespace: hello-app
spec:
  parentRefs:
  - name: my-gateway
    namespace: load-balancer
  hostnames:
  - "k8s-app.example.com"
  rules:
  - matches:
    - path:
        type: PathPrefix
        value: /
    backendRefs:
    - name: hello-app
      namespace: hello-app
      port: 80
---
apiVersion: gateway.networking.k8s.io/v1
kind: HTTPRoute
metadata:
  name: vm-http-route
  namespace: vm-app
spec:
  parentRefs:
  - name: my-gateway
    namespace: load-balancer
  hostnames:
  - "vm-app.example.com"
  rules:
  - matches:
    - path:
        type: PathPrefix
        value: /
    backendRefs:
    - name: vm-app-svc
      namespace: vm-app
      port: 443
EOF

kk apply -f routing.yaml
Retrieve the load balancer IP
Run the command to get the IP of Nginx Load Balancer
kk get services/my-gateway-nginx \
  -n load-balancer \
  -o jsonpath='{.status.loadBalancer.ingress[0].ip}'
This will be needed when verifying the access to the apps. This will be referred
to as LOAD_BALANCER_IP.
Create a client VM
Follow the steps to create a client VM
- Open the GDC console in your web browser.
- Open the menu then click Virtual machines.
- Click Create Instance.
- Create a VM named
client, select a small machine type and select either Rocky Linux or Ubuntu, which come withcurlpreinstalled. - Click Create.
- Wait a few minutes until the VM becomes ready.
- After the VM is ready, establish an SSH connection to the VM:
- In the GDC console, click the VM.
- Click Connect with SSH.
Verify access and routing
To test the routing, execute curl commands from your client VM. You can
connect to both applications using their defined hostnames with the load
balancer's IP address.
By passing the --resolve flag in curl, you can force the domain names to
resolve to your GDC air-gapped L4 Load Balancer's IP address.
Note that we pass the -k flag to trust the self-signed certificates.
Test the Kubernetes containerized app:
curl -k --resolve k8s-app.example.com:443:$LOAD_BALANCER_IP https://k8s-app.example.com -v
Test the External VM App:
curl -k --resolve vm-app.example.com:443:$LOAD_BALANCER_IP https://vm-app.example.com -v
If configured correctly, the Gateway controller will seamlessly act as TLS terminator and pass-through the traffic to the destination.
Optional: Use production-ready certificates
This section covers how to leverage the GDC air-gapped CA Service to create a private Root Certificate Authority (CA), issue signed certificates for your workloads, and securely update your GDC air-gapped standard cluster and client VMs.
This section outlines how to use the GDC air-gapped CA
Service to create a
private Root Certificate Authority (CA) and issue valid certificates for your
applications. By installing this Root CA on your client VM, you can verify that
TLS termination works seamlessly with trusted certificates, without needing to
bypass SSL warnings (for example, using curl -k).
Grant necessary permissions and get credentials
To manage the CA Service and issue certificates, your user needs the appropriate IAM roles in the project.
Grant the
certificate-authority-service-adminandcertificate-requesterroles:gdcloud projects add-iam-policy-binding ${PROJECT_ID} \ --member=user:${USER_NAME} \ --role=certificate-authority-service-admin gdcloud projects add-iam-policy-binding ${PROJECT_ID} \ --member=user:${USER_NAME} \ --role=certificate-requesterGet the credentials of the management API server:
gdcloud clusters get-credentials ${ORG_NAME}-admin
Create the root CA
You will create a Certificate Authority in the management API server within your project namespace.
Apply the
CertificateAuthorityresource:km apply -f - <<EOF apiVersion: pki.security.gdc.goog/v1 kind: CertificateAuthority metadata: name: my-root-ca namespace: ${PROJECT_ID} spec: caProfile: commonName: "My Root CA" duration: 87600h # 10 years keyAlgorithm: RSA_2048 maxChainLength: 1 caType: ROOT keyLocation: HSM rotationPolicy: cronTime: 0 0 1 1 * EOFkm -n ${PROJECT_ID} get \ certificateauthority.pki.security.gdc.goog/my-root-ca -ojson \ | jq -r ' .status.conditions[] | select( .type as $id | "Ready" | index($id)) .status'
Issue and deploy certificates
After the CA is ready, you will request certificates for both the containerized app and the VM-based app. These requests happen in the management API server, and the resulting keys must be moved to your standard cluster.
Create requests for both domains:
km apply -f - <<EOF
apiVersion: pki.security.gdc.goog/v1
kind: CertificateRequest
metadata:
  name: tls-containerized-req
  namespace: ${PROJECT_ID}
spec:
  certificateAuthorityRef:
    name: my-root-ca
    namespace: ${PROJECT_ID}
  certificateConfig:
    subjectConfig:
      commonName: "k8s-app.example.com"
      dnsNames:
      - "k8s-app.example.com"
  signedCertificateSecret: tls-containerized-signed
---
apiVersion: pki.security.gdc.goog/v1
kind: CertificateRequest
metadata:
  name: tls-vm-req
  namespace: ${PROJECT_ID}
spec:
  certificateAuthorityRef:
    name: my-root-ca
    namespace: ${PROJECT_ID}
  certificateConfig:
    subjectConfig:
      commonName: "vm-app.example.com"
      dnsNames:
      - "vm-app.example.com"
  signedCertificateSecret: tls-vm-signed
EOF
Wait a few moments for the certificates to be issued. You can verify they are ready when the Ready condition is True:
km get certificaterequests -n ${PROJECT_ID}
Update the standard cluster
If you followed the previous sections of this guide, you have self-signed secrets in your standard cluster. You must delete them before creating the new, signed versions:
kk delete secret tls-containerized -n load-balancer
kk delete secret tls-vm -n load-balancer

kk delete secret tls-containerized -n hello-app
kk delete secret tls-vm -n vm-app
Now, extract the signed certificates from the management API server and create the new secrets in the standard cluster.
km get secret -n ${PROJECT_ID} tls-containerized-signed \
  -o jsonpath='{.data.tls\.crt}' \
  | base64 -d > tls-containerized.crt

km get secret -n ${PROJECT_ID} tls-containerized-signed \
  -o jsonpath='{.data.tls\.key}' \
  | base64 -d > tls-containerized.key

kk create secret tls tls-containerized \
  --namespace load-balancer \
  --key tls-containerized.key \
  --cert tls-containerized.crt

kk create secret tls tls-containerized \
  --namespace hello-app \
  --key tls-containerized.key \
  --cert tls-containerized.crt

km get secret -n ${PROJECT_ID} tls-vm-signed \
  -o jsonpath='{.data.tls\.crt}' \
  | base64 -d > tls-vm.crt

km get secret -n ${PROJECT_ID} tls-vm-signed \
  -o jsonpath='{.data.tls\.key}' \
  | base64 -d > tls-vm.key

kk create secret tls tls-vm \
  --namespace load-balancer \
  --key tls-vm.key \
  --cert tls-vm.crt

kk create secret tls tls-vm \
  --namespace vm-app \
  --key tls-vm.key \
  --cert tls-vm.crt
The new secrets will be obtained automatically and refreshed by load balancers.
Configure client trust
To verify the setup, you need to tell your client VM to trust your new root CA.
Extract the root CA certificate to a file:
km get secret -n ${PROJECT_ID} my-root-ca-secret \
  -o jsonpath='{.data.tls\.crt}' \
  | base64 -d > my-root-ca.crt
Transfer the certificate to your client VM. (You can copy the content of my-root-ca.crt and paste it into a file on the client VM).
On the client VM, update the trust store.
If client VM is Ubuntu:
sudo cp my-root-ca.crt /usr/local/share/ca-certificates/
sudo chmod 644 /usr/local/share/ca-certificates/my-root-ca.crt
sudo update-ca-certificates
If client VM is Rocky Linux:
sudo cp my-root-ca.crt /etc/pki/ca-trust/source/anchors/
sudo update-ca-trust
Verify access
You can now access your applications using curl without the -k flag. The
connection will be fully trusted.
Test the Kubernetes containerized app:
curl -v --resolve k8s-app.example.com:443:LOAD_BALANDER_IP https://k8s-app.example.com
Test the VM App:
curl -v --resolve vm.example.com:443:LOAD_BALANDER_IP https://vm-app.example.com
If successful, you will see the application output immediately without any SSL certificate warnings.