

Overview
This guide walks through the integration of Keyfactor EJBCA Enterprise (deployed as an external appliance) as a third-party Certificate Authority (CA) for Google Distributed Cloud (GDC) air-gapped.
Keyfactor EJBCA Enterprise is a highly scalable, robust, and FIPS-compliant Certificate Authority platform that enables organizations to manage public key infrastructure (PKI) across heterogeneous environments.
GDC air-gapped includes a built-in Certificate Authority service for automated key and certificate management inside the hosted cloud boundary. However, organizations that have standardized their PKI infrastructure on Keyfactor EJBCA for existing workloads outside of GDC might prefer to leverage the same consistent CA architecture and management policies for workloads running within their air-gapped GDC environments.
This guide demonstrates how to configure GDC networking, internal DNS, and Kubernetes cert-manager to automate certificate lifecycle management (ACME) and support high-volume programmatic issuance using a Registration Authority (RA) pattern.
Assumptions
Before proceeding with this guide, ensure the following assumptions are met:
- Keyfactor EJBCA is deployed either as a software appliance or hardware appliance, and a stable IP address is configured for the service.
- Root, subordinate, and management Certificate Authorities (CAs) have been created in the EJBCA instance.
- End Entity (EE) profiles have been configured (e.g., for TLS server certificates).
- Certificates for the administrative CA users have been downloaded.
- Required protocols (such as ACME) are enabled on the EJBCA instance.
- RSA signing algorithms are used in this guide. You can change the signing algorithm based on your specific requirements or what is configured in your EJBCA instance.
Architecture
The architecture follows the external Certificate Authority model, where the EJBCA server and its backing Hardware Security Module (HSM) are hosted externally outside the physical GDC boundaries but are network-accessible. The EJBCA server can be deployed externally either as a hardware or software appliance. The core integration described in this guide only requires that the external EJBCA server is reachable using a stable IP address.
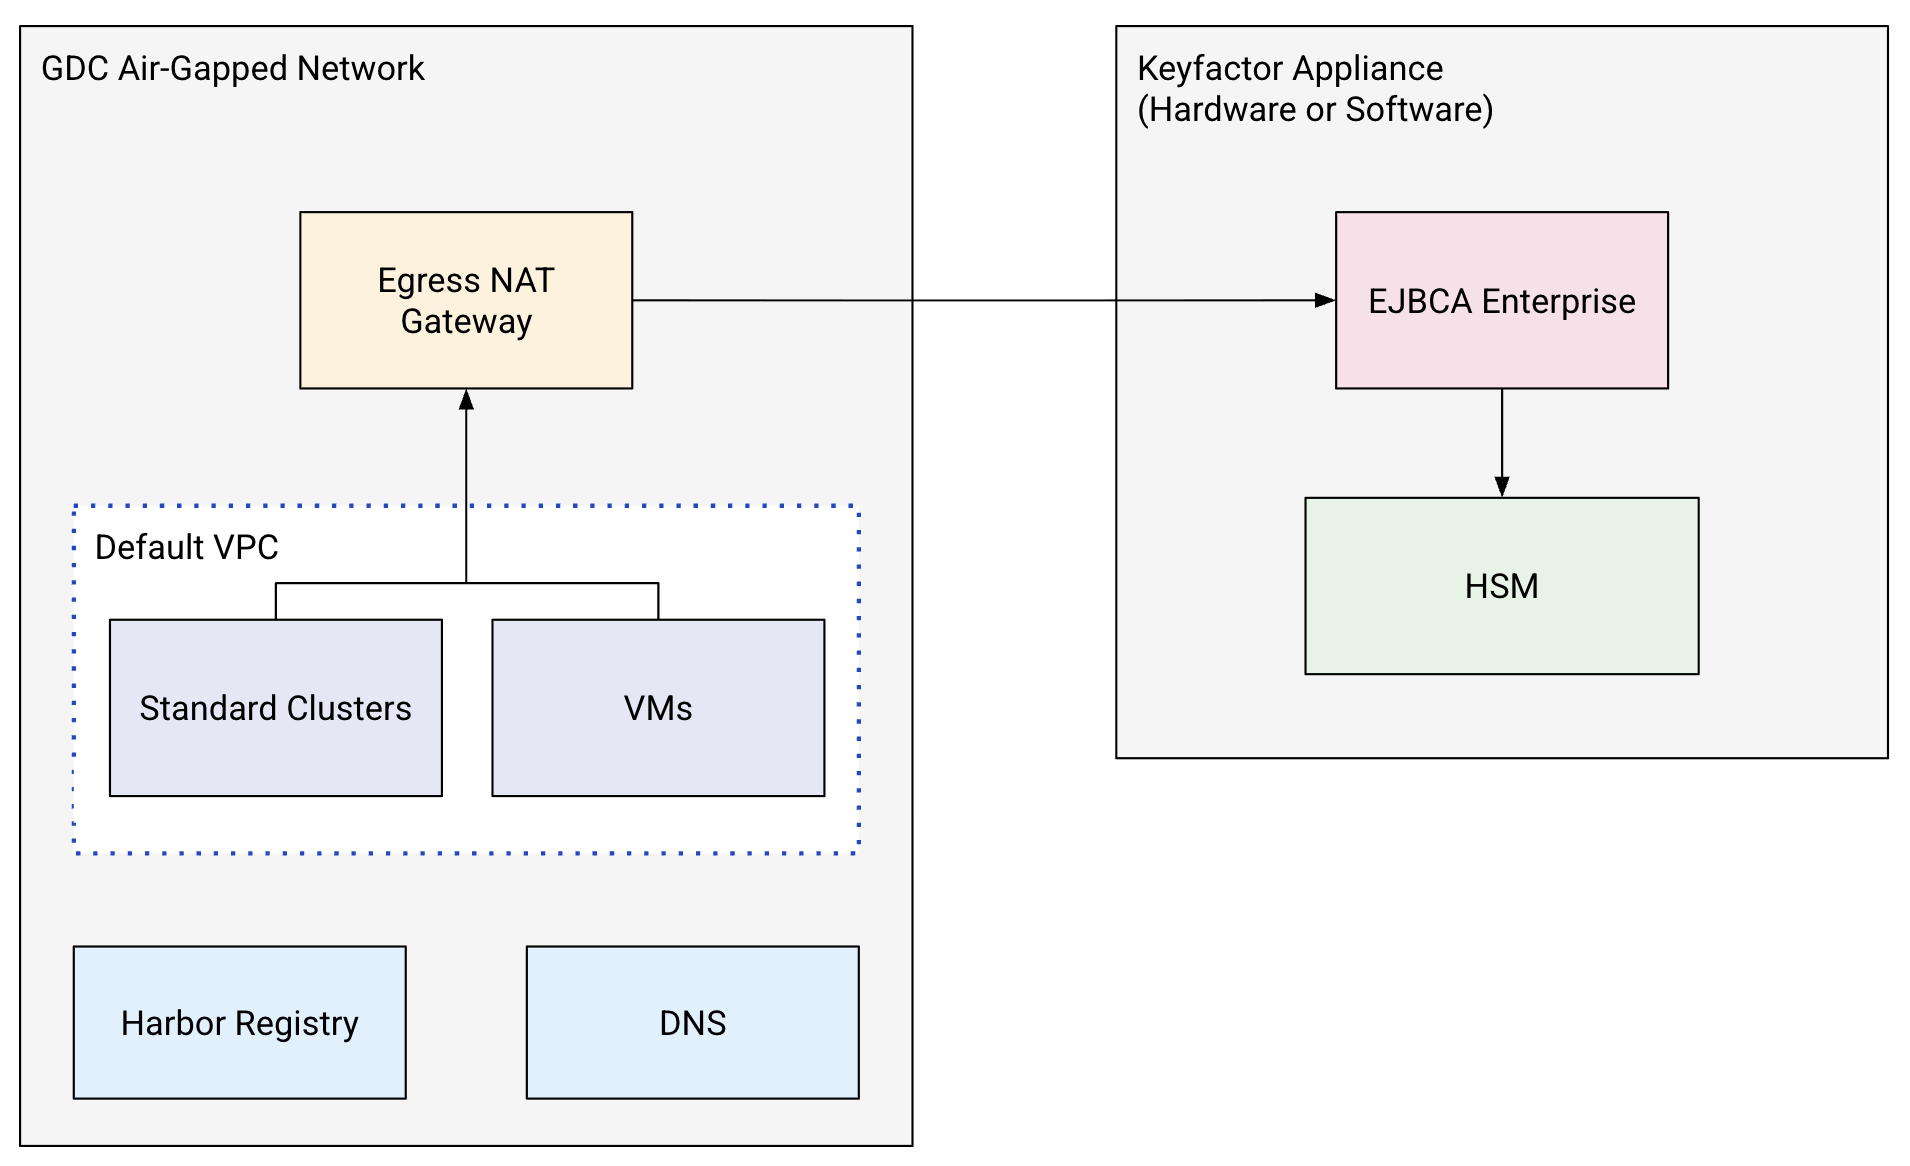
Key components of this architecture include:
- EJBCA Enterprise Server: Deployed externally either as a Keyfactor hardware appliance or software appliance, housing the CAs (Root and Subordinate) and generating all CA key material inside a CC EAL4+ certified HSM.
- GDC Standard Kubernetes Cluster: The compute environment running customer workloads, cert-manager, and integration proxies.
- GDC Internal DNS: Manages local private DNS zones (using the private domain name configured in the environment variables) used for resolving ACME DNS-01 challenges.
- GDC Egress Gateway: Directs outbound traffic from cluster pods to the external EJBCA server IP address.
- Harbor Private Registry: Hosts mirrored container images (such as the EJBCA cert-manager issuer) for air-gapped deployment.
Before you begin
Ensure your GDC environment meets the following requirements before starting the integration:
- First, create a project that will serve as the holder for all resources generated throughout this guide.
Configure environment variables that will be referenced throughout this guide. Modify these values as needed to match your specific environment:
# GDC Environment Configuration
export GDC_ORG="your-org-name"
export GDC_ZONE="your-zone-name"
export GDC_PROJECT_ID="your-project-id"
export GDC_USER_NAME="your-gdc-user-email"
export GDC_CLUSTER_NAME="your-cluster-name"

# EJBCA Server Configuration
export EJBCA_DNS_ZONE="example.internal"
export EJBCA_HOSTNAME="ejbca.${EJBCA_DNS_ZONE}"
export EJBCA_LB_IP="XX.XX.XX.XX" # Stable IP of your EJBCA Server
export EJBCA_CA_NAME="GDC Subordinate CA"
export EJBCA_NAMESPACE="ejbca-ee"
export CERTIFICATE_PROFILE_NAME="GDC TLS SERVER PROFILE"
export END_ENTITY_PROFILE_NAME="GDC TLS SERVER EE PROFILE"

# Harbor Private Registry Configuration
export HARBOR_INSTANCE_URL="your-harbor-url.internal"
export HARBOR_PROJECT="your-harbor-project"
export HARBOR_ROBOT_ACCOUNT="robot$your-robot-name"
export HARBOR_ROBOT_SECRET="your-robot-secret"
export HARBOR_PULL_SECRET_NAME="harbor-secret"
Network Note: This guide assumes it is being run from a bastion node that has access to the GDC air-gapped APIs and also has access to the internet to download the required manifests and container images. If you are running this from a machine without internet access, you must obtain these assets separately (for example, using
docker saveto export images from a connected machine anddocker loadto import them) and securely upload them to your environment before proceeding.
Configure kubectl aliases
In this section, you create convenient command-line aliases for GDC's zonal management and global APIs:
Create an alias for the zonal management API (Replace MANAGEMENT_API_KUBECONFIG with the path to the kubeconfig for the management API):
alias km="kubectl --kubeconfig MANAGEMENT_API_KUBECONFIG"Create an alias for the global API (Replace GLOBAL_API_KUBECONFIG with the path to the kubeconfig for the global API):
alias kg="kubectl --kubeconfig GLOBAL_API_KUBECONFIG"
Create the GDC standard cluster
In this section, you deploy a standard Kubernetes cluster inside GDC and configure GDC standard cluster administrator roles and local Harbor container registry credentials:
1 Identify the available virtual machine image types by running:
```shell
gdcloud compute machine-types list
```
2 Select an appropriate machine type for your cluster worker nodes:
```shell
export MACHINE_TYPE="n3-standard-8-gdc"
```
3 Create a standard cluster with two worker nodes using the zonal management API:
```shell
km create -f - <<EOF
apiVersion: cluster.gdc.goog/v1
kind: Cluster
metadata:
  name: ${GDC_CLUSTER_NAME}
  namespace: ${GDC_PROJECT_ID}
spec:
  nodePools:
  - machineTypeName: ${MACHINE_TYPE}
    nodeCount: 2
    name: ${GDC_CLUSTER_NAME}-node-pool
EOF
```

This creates a simple GDC cluster. Cluster creation
can take up to 60 minutes to complete. To check the status, use the
following command:

```shell
km get clusters/${GDC_CLUSTER_NAME} \
  -n ${GDC_PROJECT_ID} \
  --watch
```

After the cluster is ready, the output should show a STATE of `Running`.
4 After the cluster is ready, retrieve its credentials:
```shell
KUBECONFIG=kubeconfig-${GDC_CLUSTER_NAME}.yaml gdcloud clusters \
  get-credentials ${GDC_CLUSTER_NAME} \
  --standard \
  --project ${GDC_PROJECT_ID} \
  --zone ${GDC_ZONE}
```
5 Assign GDC standard cluster administrator roles to your GDC user:
```shell
gdcloud projects add-iam-policy-binding ${GDC_PROJECT_ID} \
  --member="user:${GDC_USER_NAME}" \
  --role=cluster-admin

gdcloud projects add-iam-policy-binding ${GDC_PROJECT_ID} \
  --member="user:${GDC_USER_NAME}" \
  --role=standard-cluster-admin
```
6 Create a Harbor instance and a Harbor project in GDC to host the mirrored container images:
```shell
gdcloud projects add-iam-policy-binding ${GDC_PROJECT_ID} \
  --member="user:${GDC_USER_NAME}" \
  --role=harbor-instance-admin
```
7 Create a Harbor robot account and record its username and secret key.
8 Authenticate with your Harbor instance:
```shell
docker --config=./docker-harbor login ${HARBOR_INSTANCE_URL} \
  -u ${HARBOR_ROBOT_ACCOUNT} \
  -p ${HARBOR_ROBOT_SECRET}
```

This saves the robot account credentials to
`./docker-harbor/config.json` for subsequent Secret creation.
Infrastructure and network configuration
In this section, you configure the underlying GDC infrastructure and network settings. This ensures that your Kubernetes workloads can resolve the external EJBCA host domain name and successfully route outbound API calls to its IP address.
Private DNS setup in GDC air-gapped
To establish domain resolution, you deploy a private DNS zone and record set to map the external EJBCA server to a local domain name, allowing services inside GDC to connect using a stable hostname instead of a raw IP address:
Assign the Managed DNS Project Admin role to your user:
gdcloud projects add-iam-policy-binding ${GDC_PROJECT_ID} \
  --member=user:${GDC_USER_NAME} \
  --role=managed-dns-project-admin
Deploy the global
ManagedDNSZoneresource:kubectl --kubeconfig GLOBAL_API_KUBECONFIG apply -f - <<EOF apiVersion: networking.global.gdc.goog/v1 kind: ManagedDNSZone metadata: name: private-example-internal namespace: ${GDC_PROJECT_ID} spec: dnsName: ${EJBCA_DNS_ZONE} visibility: PRIVATE EOFDeploy the
ResourceRecordSetpointing to your EJBCA appliance IP address:kubectl --kubeconfig GLOBAL_API_KUBECONFIG apply -f - <<EOF apiVersion: networking.global.gdc.goog/v1 kind: ResourceRecordSet metadata: name: ${EJBCA_HOSTNAME} namespace: ${GDC_PROJECT_ID} spec: name: ${EJBCA_HOSTNAME} ttlSeconds: 600 type: A rrData: - ${EJBCA_LB_IP} dnsZone: private-example-internal EOF
Outbound NAT gateway setup
Next, you configure GDC egress networking by setting up a custom subnet and NAT gateway to allow Kubernetes workloads (such as cert-manager and Registration Authority clients) to securely route outbound traffic to the EJBCA server:
Assign project and organization-level network developer roles:
gdcloud projects add-iam-policy-binding ${GDC_PROJECT_ID} \
  --member=user:${GDC_USER_NAME} \
  --role=cloud-nat-developer

gdcloud projects add-iam-policy-binding ${GDC_PROJECT_ID} \
  --member=user:${GDC_USER_NAME} \
  --role=subnet-project-admin

gdcloud organizations add-iam-policy-binding ${GDC_ORG} \
  --member="user:${GDC_USER_NAME}" \
  --role=subnet-org-admin
Create the egress subnet:
kubectl --kubeconfig MANAGEMENT_API_KUBECONFIG apply -f - <<EOF
apiVersion: ipam.gdc.goog/v1
kind: Subnet
metadata:
  name: ejbca-cluster-egress
  namespace: ${GDC_PROJECT_ID}
spec:
  ipv4Request:
    prefixLength: 32
  parentReference:
    name: data-network-segment-${GDC_ZONE}-group
    namespace: platform
    type: SubnetGroup
  type: Leaf
EOF
Create the
CloudNATGatewaymatching the cert-manager issuer selector:kubectl --kubeconfig MANAGEMENT_API_KUBECONFIG apply -f - <<EOF apiVersion: networking.gdc.goog/v1 kind: CloudNATGateway metadata: name: ejbca-egress-gateway namespace: ${GDC_PROJECT_ID} spec: subnetRefs: - ejbca-cluster-egress workloadSelector: labelSelector: clusters: matchLabels: kubernetes.io/metadata.name: ${GDC_CLUSTER_NAME} workloads: matchLabels: app.kubernetes.io/name: ejbca-cert-manager-issuer EOF
Kubernetes cert-manager integration
In this section, you integrate the custom EJBCA cert-manager issuer with GDC's cert-manager service. This lets you establish automated certificate provisioning, renewal, and lifecycle management for your containerized services.
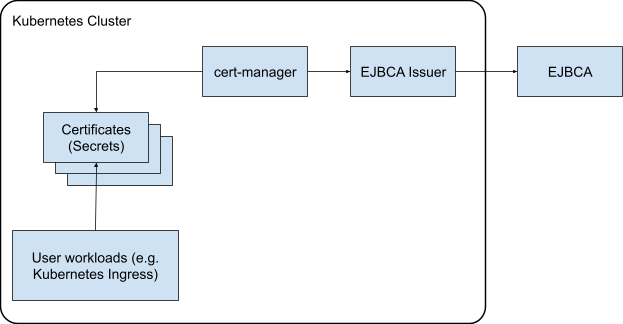
Configure EJBCA for the issuer
To integrate the issuer, you configure the necessary profiles, enroll the administration client credential, and set up role bindings inside the EJBCA server. This establishes a secure administrative channel that allows cert-manager to authenticate with and request certificates from EJBCA.
Create admin certificate profile
You begin by establishing a certificate profile inside EJBCA to define the technical properties and cryptographic constraints (such as algorithms and validity periods) of the administrative certificate:
- Open the EJBCA Admin UI, navigate to CA Functions > Certificate Profiles.
- Clone the ENDUSER profile and name it
GDC ADMIN PROFILE. - Edit the
GDC ADMIN PROFILEand configure the following settings:- Available Key Algorithms: RSA
- Available Bit Lengths: 2048, 3072, 4096
- Signature Algorithm: SHA512WithRSA
- Validity:
200d - Issuer Alternative Name: Clear Use
- CRL Distribution Points: Check Use
- Use CA defined CRL Distribution Point: Check Use
- Authority Information Access: Check Use
- Use CA defined OCSP locator: Check Use
- Use CA defined CA issuer: Check Use
- Available CAs: Select
GDC Subordinate CA
- Click Save.
Create administrator end entity profile
Next, you create an end entity profile in EJBCA to define default fields and CA assignments, which simplifies the process of enrolling and issuing the administrative certificate:
- Navigate to RA Functions > End Entity Profiles.
- Under Add End Entity Profile, enter
GDC ADMIN EE PROFILEand click Add Profile. - Edit the profile and configure the following settings:
- Default Certificate Profile:
GDC ADMIN PROFILE - Available Certificate Profiles:
GDC ADMIN PROFILE - Default CA:
GDC Subordinate CA - Available CAs:
GDC Subordinate CA
- Default Certificate Profile:
- Click Save.
Enroll administrator certificate
With the profiles established, you enroll the administrative identity using the EJBCA Registration Authority (RA) interface and extract the private key, public certificate, and trust chain to generate the physical credential files needed to authenticate cert-manager:
- Navigate to the RA Web tab.
- Click Make New Request and configure:
- Certificate Type:
GDC ADMIN EE PROFILE - Key-pair generation: By the CA
- Key algorithm: RSA 4096 bits
- Common Name (CN):
cert-manager - Username:
cert-manager - Enrollment code:
abcd
- Certificate Type:
- Click Download PEM and save it as
cert-manager.pem. Split the PEM files into three files:
client.key(the secret key):openssl pkey -in cert-manager.pem -out client.keyclient.crt(the public certificate):openssl x509 -in cert-manager.pem -out client.crtca.crt(the trust chain with the subordinate and root CA certificates):awk '/BEGIN CERTIFICATE/{i++} i>1' cert-manager.pem > ca.crt
Configure roles and access rules
Finally, you create an administrative role in EJBCA and bind it to the cert-manager certificate serial number to ensure the issuer only has the minimal set of permissions required to approve and request certificates:
- In the EJBCA Admin UI, navigate to RA Functions > Search End Entities.
- Search for the
cert-managerend entity and record its Certificate Serial Number. - Navigate to System Functions > Roles and Access Rules and click Add.
- Name the role
cert-managerand add a new member using the serial number you recorded. - Click Edit Access Rules and configure the following privileges:
- Role Template: RA Administrators
- Authorized CAs:
GDC Subordinate CA - End Entity Rules: Approve, Create, and Edit End Entities
- End Entity Profiles:
GDC TLS SERVER EE PROFILE - Other Rules: clear View Audit Log
- Click Save.
Prepare the GDC cluster
To prepare the GDC environment, you authenticate with your standard Kubernetes cluster and store the extracted EJBCA administrative credentials inside Kubernetes Secrets, making them securely accessible to the cert-manager issuer pods:
Retrieve standard cluster credentials:
gdcloud clusters get-credentials "${GDC_CLUSTER_NAME}" \
  --standard \
  --project "${GDC_PROJECT_ID}" \
  --zone "${GDC_ZONE}"
Create the target namespace for the custom issuer:
kubectl create ns ejbca-issuer-systemDeploy the TLS authentication secret:
kubectl create secret tls ejbca-secret \
  -n ejbca-issuer-system \
  --cert=client.crt \
  --key=client.key
Deploy the EJBCA trust chain secret:
kubectl create secret generic ejbca-ca-secret \
  -n ejbca-issuer-system \
  --from-file=ca.crt
Install the EJBCA issuer
To configure the deployment, you mirror the EJBCA cert-manager issuer container image to your private Harbor registry and deploy the Helm chart. This instantiates the custom controller required to translate Kubernetes certificate requests into EJBCA API calls:
Create a Harbor image pull secret in the issuer's namespace:
# Authenticate with the private Harbor registry
docker --config=./docker-harbor login ${HARBOR_INSTANCE_URL} \
  -u ${HARBOR_ROBOT_ACCOUNT} \
  -p ${HARBOR_ROBOT_SECRET}

kubectl create secret docker-registry ${HARBOR_PULL_SECRET_NAME} \
  --from-file=.dockerconfigjson=./docker-harbor/config.json \
  -n ejbca-issuer-system
Mirror the official EJBCA cert-manager issuer image to Harbor:
docker pull keyfactor/ejbca-cert-manager-issuer:latest --platform linux/amd64

docker tag keyfactor/ejbca-cert-manager-issuer:latest \
  ${HARBOR_INSTANCE_URL}/${HARBOR_PROJECT}/ejbca-cert-manager-issuer:latest

docker --config=./docker-harbor push \
  ${HARBOR_INSTANCE_URL}/${HARBOR_PROJECT}/ejbca-cert-manager-issuer:latest
Add the Helm repository and download the chart:
helm repo add ejbca-issuer https://keyfactor.github.io/ejbca-cert-manager-issuer
helm repo update
helm pull ejbca-issuer/ejbca-cert-manager-issuer --untar
Deploy the Helm chart using the mirrored image repository:
helm install ejbca-cert-manager-issuer ./ejbca-cert-manager-issuer \
  --namespace ejbca-issuer-system \
  --set image.repository=${HARBOR_INSTANCE_URL}/${HARBOR_PROJECT}/ejbca-cert-manager-issuer \
  --set "imagePullSecrets[0].name=${HARBOR_PULL_SECRET_NAME}" \
  --set image.tag=latest
Create the issuer resource
Next, you establish GDC RBAC permissions and deploy a
global ClusterIssuer resource, which registers the EJBCA server as a trusted
signing source inside the Kubernetes cert-manager framework:
Configure RBAC permissions to allow GDC's cert-manager controller to use the custom EJBCA issuer:
kubectl apply -f - <<EOF
apiVersion: rbac.authorization.k8s.io/v1
kind: ClusterRole
metadata:
  name: cert-manager-controller-approve:issuers-ejbca-issuer-keyfactor-com
rules:
- verbs:
  - approve
  apiGroups:
  - cert-manager.io
  resources:
  - signers
  resourceNames:
  - issuers.ejbca-issuer.keyfactor.com/*
  - clusterissuers.ejbca-issuer.keyfactor.com/*
---
apiVersion: rbac.authorization.k8s.io/v1
kind: ClusterRoleBinding
metadata:
  name: cert-manager-controller-approve:issuers-ejbca-issuer-keyfactor-com
subjects:
- kind: ServiceAccount
  name: cert-manager
  namespace: cert-manager
roleRef:
  apiGroup: rbac.authorization.k8s.io
  kind: ClusterRole
  name: cert-manager-controller-approve:issuers-ejbca-issuer-keyfactor-com
EOF
Deploy the global
ClusterIssuerresource:kubectl apply -f - <<EOF apiVersion: ejbca-issuer.keyfactor.com/v1alpha1 kind: ClusterIssuer metadata: name: clusterissuer-ejbca spec: hostname: "${EJBCA_HOSTNAME}" ejbcaSecretName: "ejbca-secret" caBundleSecretName: "ejbca-ca-secret" certificateAuthorityName: "${EJBCA_CA_NAME}" certificateProfileName: "${CERTIFICATE_PROFILE_NAME}" endEntityProfileName: "${END_ENTITY_PROFILE_NAME}" endEntityName: "" EOFVerify the issuer status:
kubectl get clusterissuer.ejbca-issuer.keyfactor.com/clusterissuer-ejbca \
  -o "custom-columns=NAME:.metadata.name,STATUS:.status.conditions[0].message"
The output should show:
NAME                  STATUS
clusterissuer-ejbca   Success
Request a certificate
To verify the integration, you deploy a standard Kubernetes Certificate resource to test the end-to-end cert-manager flow and confirm that EJBCA successfully signs and provisions the requested certificate:
Create a test Certificate resource to verify successful integration:
kubectl apply -f - <<EOF
apiVersion: cert-manager.io/v1
kind: Certificate
metadata:
  name: ejbca-test-certificate
  namespace: ${EJBCA_NAMESPACE}
spec:
  commonName: example.com
  secretName: ejbca-certificate
  issuerRef:
    name: clusterissuer-ejbca
    group: ejbca-issuer.keyfactor.com
    kind: ClusterIssuer
EOF
Verify that the certificate was created and is ready:
kubectl get certificates.cert-manager.io -n ${EJBCA_NAMESPACE}
The output should show:
NAME                     READY   SECRET              AGE
ejbca-test-certificate   True    ejbca-certificate   12s
Automated ACME with DNS-01 challenges
In this section, you configure EJBCA's ACME service and utilize GDC internal DNS resources to automate domain-validated certificate issuance. This enables standard cert-manager or Certbot clients to request certificates using standard automated ACME protocols.
Configure EJBCA for ACME
To prepare the server, you enable the ACME service inside EJBCA and configure an ACME alias with a dedicated DNS resolver. This prepares the EJBCA server to process and validate DNS-01 challenge responses inside GDC:
- In the EJBCA Admin UI, navigate to System Configuration > ACME Configuration.
- Click Add and configure the following:
- Name:
default - End entity profile:
GDC TLS SERVER EE PROFILE - Wildcard Certificate Issuance Allowed: Check
- Challenge Response MPIC Validation DNS identifier challenge types:
Select
dns-01 - DNS resolver: Enter IP of your global DNS.
- Validate DNSSEC: clear (since this is a local private environment)
- Name:
- Click Save.
Create ACME environment variables
In this section, you create the following environment variables to configure your Certbot client. Modify these values as needed:
# ACME Alias created in the EJBCA configuration
export ACME_ALIAS="default"

# Arbitrary email address used for ACME registration
export ACME_EMAIL="your-email@example.com"
Register the Certbot client
Next, you install the standard Certbot client and register it with EJBCA's private ACME endpoint. This establishes the trusted client account needed to perform automated certificate operations:
Install
certboton your workstation. For example, for macOS:brew install certbotCreate local folders for configuration and logs:
mkdir -p ./certbot/config ./certbot/work ./certbot/logsRegister the client with the EJBCA ACME directory endpoint:
certbot register \
  --config-dir ./certbot/config \
  --work-dir ./certbot/work \
  --logs-dir ./certbot/logs \
  --server https://${EJBCA_HOSTNAME}/ejbca/acme/${ACME_ALIAS}/directory \
  --email ${ACME_EMAIL} \
  --agree-tos \
  --no-eff-email
Issue a certificate using DNS challenge
Finally, you execute a manual Certbot request and deploy a temporary GDC DNS TXT resource to solve the DNS-01 challenge. This validates your ownership of the target domain and triggers automated certificate issuance:
Run the manual challenge command:
certbot certonly \
  --manual \
  --preferred-challenges dns \
  --key-type rsa \
  --rsa-key-size 2048 \
  --config-dir ./certbot/config \
  --work-dir ./certbot/work \
  --logs-dir ./certbot/logs \
  --server https://${EJBCA_HOSTNAME}/ejbca/acme/${ACME_ALIAS}/directory \
  -d test.${EJBCA_DNS_ZONE}
The terminal will halt and display a challenge value. Example output:
Please deploy a DNS TXT record under the name:

_acme-challenge.test.example.internal.

with the following value:

q3pCmzXfIhsTpT4f4JAulHmHaAR3udC_9Wf1G498ER0

Before continuing, verify the TXT record has been deployed.
Deploy the TXT record to your global DNS with the string provided by Certbot.
Wait approximately 30 seconds for DNS propagation, return to the Certbot terminal, and press Enter.
Example output:
Successfully received certificate.
Certificate is saved at:./certbot/config/live/test.example.internal/fullchain.pem
Key is saved at:./certbot/config/live/test.example.internal/privkey.pem
This certificate expires on 2026-11-16.
These files will be updated when the certificate renews.
Verify the certificate is successfully written to
./certbot/config/live/test.${EJBCA_DNS_ZONE}/.