

Migrate code with the batch SQL translator
This document describes how to use the batch SQL translator in BigQuery to translate scripts written in other SQL dialects into GoogleSQL queries. You can submit and review the results of a translation job from the Google Cloud console or from the command line.
For a list of SQL dialects supported by this SQL translator, see Supported SQL dialects.
For a list of supported processing locations, see Locations.
Before you begin
Before you submit a translation job, do the following steps.
Enable SQL translations
Enable the required API, and get the permissions needed to use a BigQuery SQL translator. For more information, see Enable SQL translations.
Required permissions
To get the permissions that
you need to create translation jobs with the interactor translator, the translation API, or the batch SQL translator,
ask your administrator to grant you the
following IAM roles on the parent resource:
-
Viewing and monitoring migration jobs:
MigrationWorkflow Viewer (
roles/bigquerymigration.viewer) -
Submitting migration jobs:
MigrationWorkflow Editor (
roles/bigquerymigration.editor) -
Access the Cloud Storage buckets for input and files:
Storage Object Admin (
roles/storage.objectAdmin) - on the source and destination Cloud Storage bucket.
For more information about granting roles, see Manage access to projects, folders, and organizations.
These predefined roles contain the permissions required to create translation jobs with the interactor translator, the translation API, or the batch SQL translator. To see the exact permissions that are required, expand the Required permissions section:
Required permissions
The following permissions are required to create translation jobs with the interactor translator, the translation API, or the batch SQL translator:
-
bigquerymigration.workflows.create -
bigquerymigration.workflows.get -
bigquerymigration.workflows.list -
bigquerymigration.workflows.delete -
bigquerymigration.subtasks.get -
bigquerymigration.subtasks.list -
storage.objects.get -
storage.objects.list -
storage.objects.create
You might also be able to get these permissions with custom roles or other predefined roles.
Collect source files
Source files must be text files that contain valid SQL for the source dialect. Source files can also include comments. Do your best to ensure the SQL is valid, using whatever methods are available to you.
Create metadata files
To help the service generate more accurate translation results, we recommend that you provide metadata files. However, this isn't mandatory.
You can use the dwh-migration-dumper command-line extraction tool to generate the metadata
information. After you prepare the metadata files, you can include them along with the source files in the translation
source folder. The translator automatically detects them and leverages them
to translate source files, you don't need to configure any extra settings to enable this.
To generate metadata information by using the
dwh-migration-dumper tool, see
Generate metadata for translation.
Create configuration YAML files
You can optionally create and use configuration configuration YAML files to customize your batch translations. These files can be used to transform your translation output in various ways. For example, you can create a configuration YAML file to change the case of a SQL object during translation.
To use a configuration YAML file, upload it to the Cloud Storage bucket containing the source files.
Upload input files to Cloud Storage
Upload the source files containing the queries and scripts that you want to translate to Cloud Storage. You can also upload any metadata files or configuration YAML files to the same Cloud Storage bucket and directory containing the source files. For more information about creating buckets and uploading files to Cloud Storage, see Create buckets and Upload objects from a filesystem.
Choose how to submit the translation job
You have two options for submitting a batch translation job:
Google Cloud console: Configure and submit a job using a user interface.
Command-line tools: Describe the job in a translation configuration file, and submit it with the Google Cloud CLI or the bq command-line tool command-line tool.
Both options require you to upload your source files to Cloud Storage, and both create the same kind of translation job. A job that you submit from the command line still appears in the translation jobs list in the Google Cloud console.
Submit a translation job
Use one of the following options to start a translation job and view its progress. To review the results afterwards, see Explore the translation output.
Console
These steps assume that you uploaded source files to a Cloud Storage bucket.
To use the Google Cloud console to submit a batch translation job, do the following steps:
In the Google Cloud console, go to the SQL Translation page.
In the SQL translation panel, click Start translation.
For Translation configuration, enter the following:
- For Display name, enter a name for the translation job. The name can contain letters, numbers or underscores.
- For Processing location, select the location where you want the
translation job to run. For example, if you are in Europe and you
don't want your data to cross any location boundaries, select the
euregion. The translation job performs best when you choose the same location as your source file bucket. - For Source dialect, select the SQL dialect that you want to translate.
- For Target dialect, select GoogleSQL.
Click Next.
For File location details, specify the Cloud Storage paths to use for translation input and output. You can enter the paths in the format
bucket_name/folder_name/or use the Browse option to navigate to a folder.- For Output directory location, specify a path to the destination Cloud Storage folder for the translated files. This serves as a root directory for all translation output.
- Choose one or more Input directory locations containing the path to the SQL files to translate.
- Each input directory can optionally be given an Output subdirectory name underneath the root output directory if necessary.
Click Next.
Select any optional settings that you need to customize metadata and any additional translation outputs.
Optional: To further customize translation behavior, create configuration YAML files and place these files in the input Cloud Storage bucket. These files can be used to rename objects, enable optimizations, enhance translations with Gemini and more. For more information about configuration YAML files, see Create a configuration YAML file.
Click Create to start the translation job.
After you create the translation job, you can see its status in the translation jobs list.
bq
To use the gcloud CLI or the bq command-line tool command-line tool to submit a batch translation job, do the following steps.
These steps assume that you uploaded source files to a Cloud Storage bucket.
Create a translation configuration file
A translation configuration file defines the path to the source files, the output destination, and the source and target dialects of your translation. You can write this file in either YAML or JSON.
The following example shows a translation configuration YAML file for a Teradata to BigQuery translation:
tasks:
  translation_task:
    type: Teradata2BigQuery_Translation
    translationDetails:
      sourceTargetMapping:
      - sourceSpec:
          baseUri: gs://bq-translations/input
        targetSpec:
          relativePath: output
      targetBaseUri: gs://bq-translations
      targetTypes:
      - sql
      sourceEnvironment:
        defaultDatabase: default_db
        schemaSearchPath:
        - foo
The following example shows a translation configuration JSON file for a Teradata to BigQuery translation:
{
  "tasks": {
    "translation_task": {
      "type": "Teradata2BigQuery_Translation",
      "translationDetails": {
        "sourceTargetMapping": [
          {
            "sourceSpec": {
              "literal": {
                "literalString": "sel 1",
                "relativePath": "my_input_1"
              },
              "encoding": "UTF-8"
            }
          },
          {
            "sourceSpec": {
              "literal": {
                "literalString": "sel 2",
                "relativePath": "my_input_2"
              },
              "encoding": "UTF-8"
            }
          }
        ],
        "targetReturnLiterals": [
          "sql/my_input_1",
          "sql/my_input_2"
        ]
      }
    }
  }
}
Submit the job with the Google Cloud CLI
To create a translation job and run the workflow, use the following command:
gcloud bq migration-workflows create --location=LOCATION --config-file=CONFIG_FILE
To create and run the workflow and return immediately with a link to the
workflow, add the --async flag:
gcloud bq migration-workflows create --location=LOCATION --config-file=CONFIG_FILE --async
To list your translation jobs, use the following command:
gcloud bq migration-workflows list --location=LOCATION
To see the details of a specific translation job, use the following command:
gcloud bq migration-workflows describe projects/PROJECT_ID/locations/LOCATION/workflows/WORKFLOW_ID
Replace the following:
LOCATION: the location of the Google Cloud project that is running this translation job.CONFIG_FILE: the path to your translation configuration file.PROJECT_ID: the ID of the Google Cloud project that is running this translation job.WORKFLOW_ID: the ID of the translation job.
Submit the job with the bq command-line tool command-line tool
To run the translation job, use the following command:
bq mk --migration_workflow --location=LOCATION --config_file=CONFIG_FILE
To list all your translation jobs, use the following command:
bq ls --migration_workflow --location=LOCATION
To view details about a specific translation job, use the following command:
bq show --migration_workflow projects/PROJECT_ID/locations/LOCATION/workflows/WORKFLOW_ID
To remove a translation job from the list, use the following command:
bq rm --migration_workflow projects/PROJECT_ID/locations/LOCATION/workflows/WORKFLOW_ID
Replace the following:
LOCATION: the location of the Google Cloud project that is running this translation job.CONFIG_FILE: the path to your translation configuration file.PROJECT_ID: the ID of the Google Cloud project that is running this translation job.WORKFLOW_ID: the ID of the translation job.
Retrieve the output files
The translation job writes its results to the Cloud Storage directory
that you set in the targetBaseUri field of the translation configuration file. This target directory holds the
translated files, the translation summary report, and any AI suggestion files.
To copy the output to your local machine, use the following command:
gcloud storage cp --recursive TARGET_URI LOCAL_DIRECTORY
Replace the following:
TARGET_URI: your target base URI, such asgs://my_data_bucket/teradata/output/.LOCAL_DIRECTORY: the local directory that receives the files.
Your job also appears in the translation jobs list in the Google Cloud console, even though you submitted it from the command line. To review the quality of a translation output, see Explore the translation output.
Explore the translation output
You can review the results of a translation job in the Google Cloud console, regardless of whether the job was submitted from the command line or the Google Cloud console. The batch SQL translator outputs the following files to the specified destination:
- The translated files.
- The translation summary report in CSV format.
- The AI suggestion files.
Google Cloud console output
To see translation job details, follow these steps:
In the Google Cloud console, go to the SQL Translation page.
In the list of translation jobs, locate the job for which you want to see the translation details. Then, click the translation job name. You can see a Sankey visualization that illustrates the overall quality of the job, the number of input lines of code (excluding blank lines and comments), and a list of issues that occurred during the translation process. You should prioritize fixes from left to right. Issues in an early stage can cause additional issues in subsequent stages.
Hold the pointer over the error or warning bars, and review the suggestions to determine next steps to debug the translation job.
Select the Log Summary tab to see a summary of the translation issues, including issue categories, suggested actions, and how often each issue occurred. You can click the Sankey visualization bars to filter issues. You can also select an issue category to see log messages associated with that issue category.
Select the Log Messages tab to see more details about each translation issue, including the issue category, the specific issue message, and a link to the file in which the issue occurred. You can click the Sankey visualization bars to filter issues. You can select an issue in the Log Message tab to open the Code tab that displays the input and output file if applicable.
Click the Job details tab to see the translation job configuration details.
Summary report
The summary report is a CSV file that contains a table of all of the warning and error messages encountered during the translation job.
To see the summary file in the Google Cloud console, follow these steps:
In the Google Cloud console, go to the SQL Translation page.
In the list of translation jobs, locate the job that you are interested in, then click the job name or click More options > Show details.
In the Job details tab, in the Translation report section, click translation_report.csv.
On the Object details page, click the value in the Authenticated URL row to see the file in your browser.
The following table describes the summary file columns:
| Column | Description |
|---|---|
| Timestamp | The timestamp at which the issue occurred. |
| FilePath | The path to the source file that the issue is associated with. |
| FileName | The name of the source file that the issue is associated with. |
| ScriptLine | The line number where the issue occurred. |
| ScriptColumn | The column number where the issue occurred. |
| TranspilerComponent | The translation engine internal component where the warning or error occurred. This column might be empty. |
| Environment | The translation dialect environment associated with the warning or error. This column might be empty. |
| ObjectName | The SQL object in the source file that is associated with the warning or error. This column might be empty. |
| Severity | The severity of the issue, either warning or error. |
| Category | The translation issue category. |
| SourceType | The source of this issue. The value in this column can either be
SQL, indicating an issue in the input SQL files, or
METADATA, indicating an issue in the metadata package. |
| Message | The translation issue warning or error message. |
| ScriptContext | The SQL snippet in the source file that is associated with the issue. |
| Action | The action we recommend you take to resolve the issue. |
Code tab
The code tab lets you review further information about the input and output files for a particular translation job. In the code tab, you can examine the files used in a translation job, review a side-by-side comparison of an input file and its translation for any inaccuracies, and view log summaries and messages for a specific file in a job.
To access the code tab, follow these steps:
In the Google Cloud console, go to the SQL Translation page.
In the list of translation jobs, locate the job that you are interested in, then click the job name or click More options > Show details.
Select Code tab. The code tab consists of the following panels:
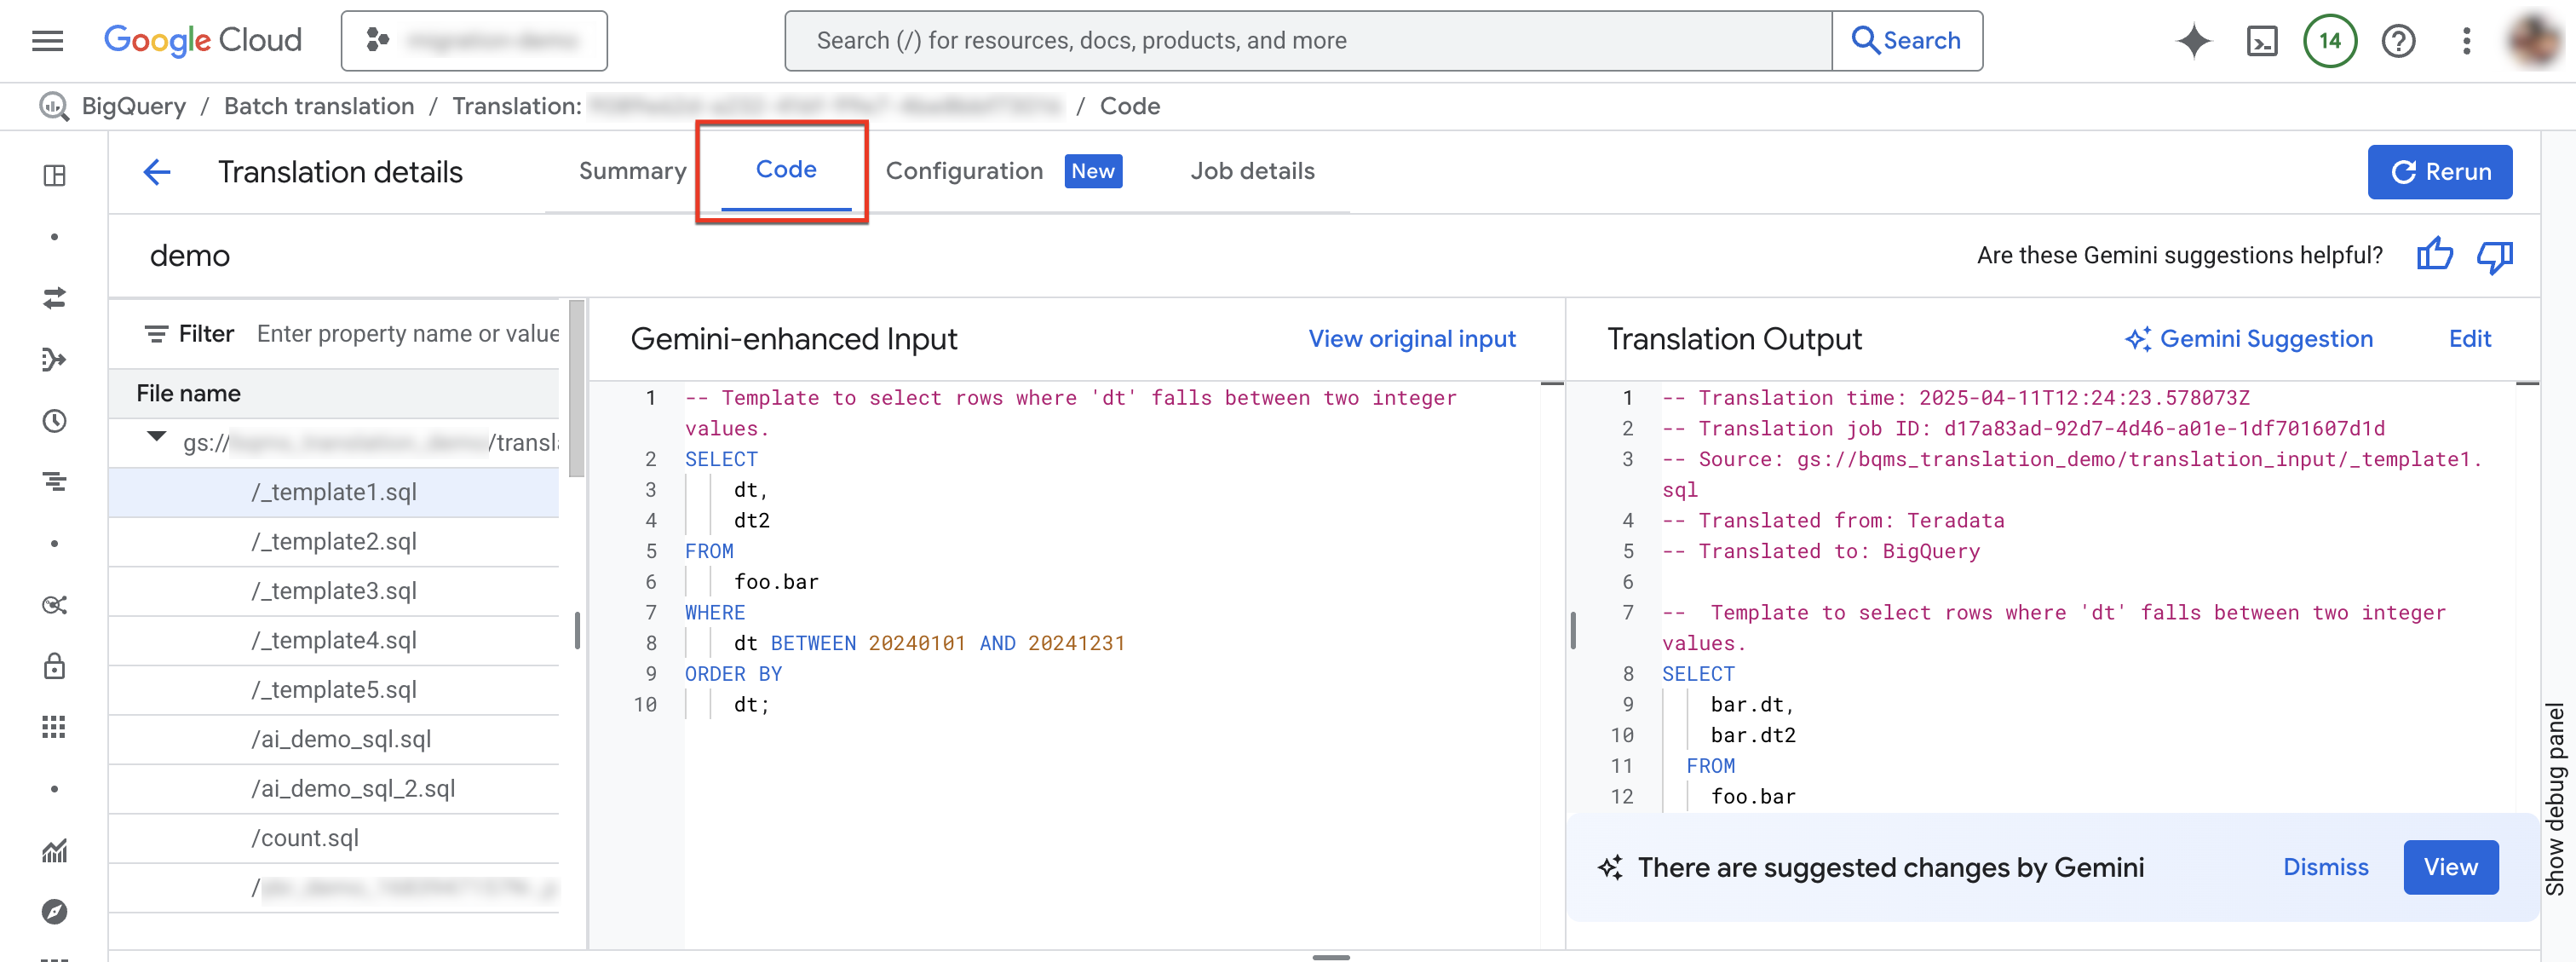
- File explorer: Contains all SQL files used for translation. Click a file to view its translation input and output, and any translation issues from its translation.
- Gemini-enhanced input: The input SQL that was translated by the translation engine. If you have specified Gemini customization rules for the source SQL in the Gemini configuration, then the translator transforms the original input first and then translates the Gemini-enhanced input. To view the original input, click View original input.
- Translation output: The translation result. If you have specified Gemini customization rules for the target SQL in the Gemini configuration, then the transformation is applied to the translated result as a Gemini-enhanced output. If a Gemini-enhanced output is available, then you can click the Gemini suggestion button to review the Gemini-enhanced output.
Optional: To view an input file and its output file in the BigQuery interactive SQL translator, click Edit. You can edit the files and save the output file back to Cloud Storage.
Configuration tab
You can add, rename, view, or edit your configuration YAML files in the Configuration tab. The Schema Explorer shows the documentation for supported configuration types to help you write your configuration YAML files. After you edit the configuration YAML files, you can rerun the job to use the new configuration.
To access the configuration tab, follow these steps:
In the Google Cloud console, go to the SQL Translation page.
In the list of translation jobs, locate the job that you are interested in, then click the job name or click More options > Show details.
In the Translation details window, click the Configuration tab.
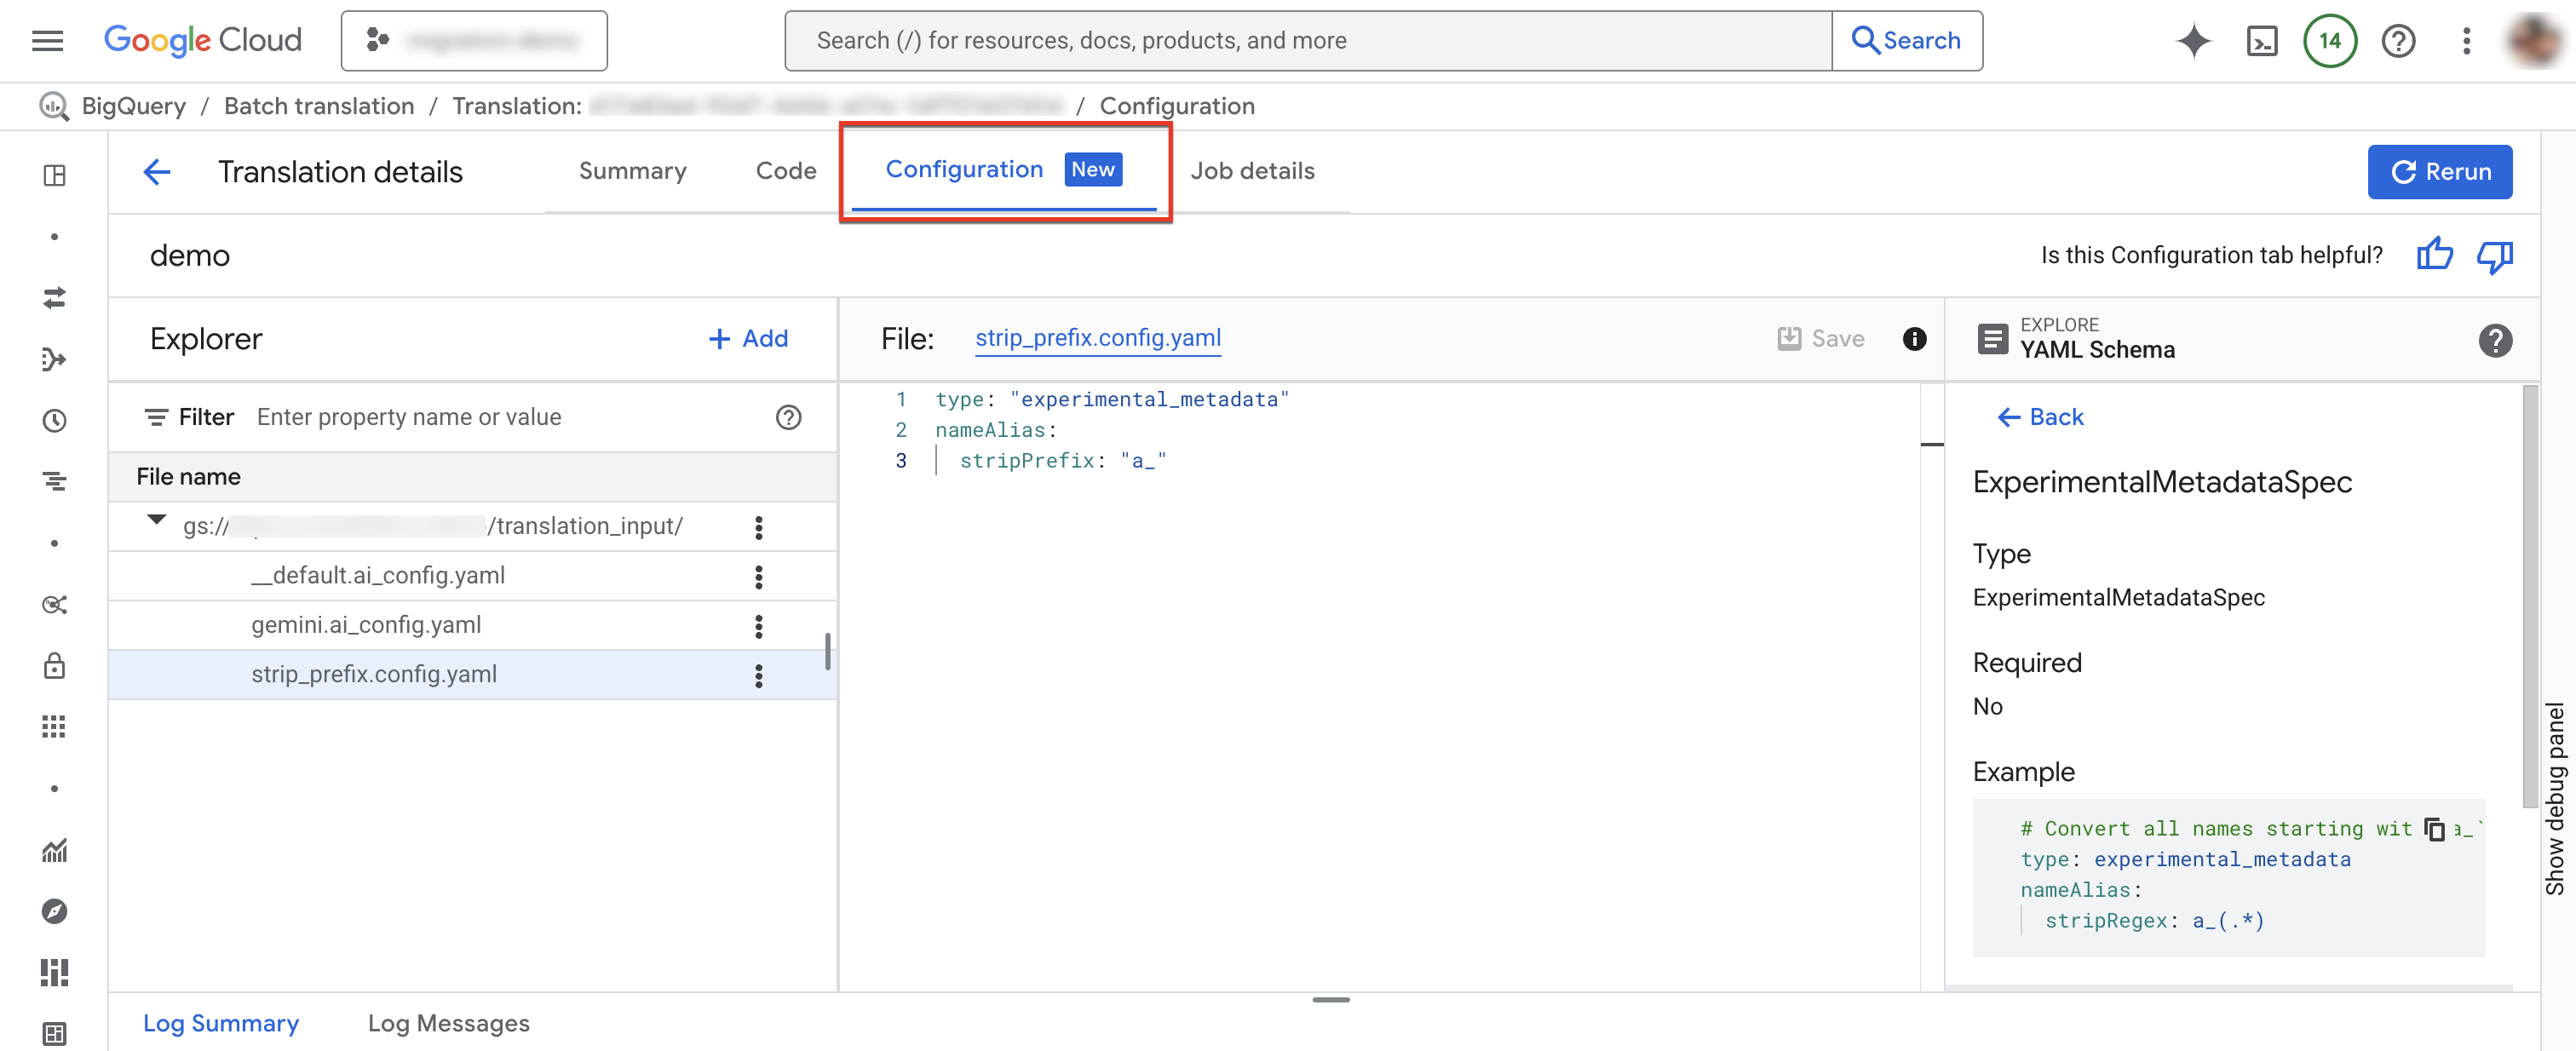
To add a new configuration file:
- Click more_vert More options > Create configuration YAML file.
- A panel appears where you can choose the type, location, and name of the new configuration YAML file.
- Click Create.
To edit an existing configuration file:
- Click the configuration YAML file.
- Edit the file, then click Save.
- Click Re-run to run a new translation job that uses the edited configuration YAML files.
You can rename an existing configuration file by clicking more_vert More options > Rename.
Translated files
For each source file, a corresponding output file is generated in the destination path. The output file contains the translated query.
Handling unsupported SQL functions with helper UDFs
When translating SQL from a source dialect to BigQuery, some functions might not have a direct equivalent. To address this, the BigQuery Migration Service (and the broader BigQuery community) provide helper user-defined functions (UDFs) that replicate the behavior of these unsupported source dialect functions.
These UDFs are often found in the bqutil public dataset, allowing translated
queries to initially reference them using the format
bqutil.<dataset>.<function>(). For example, bqutil.fn.cw_count().
Considerations for production environments
While bqutil offers convenient access to these helper UDFs for initial
translation and testing, direct reliance on bqutil for production workloads is
not recommended for the following reasons:
- Version control: The
bqutilproject hosts the latest version of these UDFs, which means their definitions can change over time. Relying directly onbqutilcould lead to unexpected behavior or breaking changes in your production queries if a UDF's logic is updated. - Dependency isolation: Deploying UDFs to your own project isolates your production environment from external changes.
- Customization: You might need to modify or optimize these UDFs to better suit your specific business logic or performance requirements. This is only possible if they are within your own project.
- Security and governance: Your organization's security policies might restrict
direct access to public datasets like
bqutilfor production data processing. Copying UDFs to your controlled environment aligns with such policies.
Deploying helper UDFs to your project
To give you full control over UDF version, customization, and access, we recommend deploying helper UDFs into your own project and dataset for reliable and stable production use. For more information about the necessary scripts and steps to deploy helper UDFs into your environment, see Deploying the UDFs.
Troubleshooting
This section describes how to debug individual queries and how to resolve the most common translation errors.
Debug batch translated SQL queries with the interactive SQL translator
You can use the BigQuery interactive SQL translator to review or debug a SQL query using the same metadata or object mapping information as your source database. After you complete a batch translation job, BigQuery generates a translation configuration ID that contains information about the job's metadata, the object mapping, or the schema search path, as applicable to the query. You use the batch translation configuration ID with the interactive SQL translator to run SQL queries with the specified configuration.
To start an interactive SQL translation by using a batch translation configuration ID, follow these steps:
In the Google Cloud console, go to the SQL Translation page.
In the list of translation jobs, locate the job that you are interested in, and then click More Options > Open Interactive Translation.
The BigQuery interactive SQL translator now opens with the corresponding batch translation configuration ID. To view the translation configuration ID for the interactive translation, click Tools > Query translation > Translation settings in the interactive SQL translator.
To debug a batch translation file in the interactive SQL translator, follow these steps:
In the Google Cloud console, go to the SQL Translation page.
In the list of translation jobs, locate the job that you are interested in, and then click the job name or click More options > Show details.
In the Translation details window, click the Code tab.
In the file explorer, click your filename to open the file.
Next to the output filename, click Edit to open the files in the interactive SQL translator (Preview).
You see the input and output files populated in the interactive SQL translator that now uses the corresponding batch translation configuration ID.
To save the edited output file back to Cloud Storage, in the interactive SQL translator click Save > Save To GCS.
Troubleshoot translation errors
The following sections describe commonly encountered errors when using the batch SQL translator.
RelationNotFound or AttributeNotFound translation issues
After translating a query using the
batch SQL translator,
you might encounter a failed translation with the RelationNotFound or
AttributeNotFound error.
You can find failed translations by going to the Translation details page in BigQuery in the Google Cloud console and opening the Log Messages tab.
Translation works best with metadata DDLs. When SQL object definitions can't be
found, the translation engine raises RelationNotFound or AttributeNotFound
issues. We recommend using the metadata extractor to generate metadata packages
to make sure all object definitions are present. Adding metadata is the
recommended first step to resolve most translation errors, because this step
often fixes many other errors that are indirectly caused by a lack of metadata.
For more information, see Generate metadata for translation and assessment.
Fix translation issues with Gemini
To fix failed translation jobs with the RelationNotFound or
AttributeNotFound errors, you can also use Gemini to resolve these
issues:
- Go to the Translation details page and open the Log Messages tab.
- Click the query that has the message
RelationNotFoundorAttributeNotFoundin the Category column. To go to the file and line containing the error in the code tab, click the
error message.
In the Action column, click Suggested fix.
Select one of the following options, Apply or Apply and rerun:
- To copy the generated schema file from the output directory to the input directory, click Apply.
- To copy the generated schema file from the output directory to the input directory and open a rerun window, click Apply and rerun.
Quota and limits
- BigQuery Migration API quotas apply.
- Each project can have at most 10 active translation tasks.
- While there is no hard limit on the total number of source and metadata files, we recommend keeping the number of files to under 1000 for better performance.
Pricing
There is no charge to use the batch SQL translator. However, storage used to store input and output files incurs the normal fees. For more information, see Storage pricing.
What's next
Learn more about the following steps in data warehouse migration:
- Migration overview
- Migration assessment
- Schema and data transfer overview
- Data pipelines
- Interactive SQL translation
- Data security and governance
- Data validation tool