
本教學課程說明如何使用 Backup for GKE,將 GKE 中的有狀態應用程式從舊版機器類型 (例如 N2) 遷移至新版機器類型 (例如 N4),並將附加的 Persistent Disk 磁碟區換成附加的 Hyperdisk 磁碟區。如要進一步瞭解支援 Hyperdisk 的機器類型,請參閱 Compute Engine 說明文件。
為示範遷移作業,本教學課程會使用 Sakila 資料庫和 World 資料庫提供範例資料集。Sakila 是 MySQL 提供的範例資料庫,代表虛構的 DVD 租賃商店。World 資料庫包含國家/地區和城市的資料。本教學課程會使用不同命名空間中的兩個不同資料集,模擬複雜的多租戶環境。
本教學課程適用於負責建立及分配儲存空間,並管理資料安全性及資料存取權的儲存空間專家和管理員。如要進一步瞭解內容中提及的常見角色和範例工作,請參閱「常見的 GKE 使用者角色和工作」。 Google Cloud
部署架構
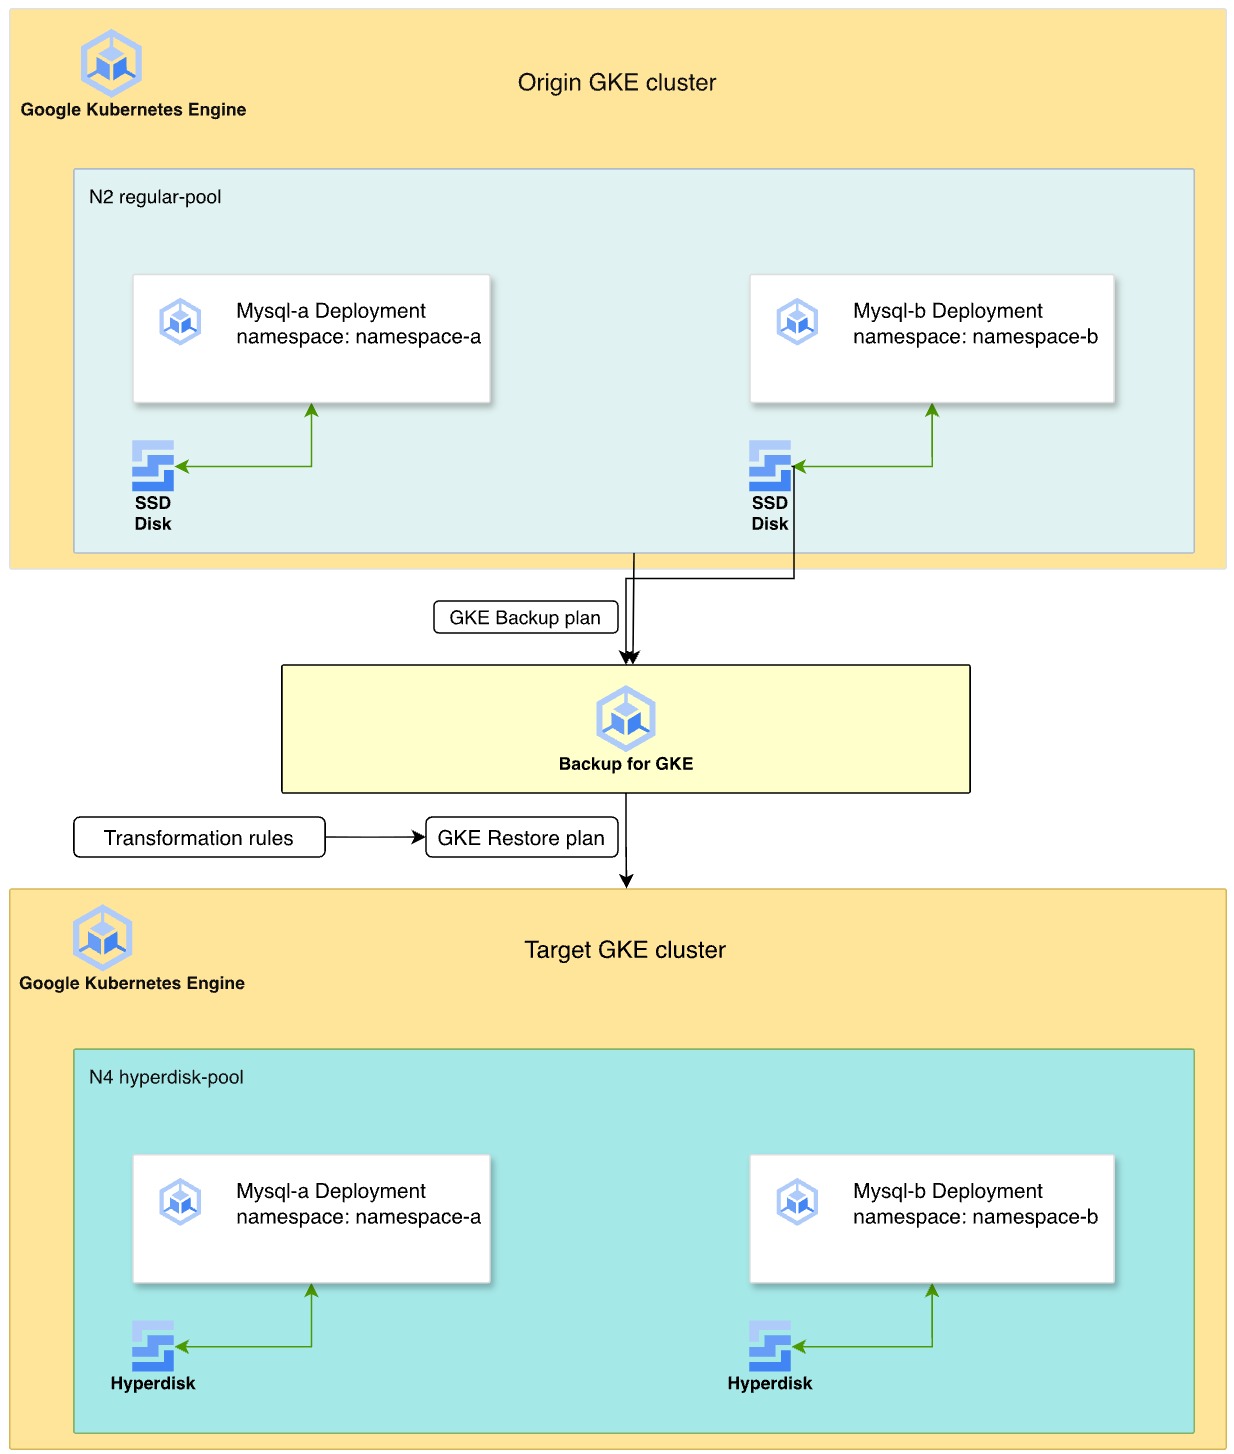
下圖說明使用 GKE 備份將有狀態 MySQL 工作負載,從 N2 機型上的 Persistent Disk 遷移至 N4 機型上的 Hyperdisk 的程序。
- 來源叢集:兩個 MySQL 部署作業分別位於 N2 機器系列節點集區的
namespace-a和namespace-b命名空間。這些部署作業會使用 SSD 永久磁碟儲存資料。 - 備份策略:在叢集上啟用 GKE 備份代理程式,並建立備份方案來擷取命名空間、磁碟區資料和密鑰。接著,您會執行手動備份,建立時間點復原點。
- 轉換和還原:您可以使用轉換規則定義還原方案,以調整資源來配合目標環境。這些規則會執行下列作業:
- 將
StorageClass從premium-rwo(PD) 換成名為balanced-storage的 Hyperdisk 儲存空間級別。 - 修改 Pod 親和性規則,確保還原的工作負載排定在新的 N4 節點集區。
- 將
- 目標環境:您佈建了使用 N4 機型的新 GKE 叢集。還原程序會從備份重新建立磁碟做為 Hyperdisk 磁碟區,並將 MySQL 執行個體部署到相容的 N4 節點。
目標
在本教學課程中,您將瞭解如何執行下列操作:
- 準備備份 GKE 有狀態應用程式。
- 啟用 GKE 備份外掛程式。
- 建立備份方案並備份來源叢集。
- 建立還原方案,使用轉換規則將儲存空間遷移至 Hyperdisk。
- 將工作負載還原至新叢集,並驗證資料。
費用
在本文件中,您會使用下列 Google Cloud的計費元件:
- GKE
- Compute Engine (Persistent Disk and Hyperdisk)
- Backup for GKE
如要根據預測用量估算費用,請使用 Pricing Calculator。
事前準備
- 登入 Google Cloud 帳戶。如果您是 Google Cloud新手,歡迎 建立帳戶,親自評估產品在實際工作環境中的成效。新客戶還能獲得價值 $300 美元的免費抵免額,可用於執行、測試及部署工作負載。
-
In the Google Cloud console, on the project selector page, select or create a Google Cloud project.
Roles required to select or create a project
- Select a project: Selecting a project doesn't require a specific IAM role—you can select any project that you've been granted a role on.
-
Create a project: To create a project, you need the Project Creator role
(
roles/resourcemanager.projectCreator), which contains theresourcemanager.projects.createpermission. Learn how to grant roles.
-
Verify that billing is enabled for your Google Cloud project.
Enable the Compute Engine, GKE, Backup for GKE, and IAM APIs.
Roles required to enable APIs
To enable APIs, you need the Service Usage Admin IAM role (
roles/serviceusage.serviceUsageAdmin), which contains theserviceusage.services.enablepermission. Learn how to grant roles.-
確認您在專案中具備下列一或多個角色: roles/container.admin、roles/iam.serviceAccountAdmin、roles/compute.admin、roles/gkebackup.admin、roles/monitoring.viewer
檢查角色
-
前往 Google Cloud 控制台的「IAM」頁面。
前往「IAM」頁面 - 選取專案。
-
在「主體」欄中,找出所有識別您或您所屬群組的資料列。如要瞭解自己所屬的群組,請與管理員聯絡。
- 針對指定或包含您的所有列,請檢查「角色」欄,確認角色清單是否包含必要角色。
授予角色
-
前往 Google Cloud 控制台的「IAM」頁面。
前往「IAM」頁面 - 選取專案。
- 按一下「Grant access」(授予存取權)。
-
在「New principals」(新增主體) 欄位中,輸入您的使用者 ID。 這通常是指 Google 帳戶的電子郵件地址。
- 按一下「選取角色」,然後搜尋角色。
- 如要授予其他角色,請按一下「Add another role」(新增其他角色),然後新增其他角色。
- 按一下「Save」(儲存)。
-
設定 Cloud Shell
-
在 Google Cloud 控制台中啟用 Cloud Shell。
Cloud Shell 工作階段會開啟,並顯示指令列提示。工作階段可能要幾秒鐘的時間才能初始化。
- 設定您的預設專案:
gcloud config set project PROJECT_ID將
PROJECT_ID替換為專案 ID。
設定環境
在本節中,您將準備環境變數,並複製範例存放區。
為專案、叢集名稱和區域設定環境變數:
export PROJECT_ID=PROJECT_ID
export KUBERNETES_CLUSTER_PREFIX=backup-gke-migration
export TARGET_CLUSTER_PREFIX=restore-gke-migration
export ZONE=us-central1-a
將
PROJECT_ID替換為 Google Cloud專案 ID。複製程式碼範例存放區,然後前往該目錄:
git clone https://github.com/GoogleCloudPlatform/kubernetes-engine-samples
cd kubernetes-engine-samples/databases/backup-migration
建立來源 GKE 叢集
建立可用區叢集,其中節點集區使用 N2 機型,並附加永久磁碟卷。
建立叢集:
gcloud container clusters create ${KUBERNETES_CLUSTER_PREFIX}-cluster \
  --location ${ZONE} \
  --node-locations ${ZONE} \
  --shielded-secure-boot \
  --shielded-integrity-monitoring \
  --machine-type "e2-micro" \
  --num-nodes "1"
為來源工作負載建立具有
n2-standard-4機型的節點集區:gcloud container node-pools create regular-pool \ --cluster ${KUBERNETES_CLUSTER_PREFIX}-cluster \ --machine-type n2-standard-4 \ --zone ${ZONE} \ --num-nodes 1在來源叢集上啟用 GKE 備份 外掛程式:
gcloud container clusters update ${KUBERNETES_CLUSTER_PREFIX}-cluster \
  --project=${PROJECT_ID}  \
  --location=${ZONE} \
  --update-addons=BackupRestore=ENABLED
取得叢集的憑證:
gcloud container clusters get-credentials ${KUBERNETES_CLUSTER_PREFIX}-cluster --zone ${ZONE}確認已啟用 GKE 備份代理程式:
gcloud container clusters describe ${KUBERNETES_CLUSTER_PREFIX}-cluster \
  --project=${PROJECT_ID}  \
  --location=${ZONE}
輸出結果看起來與下列內容相似,並確認備份代理程式已啟用:
addonsConfig:
  gkeBackupAgentConfig:
    enabled: true
部署 MySQL 並填入範例資料
在不同命名空間中部署兩個 MySQL 資料庫,模擬實際工作環境。
建立
namespace-a和namespace-b命名空間:kubectl create namespace namespace-a kubectl create namespace namespace-b在
namespace-a和namespace-b中部署 MySQL 工作負載:部署
mysql-a-deployment.yaml檔案:kubectl apply -f manifests/02-mysql/mysql-a-deployment.yaml -n namespace-a下列資訊清單會在
namespace-a中建立 MySQL Pod,並在regular-pool節點上動態佈建 Persistent Disk SSD 磁碟。根密碼設為migration:部署 檔案:
mysql-b-deployment.yamlkubectl apply -f manifests/02-mysql/mysql-b-deployment.yaml -n namespace-b下列資訊清單會在
namespace-b中建立 MySQL Pod,並在regular-pool節點上動態佈建 Persistent Disk SSD 磁碟。根密碼設為migration:
部署 MySQL 用戶端 Pod,上傳範例資料集:
kubectl apply -f manifests/02-mysql/mysql-client.yaml
kubectl wait pods mysql-client --for condition=Ready --timeout=300s
下列資訊清單會部署 MySQL 用戶端 Pod:
連線至用戶端 Pod:
kubectl exec -it mysql-client -- bash在 Pod 內,下載 Sakila 和 World 範例資料集:
curl --output dataset.tgz "https://downloads.mysql.com/docs/sakila-db.tar.gz"
tar -xvzf dataset.tgz -C ./

curl --output world-db.tar.gz "https://downloads.mysql.com/docs/world-db.tar.gz"
tar xvzf world-db.tar.gz -C ./
將 Sakila 資料集匯入
mysql-a資料庫:mysql -u root -h mysql-a.namespace-a -p # Enter password: migration SOURCE /sakila-db/sakila-schema.sql; SOURCE /sakila-db/sakila-data.sql;驗證匯入的 Sakila 資料:
USE sakila;
SELECT table_name, table_rows FROM INFORMATION_SCHEMA.TABLES WHERE TABLE_SCHEMA = 'sakila';
結束 MySQL:
exit將 World 資料集匯入
mysql-b資料庫:mysql -u root -h mysql-b.namespace-b -p # Enter password: migration SOURCE /world-db/world.sql;驗證匯入的「World」資料:
USE world;
SELECT table_name, table_rows FROM INFORMATION_SCHEMA.TABLES WHERE TABLE_SCHEMA = 'world';
輸出結果會與下列內容相似:
+-----------------+------------+
| table_name      | table_rows |
+-----------------+------------+
| city            |       4079 |
| country         |        239 |
| countrylanguage |        984 |
+-----------------+------------+
結束 MySQL:
exit結束用戶端 Pod 殼層:
exit
備份 GKE 叢集
備份整個叢集,包括密鑰和磁碟區。
建立備份方案:
gcloud beta container backup-restore backup-plans create main-plan \ --project=${PROJECT_ID} \ --location=us-central1 \ --cluster=projects/${PROJECT_ID}/locations/${ZONE}/clusters/${KUBERNETES_CLUSTER_PREFIX}-cluster \ --selected-namespaces=namespace-a,namespace-b,default \ --include-secrets \ --include-volume-data \ --target-rpo-minutes=1440 \ --backup-retain-days=7 \ --backup-delete-lock-days=3 \ --locked--selected-namespaces:備份特定命名空間,避免與系統資源發生衝突。--include-volume-data: 有助於確保永久磁碟資料已備份。--target-rpo-minutes:根據復原點目標 (RPO) 設定備份時間表。RPO 是可接受的資料遺失時間範圍上限,並決定備份頻率。如果設定為1440分鐘 (1 天),系統就會排定每日備份。
建立備份:
gcloud beta container backup-restore backups create first-backup \
    --project=${PROJECT_ID} \
    --location=us-central1 \
    --backup-plan=main-plan \
    --wait-for-completion
等待輸出內容顯示
Backup state: SUCCEEDED。確認備份已建立:
gcloud beta container backup-restore backups list \
    --project=${PROJECT_ID} \
    --location=us-central1 \
    --backup-plan=main-plan
透過 Hyperdisk 轉換還原
將備份還原至新叢集。還原作業會將儲存空間從 Persistent Disk 轉換為 Hyperdisk,並將工作負載移至 N4 節點。
在 N4 節點上建立目標 GKE 叢集:
gcloud container clusters create ${TARGET_CLUSTER_PREFIX}-cluster \
  --location ${ZONE} \
  --node-locations ${ZONE} \
  --shielded-secure-boot \
  --shielded-integrity-monitoring \
  --machine-type "e2-micro" \
  --num-nodes "1"
建立具有
n4-standard-4機型的節點集區,這是 Hyperdisk 的必要條件:gcloud container node-pools create hyperdisk-pool \ --cluster ${TARGET_CLUSTER_PREFIX}-cluster \ --machine-type n4-standard-4 \ --zone ${ZONE} \ --num-nodes 1取得目標叢集的憑證:
gcloud container clusters get-credentials ${TARGET_CLUSTER_PREFIX}-cluster --zone ${ZONE}套用名為
balanced-storage的 HyperdiskStorageClass:kubectl apply -f manifests/01-storage-class/storage-class-hdb.yaml下列資訊清單定義 Hyperdisk
StorageClass:查看
manifests/03-transformation-rule/volume.yaml檔案中的轉換規則。這個檔案定義了還原期間資源的修改方式:- PVC 轉換:將
storageClassName變更為balanced-storage(Hyperdisk)。 - 部署作業轉換:更新節點親和性,在
n4-standard-4節點上排定 Pod。
- PVC 轉換:將
使用下列轉換規則建立還原方案:
gcloud beta container backup-restore restore-plans create main-restore \
  --project=${PROJECT_ID} \
  --location=us-central1 \
  --backup-plan=projects/${PROJECT_ID}/locations/us-central1/backupPlans/main-plan \
  --cluster=projects/${PROJECT_ID}/locations/${ZONE}/clusters/${TARGET_CLUSTER_PREFIX}-cluster \
  --namespaced-resource-restore-mode=merge-replace-on-conflict \
  --all-namespaces \
  --cluster-resource-conflict-policy=use-existing-version  \
  --cluster-resource-scope-selected-group-kinds=cluster-resource-scope-all-group-kinds \
  --volume-data-restore-policy=restore-volume-data-from-backup \
  --transformation-rules-file=manifests/03-transformation-rule/volume.yaml
執行還原作業:
gcloud beta container backup-restore restores create first-restore \
   --project=${PROJECT_ID} \
   --location=us-central1 \
   --restore-plan=main-restore \
   --backup=projects/${PROJECT_ID}/locations/us-central1/backupPlans/main-plan/backups/first-backup
驗證遷移結果
確認應用程式在新叢集上執行,且資料完好無損。
檢查 Pod 是否正在執行:
kubectl get pods -A連線至新叢集上的 MySQL 用戶端 Pod:
# Verify that the client Pod is running
kubectl apply -f manifests/02-mysql/mysql-client.yaml
kubectl wait pods mysql-client --for condition=Ready --timeout=300s
kubectl exec -it mysql-client -- bash
在
namespace-a中驗證還原的 Sakila 資料庫:mysql -u root -h mysql-a.namespace-a -p # Password: migration USE sakila; SELECT table_name, table_rows FROM INFORMATION_SCHEMA.TABLES WHERE TABLE_SCHEMA = 'sakila';在
namespace-b中驗證還原的 World 資料庫:mysql -u root -h mysql-b.namespace-b -p # Password: migration USE world; SELECT table_name, table_rows FROM INFORMATION_SCHEMA.TABLES WHERE TABLE_SCHEMA = 'world';
清除所用資源
為避免因為本教學課程所用資源,導致系統向 Google Cloud 帳戶收取費用,請刪除含有相關資源的專案,或者保留專案但刪除個別資源。
刪除 GKE 叢集:
gcloud container clusters delete ${KUBERNETES_CLUSTER_PREFIX}-cluster --location ${ZONE} --quiet
gcloud container clusters delete ${TARGET_CLUSTER_PREFIX}-cluster --location ${ZONE} --quiet
刪除備份和還原方案:
# Delete the restore plan
gcloud beta container backup-restore restore-plans delete main-restore \
    --project=${PROJECT_ID} \
    --location=us-central1 \
    --quiet

# Delete the Backup
gcloud beta container backup-restore backups delete first-backup \
    --project=${PROJECT_ID} \
    --location=us-central1 \
    --backup-plan=main-plan \
    --quiet

# Delete the backup plan
gcloud beta container backup-restore backup-plans delete main-plan \
    --project=${PROJECT_ID} \
    --location=us-central1 \
    --quiet
後續步驟
- 進一步瞭解 GKE 備份。
- 請參閱 Hyperdisk 儲存空間集區。