
This tutorial demonstrates how to migrate stateful applications in GKE from older generation machine types, such as N2, with attached Persistent Disk volumes, to newer generation machine types, such as N4, with attached Hyperdisk volumes by using Backup for GKE. For more information about machines types that support Hyperdisk, see Compute Engine documentation.
To demonstrate the migration, this tutorial uses the Sakila database and the World database to provide sample datasets. Sakila is a sample database provided by MySQL that represents a fictional DVD rental store. The World database contains data about countries and cities. The tutorial uses two different datasets across separate namespaces to simulate a complex, multi-tenant environment.
This tutorial is for Storage specialists and Storage administrators who create and allocate storage, and manage data security and data access. To learn more about common roles and example tasks referenced in Google Cloud content, see Common GKE user roles and tasks.
Deployment architecture
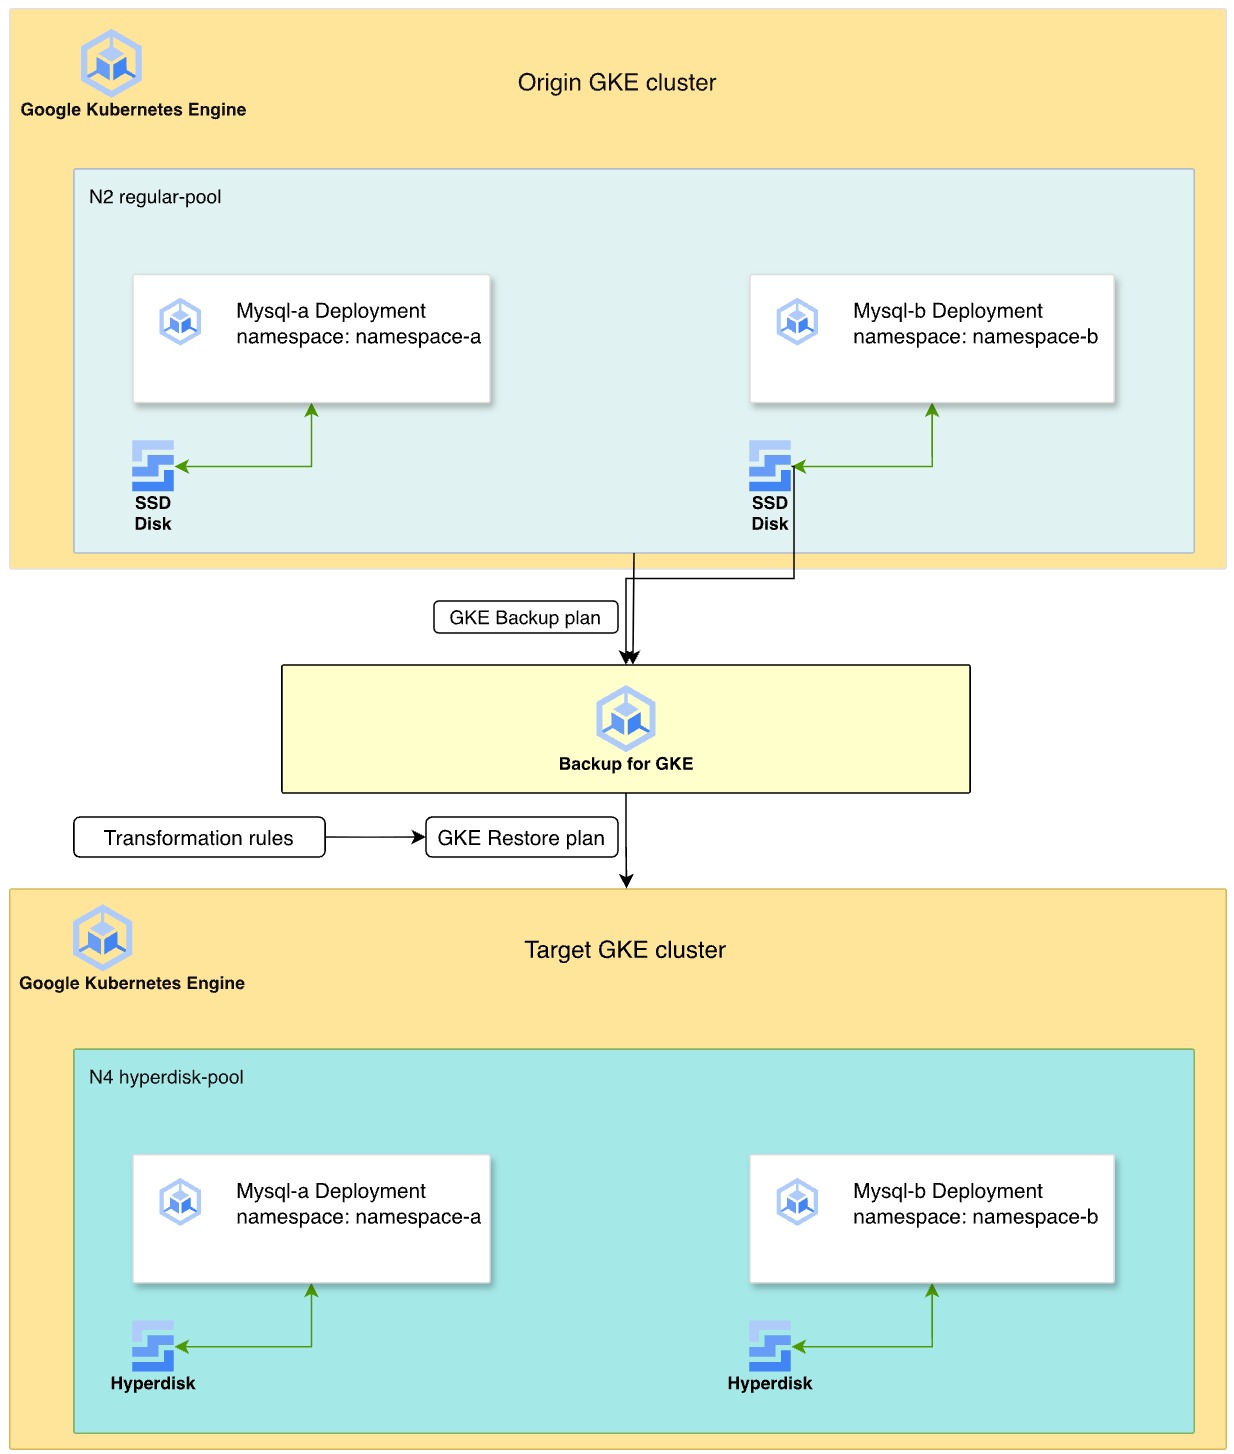
The following diagram illustrates the process of using Backup for GKE to migrate stateful MySQL workloads from Persistent Disk on N2 machine types to Hyperdisk on N4 machine types.
- Origin cluster: two MySQL deployments reside in separate namespaces,
namespace-aandnamespace-b, on an N2 machine series node pool. These deployments use SSD Persistent Disk for data storage. - Backup strategy: you enable the Backup for GKE agent on the cluster, and create a backup plan to capture the namespaces, volume data, and secrets. Then, you execute a manual backup to create a point-in-time recovery point.
- Transformation and restore: you define a restore plan by using
transformation rules to adapt the resources for the target environment.
These rules do the following:
- Swap the
StorageClassfrompremium-rwo(PD) to a Hyperdisk storage class namedbalanced-storage. - Modify Pod affinity rules to help ensure that the restored workloads are scheduled on a new N4 node pool.
- Swap the
- Target environment: you provision a new GKE cluster with N4 machine types. The restore process re-creates the disks as Hyperdisk volumes from the backup and deploys the MySQL instances onto the compatible N4 nodes.
Objectives
In this tutorial, you learn how to do the following:
- Prepare GKE stateful applications for backup.
- Enable the Backup for GKE add-on.
- Create a backup plan and back up the source cluster.
- Create a restore plan that uses transformation rules to migrate storage to Hyperdisk.
- Restore the workload to a new cluster and verify the data.
Costs
In this document, you use the following billable components of Google Cloud:
- GKE
- Compute Engine (Persistent Disk and Hyperdisk)
- Backup for GKE
To generate a cost estimate based on your projected usage,
use the pricing calculator.
Before you begin
- Sign in to your Google Cloud account. If you're new to Google Cloud, create an account to evaluate how our products perform in real-world scenarios. New customers also get $300 in free credits to run, test, and deploy workloads.
-
In the Google Cloud console, on the project selector page, select or create a Google Cloud project.
Roles required to select or create a project
- Select a project: Selecting a project doesn't require a specific IAM role—you can select any project that you've been granted a role on.
-
Create a project: To create a project, you need the Project Creator role
(
roles/resourcemanager.projectCreator), which contains theresourcemanager.projects.createpermission. Learn how to grant roles.
-
Verify that billing is enabled for your Google Cloud project.
Enable the Compute Engine, GKE, Backup for GKE, and IAM APIs.
Roles required to enable APIs
To enable APIs, you need the Service Usage Admin IAM role (
roles/serviceusage.serviceUsageAdmin), which contains theserviceusage.services.enablepermission. Learn how to grant roles.-
Make sure that you have the following role or roles on the project: roles/container.admin, roles/iam.serviceAccountAdmin, roles/compute.admin, roles/gkebackup.admin, roles/monitoring.viewer
Check for the roles
-
In the Google Cloud console, go to the IAM page.
Go to IAM - Select the project.
-
In the Principal column, find all rows that identify you or a group that you're included in. To learn which groups you're included in, contact your administrator.
- For all rows that specify or include you, check the Role column to see whether the list of roles includes the required roles.
Grant the roles
-
In the Google Cloud console, go to the IAM page.
Go to IAM - Select the project.
- Click Grant access.
-
In the New principals field, enter your user identifier. This is typically the email address for a Google Account.
- Click Select a role, then search for the role.
- To grant additional roles, click Add another role and add each additional role.
- Click Save.
-
Set up Cloud Shell
-
In the Google Cloud console, activate Cloud Shell.
A Cloud Shell session starts and displays a command-line prompt. It can take a few seconds for the session to initialize.
- Set your default project:
gcloud config set project PROJECT_IDReplace
PROJECT_IDwith your project ID.
Set up the environment
In this section, you prepare the environment variables and clone the sample repository.
Set the environment variables for your project, cluster names, and zone:
export PROJECT_ID=PROJECT_ID
export KUBERNETES_CLUSTER_PREFIX=backup-gke-migration
export TARGET_CLUSTER_PREFIX=restore-gke-migration
export ZONE=us-central1-a
Replace
PROJECT_IDwith your Google Cloud project ID.Clone the sample code repository and navigate to the directory:
git clone https://github.com/GoogleCloudPlatform/kubernetes-engine-samples
cd kubernetes-engine-samples/databases/backup-migration
Create the source GKE cluster
Create a zonal cluster with a node pool that uses N2 machine types and attached Persistent Disk volumes.
Create the cluster:
gcloud container clusters create ${KUBERNETES_CLUSTER_PREFIX}-cluster \
  --location ${ZONE} \
  --node-locations ${ZONE} \
  --shielded-secure-boot \
  --shielded-integrity-monitoring \
  --machine-type "e2-micro" \
  --num-nodes "1"
Create a node pool with
n2-standard-4machine types for the source workload:gcloud container node-pools create regular-pool \ --cluster ${KUBERNETES_CLUSTER_PREFIX}-cluster \ --machine-type n2-standard-4 \ --zone ${ZONE} \ --num-nodes 1Enable the Backup for GKE add-on on the source cluster:
gcloud container clusters update ${KUBERNETES_CLUSTER_PREFIX}-cluster \
  --project=${PROJECT_ID}  \
  --location=${ZONE} \
  --update-addons=BackupRestore=ENABLED
Get credentials for the cluster:
gcloud container clusters get-credentials ${KUBERNETES_CLUSTER_PREFIX}-cluster --zone ${ZONE}Verify that the Backup for GKE agent is enabled:
gcloud container clusters describe ${KUBERNETES_CLUSTER_PREFIX}-cluster \
  --project=${PROJECT_ID}  \
  --location=${ZONE}
The output looks similar to the following, and confirms that the backup agent is enabled:
addonsConfig:
  gkeBackupAgentConfig:
    enabled: true
Deploy MySQL with sample data
Deploy two MySQL databases in separate namespaces to simulate a production environment.
Create the
namespace-aandnamespace-bnamespaces:kubectl create namespace namespace-a kubectl create namespace namespace-bDeploy the MySQL workloads in
namespace-aandnamespace-b:Deploy the
mysql-a-deployment.yamlfile:kubectl apply -f manifests/02-mysql/mysql-a-deployment.yaml -n namespace-aThe following manifest creates a MySQL Pod in
namespace-awith dynamically provisioned Persistent Disk SSD disks on theregular-poolnodes. The root password is set tomigration:Deploy the
mysql-b-deployment.yamlfile:kubectl apply -f manifests/02-mysql/mysql-b-deployment.yaml -n namespace-bThe following manifest creates a MySQL Pod in
namespace-bwith dynamically provisioned Persistent Disk SSD disks on theregular-poolnodes. The root password is set tomigration:
Deploy a MySQL client Pod to upload sample datasets:
kubectl apply -f manifests/02-mysql/mysql-client.yaml
kubectl wait pods mysql-client --for condition=Ready --timeout=300s
The following manifest deploys a MySQL client Pod:
Connect to the client Pod:
kubectl exec -it mysql-client -- bashInside the Pod, download the Sakila and World sample datasets:
curl --output dataset.tgz "https://downloads.mysql.com/docs/sakila-db.tar.gz"
tar -xvzf dataset.tgz -C ./

curl --output world-db.tar.gz "https://downloads.mysql.com/docs/world-db.tar.gz"
tar xvzf world-db.tar.gz -C ./
Import the Sakila dataset into the
mysql-adatabase:mysql -u root -h mysql-a.namespace-a -p # Enter password: migration SOURCE /sakila-db/sakila-schema.sql; SOURCE /sakila-db/sakila-data.sql;Verify the imported Sakila data:
USE sakila;
SELECT table_name, table_rows FROM INFORMATION_SCHEMA.TABLES WHERE TABLE_SCHEMA = 'sakila';
Exit MySQL:
exitImport the World dataset into the
mysql-bdatabase:mysql -u root -h mysql-b.namespace-b -p # Enter password: migration SOURCE /world-db/world.sql;Verify the imported World data:
USE world;
SELECT table_name, table_rows FROM INFORMATION_SCHEMA.TABLES WHERE TABLE_SCHEMA = 'world';
The output is similar to the following:
+-----------------+------------+
| table_name      | table_rows |
+-----------------+------------+
| city            |       4079 |
| country         |        239 |
| countrylanguage |        984 |
+-----------------+------------+
Exit MySQL:
exitExit the client Pod shell:
exit
Back up the GKE cluster
Back up the entire cluster, including secrets and volumes.
Create a backup plan:
gcloud beta container backup-restore backup-plans create main-plan \ --project=${PROJECT_ID} \ --location=us-central1 \ --cluster=projects/${PROJECT_ID}/locations/${ZONE}/clusters/${KUBERNETES_CLUSTER_PREFIX}-cluster \ --selected-namespaces=namespace-a,namespace-b,default \ --include-secrets \ --include-volume-data \ --target-rpo-minutes=1440 \ --backup-retain-days=7 \ --backup-delete-lock-days=3 \ --locked--selected-namespaces: backs up specific namespaces to avoid conflicts with system resources.--include-volume-data: helps to ensure the Persistent Disk data is backed up.--target-rpo-minutes: configures the Recovery Point Objective (RPO) based backup schedule. RPO is the maximum acceptable time window during which data might be lost, and it dictates backup frequency. With1440minutes (1 day), backups are scheduled to run daily.
Create a backup:
gcloud beta container backup-restore backups create first-backup \
    --project=${PROJECT_ID} \
    --location=us-central1 \
    --backup-plan=main-plan \
    --wait-for-completion
Wait for the output to show
Backup state: SUCCEEDED.Verify that the backup is created:
gcloud beta container backup-restore backups list \
    --project=${PROJECT_ID} \
    --location=us-central1 \
    --backup-plan=main-plan
Restore with Hyperdisk transformation
Restore the backup to a new cluster. The restore transforms the storage from Persistent Disk to Hyperdisk and moves workloads to N4 nodes.
Create the target GKE cluster on an N4 node:
gcloud container clusters create ${TARGET_CLUSTER_PREFIX}-cluster \
  --location ${ZONE} \
  --node-locations ${ZONE} \
  --shielded-secure-boot \
  --shielded-integrity-monitoring \
  --machine-type "e2-micro" \
  --num-nodes "1"
Create a node pool with
n4-standard-4machine types, which are required for Hyperdisk:gcloud container node-pools create hyperdisk-pool \ --cluster ${TARGET_CLUSTER_PREFIX}-cluster \ --machine-type n4-standard-4 \ --zone ${ZONE} \ --num-nodes 1Get credentials for the target cluster:
gcloud container clusters get-credentials ${TARGET_CLUSTER_PREFIX}-cluster --zone ${ZONE}Apply the Hyperdisk
StorageClassnamedbalanced-storage:kubectl apply -f manifests/01-storage-class/storage-class-hdb.yamlThe following manifest defines a Hyperdisk
StorageClass:Review the transformation rules in the
manifests/03-transformation-rule/volume.yamlfile. This file defines how resources are modified during restore:- PVC transformation: changes the
storageClassNametobalanced-storage(Hyperdisk). - Deployment transformation: updates node affinity to schedule Pods on
n4-standard-4nodes.
- PVC transformation: changes the
Create a restore plan by using these transformation rules:
gcloud beta container backup-restore restore-plans create main-restore \
  --project=${PROJECT_ID} \
  --location=us-central1 \
  --backup-plan=projects/${PROJECT_ID}/locations/us-central1/backupPlans/main-plan \
  --cluster=projects/${PROJECT_ID}/locations/${ZONE}/clusters/${TARGET_CLUSTER_PREFIX}-cluster \
  --namespaced-resource-restore-mode=merge-replace-on-conflict \
  --all-namespaces \
  --cluster-resource-conflict-policy=use-existing-version  \
  --cluster-resource-scope-selected-group-kinds=cluster-resource-scope-all-group-kinds \
  --volume-data-restore-policy=restore-volume-data-from-backup \
  --transformation-rules-file=manifests/03-transformation-rule/volume.yaml
Perform the restore:
gcloud beta container backup-restore restores create first-restore \
   --project=${PROJECT_ID} \
   --location=us-central1 \
   --restore-plan=main-restore \
   --backup=projects/${PROJECT_ID}/locations/us-central1/backupPlans/main-plan/backups/first-backup
Verify the migration
Verify that the applications are running on the new cluster and the data is intact.
Check if the Pods are running:
kubectl get pods -AConnect to the MySQL client Pod on the new cluster:
# Verify that the client Pod is running
kubectl apply -f manifests/02-mysql/mysql-client.yaml
kubectl wait pods mysql-client --for condition=Ready --timeout=300s
kubectl exec -it mysql-client -- bash
Verify the restored Sakila database in
namespace-a:mysql -u root -h mysql-a.namespace-a -p # Password: migration USE sakila; SELECT table_name, table_rows FROM INFORMATION_SCHEMA.TABLES WHERE TABLE_SCHEMA = 'sakila';Verify the restored World database in
namespace-b:mysql -u root -h mysql-b.namespace-b -p # Password: migration USE world; SELECT table_name, table_rows FROM INFORMATION_SCHEMA.TABLES WHERE TABLE_SCHEMA = 'world';
Clean up
To avoid incurring charges to your Google Cloud account for the resources used in this tutorial, either delete the project that contains the resources, or keep the project and delete the individual resources.
Delete the GKE clusters:
gcloud container clusters delete ${KUBERNETES_CLUSTER_PREFIX}-cluster --location ${ZONE} --quiet
gcloud container clusters delete ${TARGET_CLUSTER_PREFIX}-cluster --location ${ZONE} --quiet
Delete the backup and restore plans:
# Delete the restore plan
gcloud beta container backup-restore restore-plans delete main-restore \
    --project=${PROJECT_ID} \
    --location=us-central1 \
    --quiet

# Delete the Backup
gcloud beta container backup-restore backups delete first-backup \
    --project=${PROJECT_ID} \
    --location=us-central1 \
    --backup-plan=main-plan \
    --quiet

# Delete the backup plan
gcloud beta container backup-restore backup-plans delete main-plan \
    --project=${PROJECT_ID} \
    --location=us-central1 \
    --quiet
What's next
- Learn more about Backup for GKE.
- Read about Hyperdisk storage pools.