
在 Python 中使用使用者定義函式
Python 使用者定義函式 (UDF) 可讓您在 Python 中實作純量函式,並在 SQL 查詢中使用。Python UDF 與 SQL 和 JavaScript UDF 類似,但具備額外功能。您可以使用 Python UDF 從 Python Package Index (PyPI) 安裝第三方程式庫,並透過 Cloud 資源連結存取外部服務。
Python UDF 會在 BigQuery 管理的資源上建構及執行。
限制
- 目前僅支援
python-3.11執行階段。 - 您無法建立暫時性 Python UDF。
- 您無法搭配具體化檢視表使用 Python UDF。
- 呼叫 Python UDF 的查詢結果不會快取,因為系統一律會假設 Python UDF 的傳回值不具決定性。
- 不支援 Assured Workloads。
- 不支援的資料類型:
JSON、RANGE、INTERVAL和GEOGRAPHY。 - 執行 Python UDF 的容器最多只能設定 4 個 vCPU 和 16 GiB。
- 不支援使用客戶自行管理的加密金鑰 (CMEK) 加密 Python UDF 程式碼。
- Python UDF 支援 VPC Service Controls,但不支援 VPC 網路。
必要的角色
所需 IAM 角色取決於您是 Python UDF 擁有者還是使用者。
UDF 擁有者
Python UDF 擁有者通常會建立或更新 UDF。如果您建立的 Python UDF 參照 Cloud 資源連結,也需要其他角色。只有在 UDF 使用 WITH CONNECTION 子句存取外部服務時,才需要這個連線。
如要取得建立或更新 Python UDF 所需的權限,請要求系統管理員授予您下列 IAM 角色:
- 資料集的「BigQuery 資料編輯者」 (
roles/bigquery.dataEditor) - 專案的 BigQuery 工作使用者 (
roles/bigquery.jobUser) - 專案的 BigQuery 連線管理員 (
roles/bigquery.connectionAdmin)
如要進一步瞭解如何授予角色,請參閱「管理專案、資料夾和組織的存取權」。
這些預先定義的角色具備建立或更新 Python UDF 所需的權限。如要查看確切的必要權限,請展開「Required permissions」(必要權限) 部分:
所需權限
如要建立或更新 Python UDF,您必須具備下列權限:
-
使用
CREATE FUNCTION陳述式建立 Python UDF:bigquery.routines.create在資料集上 -
使用
CREATE FUNCTION陳述式更新 Python UDF:bigquery.routines.update在資料集上 -
執行
CREATE FUNCTION陳述式查詢作業:bigquery.jobs.create在專案中 -
建立新的 Cloud 資源連線:
bigquery.connections.create在專案中 -
在
CREATE FUNCTION陳述式中使用連線:bigquery.connections.delegateon the connection
如要進一步瞭解 BigQuery 中的角色,請參閱「預先定義的 IAM 角色」。
UDF 使用者
Python UDF 使用者會叫用他人建立的 UDF。如果叫用參照 Cloud 資源連線的 Python UDF,也需要其他角色。
如要取得呼叫他人建立的 Python UDF 所需的權限,請要求系統管理員授予您下列 IAM 角色:
- 專案的 BigQuery 使用者 (
roles/bigquery.user) - 資料集的 BigQuery 資料檢視者 (
roles/bigquery.dataViewer) - 連線的BigQuery 連線使用者 (
roles/bigquery.connectionUser)
如要進一步瞭解如何授予角色,請參閱「管理專案、資料夾和組織的存取權」。
這些預先定義的角色具備叫用他人建立的 Python UDF 所需的權限。如要查看確切的必要權限,請展開「Required permissions」(必要權限) 部分:
所需權限
如要叫用他人建立的 Python UDF,必須具備下列權限:
-
如要執行參照 Python UDF 的查詢工作:
bigquery.jobs.create在專案中 -
如要叫用其他人建立的 Python UDF,請按照下列步驟操作:
bigquery.routines.get在資料集上 -
如要執行參照 Cloud 資源連結的 Python UDF,請按照下列步驟操作:
bigquery.connections.useon the connection
如要進一步瞭解 BigQuery 中的角色,請參閱「預先定義的 IAM 角色」。
建立永久 Python UDF
建立 Python UDF 時,請遵守下列規則:
Python UDF 的主體必須是代表 Python 程式碼的引號字串常值。如要進一步瞭解以引號括住的字串文字,請參閱以引號括住的字串文字格式。
Python UDF 的主體必須包含 Python 函式,該函式會用於 Python UDF 選項清單中的
entry_point引數。您需要在
runtime_version選項中指定 Python 執行階段版本。目前僅支援 Python 執行階段版本python-3.11。如需可用選項的完整清單,請參閱CREATE FUNCTION陳述式的函式選項清單。
如要建立永久 Python UDF,請使用CREATE FUNCTION 陳述式,但不要使用 TEMP 或 TEMPORARY 關鍵字。如要刪除永久 Python UDF,請使用 DROP FUNCTION 陳述式。
範例
如要查看建立永久性 Python UDF 的範例,請選擇下列任一選項:
控制台
下列範例會建立名為 multiplyInputs 的永久 Python UDF,並從 SELECT 陳述式中呼叫該 UDF:
前往「BigQuery」頁面
在查詢編輯器中,輸入下列
CREATE FUNCTION陳述式:CREATE FUNCTION `PROJECT_ID.DATASET_ID`.multiplyInputs(x FLOAT64, y FLOAT64) RETURNS FLOAT64 LANGUAGE python OPTIONS(runtime_version="python-3.11", entry_point="multiply") AS r''' def multiply(x, y): return x * y '''; -- Call the Python UDF. WITH numbers AS (SELECT 1 AS x, 5 as y UNION ALL SELECT 2 AS x, 10 as y UNION ALL SELECT 3 as x, 15 as y) SELECT x, y, `PROJECT_ID.DATASET_ID`.multiplyInputs(x, y) AS product FROM numbers;
取代 PROJECT_ID。將 DATASET_ID 改成您的專案 ID 和資料集 ID。
按一下「執行」。
這個範例會產生下列輸出內容:
+-----+-----+--------------+
| x   | y   | product      |
+-----+-----+--------------+
| 1   | 5   |  5.0         |
| 2   | 10  | 20.0         |
| 3   | 15  | 45.0         |
+-----+-----+--------------+
BigQuery DataFrames
下列範例使用 BigQuery DataFrames,將自訂函式轉換為 Python UDF:
容器建構狀態
使用 CREATE FUNCTION 陳述式建立 Python UDF 時,BigQuery 會根據基礎映像檔建立或更新容器映像檔。容器會使用您的程式碼和任何指定的套件依附元件,以基本映像檔為基礎建構。
建立容器是長時間執行的程序。執行 CREATE FUNCTION 陳述式後的第一個查詢會等待映像檔建構完成。如果沒有外部依附元件,通常不到一分鐘就能建立容器映像檔。
每個專案和每個區域的所有 Python UDF 容器大小總和不得超過 10 GiB。詳情請參閱「永久性 UDF 的使用者定義函式限制」。如果專案已達配額,容器建構作業就會失敗。
如要查看容器建構狀態,請選擇下列其中一個選項:
控制台
前往 BigQuery Studio 頁面。
在左側窗格中展開專案,然後按一下「Datasets」(資料集)。
按一下連結,開啟包含 Python UDF 的資料集。
在資料集頁面中,按一下「日常安排」分頁標籤。
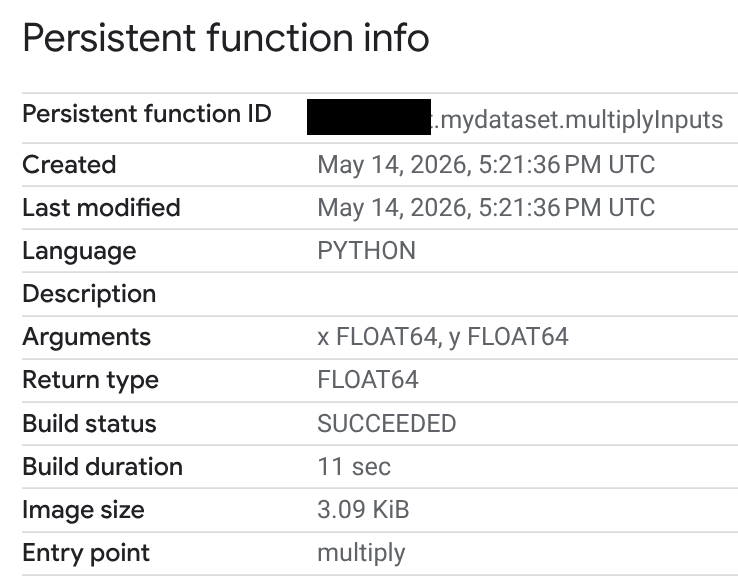
在「Routine ID」(常式 ID) 欄中,按一下 Python UDF。
在「永久函式資訊」頁面中,您可以查看建構狀態、建構時間和映像檔大小。建構狀態為下列其中一種:
- 進行中
- 成功
- 失敗
如果建構失敗,函式資訊頁面會提供詳細的錯誤訊息,方便您排解語法錯誤或安裝外部套件等問題。
SQL
如要在 INFORMATION_SCHEMA.ROUTINES 檢視畫面中查詢建構狀態欄位,請按照下列步驟操作:
前往 BigQuery Studio 頁面。
切換至查詢編輯器,或點選 「SQL 查詢」。
輸入下列查詢,從
INFORMATION_SCHEMA.ROUTINES檢視區塊擷取BUILD_STATUS欄位。 「BUILD_STATUS」欄是 GoogleSQL 中的STRUCT類型:SELECT build_status.* FROM `PROJECT_ID.DATASET_ID`.INFORMATION_SCHEMA.ROUTINES;取代 PROJECT_ID。將 DATASET_ID 替換為專案 ID 和資料集 ID。
輸出內容應如下所示。已省略錯誤欄位:
+---------------+--------------------------------+------------------------+------------------+
| build_state   | build_state_update_time        | build_duration_seconds | image_size_bytes |
+---------------+--------------------------------+------------------------+------------------+
| SUCCEEDED     | 2026-05-14 17:21:49.736000 UTC |                     11 |             3167 |
+---------------+--------------------------------+------------------------+------------------+
API
在 API 中使用 RoutineBuildStatus 查看容器建構狀態。
建立向量化 Python UDF
您可以實作 Python UDF,使用向量化處理一批資料列,而非單一資料列。向量化可提高查詢效能。您可以使用 Pandas 或 Apache Arrow 建立向量化 UDF。
如要控管批次處理行為,請在CREATE OR REPLACE FUNCTION選項清單中使用 max_batching_rows 選項,指定每個批次中的資料列數上限。如果您指定 max_batching_rows,BigQuery 會判斷批次中的資料列數量,最多為 max_batching_rows 限制。如未指定 max_batching_rows,系統會自動判斷要批次處理的資料列數量。
使用 Pandas
向量化 Python UDF 具有單一 pandas.DataFrame 引數,且必須加上註解。pandas.DataFrame 引數的欄數與 CREATE FUNCTION 陳述式中定義的 Python UDF 參數相同。pandas.DataFrame 引數中的資料欄名稱與 UDF 的參數名稱相同。
函式必須傳回 pandas.Series 或單欄 pandas.DataFrame,且列數與輸入內容相同。
下列範例會建立名為 multiplyInputs 的向量化 Python UDF,並使用兩個參數 (x 和 y):
前往「BigQuery」頁面
在查詢編輯器中,輸入下列
CREATE FUNCTION陳述式:CREATE FUNCTION `PROJECT_ID.DATASET_ID`.multiplyVectorized(x FLOAT64, y FLOAT64) RETURNS FLOAT64 LANGUAGE python OPTIONS(runtime_version="python-3.11", entry_point="vectorized_multiply") AS r''' import pandas as pd def vectorized_multiply(df: pd.DataFrame): return df['x'] * df['y'] ''';
取代 PROJECT_ID。將 DATASET_ID 替換為專案 ID 和資料集 ID。
呼叫 UDF 的方式與上一個範例相同。
按一下「執行」圖示 。
使用 Apache Arrow
以下範例使用 Apache Arrow RecordBatch 介面。使用 RecordBatch 介面時,函式會將等長資料欄的資料列批次傳遞至進入點。下列範例使用 Apache Arrow 建立名為 multiplyVectorizedArrow 的向量化 Python UDF。
前往「BigQuery」頁面
在查詢編輯器中,輸入下列
CREATE FUNCTION陳述式:CREATE FUNCTION `PROJECT_ID.DATASET_ID`.multiplyVectorizedArrow(x FLOAT64, y FLOAT64) RETURNS FLOAT64 LANGUAGE python OPTIONS( runtime_version="python-3.11", entry_point="vectorized_multiply_arrow" ) AS r''' import pyarrow as pa import pyarrow.compute as pc def vectorized_multiply_arrow(batch: pa.RecordBatch): # Access columns directly from the Arrow RecordBatch x = batch.column('x') y = batch.column('y') # Use pyarrow.compute for vectorized operations return pc.multiply(x, y) ''';
取代 PROJECT_ID。將 DATASET_ID 替換為專案 ID 和資料集 ID。
呼叫 UDF 的方式與先前的範例相同。
按一下「執行」圖示 。
呼叫 Python UDF
如果您有權叫用 Python UDF,就可以像呼叫任何其他函式一樣呼叫它。如要使用在其他專案中定義的函式,請使用該函式的完整名稱。舉例來說,如要在另一個專案中呼叫名為 cw_xml_extract 的 XML 擷取函式,請完成下列步驟。
控制台
前往「BigQuery」頁面。
在查詢編輯器中輸入下列範例:
SELECT `PROJECT_ID.DATASET_ID`.`cw_xml_extract`(xml, '//title/text()') AS `title` FROM UNNEST([ STRUCT('''<book id="1"> <title>The Great Gatsby</title> <author>F. Scott Fitzgerald</author> </book>''' AS xml), STRUCT('''<book id="2"> <title>1984</title> <author>George Orwell</author> </book>''' AS xml), STRUCT('''<book id="3"> <title>Brave New World</title> <author>Aldous Huxley</author> </book>''' AS xml) ])按一下「執行」圖示 。
這個範例會產生下列輸出內容:
+--------------------------+
| title                    |
+--------------------------+
| The Great Gatsby         |
| 1984                     |
| Brave New World          |
+--------------------------+
BigQuery DataFrames
下列範例使用 BigQuery DataFrames
sql_scalar、read_gbq_function 和 apply 方法呼叫 Python UDF:
支援的 Python UDF 資料類型
下表定義 BigQuery 資料類型、Python 資料類型和 Pandas 資料類型之間的對應關係:
| BigQuery 資料類型 | 標準 UDF 使用的 Python 內建資料型別 | 向量化 UDF 使用的 Pandas 資料類型 | 用於向量化 UDF 中 ARRAY 和 STRUCT 的 PyArrow 資料類型 |
|---|---|---|---|
BOOL |
bool |
BooleanDtype |
DataType(bool) |
INT64 |
int |
Int64Dtype |
DataType(int64) |
FLOAT64 |
float |
FloatDtype |
DataType(double) |
STRING |
str |
StringDtype |
DataType(string) |
BYTES |
bytes |
binary[pyarrow] |
DataType(binary) |
TIMESTAMP |
函式參數: 函式傳回值: |
函式參數: 函式傳回值: |
TimestampType(timestamp[us]) (含時區) |
DATE |
datetime.date |
date32[pyarrow] |
DataType(date32[day]) |
TIME |
datetime.time |
time64[pyarrow] |
Time64Type(time64[us]) |
DATETIME |
datetime.datetime (不含時區) |
timestamp[us][pyarrow] |
TimestampType(timestamp[us]),不含時區 |
ARRAY |
list |
list<...>[pyarrow],其中元素資料類型為 pandas.ArrowDtype |
ListType |
STRUCT |
dict |
struct<...>[pyarrow],其中欄位資料類型為 pandas.ArrowDtype |
StructType |
支援的執行階段版本
BigQuery Python UDF 支援 python-3.11 執行階段。這個 Python 版本包含一些額外預先安裝的套件。如果是系統程式庫,請檢查執行階段基本映像檔。
| 執行階段版本 | Python 版本 | 收錄 |
|---|---|---|
| python-3.11 | Python 3.11 | numpy 1.26.3 pyarrow 14.0.2 pandas 2.1.4 python-dateutil 2.8.2 absl-py 2.0.0 pytz 2023.3.post1 tzdata 2023.4 six 1.16.0 |
使用第三方套件
您可以使用CREATE FUNCTION 選項清單,使用 Python 標準程式庫和預先安裝的套件以外的模組。您可以從 Python Package Index (PyPI) 安裝套件,也可以從 Cloud Storage 匯入 Python 檔案。
從 Python Package Index 安裝套件
安裝套件時,您必須提供套件名稱,並可選擇使用 Python 套件版本指定符提供套件版本。
如果套件位於執行階段,系統會使用該套件,除非 CREATE FUNCTION 選項清單中指定了特定版本。如果未指定套件版本,且套件不在執行階段中,系統會使用最新版本。僅支援車輪二進位格式的套件。
以下範例說明如何建立 Python UDF,使用 CREATE OR REPLACE FUNCTION 選項清單安裝 scipy 套件:
前往「BigQuery」頁面
在查詢編輯器中,輸入下列
CREATE FUNCTION陳述式:CREATE FUNCTION `PROJECT_ID.DATASET_ID`.area(radius FLOAT64) RETURNS FLOAT64 LANGUAGE python OPTIONS (entry_point='area_handler', runtime_version='python-3.11', packages=['scipy==1.15.3']) AS r""" import scipy def area_handler(radius): return scipy.constants.pi*radius*radius """; SELECT `PROJECT_ID.DATASET_ID`.area(4.5);
取代 PROJECT_ID。將 DATASET_ID 替換為專案 ID 和資料集 ID。
按一下「執行」圖示 。
將其他 Python 檔案匯入為程式庫
您可以從 Cloud Storage 匯入 Python 檔案,使用函式選項清單擴充 Python UDF。
在 UDF 的 Python 程式碼中,您可以使用 import 陳述式,後面加上 Cloud Storage 物件的路徑,將 Cloud Storage 中的 Python 檔案匯入為模組。舉例來說,如果您要匯入 gs://BUCKET_NAME/path/to/lib1.py,匯入陳述式就會是 import
path.to.lib1。
Python 檔案名稱必須是 Python ID。物件名稱中的每個 folder 名稱 (/ 後方) 都應是有效的 Python 識別碼。在 ASCII 範圍 (U+0001..U+007F) 內,以下字元可用於 ID:
- 大寫和大小寫字母 A 到 Z。
- 底線。
- 數字 0 到 9,但識別碼的第一個字元不得為數字。
以下範例說明如何建立 Python UDF,從名為 my_bucket 的 Cloud Storage bucket 匯入 lib1.py 用戶端程式庫套件:
前往「BigQuery」頁面
在查詢編輯器中,輸入下列
CREATE FUNCTION陳述式:CREATE FUNCTION `PROJECT_ID.DATASET_ID`.myFunc(a FLOAT64, b STRING) RETURNS STRING LANGUAGE python OPTIONS ( entry_point='compute', runtime_version='python-3.11', library=['gs://BUCKET_NAME/PATH/lib1.py']) AS r""" import path.to.lib1 as lib1 def compute(a, b): # doInterestingStuff is a function defined in # gs://BUCKET_NAME/PATH/lib1.py return lib1.doInterestingStuff(a, b); """;
更改下列內容:
- PROJECT_ID:您的專案 ID。
- DATASET_ID:您的資料集 ID。
- BUCKET_NAME:包含
lib1.py的 Cloud Storage bucket 名稱。 - PATH:Cloud Storage bucket 的路徑。
按一下「執行」圖示 。
設定 Python UDF 的容器限制
您可以透過CREATE FUNCTION選項清單,為執行 Python UDF 的容器指定 CPU、記憶體和容器要求並行限制。
根據預設,容器會分配到下列資源:
- 分配的記憶體為
512Mi。 - 分配的 CPU 為
1.0個 vCPU。 - 容器要求並行限制為
80。
下列範例會使用 CREATE FUNCTION 選項清單建立 Python UDF,指定容器限制:
前往「BigQuery」頁面
在查詢編輯器中,輸入下列
CREATE FUNCTION陳述式:CREATE FUNCTION `PROJECT_ID.DATASET_ID`.square_area(length FLOAT64) RETURNS FLOAT64 LANGUAGE python OPTIONS (entry_point='square_area', runtime_version='python-3.11', container_memory='CONTAINER_MEMORY', container_cpu=CONTAINER_CPU, container_request_concurrency=CONTAINER_REQUEST_CONCURRENCY) AS r""" def square_area(length): return length*length """; SELECT `PROJECT_ID.DATASET_ID`.square_area(4.5);
更改下列內容:
- PROJECT_IDDATASET_ID: 您的專案 ID 和資料集 ID。
- CONTAINER_MEMORY:記憶體值,格式如下:
<integer_number><unit>。單位必須是下列其中一個值:Mi(MiB)、M(MB)、Gi(GiB) 或G(GB)。例如:2Gi。 - CONTAINER_CPU:CPU 值。Python UDF 支援介於
0.33和1.0之間的 CPU 分數值,以及1、2和4的 CPU 非分數值。 - CONTAINER_REQUEST_CONCURRENCY:每個 Python UDF 容器執行個體的並行要求數量上限。值必須是介於
1到1000之間的整數。
按一下「執行」圖示 。
支援的 CPU 值
Python UDF 支援介於 0.33 和 1.0 之間的小數 CPU 值,以及 1、2 和 4 的非小數 CPU 值。執行 Python UDF 的容器最多可設定 4 個 vCPU。預設值為 1.0。系統會先將分數輸入值四捨五入至小數點後兩位,再套用至容器。
支援的記憶體值
Python UDF 容器支援下列格式的記憶體值:
<integer_number><unit>。單位必須是下列其中一個值:Mi、M、Gi、G。可設定的記憶體容量下限為 256Mi。可設定的記憶體容量上限為 16Gi。
根據您選擇的記憶體值,您也必須指定適當的 CPU 量。下表顯示每個記憶體值的 CPU 最小值和最大值:
| 記憶體 | 最低 CPU | 最高 CPU |
|---|---|---|
256Mi 至 512Mi |
0.33 |
2 |
大於 512Mi 且小於或等於 1Gi |
0.5 |
2 |
大於 1Gi 且小於 2Gi |
1 |
2 |
2Gi 至 4Gi |
1 |
4 |
大於 4Gi 且小於或等於 8Gi |
2 |
4 |
大於 8Gi 且小於或等於 16Gi |
4 |
4 |
或者,如果您已決定要分配的 CPU 數量,可以使用下表判斷適當的記憶體範圍:
| CPU | 最低記憶體 | 記憶體上限 |
|---|---|---|
小於 0.5 |
256Mi |
512Mi |
0.5 至低於 1 |
256Mi |
1Gi |
1 |
256Mi |
4Gi |
2 |
256Mi |
8Gi |
4 |
2Gi |
16Gi |
在 Python 程式碼中呼叫 Google Cloud 或線上服務
Python UDF 會使用雲端資源連線服務帳戶,存取 Google Cloud 服務或外部服務。必須將存取服務的權限授予連線的服務帳戶。所需權限會因存取的服務和從 Python 程式碼呼叫的 API 而異。
如果您建立 Python UDF 時未使用 Cloud 資源連結,系統會在封鎖網路存取的環境中執行函式。如果 UDF 會存取線上服務,您必須使用 Cloud 資源連線建立 UDF。否則,UDF 會遭到封鎖,無法存取網路,直到內部連線逾時為止。使用 Cloud 資源連線時,請實作下列項目:
禁言次數。在 Python UDF 中發出網路呼叫時,請務必加入合理的逾時時間。如果外部服務回應緩慢或無法連線,這項設定可避免 UDF 無限期停止運作。
使用錯誤處理機制。將網路呼叫程式碼包裝在
try...except區塊中,以便妥善處理潛在錯誤,例如連線錯誤、逾時或 HTTP 失敗狀態碼。這樣一來,UDF 就能傳回有意義的錯誤或備用值,而不是導致查詢失敗或停止回應。
以下範例說明如何從 Python UDF 存取 Cloud Translation 服務。這個範例有兩個專案:一個是名為 my_query_project 的專案,您可以在其中建立 UDF 和 Cloud 資源連結;另一個是名為 my_translate_project 的專案,您可以在其中執行 Cloud Translation。
建立 Cloud 資源連結
首先,您要在 my_query_project 中建立 Cloud 資源連結。如要建立 Cloud 資源連結,請按照下列步驟操作。
控制台
前往「BigQuery」頁面。
點選左側窗格中的 「Explorer」。

如果沒有看到左側窗格,請按一下 「Expand left pane」(展開左側窗格),開啟窗格。
在「Explorer」窗格中展開專案名稱,然後按一下「Connections」。
在「Connections」(連線) 頁面中,按一下「Create connection」(建立連線)。
在「連線類型」中,選擇「Vertex AI 遠端模型、遠端函式、BigLake 和 Spanner (Cloud 資源)」。
在「連線 ID」欄位中,輸入連線名稱。
在「位置類型」部分,選取連線位置。連線應與資料集等其他資源位於同一位置。
點選「建立連線」。
點選「前往連線」。
在「連線資訊」窗格中,複製服務帳戶 ID,以便在後續步驟中使用。
SQL
前往 Google Cloud 控制台的「BigQuery」頁面。
在查詢編輯器中輸入下列陳述式:
CREATE CONNECTION [IF NOT EXISTS] `CONNECTION_NAME`
OPTIONS (
  connection_type = "CLOUD_RESOURCE",
  friendly_name = "FRIENDLY_NAME",
  description = "DESCRIPTION"
  );
請替換下列項目:
-
CONNECTION_NAME:連線名稱,格式為PROJECT_ID.LOCATION.CONNECTION_ID、LOCATION.CONNECTION_ID或CONNECTION_ID。如果省略專案或位置,系統會從執行陳述式的專案和位置推斷。 -
FRIENDLY_NAME(選用):連線的描述性名稱。 -
DESCRIPTION(選用):連線說明。
-
按一下「執行」。
如要進一步瞭解如何執行查詢,請參閱「執行互動式查詢」。
bq
在指令列環境中建立連線:
bq mk --connection --location=REGION --project_id=PROJECT_ID \
    --connection_type=CLOUD_RESOURCE CONNECTION_ID
--project_id參數會覆寫預設專案。更改下列內容:
REGION:您的連線區域PROJECT_ID:您的 Google Cloud 專案 IDCONNECTION_ID:連線的 ID
建立連線資源時,BigQuery 會建立專屬的系統服務帳戶,並將其與連線建立關聯。
疑難排解:如果收到下列連線錯誤訊息,請更新 Google Cloud SDK:
Flags parsing error: flag --connection_type=CLOUD_RESOURCE: value should be one of...
擷取並複製服務帳戶 ID,以供後續步驟使用:
bq show --connection PROJECT_ID.REGION.CONNECTION_ID
輸出結果會與下列內容相似:
name                          properties
1234.REGION.CONNECTION_ID     {"serviceAccountId": "connection-1234-9u56h9@gcp-sa-bigquery-condel.iam.gserviceaccount.com"}
Python
在試用這個範例之前,請先按照「使用用戶端程式庫的 BigQuery 快速入門導覽課程」中的 Python 設定說明操作。詳情請參閱 BigQuery Python API 參考說明文件。
如要向 BigQuery 進行驗證,請設定應用程式預設憑證。詳情請參閱「設定用戶端程式庫的驗證作業」。
Node.js
在試用這個範例之前,請先按照「使用用戶端程式庫的 BigQuery 快速入門導覽課程」中的 Node.js 設定說明操作。詳情請參閱 BigQuery Node.js API 參考說明文件。
如要向 BigQuery 進行驗證,請設定應用程式預設憑證。詳情請參閱「設定用戶端程式庫的驗證作業」。
Terraform
請使用 google_bigquery_connection 資源。
如要向 BigQuery 進行驗證,請設定應用程式預設憑證。詳情請參閱「設定用戶端程式庫的驗證作業」。
下列範例會在 US 區域中建立名為 my_cloud_resource_connection 的 Cloud 資源連結:
如要在 Google Cloud 專案中套用 Terraform 設定,請完成下列各節的步驟。
準備 Cloud Shell
- 啟動 Cloud Shell。
-
設定要套用 Terraform 設定的預設 Google Cloud 專案 。
每項專案只需要執行一次這個指令,而且可以在任何目錄中執行。
export GOOGLE_CLOUD_PROJECT=PROJECT_ID
如果您在 Terraform 設定檔中設定明確值,環境變數就會遭到覆寫。
準備目錄
每個 Terraform 設定檔都必須有自己的目錄 (也稱為根模組)。
-
在 Cloud Shell 中建立目錄,並在該目錄中建立新檔案。檔案名稱的副檔名必須是
.tf,例如main.tf。在本教學課程中,這個檔案稱為main.tf。mkdir DIRECTORY && cd DIRECTORY && touch main.tf
-
如果您正在學習教學課程,可以複製每個章節或步驟中的程式碼範例。
將程式碼範例複製到新建立的
main.tf。視需要從 GitHub 複製程式碼。如果 Terraform 代码片段是端對端解決方案的一部分,建議您使用這個方法。
- 查看並修改範例參數,套用至您的環境。
- 儲存變更。
-
初始化 Terraform。每個目錄只需執行一次這項操作。
terraform init
如要使用最新版 Google 供應商,請加入
-upgrade選項:terraform init -upgrade
套用變更
-
查看設定,確認 Terraform 即將建立或更新的資源符合您的預期:
terraform plan
視需要修正設定。
-
執行下列指令,並在提示中輸入
yes,套用 Terraform 設定:terraform apply
等待 Terraform 顯示「Apply complete!」訊息。
- 開啟 Google Cloud 專案即可查看結果。在 Google Cloud 控制台中,前往 UI 中的資源,確認 Terraform 已建立或更新這些資源。
將存取權授予連線的服務帳戶
設定連線的權限時,您需要先前複製的服務帳戶 ID。建立連線資源時,BigQuery 會建立專屬的系統服務帳戶,並將其與連線建立關聯。
如要授予 Cloud 資源連結服務帳戶專案存取權,請在 my_query_project 中將服務使用情形個人使用者角色 (roles/serviceusage.serviceUsageConsumer) 授予服務帳戶,並在 my_translate_project 中將 Cloud Translation API 使用者角色 (roles/cloudtranslate.user) 授予服務帳戶。
控制台
前往身分與存取權管理頁面。
確認已選取
my_query_project。按一下 「授予存取權」。
在「新增主體」欄位,輸入先前複製的 Cloud 資源連線服務帳戶 ID。
在「Select a role」(請選擇角色) 欄位中,依序選取「Service usage」(服務用量) 和「Service usage consumer」(服務用量消費者)。
按一下 [儲存]。
在專案選取器中,選擇
my_translate_project。前往身分與存取權管理頁面。
按一下 「授予存取權」。
在「新增主體」欄位,輸入先前複製的 Cloud 資源連線服務帳戶 ID。
在「Select a role」(選取角色) 欄位中,依序選擇「Cloud translation」和「Cloud Translation API user」(Cloud Translation API 使用者)。
按一下 [儲存]。
SQL
使用 GRANT 陳述式,將 服務使用情形消費者角色 (roles/serviceusage.serviceUsageConsumer) 授予 my_query_project 中的服務帳戶:
前往 Google Cloud 控制台的「BigQuery」頁面。
在查詢編輯器中輸入下列陳述式:
  GRANT `roles/serviceusage.serviceUsageConsumer`
  ON PROJECT `my_query_project`
  TO "connection:SERVICE_ACCOUNT_ID";
將
SERVICE_ACCOUNT_ID替換成您先前複製的服務帳戶 ID。按一下「執行」。
如要進一步瞭解如何執行查詢,請參閱「執行互動式查詢」。
使用 GRANT 陳述式,在 my_translate_project 中授予 Cloud Translation API 使用者角色 (roles/cloudtranslate.user):
前往 Google Cloud 控制台的「BigQuery」頁面。
在查詢編輯器中輸入下列陳述式:
  GRANT `roles/cloudtranslate.user`
  ON PROJECT `my_translate_project`
  TO "connection:SERVICE_ACCOUNT_ID";
將
SERVICE_ACCOUNT_ID替換成您先前複製的服務帳戶 ID。按一下「執行」。
如要進一步瞭解如何執行查詢,請參閱「執行互動式查詢」。
建立呼叫 Cloud Translation 服務的 Python UDF
在 my_query_project 中,使用 Cloud 資源連結建立 Python UDF,呼叫 Cloud Translation 服務。
前往 Google Cloud 控制台的「BigQuery」頁面。
在查詢編輯器中輸入下列
CREATE FUNCTION陳述式:CREATE FUNCTION `PROJECT_ID.DATASET_ID`.translate_to_es(x STRING) RETURNS STRING LANGUAGE python WITH CONNECTION `PROJECT_ID.REGION.CONNECTION_ID` OPTIONS (entry_point='do_translate', runtime_version='python-3.11', packages=['google-cloud-translate>=3.11', 'google-api-core']) AS r""" from google.api_core.retry import Retry from google.cloud import translate project = "my_translate_project" translate_client = translate.TranslationServiceClient() def do_translate(x : str) -> str: response = translate_client.translate_text( request={ "parent": f"projects/PROJECT_ID/locations/us-central1", "contents": [x], "target_language_code": "es", "mime_type": "text/plain", }, retry=Retry(), ) return response.translations[0].translated_text """; -- Call the UDF. WITH text_table AS (SELECT "Hello" AS text UNION ALL SELECT "Good morning" AS text UNION ALL SELECT "Goodbye" AS text) SELECT text, `PROJECT_ID.DATASET_ID`.translate_to_es(text) AS translated_text FROM text_table;
更改下列內容:
PROJECT_ID:專案 ID。DATASET_ID:資料集 ID。REGION:連線所在的區域。CONNECTION_ID:連線 ID。
按一下「執行」圖示 。
輸出內容應如下所示:
+--------------------------+-------------------------------+
| text                     | translated_text               |
+--------------------------+-------------------------------+
| Hello                    | Hola                          |
| Good morning             | Buen dia                      |
| Goodbye                  | Adios                         |
+--------------------------+-------------------------------+
使用 VPC Service Controls
Python UDF 會沿用執行查詢作業的專案 VPC Service Controls perimeter。這個邊界可保護工作免於資料竊取,並確保服務互動安全無虞。
在 VPC Service Controls 服務範圍內叫用 Python UDF 時,會出現下列網路連線:
- 不使用 Cloud 資源連結的 Python UDF 會完全隔離。所有傳出流量都會遭到封鎖。
- 使用 Cloud 資源連結的 Python UDF 會遭到封鎖,無法存取公開網際網路。Python UDF 只能存取支援 VPC Service Controls 的服務。 Google Cloud 系統會封鎖傳出至
restricted.googleapis.com以外任何目的地的流量。
設定 Python UDF,在 VPC Service Controls 中安全存取 Google Cloud 服務
如要從 Python UDF 存取服務,同時強制執行 VPC Service Controls,請按照下列步驟操作: Google Cloud
- 使用 CREATE FUNCTION 陳述式的
WITH CONNECTION子句建立 Python UDF。 - 在服務安全防護範圍中,加入執行查詢工作的 BigQuery 專案和目標服務專案。或者,您也可以設定perimeter bridge。
- 將目標服務 API 新增至範圍設定。舉例來說,
translate.googleapis.com如果您要連線至 Cloud Translation API。
如要進一步瞭解如何設定 VPC Service Controls 服務範圍,請參閱:
最佳做法
建立 Python UDF 時,請遵循下列最佳做法:
- 最佳化查詢邏輯以進行批次處理。複雜的查詢結構可能會停用批次處理。這會強制執行緩慢的逐列處理作業,大幅增加大型資料集的延遲時間。
- 最佳化資料酬載。個別資料列的大小可能會影響批次處理功能的效率。盡可能縮小每列的大小,以便在單一批次中處理最多列。
- 有效設定容器限制。擴充性取決於 CPU、記憶體和要求並行。查看監控指標,調整容器設定。
如果 CPU 使用率偏高,請使用
container_cpu限制增加 CPU 分配量,或使用container_request_concurrency限制減少容器要求並行數。 - 使用疊代式調整時,請從預設值開始。如果效能不佳,請分析監控指標,找出特定瓶頸。
- 實作 API 逾時。當 Python UDF 存取網際網路時,請為 API 呼叫設定逾時,避免發生非預期的行為。例如從 Cloud Storage 值區讀取資料。
查看 Python UDF 指標
Python UDF 會將指標匯出至 Cloud Monitoring。這些指標可協助您監控 UDF 運作狀態和資源消耗量的各個層面,深入瞭解 UDF 執行個體的效能和行為。
受控資源類型
Python UDF 的指標會回報至下列 Cloud Monitoring 資源類型:
- 「Type」(類型):
bigquery.googleapis.com/ManagedRoutineInvocation - 顯示名稱:BigQuery 代管處理常式叫用
- 標籤:
resource_container:查詢工作執行的專案 ID。location:查詢作業的執行位置。query_job_id:叫用 Python UDF 的查詢作業 ID。routine_project_id:儲存所叫用常式的專案 ID。routine_dataset_id:儲存所叫用常式的資料集 ID。routine_id:叫用常式的 ID。
指標
下列指標適用於 bigquery.googleapis.com/ManagedRoutineInvocation 資源類型:
| 指標 | 說明 | 單位 | 值類型 |
|---|---|---|---|
bigquery.googleapis.com/managed_routine/python/cpu_utilizations |
叫用 Python UDF 時,這項指標會顯示查詢作業中所有 Python UDF 執行個體的 CPU 使用率分布情形。 | 百分比值 | DISTRIBUTION |
bigquery.googleapis.com/managed_routine/python/memory_utilizations |
叫用 Python UDF 時,這項指標會顯示查詢工作所有 Python UDF 執行個體的記憶體使用率分布情形。 | 百分比值 | DISTRIBUTION |
bigquery.googleapis.com/managed_routine/python/max_request_concurrencies |
這項指標會顯示每個 Python UDF 執行個體處理的並行要求數量上限分布情形。 | 數量 | DISTRIBUTION |
查看指標
如要查看 Python UDF 的指標,請選擇下列章節中的其中一個選項。
工作詳細資料
如要查看特定查詢工作的 Python UDF 指標,請按照下列步驟操作:
前往「BigQuery」頁面
按一下「工作記錄」。
在「Job ID」(工作 ID) 欄中,按一下查詢工作 ID。
在「查詢工作詳細資料」頁面中,按一下「Cloud Monitoring 資訊主頁」。 這個連結會顯示經過篩選的資訊主頁,其中包含這項工作的 Python UDF 指標。
Metrics Explorer
如要在 Metrics Explorer 中查看 Python UDF 指標,請按照下列步驟操作:
前往 Cloud Monitoring 的「Metrics Explorer」頁面。
按一下「選取指標」,然後在「篩選器」欄位中輸入
BigQuery Managed Routine Invocation或bigquery.googleapis.com/ManagedRoutineInvocation。選擇「Bigquery Managed Routine」>「Managed_routine」。
點選任一可用指標,例如:
- 執行個體 CPU 使用率
- 執行個體記憶體使用率
- 並行要求數量上限
按一下「套用」。
根據預設,指標會顯示在圖表中。
您可以使用監控資源類型中定義的標籤,篩選指標並加以分組。如要篩選指標,請按照下列步驟操作:
在「Filter」(篩選器) 欄位中,選擇資源類型,例如
query_job_id或routine_id。在「Value」(值) 欄位中,輸入工作 ID 或常式 ID,或從清單中選擇一個。
Cloud Monitoring 資訊主頁
如要使用監控資訊主頁查看 Python UDF 指標,請按照下列步驟操作:
前往 Cloud Monitoring 的「Dashboards」(資訊主頁) 頁面。
按一下「BigQuery Managed Routine Query Monitoring」(BigQuery 代管常式查詢監控) 資訊主頁。
這個資訊主頁會概略顯示 UDF 的主要指標。
如要篩選這個資訊主頁,請按照下列步驟操作:
按一下「篩選器」圖示 。
在「依資源篩選」清單中,選擇專案 ID、位置、例行程序 ID 或工作 ID 等選項。
支援的地區
所有 BigQuery 多區域和區域位置都支援 Python UDF。
定價
系統會使用 BigQuery 服務 SKU,收取 Python UDF 費用。
費用包括:
建構或重建 UDF 容器映像檔。這項費用與使用客戶程式碼和依附元件建構相應映像檔所需的時間成正比。
- 如果您使用 Routines API,最新建構作業的持續時間會顯示在
BuildStatus欄位中。您也可以在INFORMATION_SCHEMA.ROUTINES檢視畫面的「BuildStatus」欄中查看建構時間。 - 如要查看每個專案的建構總費用,請使用下列項目篩選帳單報表:
- 金鑰:
goog-bq-feature-type - 價值:
MANAGED_ROUTINE_BUILD
- 金鑰:
- 如果您使用 Routines API,最新建構作業的持續時間會顯示在
Python UDF 客戶也須支付叫用 Python UDF 的費用。 這項費用與叫用 Python UDF 時消耗的運算和記憶體量成正比。
- 如要查看每個查詢的 Python UDF 費用,可以使用 Job API 查詢
ExternalServiceCosts欄位。您也可以在INFORMATION_SCHEMA.JOBS檢視表中查看external_service_costs資料欄,並套用下列篩選器:'external_service_costs.external_service="MANAGED_ROUTINE_EXECUTION"',即可查看每項查詢的費用。 - 如要查看每個專案執行 Python UDF 的總費用,可以按照下列方式篩選帳單報表:
- 金鑰:
goog-bq-feature-type - 價值:
MANAGED_ROUTINE_EXECUTION
- 金鑰:
- 如要查看每個查詢的 Python UDF 費用,可以使用 Job API 查詢
如果 Python UDF 導致外部或網際網路網路輸出,您也會看到根據 BigQuery 輸出 SKU 計算的進階級網際網路輸出費用。
配額
請參閱使用者定義函式配額和限制。