
Use Data Apps in BigQuery and Data Studio
Colab Data Apps let you transform your data analyses from Colaboratory notebooks into polished, interactive applications. Instead of sharing code or static reports, you can now build shareable experiences that include interactive visualizations, data tables, and machine learning inferences.
Data Apps provide the following:
- Self-service insights. Business users can adjust parameters such as date ranges or filters to see the data that they need without editing code.
- No setup for app viewers. Consumers access your app using a URL. They don't need to navigate the Google Cloud console or run notebooks.
- Flexibility. Integrate any Python visualization library or widget to build custom, complex Data Apps with ease. To save time, use the integrated agent to generate the code for you.
- Managed life cycle. Administrators and authors retain control over sharing, versions, and resource usage.
Before you begin
- Sign in to your Google Cloud account. If you're new to Google Cloud, create an account to evaluate how our products perform in real-world scenarios. New customers also get $300 in free credits to run, test, and deploy workloads.
-
In the Google Cloud console, on the project selector page, select or create a Google Cloud project.
Roles required to select or create a project
- Select a project: Selecting a project doesn't require a specific IAM role—you can select any project that you've been granted a role on.
-
Create a project: To create a project, you need the Project Creator role
(
roles/resourcemanager.projectCreator), which contains theresourcemanager.projects.createpermission. Learn how to grant roles.
-
Verify that billing is enabled for your Google Cloud project.
-
Enable the BigQuery and Dataform APIs.
Roles required to enable APIs
To enable APIs, you need the
serviceusage.services.enablepermission. If you created the project, then you likely already have this permission through the Owner role (roles/owner). Otherwise, you can get this permission through the Service Usage Admin role (roles/serviceusage.serviceUsageAdmin). Learn how to grant roles.For new projects, the BigQuery API is automatically enabled.
Required roles
To get the permissions that you need to create data apps, ask your administrator to grant you the following IAM roles on the project:
- BigQuery Read Session User (
roles/bigquery.readSessionUser) - BigQuery Studio User (
roles/bigquery.studioUser)
For more information about granting roles, see Manage access to projects, folders, and organizations.
You might also be able to get the required permissions through custom roles or other predefined roles.
If you're new to Colab Enterprise in BigQuery, see the required permissions on the Create notebooks page.
Limitations
Data Apps are subject to the following limitations:
The first time you open an app, it can take from two to five minutes to load, depending on its complexity.
Interactivity sessions last for 30 minutes. After 30 minutes, apps lose their connection to the kernel and become static. To initiate a new 30-minute session, you can reload the page or refresh the data.
Regardless of which cells are visible in the app, all cells are run in order from first to last. If non-visible cells are running and consuming kernel resources, the app might appear unresponsive until kernel resources are freed.
You can't use a service account or End User Credentials (EUC) for data access or for viewing Data Apps.
Components of Data Apps
The components you can add to your Data Apps are derived from the underlying notebook. If you're working with an existing notebook, you can add any of its existing cells to your Data Apps.
You can add to Data Apps any supported cell types that you can create in a Colab notebook, including SQL cells, code cells, text cells, and visualization cells. You can create cell types manually, or you can use the Colab Data Science Agent or Gemini to generate cells for you.
For information on adding different cell types to notebooks, see the following tutorials:
Controls created using third-party libraries
Data Apps support controls that are created using third-party widget libraries. For example:
- You can use the
ipywidgetspackage or theanywidgetlibrary to add interactive controls to your notebook. The widgets can be generated by using the Colab Data Science Agent. - At the notebook level, you can chain widget cells. You define a widget at the start of the notebook, and its output can be consumed by other cells such as visualization cells. This setup lets you set up a global filter for your Data Apps.
Create and publish Data Apps
You can create Data Apps using an existing notebook or by creating a new one. In the following example, you use the Getting started with notebooks for Python users template to generate a notebook and to create a Data App from it.
After you create Data Apps, you publish them to Data Studio to turn your data analyses into shareable, interactive experiences.
When you publish Data Apps, you can connect them to an existing Colab runtime, or you can create a new runtime using a template. With templates, you can size the runtime according to your workloads, and you can set the idle shutdown time to balance costs and app startup time.
To create and publish Data Apps, follow these steps:
In the Google Cloud console, go to the BigQuery Studio page.
To open the template gallery, do one of the following:
In the left pane, click Explorer, expand your project, and then select Notebook > View actions > Create notebook > All templates.

If you don't see the left pane, click Expand left pane to open the pane.
On the Studio page, click View notebook gallery:
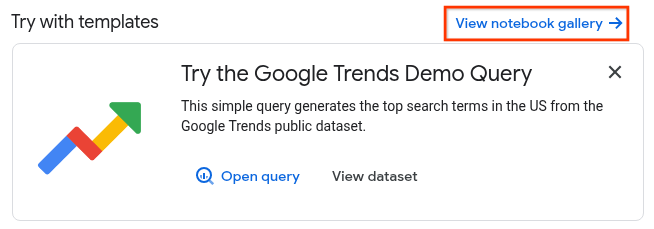
Click the Getting started with notebooks for Python users card or search for it in the gallery.
After the template opens, click Use this template to convert the template into a runnable notebook.
Click dashboard Data app.
Optional: In the Components pane, add and remove cells from the app by using the checkboxes:

To create new components, do the following:
- To go back to the notebook, click arrow_back Notebook.
- To add new cells, click the drop-down arrow next to Code or Text.
- Click Save.
- To return to the app, click dashboard Data app.
When you're satisfied with the layout of your app, click Publish.
On the Publish page, enter the following:
In the Name field, enter a name for the app. The app name doesn't have to be the same as the name of the notebook used to create it.
In the Runtime section, choose Connect to an existing runtime, and then choose the runtime from the Runtime list, or choose Create new Runtime, and then choose the appropriate template from the Runtime template list.
If you choose Connect to an existing runtime, you must connect your notebook to a runtime before you publish the app.
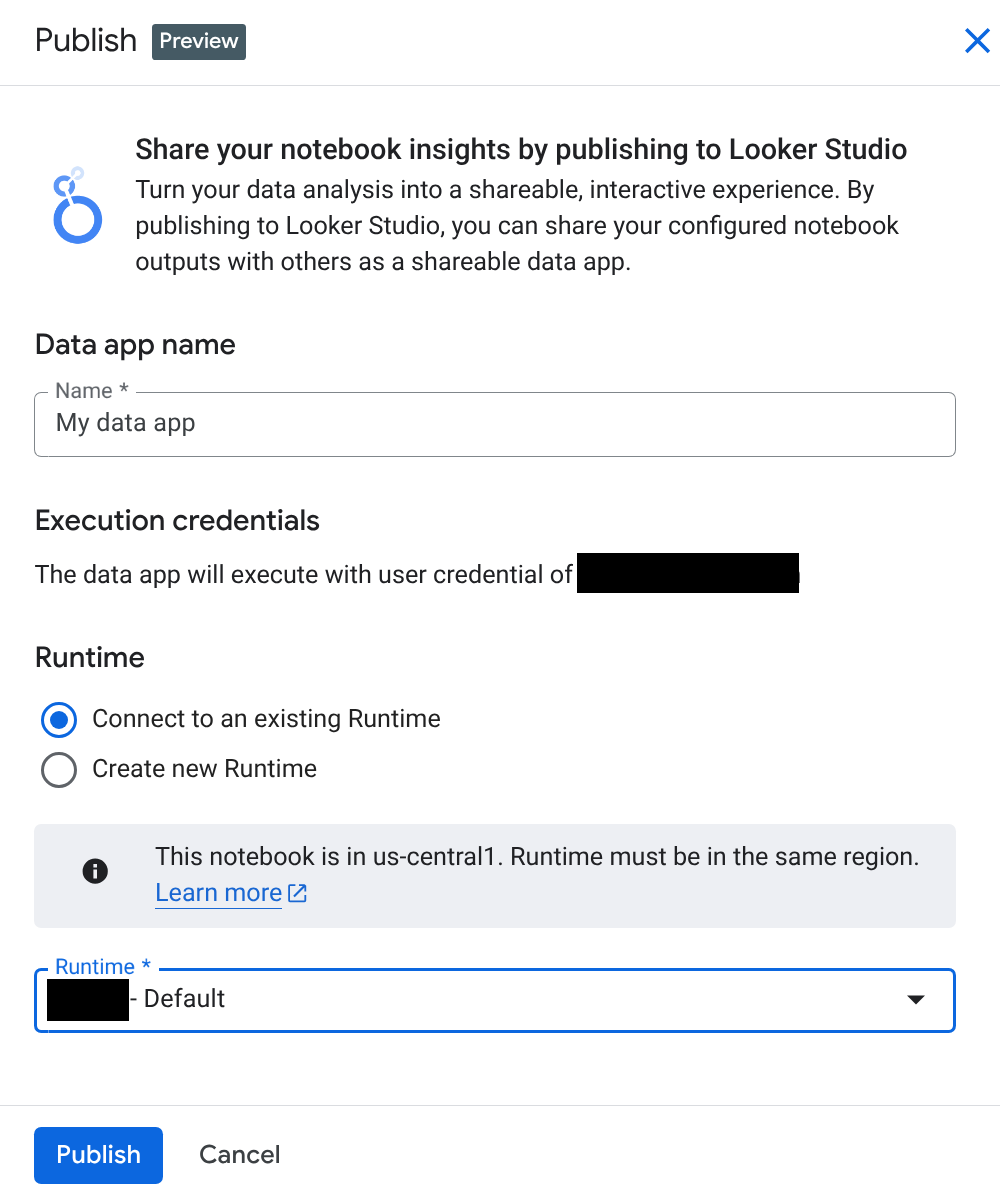
Click Publish.
If you're prompted to give Data Studio access to your Google Account, click Allow.
If you make changes to your source notebooks and your app, click Publish changes to update the app.
Alternatively, from Data Studio you can edit the app by clicking more_vert More options > Edit.
The source notebook opens in BigQuery Studio.
View and share Data Apps
You use Data Studio to view your Colab Data Apps and to share your apps with others.
When you view an app, interactivity depends on the components you included. For example, a Matplotlib chart is static, and a chart created using Colab visualization cells or using libraries such as Plotly is interactive.
You can interact with widgets defined in your code and use them for tasks like filtering or changing the output. These interactions are user-specific.
To view and share your app in Data Studio, follow these steps:
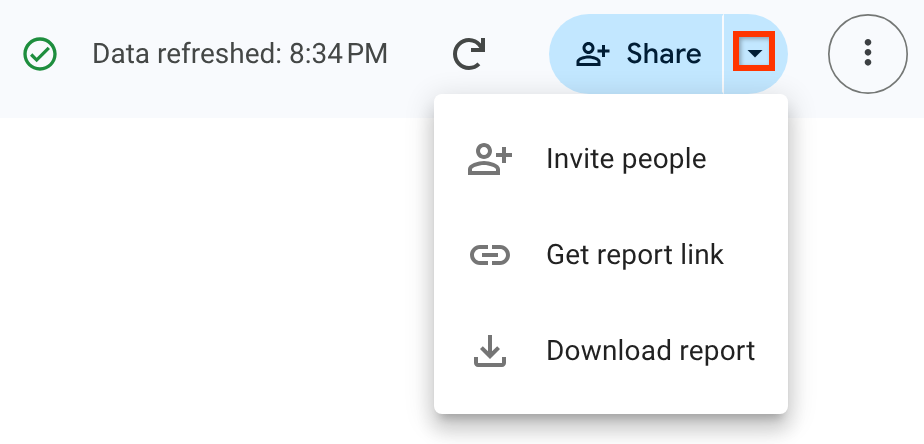
To view your app in Data Studio, click View Data App.
To share your app, in Data Studio, click person_add Share.
On the Share with people and groups page, do the following:
In the Add people and groups field, enter the groups and individuals you're granting access.
Select the access permission for the users and groups you specified:
- Editor: users can edit the app, create and edit schedules and alerts, and share the app with others.
- Viewer: users can see the app but can't edit or share it with others.
Click Send.
To invite others, get a report link, or share or download the app, beside the Share option, click arrow_drop_down, and then choose one of the following:
- Invite people
- Get report link
- Download report
For more information on sharing assets in Data Studio, see Invite others to your reports.
Reconnecting and refreshing Data Apps
Interactivity sessions last for 30 minutes. After 30 minutes, apps lose their connection to the kernel and become static. To initiate a new 30-minute session, you can reload the page or refresh the data.
To refresh the data in Data Studio, do the following:
- With your app open, click more_vert More report actions > Refresh data.
Credentials used to run cells in Data Apps
By default, Data Apps use the app creator's credentials for data access and to render visualizations. All viewers see the rendered Data Apps based on the author's access. Consider this outcome before you share Data Apps that have access to sensitive data.
Delete Data Apps
You can delete Data Apps using Data Studio. Deleting the notebook that you used to create the app doesn't delete the app or prevent the app from functioning.
To delete Data Apps in Data Studio, follow these steps:
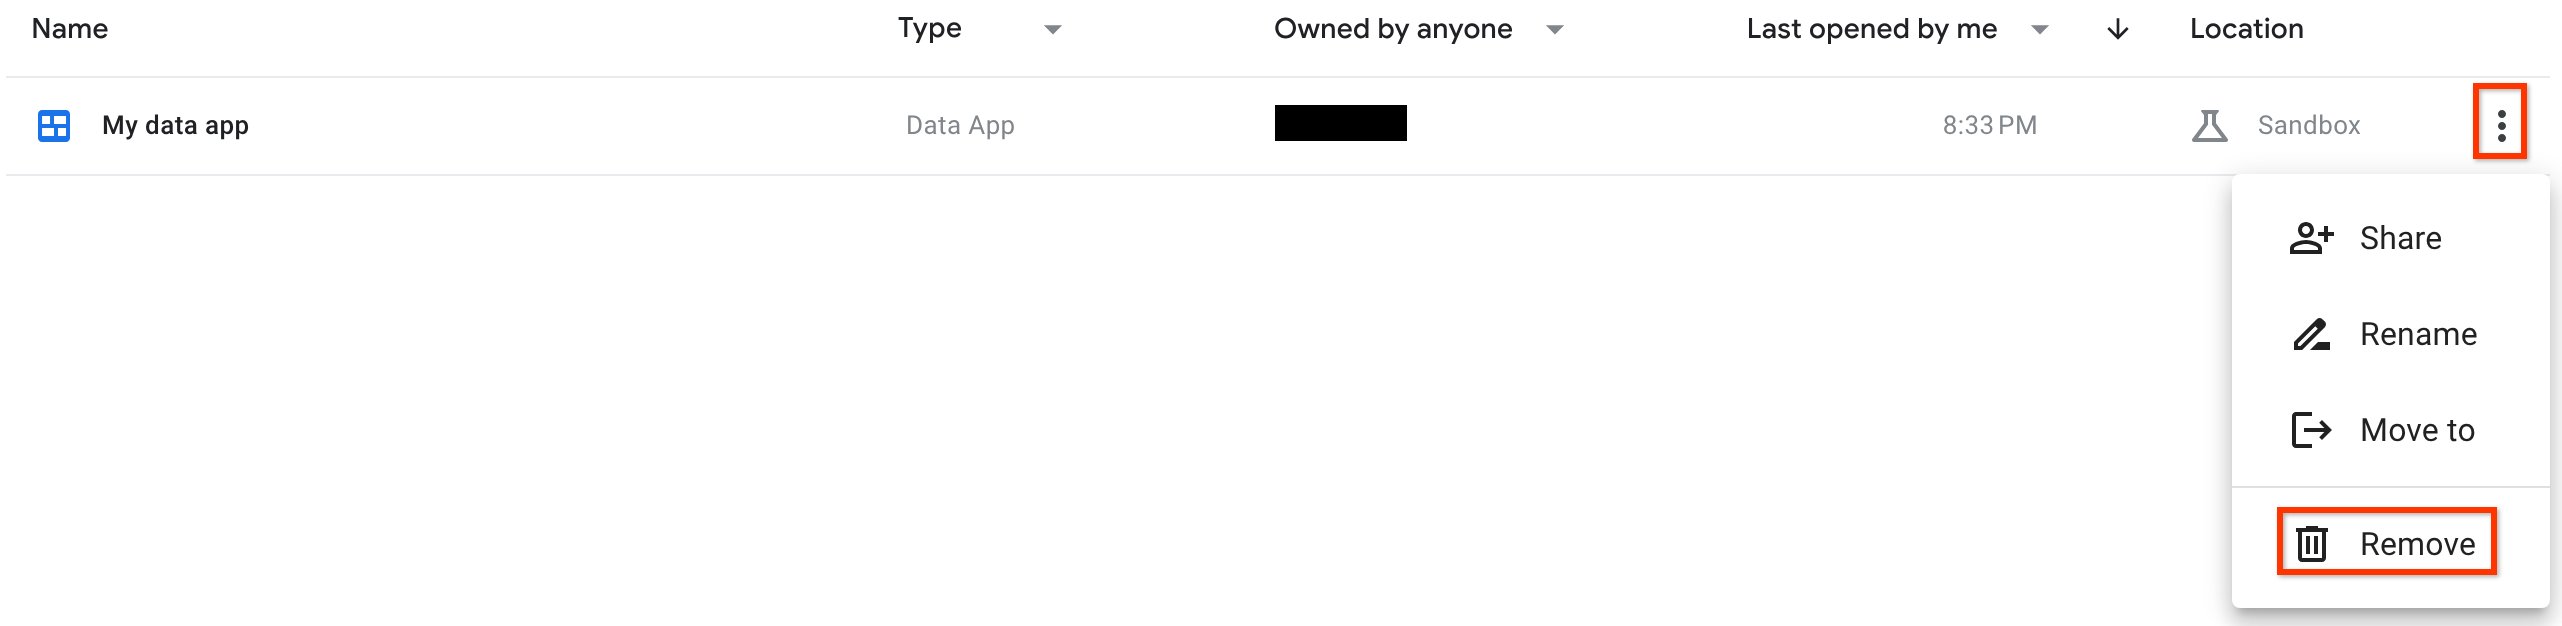
On the Recent page, locate your app.
At the end of the row, click more_vert More options > Remove:
Pricing
You are charged for running code in the notebook's runtime and for any BigQuery slots that you use. For more information, see Colab Enterprise pricing.