
适用于 Apple iOS 操作系统的 Contact Center AI 平台 (CCAI 平台) 移动 SDK 可让您在 iOS 移动应用中嵌入 CCAI 平台移动体验。
要求
iOS 移动 SDK 具有以下要求:
- iOS 12.0 及更高版本
检索公司凭据
使用管理员凭据登录 Contact Center AI 平台 (CCAI Platform) 门户。
依次前往设置 > 开发者设置。
在公司密钥和密钥代码下,记下公司密钥和公司密钥代码。
使用入门
下文提供了有关如何开始使用 CCAI 平台 iOS 移动 SDK 的指南。
安装
如需开始使用,您需要安装 iOS SDK。
下载示例应用
下载 iOS 示例应用。
前往相应文件夹,然后使用 CocoaPods 安装依赖项:
$ pod install --project-directory=ExampleApp如需快速配置项目设置,请运行 shell 脚本:
$ ./setup.sh或者,您也可以按照以下步骤手动修改项目设置:
打开
ExampleApp.xcworkspace。将
Info.plist中的UJETCompanyKey和UJETCompanySecret值替换为 CCAI 平台门户网站中设置 > 开发者设置页面中的公司密钥和公司密钥值。将
Info.plist中的UJETSubdomain值替换为 CCAI 平台门户网站网址中的子网域。子网域直接位于网址中的.ujet.com之前,例如https://your-subdomain.ujet.com/settings/developer-setting中的your-subdomain。
集成到您的项目中
将 iOS SDK 与应用集成取决于您的开发环境。
Swift 软件包管理器
在 build 设置中,将 -ObjC 放在 Other Linker Flags 中。
在最新版 Xcode(目前为 13.2)中,使用 Swift Package Manager 分发的二进制框架存在已知问题。目前解决此问题的权宜措施是向 Xcode 项目的构建阶段添加运行脚本阶段。此“运行脚本”构建阶段应位于“嵌入框架”构建阶段之后。这个新的“运行脚本”阶段应包含以下代码:
find "${CODESIGNING_FOLDER_PATH}" -name '*.framework' -print0 | while read -d $'0' framework
do
codesign --force --deep --sign "${EXPANDED_CODE_SIGN_IDENTITY}" --preserve-metadata=identifier,entitlements --timestamp=none "${framework}"
done
CocoaPods
将以下代码行添加到 Podfile 中:
pod 'UJET', :podspec =>
'https://sdk.ujet.co/ios/x.y.z/ujet.podspec' #specific version
x.y.z
运行 pod install。如果之前已集成 iOS SDK,请改为运行 pod update CCAI Platform。
Carthage
Google Cloud 建议使用依赖项管理器或手动集成,因为 CCAI 平台依赖项不支持 Carthage。为此,请添加以下几行代码:
binary "https://sdk.ujet.co/ios/UJETKit.json
binary "https://sdk.ujet.co/ios/UJETFoundationKit.json
binary https://raw.githubusercontent.com/twilio/twilio-voice-ios/Releases/twilio-voice-ios.json
手动集成
不支持此功能:https://github.com/twilio/conversations-ios/issues/12。
二进制文件 https://raw.githubusercontent.com/twilio/conversations-ios/master/twilio-convo-ios.json
运行
carthage bootstrap --use-xcframeworks(或carthage update --use-xcframeworks[如果您要更新依赖项)。下载
UJETKit.xcframework、UJETFoundationKit.xcframework、UJETChatRedKit.xcframework、UJETChatBlueKit.xcframework、UJETTwilioCallKit.xcframework以及所有依赖项TwilioVoice.xcframework和TwilioConversationsClient.xcframework。将 UJETKit.xcframework 拖动到“Frameworks, Libraries, and Embedded Content”(框架、库和嵌入内容)部分,以将其添加到您的目标中。
针对第 1 步中的所有依赖项重复执行第 2 步和第 3 步。
在build 设置中,将
-ObjC放在Other Linker Flags上。在目标的
Linked Frameworks部分中,将libc++.tbd添加为依赖项。
如果您要使用示例项目手动构建 SDK,请按照以下部分中的步骤操作。
使用示例项目手动构建 SDK
请按以下顺序执行这些步骤:
下载所有框架,包括
UJETKit.xcframework和其他依赖项。在项目根目录下创建文件夹 CCAI Platform,并提取所有框架。
选择
Objc-Manual或Swift-Manual目标,然后进行构建。
导入框架
以下部分提供了有关如何导入框架的说明。
Objective-C 项目
@import UJETKit;
Swift 项目
swiftimport
UJETimport UJETKit
初始化 SDK
使用 UJET_COMPANY_KEY 和 UJET_SUBDOMAIN 初始化 CCAI Platform。
In application:didFinishLaunchingWithOptions: method:
- (BOOL)application:(UIApplication *)application didFinishLaunchingWithOptions:(NSDictionary *)launchOptions {

    // Initialize CCAI Platform
    [UJET.initialize:UJET_COMPANY_KEY subdomain:UJET_SUBDOMAIN delegate:self];

    // YOUR CODE

    return YES;
}
您可以将日志级别从 verbose 更改为 error。默认日志级别为 UjetLogLevelInfo。
[UJET.setLogLevel:UjetLogLevelVerbose];
最终用户身份验证
通过 iOS 应用访问 iOS SDK。
为了确保最终用户已通过身份验证,我们引入了 JWT 签名机制。
当需要进行身份验证时,iOS SDK 会要求对载荷进行签名。如果签名成功,应用会将已签名的 JWT 交换为最终用户身份验证令牌。必须在委托返回之前调用成功或失败块。
对于匿名用户(标识符 = nil),应用将为该用户创建一个 UUID。如果用户稍后通过某个标识符进行身份验证,应用会尝试根据 UUID 合并这两个用户。
在示例项目中的 UJETObject.h 中:
@import UJETKit;

@interface UJETObject : NSObject <UJETDelegate>
实现 signPayload:payloadType:成功:失败:委托方法。
- (void)signPayload:(NSDictionary *)payload payloadType:(UjetPayloadType)payloadType success:(void (^)(NSString *))success failure:(void (^)(NSError *))failure {
  if (payloadType == UjetPayloadAuthToken) {
    [self signAuthTokenInLocal:payload success:success failure:failure];
  }
}

- (void)signAuthTokenInLocal:(NSDictionary *)payload success:(void (^)(NSString *))success failure:(void (^)(NSError *))failure {
    NSMutableDictionary *payloadData = [payload mutableCopy];

    NSDictionary *userData = [[NSUserDefaults standardUserDefaults] objectForKey:@"user-data"];
    [payloadData addEntriesFromDictionary:userData];
    payloadData[@"iat"] = [NSNumber numberWithDouble:[[NSDate date] timeIntervalSince1970]]; // required
    payloadData[@"exp"] = [NSNumber numberWithDouble:([[NSDate date] timeIntervalSince1970] + 600)]; // required

    NSString *signedToken = [self encodeJWT:payloadData];

    if (signedToken.length > 0) {
        success(signedToken);

    } else {
        NSDictionary *userInfo = @{ NSLocalizedDescriptionKey: @"Failed to sign token" };
        NSError *error = [NSError errorWithDomain:@"ExampleApp" code:0 userInfo:userInfo];
        failure(error);
    }
}

- (NSString *)encodeJWT:(NSDictionary *)payload {
    id<JWTAlgorithm> algorithm = [JWTAlgorithmHSBase algorithm384];
    NSString *secret = NSBundle.mainBundle.infoDictionary[@"UJETCompanySecret"];
    return [JWTBuilder encodePayload:payload].secret().algorithm(algorithm).encode;
}
我们强烈建议您从应用服务器(而非客户端)对载荷进行签名。
此示例使用本地签名进行测试。请参阅 UJETObject.m 文件中的 signDataInRemote: success: failure:。
如需了解详情,请参阅 SDK 最终用户身份验证。
设置推送通知
应用会发送推送通知来请求智能操作(例如验证和拍照),以及报告来电。应用需要将两种不同类型的证书(VoIP 和 APNs)保存在管理门户中。
准备 VoIP 服务证书
Apple 的 VoIP 推送通知提供了参考文档。
从 Apple 开发者网站创建并下载 VoIP 证书。
双击证书,将其添加到钥匙串中。
在 Mac 上启动“钥匙串访问”应用。
在左侧边栏中选择“我的证书”类别。
右键点击 VoIP 服务:your.app.id 证书。
在弹出式菜单中,选择导出。
将其另存为 cert.p12,不使用密码保护,方法是将密码留空。
在终端中运行以下命令。
openssl s_client -connect gateway.push.apple.com:2195 -cert cert.pem -debug -showcertcert.pem 的上半部分是证书,下半部分是私钥。
检查您的证书是否可与 Apple 的推送通知服务器搭配使用。
openssl s_client -connect gateway.push.apple.com:2195 -cert cert.pem -debug -showcerts如果成功,则应返回:
---
New, TLSv1/SSLv3, Cipher is AES256-SHA
Server public key is 2048 bit
Secure Renegotiation IS supported
Compression: NONE
Expansion: NONE
SSL-Session:
    Protocol  : TLSv1
    Cipher    : AES256-SHA
    Session-ID:
    Session-ID-ctx:
    Master-Key: XXXXXXXXXXXXXXXXXXXXXXXXXXXXXXXXXXXXXXXXXXXXXXXXXXXXXXXXXXXXXXXXXXXXXXXXXXXXXXXXXXXXX
    Key-Arg   : None
    Start Time: 1475785489
    Timeout   : 300 (sec)
    Verify return code: 0 (ok)
---
使用管理员凭据登录 CCAI 平台门户,然后依次前往设置 > 开发者设置 > 移动应用。
在“VoIP 服务证书”部分中填写证书,然后保存。 请务必包含证书和私钥的边界(
-----BEGIN-----和-----END-----)。如果您正在运行具有开发配置描述文件的应用(例如在 Xcode 中进行调试),请选中“沙盒”复选框。如果您的应用已归档以用于临时或 App Store,并且正在使用分发预配配置文件,请清除“沙盒”复选框。
准备 Apple 推送通知服务 SSL
此流程与 VoIP 服务证书的流程类似。在这种情况下,系统会使用 Apple 推送通知服务 SSL(沙盒和生产环境)证书。如需获取有关如何创建证书的指导,请参阅 Apple 远程通知服务器文档。
集成推送通知
在 AppDelegate.m 中:
@import PushKit;

@interface AppDelegate() <PKPushRegistryDelegate>
In application:didFinishLaunchingWithOptions: method:
// Initialize CCAI Platform
[UJET] initialize:UJET_COMPANY_KEY subdomain:UJET_SUBDOMAIN delegate:self];

//  Register for VoIP notifications on launch.
PKPushRegistry *voipRegistry = [[PKPushRegistry alloc] initWithQueue: dispatch_get_main_queue()];
voipRegistry.delegate = self;
voipRegistry.desiredPushTypes = [NSSet setWithObject:PKPushTypeVoIP];
在实现 UIApplicationDelegate 协议的文件中添加以下委托方法:
请打印设备令牌以测试推送通知。
// PKPushRegistryDelegate

- (void)pushRegistry:(PKPushRegistry *)registry didUpdatePushCredentials:(PKPushCredentials *)credentials forType:(NSString *)type {
  [UJET updatePushToken:credentials.token type:UjetPushTypeVoIP];
}

- (void)pushRegistry:(PKPushRegistry *)registry didReceiveIncomingPushWithPayload:(PKPushPayload *)payload forType:(PKPushType)type withCompletionHandler:(void (^)(void))completion {
  if (payload.dictionaryPayload[@"ujet"]) {
    [UjetreceivedNotification:payload.dictionaryPayload completion:completion];
  } else {
    completion();
  }
}

// UIApplicationDelegate

- (void)application:(UIApplication *)application didRegisterForRemoteNotificationsWithDeviceToken:(NSData *)deviceToken {
  [UjetupdatePushToken:deviceToken type:UjetPushTypeAPN];
}

- (void)application:(UIApplication *)application didReceiveRemoteNotification:(NSDictionary *)userInfo fetchCompletionHandler:(void (^)(UIBackgroundFetchResult))completionHandler {
  if (userInfo[@"ujet"]) {
    [UJET receivedNotification:userInfo completion:nil];
  }
}

// UserNotificationsDelegate overrides [UIApplicationDelegate didReceiveRemoteNotification:]

- (void)userNotificationCenter:(UNUserNotificationCenter *)center willPresentNotification:(UNNotification *)notification withCompletionHandler:(void (^)(UNNotificationPresentationOptions))completionHandler {
    NSDictionary *userInfo = notification.request.content.userInfo;

    if (userInfo[@"ujet"] != nil) {
        [UJET receivedNotification:userInfo completion:nil];
    }
}

- (void)userNotificationCenter:(UNUserNotificationCenter *)center didReceiveNotificationResponse:(UNNotificationResponse *)response withCompletionHandler:(void (^)(void))completionHandler {
    NSDictionary *userInfo = response.notification.request.content.userInfo;

    if (userInfo[@"ujet"] != nil) {
        [UJET receivedNotification:userInfo completion:nil];
    }
}
启用推送通知
选择目标,然后打开 Capabilities 标签页。
开启推送通知开关。
测试推送通知
以下部分介绍了如何测试推送通知。
推送通知调试部分
在管理员门户中,依次前往“设置”>“开发者设置”。在此页面上,找到标题为 Push Notification Debug 的部分:
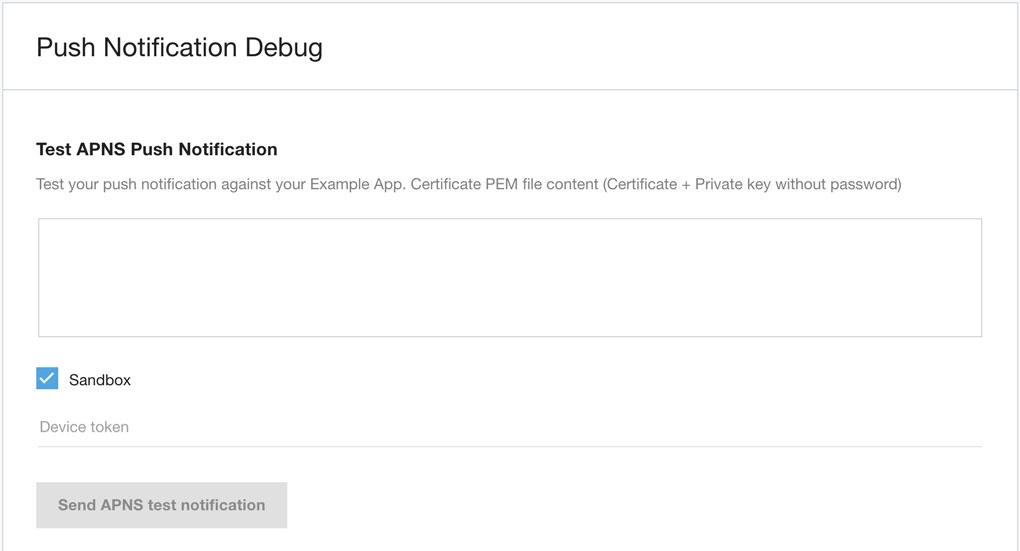
将设备令牌复制并粘贴到右侧的文本区域,然后选择正确的移动应用。
获取设备令牌
设备令牌字符串的示例如下所示:
7db0bc0044c8a203ed87cdab86a597a2c43bf16d82dae70e8d560e88253364b7
推送通知通常在符合 UIApplicationDelegate 或 PKPushRegistryDelegate 协议的类中设置。在某个时间点,您可以使用设备令牌。您可以在将其传递给 iOS SDK 之前将其打印出来。如需获取设备令牌,请使用代码段。
Swift
func tokenFromData(data: Data) -> String {
  return data.map { String(format: "%02x", $0) }.joined()
}

func application(_ application: UIApplication, didRegisterForRemoteNotificationsWithDeviceToken deviceToken: Data) {
  print("apns token: ", tokenFromData(data: deviceToken))
  ...
}

func pushRegistry(_ registry: PKPushRegistry, didUpdate credentials: PKPushCredentials, for type: PKPushType) {
  print("voip token: ", tokenFromData(data: credentials.token))
  ...
}
Obj-C
- (NSString *)tokenFromData:(NSData *)data {
  const char *d = data.bytes;
  NSMutableString *token = [NSMutableString string];

  for (NSUInteger i = 0; i < data.length; i++) {
    [token appendFormat:@"%02.2hhX", d[i]];
  }

  return [[token copy] lowercaseString];
}

- (void)pushRegistry:(PKPushRegistry *)registry didUpdatePushCredentials:(PKPushCredentials *)credentials forType:(PKPushType)type {
  NSLog(@"voip token: %@", [self tokenFromData:credentials.token]);
  ...
}

- (void)application:(UIApplication *)application didRegisterForRemoteNotificationsWithDeviceToken:(NSData *)deviceToken {
  NSLog(@"apns token: %@", [self tokenFromData:deviceToken]);
}
结果
输入证书 PEM 文件和设备令牌后,点击相应按钮。
如果测试推送通知成功送达,结果会显示一条消息:推送通知已成功配置。
推送通知不保证 100% 能够送达,具体取决于设备的网络连接。
项目配置
以下各部分概述了配置项目所需的更改。
功能
在目标设置中,开启以下功能:
推送通知
后台模式(检查这些项目)
音频和 AirPlay
IP 语音
Info.plist
为保护用户隐私,在 iOS 10.0 及更高版本上链接的任何访问设备麦克风、照片库和摄像头的 iOS 应用都必须声明其意图。请在应用的 Info.plist 文件中添加以下键(附带字符串值),并为此键提供用途字符串。如果应用尝试访问设备的任何麦克风、照片库和摄像头,但没有相应的用途字符串,则应用会退出。
NSMicrophoneUsageDescription:允许访问麦克风,以便拨打电话、与支持团队或问题排查团队交谈,以及发送与产品咨询相关的含声音的视频。
NSCameraUsageDescription:允许访问相机,以便客户拍摄并发送与其客户支持咨询相关的照片。
NSPhotoLibraryUsageDescription:允许客户访问照片,以便发送与客户支持咨询相关的照片。
NSFaceIDUsageDescription:允许使用面容 ID 进行验证。
启动 iOS SDK
在您要启动 iOS SDK 的位置添加以下代码行:
[UJET startWithOptions:nil];
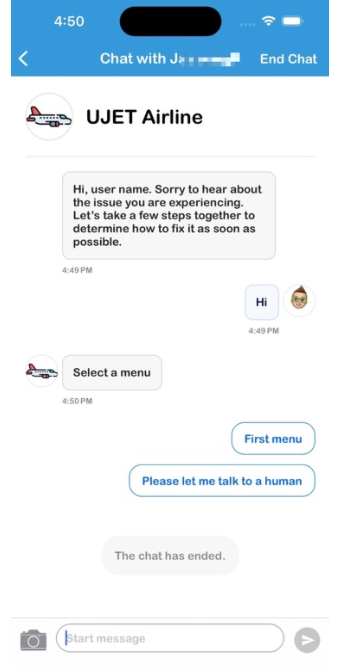
您还可以使用直接访问点,通过此键从菜单中的特定点启动 iOS SDK:
UJETStartOptions *option = [[UJETStartOptions alloc] initWithMenuKey:@"MENU_KEY"];
[UJET startWithOptions:option];
menuKey 可以通过创建直接访问点 (DAP) 来创建。以下步骤提供了有关如何创建 DAP 的指导:
使用管理员凭证登录 CCAI Platform 门户。
前往设置 > 队列。
从菜单结构中选择任意队列。
选择创建直接访问点
以文本形式输入密钥。
点击保存。

如果用户数据已更新,则清除本地缓存
我们会在钥匙串中缓存身份验证令牌,以便重复使用并减少从宿主应用请求签名载荷的频率。SDK 会一直使用该令牌,直到令牌过期或通过 clearUserData 调用撤消。每当用户相关数据发生更改或更新(例如用户退出账号)时,宿主应用负责撤消此缓存。
[UJET clearUserData];
在启动 Contact Center AI 平台之前检查是否存在现有会话
在开始会话之前,请检查当前是否没有会话。当 userId 发生变化时,这一点尤为重要。
[UJET getStatus];
如果存在现有会话,我们应提示用户继续会话或取消操作:
if ([UJET getStatus] != UjetStatusNone) {
  // Display alert to cancel login or resume existing session
}
自定义
UJETGlobalTheme.h 中列出了多种 SDK 主题。
在 [UJET initialize] 之后设置主题,例如:
UJETGlobalTheme *theme = [UJETGlobalTheme new];

theme.font = [UIFont fontWithName:@"OpenSans" size: 16.0f];
theme.lightFont = [UIFont fontWithName:@"OpenSans-Light" size: 16.0f];
theme.boldFont = [UIFont fontWithName:@"OpenSans-Bold" size: 16.0f];
theme.tintColor = [UIColor colorWithRed:0.243 green:0.663 blue:0.965 alpha:1.00];

[Ujet setGlobalTheme:theme];
公司名称是从管理门户> 设置> 支持中心详细信息> 显示名称中检索的。
您可以设置徽标图片,而不是公司名称,如下所示:
theme.companyImage = [UIImage imageNamed:@"logo"];
如果图片过大,系统会调整其大小,使其适合该区域。
字符串
您还可以通过替换值来自定义字符串。例如,将以下键值对放在 Localizable.strings 中:
"ujet_greeting_title" = "Title";

"ujet_greeting_description" = "Description";
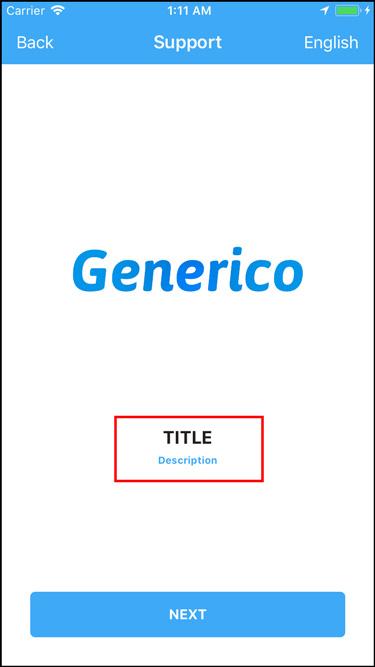
可自定义的字符串列在 ujet.strings 文件中。
深色模式
您可以为深色模式指定所需的颜色色调,以便更好地辨认字体。
@property (nonatomic, strong) UIColor \*tintColorForDarkMode;
如果您未设置该属性,则系统会使用 UJETGlobalTheme.tintColor 作为深色模式下的颜色。如果您的应用支持深色模式,建议您设置此属性。 如需了解如何为深色模式选择合适的色调,请参阅以下 Apple 文章:
Chat 主题
如需自定义聊天界面,您可以选择使用 JSON 字符串或每个主题类。
如需参考,请查看示例应用并取消注释 customizeChatTheme 方法。
func customizeChatTheme() throws {
  guard let file = Bundle.main.path(forResource: "chat-theme-custom", ofType: "json") else { return }
  let json = try String.init(contentsOfFile: file, encoding: .utf8)

  let chatTheme = UJETChatTheme.init(jsonString: json)

  let quickReplyTheme = UJETChatQuickReplyButtonTheme()
  quickReplyTheme.style = .individual
  quickReplyTheme.alignment = .right
  quickReplyTheme.backgroundColor = UJETColorRef(assetName: "white_color")
  quickReplyTheme.backgroundColorForHighlightedState = UJETColorRef(assetName: "quick_reply_color")
  quickReplyTheme.textColor = UJETColorRef(assetName: "quick_reply_color")
  quickReplyTheme.textColorForHighlightedState = UJETColorRef(assetName: "white_color")

  let fontTheme = UJETFontTheme()
  fontTheme.family = "Arial Rounded MT Bold"
  fontTheme.size = 14
  quickReplyTheme.font = fontTheme

  chatTheme?.quickReplyButtonTheme = quickReplyTheme

  let globalTheme = UJETGlobalTheme()
  globalTheme.chatTheme = chatTheme
  globalTheme.defaultAgentImage = UIImage(named: "agent_avatar_image")
  globalTheme.font = UIFont(name: "Arial Rounded MT Bold", size: 14)

  UJET.setGlobalTheme(globalTheme)
}
内容卡片主题
您可以添加内容卡片自定义设置以及聊天自定义设置。
您可以使用 JSON 文件(请参阅 content_card 属性)或使用 UJETChatContentCardTheme 类来执行此操作。
func customizeChatTheme() throws {
  guard let file = Bundle.main.path(forResource: "chat-theme-custom", ofType: "json") else { return }
  let json = try String.init(contentsOfFile: file, encoding: .utf8)

  let chatTheme = UJETChatTheme.init(jsonString: json)

  let contentCardTheme = UJETChatContentCardTheme()
  contentCardTheme.backgroundColor = UJETColorRef(assetName: "agent_message_background_color")
  contentCardTheme.cornerRadius = 16

  let contentCardFontTheme = UJETFontTheme()
  contentCardFontTheme.family = "Arial Rounded MT Bold"
  contentCardFontTheme.size = 18
  contentCardTheme.font = contentCardFontTheme

  let contentCardBorder = UJETBorderTheme()
  contentCardBorder.width =  1
  contentCardBorder.color = UJETColorRef(assetName: "agent_message_border_color")
  contentCardTheme.border = contentCardBorder

  let contentCardFontTheme = UJETFontTheme()
  contentCardFontTheme.family = "Arial Rounded MT Bold"
  contentCardFontTheme.size = 18
  contentCardTheme.font = contentCardFontTheme

  // The font family is inherited from the contentCardFontTheme
  let subtitle = UJETFontTheme()
  subtitle.size = 12
  contentCardTheme.subtitle = subtitle

  // The font family is inherited from the contentCardFontTheme
  let bodyFont = UJETFontTheme()
  bodyFont.size = 10
  contentCardTheme.body = bodyFont

  theme.chatTheme?.contentCard = contentCardTheme

  let globalTheme = UJETGlobalTheme()
  globalTheme.chatTheme = chatTheme
  globalTheme.defaultAgentImage = UIImage(named: "agent_avatar_image")
  globalTheme.font = UIFont(name: "Arial Rounded MT Bold", size: 14)

  UJET.setGlobalTheme(globalTheme)
}
表单卡片主题
您可以同时添加表单卡片自定义设置和聊天自定义设置。您可以使用 JSON 文件(请参阅 form_card property)或使用 UJETChatFormCardTheme 类来执行此操作。
func customizeChatTheme() throws {
    guard let file = Bundle.main.path(forResource: "chat-theme-custom", ofType: "json") else { return }
    let json = try String.init(contentsOfFile: file, encoding: .utf8)

    let chatTheme = UJETChatTheme.init(jsonString: json)

    let formCardTheme = UJETChatFormCardTheme()
    formCardTheme.backgroundColor = UJETColorRef(assetName: "agent_message_background_color")
    formCardTheme.cornerRadius = 16

    let formCardFontTheme = UJETFontTheme()
    formCardFontTheme.family = "Arial Rounded MT Bold"
    formCardFontTheme.size = 18
    formCardTheme.font = formCardFontTheme

    let formCardBorder = UJETBorderTheme()
    formCardBorder.width =  1
    formCardBorder.color = UJETColorRef(assetName: "agent_message_border_color")
    formCardTheme.border = formCardBorder

    let titleFontTheme = UJETFontTheme()
    titleFontTheme.family = "Arial Rounded MT Bold"
    titleFontTheme.size = 18
    formCardTheme.title = titleFontTheme

    // The font family is inherited from the formCardFontTheme
    let subtitleFontTheme = UJETFontTheme()
    subtitleFontTheme.size = 12
    formCardTheme.subtitle = subtitleFontTheme

    chatTheme?.formCard = formCardTheme

    let globalTheme = UJETGlobalTheme()
    globalTheme.chatTheme = chatTheme
    globalTheme.defaultAgentImage = UIImage(named: "agent_avatar_image")
    globalTheme.font = UIFont(name: "Arial Rounded MT Bold", size: 14)

    UJET.setGlobalTheme(globalTheme)
}
Web 表单配置
如需配置 Web 表单功能,请实现 UJETDelegate 协议的 ujetWebFormDidReceive 方法。此方法会接收一个事件(一个 FormMessageReceivedEvent 字典)作为参数,其中包含与表单相关的信息。事件 (FormMessageReceivedEvent) 字典包含以下 JSON 结构:
  {
    "type": "form_message_received",
    "smart_action_id": 1,
    "external_form_id": "external_foobar"
    "signature": "4868a7e1dcb5..."
  }
如需处理该事件,请执行以下操作:
从事件字典(
smart_action_id、external_form_id和signature)中提取相关信息。为表单数据生成表单 URI 和签名。
使用
completion closure将表单数据作为FormDataEvent字典传递给 SDK。如果在 URI/签名生成期间发生任何错误,请使用
Error调用callback.onError()的回调。
传递给 SDK 的字典 (FormDataEvent) 应具有以下结构:
 {
    "type": "form_data",
    "signature": "4868a7e1dcb5...",
    "data": {
       "smart_action_id":1,
       "external_form_id": "form_id",
       "uri":"foobar"
    }
  }
签名 (HMAC-SHA:256) 必须使用 data 生成,并使用共享密钥进行签名。在生成签名之前,数据的对象键必须按字母顺序排序,并且应将相同的 data 发送到 SDK。
会话后转移
您可以添加会后虚拟助理自定义设置以及聊天自定义设置。
这可以通过使用 JSON 文件(请参阅 post_session 属性)或使用 UJETChatPostSessionVaTheme 类来实现。边框宽度只能为 0 或 1,如果您不想区分会话后 VA 体验,则可以将 containerColor 设置为白色,并将边框设置为 0。
func customizeChatTheme() throws {
    guard let file = Bundle.main.path(forResource: "chat-theme-custom", ofType: "json") else { return }
    let json = try String.init(contentsOfFile: file, encoding: .utf8)

    let chatTheme = UJETChatTheme.init(jsonString: json)

    let postSessionVaTheme = UJETChatPostSessionVaTheme()
    postSessionVaTheme.containerColor = UJETColorRef(assetName: "white_color")

    let postSessionVaBorder = UJETBorderTheme()
    postSessionVaBorder.width =  0
    postSessionVaBorder.color = UJETColorRef(assetName: "white_color")
    containerColor.border = postSessionVaBorder

    chatTheme?.postSessionVaTheme = postSessionVaTheme

    let globalTheme = UJETGlobalTheme()
    globalTheme.chatTheme = chatTheme

    UJET.setGlobalTheme(globalTheme)
}
Chat 操作菜单
您可以将聊天操作菜单的自定义与聊天自定义一起添加。您可以使用 JSON 文件(请参阅 form_card 属性)或使用 UJETChatActionMenuTheme 类来实现此目的。
func customizeChatTheme() throws {
    guard let file = Bundle.main.path(forResource: "chat-theme-custom", ofType: "json") else { return }
    let json = try String.init(contentsOfFile: file, encoding: .utf8)

    let chatTheme = UJETChatTheme.init(jsonString: json)

    let actionMenuTheme = UJETChatActionMenuTheme()

    let photoLibraryIcon = UJETChatUserInputIconTheme()
    photoLibraryIcon.visible = true
    photoLibraryIcon.image = UJETImageRef(assetName: "library_button_asset")

    let cameraIcon = UJETChatUserInputIconTheme()
    cameraIcon.visible = true
    cameraIcon.image = UJETImageRef(assetName: "camera_button_asset")

    let cobrowseIcon = UJETChatUserInputIconTheme()
    cobrowseIcon.visible = true
    cobrowseIcon.image = UJETImageRef(assetName: "cobrowse_button_asset")

    actionMenuTheme.libraryIcon = photoLibraryIcon
    actionMenuTheme.cameraIcon = cameraIcon
    actionMenuTheme.cobrowseIcon = cobrowseIcon

    chatTheme?.actionMenu = actionMenuTheme

    let globalTheme = UJETGlobalTheme()
    globalTheme.chatTheme = chatTheme

    UJET.setGlobalTheme(globalTheme)
}
其他出场
您还可以自定义其他外观,例如字号和背景颜色。
theme.supportTitleLabelFontSize = 30;
theme.supportDescriptionLabelFontSize = 20;
theme.supportPickerViewFontSize = 30;
theme.staticFontSizeInSupportPickerView = YES;

theme.backgroundColor = UIColor.darkGrayColor;
theme.backgroundColorForDarkMode = UIColor.lightGrayColor;
CallKit
在 iOS 10.0 及更高版本中,系统会为所有通话启用 CallKit。
借助 CallKit,系统会显示应用内来电的通话界面,并在手机的通话记录中显示该通话。
如需从通话记录中开始新的 CCAI 平台支持会话,请将以下代码块添加到 AppDelegate.m 中:
AppDelegate.m:
- (BOOL)application:(UIApplication *)app continueUserActivity:(nonnull NSUserActivity *)userActivity restorationHandler:(nonnull void (^)(NSArray * _Nullable))restorationHandler {
    if ([userActivity.activityType isEqualToString:@"INStartAudioCallIntent"]) {
        // Open app from Call history
        [UJET startWithOptions:nil];
    }

    return YES;
}
CallKit 允许在设备处于锁定状态时接听来电时,在锁定屏幕上显示 40x40 图标。在名为“icon-call-kit”的 Xcassets 中放置一张图片。
配置 SDK
您可以在启动 SDK 之前设置多个选项。
如需了解详情,请查看 UJETGlobalOptions 类。
UJETGlobalOptions *options = [UJETGlobalOptions new];
options.fallbackPhoneNumber = @"+18001112222";
options.preferredLanguage = @"en";

[UJET setGlobalOptions:options];
显示或隐藏“下载转写内容”按钮
您可以配置 SDK,以在聊天选项菜单和聊天后界面中显示或隐藏“下载转写内容”按钮。
以下代码展示了如何配置“下载转写内容”按钮:
typedef NS_OPTIONS(NSUInteger, UJETChatDownloadTranscriptVisibilityOptions) {
    UJETChatDownloadTranscriptVisibilityOptionsShowAll = 0,
    UJETChatDownloadTranscriptVisibilityOptionsHideFromOptionsMenu = 1 << 0,
    UJETChatDownloadTranscriptVisibilityOptionsHideFromPostChatScreen = 1 << 1,
    UJETChatDownloadTranscriptVisibilityOptionsHideAll = UJETChatDownloadTranscriptVisibilityOptionsHideFromOptionsMenu | UJETChatDownloadTranscriptVisibilityOptionsHideFromPostChatScreen
};

@property (nonatomic, assign) UJETChatDownloadTranscriptVisibilityOptions transcriptVisibilityOptions;
PSTN 回退
在以下几种情况下,我们会提供 PSTN 回退:
移动网络已离线。
无法访问应用后端。
VoIP 不可用
网络状况不佳,无法连接。如需了解详情,请参阅 UJETGlobalOptions.pstnFallbackSensitivity 属性。
由于防火墙配置或提供商问题,连接期间发生故障。
建议您在 UJETGlobalOptions.fallbackPhoneNumber 中设置公司 IVR 号码。建议的格式是“+”后跟国家/地区代码和手机号码。例如:+18001112222。
PSTN 回退敏感度
您可以调整检查网络状况以进行 PSTN 回退的灵敏度级别。
@property (nonatomic, assign) float pstnFallbackSensitivity;
值必须在 0.0 到 1.0 的范围内。如果设置为 1,通话将始终通过 PSTN 而不是 VoIP 进行连接。如果值为 0,则最大延迟和最小带宽阈值分别为 10000 毫秒和 10KB/秒。例如,值为 0.5 表示最低延迟时间和带宽分别为 5000 毫秒和 15KB/秒。
您可以按照以下步骤配置此值:
以管理员身份登录 CCAI 平台门户。
依次前往设置 > 开发者设置 > 移动应用。
找到“回退手机号码阈值”部分。默认值为 0.85。
指定新的阈值。
点击保存。
在全局层面关闭推送通知
您可以在全局范围内关闭推送通知。将以下属性设置为 false 可绕过所有推送通知依赖项,并防止推送通知到达最终用户:
@property (nonatomic, assign) BOOL allowsPushNotifications;
忽略深色模式
您可以使用以下属性专门忽略 CCAI 平台 SDK 中的深色模式:
@property (nonatomic, assign) BOOL ignoreDarkMode;
隐藏状态栏
您可以使用此属性控制状态栏的可见性:
@property (nonatomic, assign) BOOL hideStatusBar;
默认情况下,hideStatusBar 设置为 false 和 visible。
跳过 CSAT 调查问卷
您可以添加一个按钮,让用户跳过 CSAT 调查问卷。以下代码示例展示了如何添加按钮:
let options = UJETGlobalOptions()
options.skipCsat = true
自定义 activity 指示器
您可以向 SDK 添加自己的加载动画(在 UIView 内),并替换默认的 UIActivityIndicatorView。实现 UJETDelegate 中的 ujet_activityIndicator 方法,并返回自定义视图。
public func ujet_activityIndicator() -> UIView! {
    let loader = UIView.init()
    let animation = CABasicAnimation()
    loader.backgroundColor = .blue
    loader.layer.cornerRadius = 15
    animation.timingFunction = CAMediaTimingFunction.init(name: CAMediaTimingFunctionName.easeOut)
    animation.keyPath = "transform.scale"
    animation.duration = 1.0
    animation.fromValue = 0.0
    animation.toValue = 1.0
    animation.repeatCount = Float.infinity
    animation.isRemovedOnCompletion = false
    loader.layer.add(animation, forKey: "Load")

    return loader
}
如果您已在应用的 Info.plist 中将 UIUserInterfaceStyle 设置为 Light,以完全选择停用深色模式,则可以忽略此属性。
首选语言
CCAI 平台 SDK 将使用以下优先级顺序来确定首选语言。
从应用内的启动画面中选择的语言。
已从
UJETGlobalOptions中选择默认语言。您可以使用preferredLanguage属性设置默认语言。您可以在UJETGlobalOptions.h文件中找到支持的语言代码。如果应用支持,系统将使用在设备中选择的设备语言(依次点击设置 > 通用 > 语言和地区)。
如果应用不支持设备语言,但支持其最接近的父方言,则会使用设备语言的最接近方言。例如,如果用户在设备中选择的语言是“西班牙语(古巴)”,但应用不支持“西班牙语(古巴)”,但支持父方言“西班牙语”,那么系统将使用“西班牙语”。
如果应用不支持设备语言,则会使用英语。
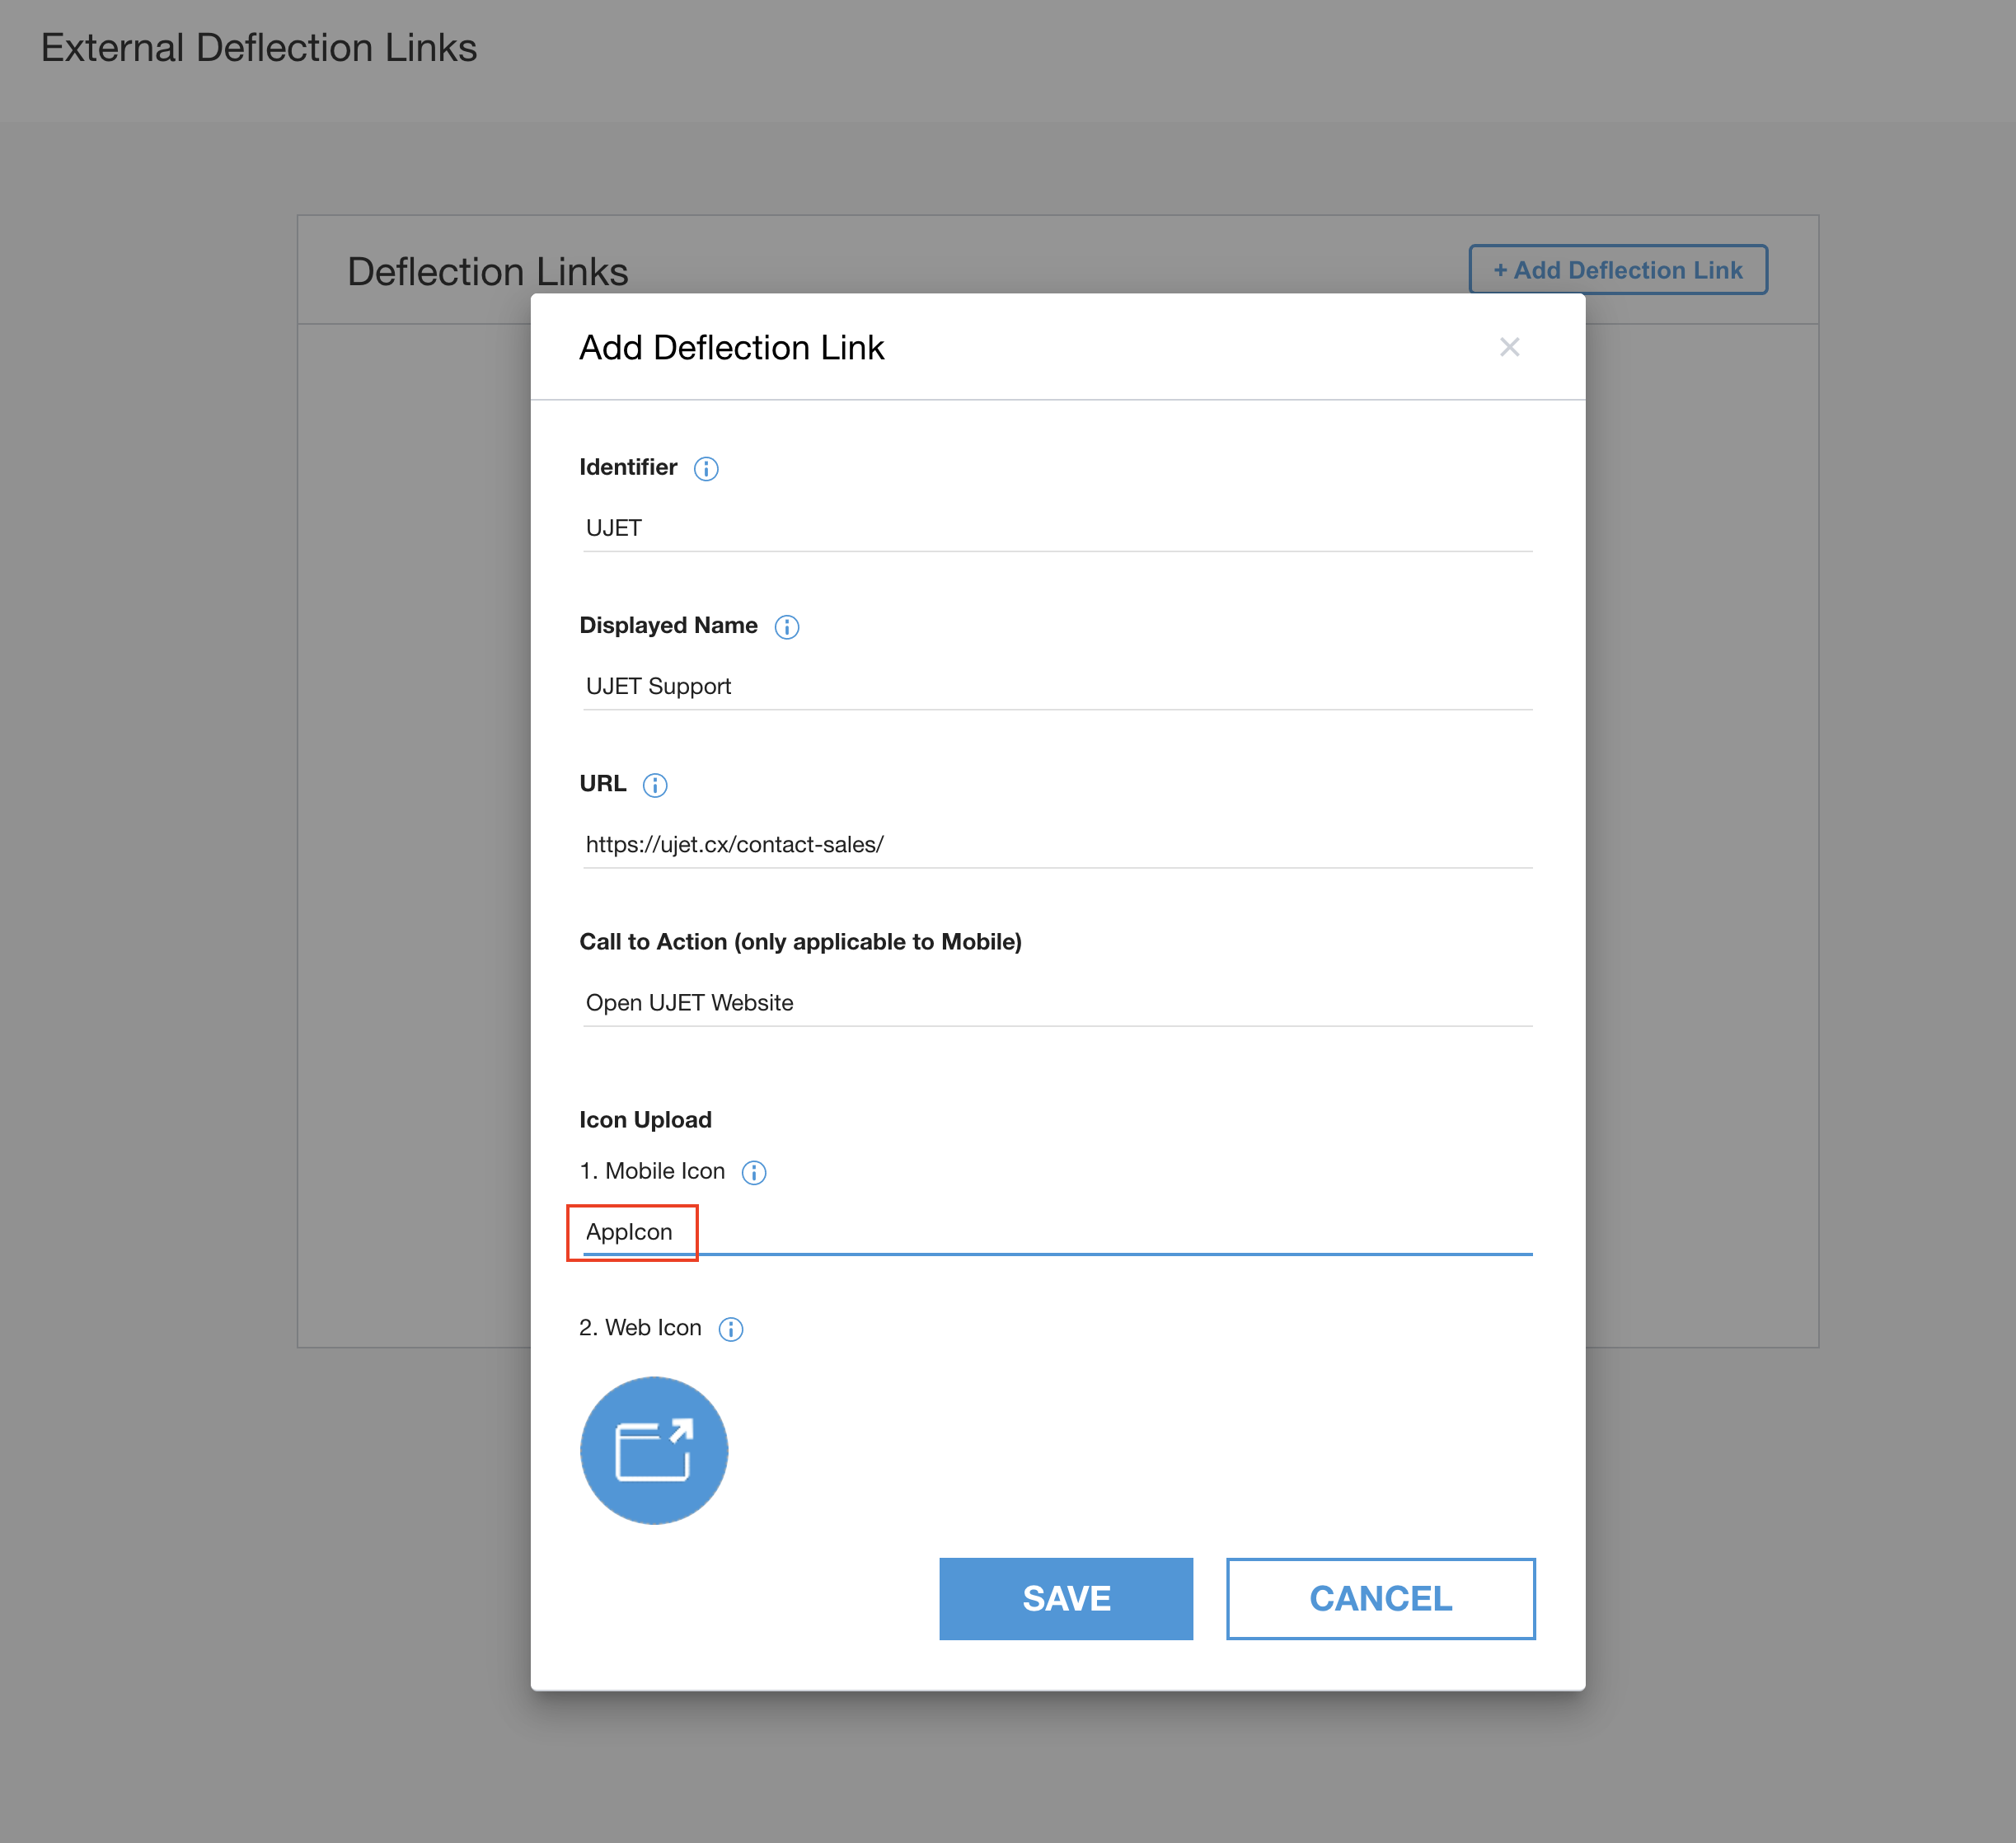
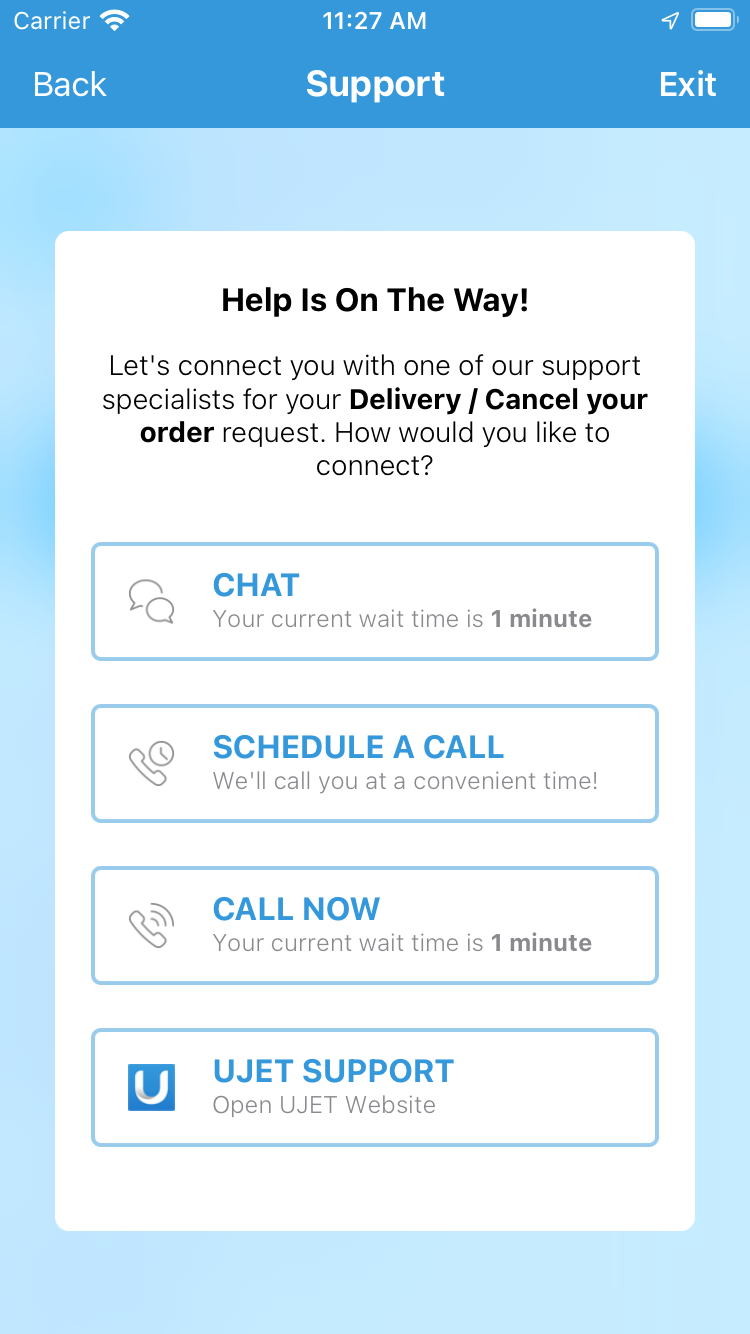
配置外部分流链接图标
您可以自定义外部分流链接渠道中的图标,方法是将图标上传到应用的资源目录中,并确保在管理门户中依次前往“设置”>“Chat”>“外部分流链接”>“查看链接”>“添加分流链接”来创建外部分流链接时使用相同的图标名称。如果管理门户中的图标名称与上传到应用中的图标不一致,SDK 将使用默认图标。您可以参阅此链接,了解如何在素材资源目录中添加图片。
后备
您可以使用 didHandleUjetError 函数来处理意外错误。如果您不使用此函数或此函数返回 false,iOS SDK 会处理相应错误。
下表显示了 didHandleUjetError 函数监听的错误:
| 错误类型 | 错误代码 | 说明 |
|---|---|---|
networkError |
1 | 网络不可用。 注意:如果在聊天或通话会话期间或在显示评分界面时网络不可用,系统不会触发此错误。 |
authenticationError |
100 | 身份验证期间发生意外错误。 |
authenticationJwtError |
101 | 在 JWT 验证期间发生了意外错误,例如解析错误。 |
voipConnectionError |
1000 | 无法建立与 VoIP 提供商的连接。VoIP SDK 回调会处理此问题。 |
voipLibraryNotFound |
1001 | 系统预期通过 VoIP 提供商建立连接,但找不到任何提供商。如果您集成了错误的 SDK 或未向依赖项添加 VoIP 提供程序库,就可能会发生这种情况。 |
chatLibraryNotFound |
1100 | 当系统找不到聊天库时发生。如果您集成了错误的 SDK 或未将 Twilio 聊天库添加到依赖项中,就可能会发生这种情况。 |
以下代码示例展示了如何使用 didHandleUjetError 函数:
public func didHandleUjetError(_ errorCode: Int32) -> Bool {
    guard let ujetError = UjetErrorCode(rawValue: Int(errorCode)) else {
        return false // Let the SDK handle unknown integer codes.
    }

    switch ujetError {
    case .networkError:
        // Example for if you have a custom UI for network errors. You can
        // handle the error and prevent the SDK from showing its own alert.
        showCustomNetworkAlert() // Your custom UI for this type of error.
        return true

    case .authenticationError, .voipConnectionError:
        // For all other errors, use the default SDK behavior.
        return false

    @unknown default:
        // Let the SDK handle future errors.
        return false
    }
}
向 CRM 发送自定义数据
您可以向 CRM 工单发送自定义数据。
您可以通过以下两种方法发送自定义数据:
安全方法:使用 JWT 进行预定义的数据签名。
不安全的方法:使用纯 JSON 的预定义数据(不推荐)。
使用安全方法发送自定义数据
您必须实现签名方法。首先,您可以在客户端放置自定义数据,然后将其发送到服务器进行签名。您可以在服务器上添加定义好的表单,并使用您的公司密钥对其进行签名,然后通过 JWT 返回。
- (void)signPayload:(NSDictionary *)payload payloadType:(UjetPayloadType)payloadType success:(void (^)(NSString *))success failure:(void (^)(NSError *))failure
{
    if (payloadType == UjetPayloadCustomData) {
      // sign custom data using UJET_COMPANY_SECRET on your server.

      NSURLSessionConfiguration *sessionConfiguration = [NSURLSessionConfiguration defaultSessionConfiguration];
      NSURLSession *session = [NSURLSession sessionWithConfiguration:sessionConfiguration];

      NSMutableURLRequest *mutableRequest = [[NSMutableURLRequest alloc] init];
      mutableRequest.URL = [NSURL URLWithString:@"https://your.company.com/api/ujet/sign/custom_data"];
      mutableRequest.HTTPMethod = @"POST";
      NSError *error;

      // Make client's custom data
      UJETCustomData *customData = [[UJETCustomData alloc] init];
      [customData set:@"name" label:@"Name" stringValue:@"USER_NAME"];
      [customData set:@"os_version" label:@"OS Version" stringValue:[[UIDevice currentDevice] systemVersion]];
      [customData set:@"model" label:@"Model number" numberValue:[NSNumber numberWithInteger:1234]];
      [customData set:@"temperature" label:@"Temperature" numberValue:[NSNumber numberWithFloat:70.5]];
      [customData set:@"purchase_date" label:@"Purchase Date" dateValue:[NSDate date]];
      [customData set:@"dashboard_url" label:@"Dashboard" urlValue:[NSURL URLWithString:@"http://internal.dashboard.com/1234"]];

      NSDictionary *data = @{@"custom_data": [customData getData]};
      mutableRequest.HTTPBody = [NSJSONSerialization dataWithJSONObject:data options:0 error:&error];
      NSURLSessionDataTask *task = [session dataTaskWithRequest:mutableRequest completionHandler:^(NSData *data, NSURLResponse *response, NSError *error) {
          if(error) {
              failure(error);
          }
          else {
              NSDictionary *json = [NSJSONSerialization JSONObjectWithData:data options:0 error:nil];
              success(json[@"jwt"]);
          }
      }];

      [task resume];
    }
}
使用不安全的方法发送自定义数据
不建议使用此方法,因为它会造成潜在的漏洞,可能会使您的应用遭受中间人攻击。如果您选择使用此方法,我们不对可能发生的安全风险和潜在损坏负责。我们建议您使用前面介绍的安全方法在应用中发送自定义数据。或者,您也可以直接使用 UJETCustomData 实例启动 iOS SDK。在这种情况下,UJETPayloadCustomData 的 signPayload 委托应仅调用 success(nil);。
- (void)signPayload:(NSDictionary *)payload payloadType:(UjetPayloadType)payloadType success:(void (^)(NSString *))success failure:(void (^)(NSError *))failure {
    if (payloadType == UjetPayloadCustomData) {
      success(nil);
    }
}
UJETStartOptions *options = [UJETStartOptions new];
options.unsignedCustomData = customData;

[UJET startWithOptions:options];
使用未签名的自定义数据发送外部聊天记录
当 SDK 在启动时带有未签名的自定义数据时,您可以通过调用 setExternalChatTransfer: 或 setExternalChatTransferWithDictionary: 方法将聊天记录发送到 SDK,以分别使用 NSString 或 NSDictionary 设置 JSON 数据。
UJETCustomData *customData = [UJETCustomData new];
[customData setExternalChatTransfer:jsonString];

UJETStartOptions *options = [UJETStartOptions new];
options.unsignedCustomData = customData;

[UJET startWithOptions:options];
JSON 格式:
greeting_override: string
代理:字典
name:字符串
avatar: string [代理头像的网址,可选]
转写内容:array
sender:字符串 [“end_user”或“agent”]
时间戳:字符串 [例如“2021-03-15 12:00:00Z”]
content: array
类型:字符串 [text、media 中的一个]
text:字符串 [对于文本类型是必需的]
media:字典 [媒体类型必需]
类型:字符串 [image、video 中的一个]
url:字符串 [指向媒体文件的公开网址]
JSON 示例:
{
  "greeting_override": "Please hold while we connect you with a human agent.",
  "agent": {
    "name": "Name",
    "avatar": "avatar url"
  },
  "transcript": [
    {
      "sender": "agent",
      "timestamp": "2021-03-15 12:00:15Z",
      "content": [
        {
          "type": "text",
          "text": "**Suggestions shown:**\n\n* Help with batch or delivery\n* Help with metrics or order feedback\n* Help with Instant Cashout"
        }
      ]
    },
    {
      "sender": "end_user",
      "timestamp": "2021-03-15 12:00:16Z",
      "content": [
        {
          "type": "text",
          "text": "Help with batch or delivery"
        }
      ]
    }
  ]
}
您可以在文本类型中使用 Markdown。支持的语法包括斜体、粗体、项目符号列表、超链接和下划线 (--text--)。
自定义数据示例 { :#example-of-custom-data }
JSON 编码为 JWT
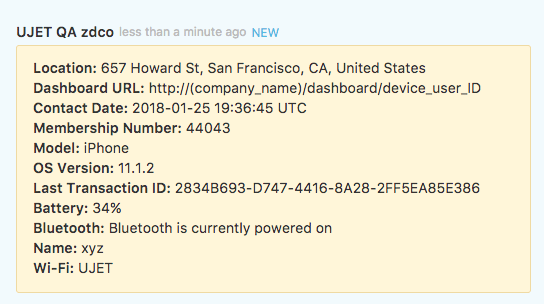
JSON 文件应验证 JWT。自定义数据对象是 custom_data 键的值。
{
  "iat" : 1537399656,
  "exp" : 1537400256,
  "custom_data" : {
    "location" : {
      "label" : "Location",
      "value" : "1000 Stockton St, San Francisco, CA, United States",
      "type" : "string"
    },
    "dashboard_url" : {
      "label" : "Dashboard URL",
      "value" : "http://(company_name)/dashboard/device_user_ID",
      "type" : "url"
    },
    "contact_date" : {
      "label" : "Contact Date",
      "value" : 1537399655992,
      "type" : "date"
    },
    "membership_number" : {
      "label" : "Membership Number",
      "value" : 62303,
      "type" : "number"
    },
    "model" : {
      "label" : "Model",
      "value" : "iPhone",
      "type" : "string"
    },
    "os_version" : {
      "label" : "OS Version",
      "value" : "12.0",
      "type" : "string"
    },
    "last_transaction_id" : {
      "label" : "Last Transaction ID",
      "value" : "243324DE-01A1-4F71-BABC-3572B77AC487",
      "type" : "string"
    },
    "battery" : {
      "label" : "Battery",
      "value" : "-100%",
      "type" : "string"
    },
    "bluetooth" : {
      "label" : "Bluetooth",
      "value" : "Bluetooth not supported",
      "type" : "string"
    },
    "wifi" : {
      "label" : "Wi-Fi",
      "value" : "Wi-Fi not connected",
      "type" : "string"
    },
    "ssn" : {
      "invisible_to_agent" : true,
      "label" : "Social Security Number",
      "value" : "102-186-1837",
      "type" : "string"
    }
  }
}
每个数据都类似于 JSON 对象格式,应包含键、值、类型和标签。
键是数据的唯一标识符。标签是 CRM 页面上的显示名称。类型是值的类型。
字符串
- JSON 字符串
数值
- 整数、浮点数
日期
- 采用 13 位数的 UTC Unix 时间戳格式。(包含毫秒)
网址
- HTTP 网址格式
CRM 示例
位置
使用 CoreLocation 框架。如需了解详情,请参阅 AppDelegate.m。
设备操作系统版本
[customData set:@"os_version" label:@"OS Version" stringValue:[[UIDevice currentDevice] systemVersion]];
防止显示自定义数据
您可以将 invisible_to_agent 属性与自定义数据对象搭配使用,以防止已签名或未签名的自定义数据在代理适配器中显示。在上述示例中,由于 "invisible_to_agent" : true 包含在 ssn 对象中,因此代理适配器中不会显示最终用户的社会保障号。
如果您在自定义数据对象中添加 "invisible_to_agent" : true 属性,则会发生以下行为:
- 自定义数据包含在会话元数据文件中。
- 自定义数据不包含在 CRM 记录中。
如需了解详情,请参阅在代理适配器中查看会话数据。
预留的数据属性
您可以在会话开始时,以签名自定义数据的形式将预留数据属性发送到 Contact Center AI 平台 (CCAI Platform)。如需了解详情,请参阅发送预留数据属性。
以下是自定义数据中预留的数据属性的示例:
  {
    "custom_data": {
      "reserved_verified_customer": {
        "label": "Verified Customer",
        "value": "VERIFIED_CUSTOMER_BOOLEAN": ,
        "type": "boolean"
      },
      "reserved_bad_actor": {
        "label": "Bad Actor",
        "value": "VERIFIED_BAD_ACTOR_BOOLEAN": ,
        "type": "boolean"
      },
      "reserved_repeat_customer": {
        "label": "Repeat Customer",
        "value": "REPEAT_CUSTOMER_BOOLEAN": ,
        "type": "boolean"
      }
    }
  }
替换以下内容:
VERIFIED_CUSTOMER_BOOLEAN:如果您认为相应最终用户是合法客户,则为 True。VERIFIED_BAD_ACTOR_BOOLEAN:如果您认为此最终用户可能是恶意行为者,则为 True。REPEAT_CUSTOMER_BOOLEAN:如果已确定相应最终用户之前曾联系过您的联络中心,则为 True。
自定义 Flow
断开 CCAI 平台以处理宿主应用事件
// CCAI Platform is connected
...
// An event has come
[UJET disconnect:^{
  // Handle an event
}];
推迟 CCAI Platform 来电或聊天
实现用于处理传入事件的委托方法
- (BOOL)shouldConnectUjetIncoming:(NSString *)identifier forType:(UjetIncomingType)type {
  if (weDoingSomething) {
    // save identifier and type
    return NO; // postpone
  } else {
    return YES;
  }
}
关联已延期的活动
[UJET connect:identifier forType:UjetIncomingTypeCall];
设置深层链接
这样一来,无论最终用户是否安装了该应用,通过 PSTN 进行通话的客服人员都可以通过短信使用智能操作。
在 CCAI 平台门户中,依次前往设置 > 操作管理 > 启用“发送短信下载应用”。
配置通用链接或自定义网址方案后,您可以将应用网址设置为您的网页(例如 https://your-company.com/support)。 您可以选择任一方式。
实现委托方法以处理深层链接
通用链接和自定义网址分别类似于 https://your-company.com/support?call_id=x&nonce=y 和 your-company://support?call_id=x&nonce=y。在管理门户中,将不含查询参数的链接之一放在“应用网址”下方。例如,如果使用自定义网址方案,则放置 your-company://support。
在委托方法中,请务必确保仅当通用链接或自定义网址中的网址路径和参数是 CCAI 平台特有的时,才调用 [UJET start]。
- (BOOL)application:(UIApplication *)app continueUserActivity:(nonnull NSUserActivity *)userActivity restorationHandler:(nonnull void (^)(NSArray * _Nullable))restorationHandler {
  ...
  if ([NSUserActivityTypeBrowsingWeb isEqualToString:userActivity.activityType]) {
    NSURL *url = userActivity.webpageURL;

    NSArray *availableSchema = @[
                                  @"your-company",   // custom URL scheme
                                  @"https"           // universal link
                                  ];

    NSArray *availableHostAndPath = @[
                                      @"ujet",                  // custom URL scheme
                                      @"your-comany.com/ujet"   // universal link
                                      ];

    if (![availableSchema containsObject:url.scheme]) {
      return NO;
    }

    NSString *hostAndPath = [NSString stringWithFormat:@"%@%@", url.host, url.path];
    if (![availableHostAndPath containsObject:hostAndPath]) {
      return NO;
    }

    // your-company://ujet?call_id={call_id}&nonce={nonce}
    // https://your-company.com/ujet?call_id={call_id}&nonce={nonce}
    NSURLComponents *urlComponents = [NSURLComponents componentsWithURL:url
                                                resolvingAgainstBaseURL:NO];
    NSArray *queryItems = urlComponents.queryItems;
    NSString *callId = [self valueForKey:@"call_id" fromQueryItems:queryItems];
    // validate call id
    if (![self isValidCallId:callId]) {
      return NO;
    }
    NSString *nonce = [self valueForKey:@"nonce" fromQueryItems:queryItems];

    UJETStartOptions *options = [[UJETStartOptions alloc] initWithCallId:callId nonce:nonce];

    [UJET startWithOptions:options];
  }
  ...
}
如果您的应用采用 UIWindowSceneDelegate,请添加以下代码段:
class SceneDelegate: UIResponder, UIWindowSceneDelegate {

    var window: UIWindow?

    func scene(_ scene: UIScene, willConnectTo session: UISceneSession, options connectionOptions: UIScene.ConnectionOptions) {

        //if app is called with universal Link and started from cold
        if connectionOptions.urlContexts.first != nil  {
            self.scene(scene, openURLContexts: connectionOptions.urlContexts)
        }

        guard let _ = (scene as? UIWindowScene) else { return }
    }

    func scene(_ scene: UIScene, willContinueUserActivityWithType userActivityType: String) {
        guard let appDelegate = UIApplication.shared.delegate as? AppDelegate else { return }
        let _ = appDelegate.application(UIApplication.shared,
                                        continue: NSUserActivity(activityType: userActivityType)) { _ in

        }
    }

    func scene(_ scene: UIScene, openURLContexts URLContexts: Set<UIOpenURLContext>) {
        guard let url = URLContexts.first?.url else {
            return
        }

        guard let appDelegate = UIApplication.shared.delegate as? AppDelegate else { return }
        let _ = appDelegate.application(UIApplication.shared,
                                        open: url,
                                        options: [:])
    }
}
如需了解详情,请参阅 UJETObject+DeepLink 文件中的示例代码。
观察 CCAI 平台事件
我们通过 NSNotificationCenter.defaultCenter 发布以下事件。您可以监听这些事件,并根据自己的使用情形(例如自定义键盘布局)自定义流程。
UJETEventEmailDidClick
- 队列菜单数据
UJETEventEmailDidSubmit
队列菜单数据
has_attachment: (NSNumber) @YES, @NO
UJETEventSessionViewDidAppear
type: @"call", @"chat"
时间戳:(NSString) ISO 8601
UJETEventSessionViewDidDisappear
type: @"call", @"chat"
时间戳:(NSString) ISO 8601
UJETEventSessionDidCreate
- 会话数据
UJETEventSessionDidEnd
会话数据
agent_name:(NSString)如果客服人员未加入,则为 null
时长:(NSNumber) 仅限通话
ended_by: (NSString)
type=call: @"agent", @"end_user"
type=chat: @"agent", @"end_user", @"timeout", @"dismissed"
UJETEventSdkDidTerminate
UJETEventPostSessionOptInDidSelected
- opt_in_selected: (NSString) @"Yes"、@"No"
事件数据
元数据
application: @"iOS"
app_id:(NSString) 软件包标识符
app_version: (NSString)
company: (NSString) 子网域
device_model: (NSString)
device_version: (NSString)
sdk_version: (NSString)
时间戳:(NSString) ISO 8601
将菜单数据加入队列
元数据
menu_id: NSString
menu_key: NSString, nullable
menu_name: NSString
menu_path : NSString
会话数据
队列菜单数据
session_id: NSString
type: @"call", @"chat"
end_user_identifier: NSString
设置屏幕共享
如果您想使用屏幕共享功能,请集成 UJETCobrowseKit.xcframework。
CocoaPods:将以下子规范添加到您的应用目标。
    ruby
target 'MyApp' do
  pod 'UJET'
  pod 'UJET/Cobrowse'
end
Carthage:在 Cartfile 中添加以下代码行:
binary "https://sdk.ujet.co/ios/UJETKit.json"
SwiftPM:选择 UJET 和 UJETCobrowse 产品,然后将其添加到应用目标中。
并设置 UJETGlobalOptions.cobrowseKey 属性。
swift
let options = UJETGlobal
Options()options.cobrowseKey = cobrowseKey

UJET.setGlobalOptions(options)
完整设备屏幕共享(可选)
通过全设备屏幕共享,支持代理可以查看您自己应用以外的应用的屏幕。在支持代理需要检查系统设置的状态或需要查看用户在多个应用之间导航时,此功能通常非常有用。如果您不想使用此功能,可以跳过此部分。
自定义屏幕共享同意对话框
如需自定义屏幕共享权限请求对话框,您需要在提供程序类中实现 UJETCobrowseAlertProvider 协议。在此实现中,通过相应协议方法返回自定义 UIViewController 或任何其他继承 UIViewController 的对象。UIViewController 应包含两个按钮,一个用于接受,另一个用于拒绝。
获得用户同意后,通过调用闭包 consentStatus 将用户同意传递到我们的 SDK。UIViewController,来自cobrowseFullDeviceRequestAlert。委托应包含带有标题的 RPSystemBroadcastPickerView(请参见下面的示例代码),并且应包含另一个拒绝按钮。在点击拒绝按钮时调用已关闭的闭包。
class CobrowseAlertProvider: NSObject, UJETCobrowseAlertProvider {
    func cobrowseSessionInitializationAlert(consentStatus: @escaping (Bool) -> Void) -> UIViewController? {
        let customAlertViewController = CustomAlertViewController()
        customAlertViewController.consentStatus = consentStatus
        return customAlertViewController
    }

    func cobrowseSessionRequestAlert(consentStatus: @escaping (Bool) -> Void) -> UIViewController? {
        // Same as cobrowseSessionInitializationAlert
    }

    func cobrowseRemoteRequestAlert(consentStatus: @escaping (Bool) -> Void) -> UIViewController? {
        // Same as cobrowseSessionInitializationAlert
    }

    func cobrowseFullDeviceRequestAlert(dismissed: @escaping () -> Void) -> UIViewController? {
        let customAlertViewController = CustomFullDeviceAlertViewController()
        cobrowseSessionAlertViewController.dismissed = dismissed
        return customAlertViewController
    }

    func cobrowseSessionEndAlert(consentStatus: @escaping (Bool) -> Void) -> UIViewController? {
        // Same as cobrowseSessionInitializationAlert
    }
}
自定义视图控制器应具有一个闭包,用于将意见征求状态传递给 SDK。
class CustomAlertViewController: UIViewController {
    var consentStatus: ((Bool) -> Void)?

    @IBAction func allowButtonClicked(_ sender: Any) {
        dismiss(animated: true) {[weak self] in
            self?.consentStatus?(true)
        }
    }

    @IBAction func denyButtonClicked(_ sender: Any) {
        dismiss(animated: true) {[weak self] in
            self?.consentStatus?(false)
        }
    }
}
用于显示完整设备请求提醒的自定义视图控制器应具有 RPSystemBroadcastPickerView 和一个用于将 dismiss 状态传递给 SDK 的闭包。
class CustomFullDeviceAlertViewController: UIViewController {
    var broadcastPickerView: RPSystemBroadcastPickerView!
    var dismissed: (() -> Void)?

    override func viewDidLoad() {
        super.viewDidLoad()

        let frame = CGRect(x: x, y: y, width: 50, height: 50) // Set your own value
        broadcastPickerView = RPSystemBroadcastPickerView(frame: frame)
        broadcastPickerView.preferredExtension = Bundle.main.object(forInfoDictionaryKey: "CBIOBroadcastExtension") as? String // Should have this value as it is
        view.addSubview(broadcastPickerView)
    }

    @IBAction func denyButtonClicked(_ sender: Any) {
        dismiss(animated: true) {[weak self] in
            self?.dismissed?()
        }
    }
}
别忘了通过以下 API 将此提供程序传递给我们的 SDK:
let provider = CobrowseAlertProvider()
UJET.setCobrowseAlertProvider(provider)
广播扩展服务
此功能需要添加广播扩展服务。
打开您的 Xcode 项目。
依次选择 File > Target。
选择 Broadcast Upload Extension。
输入目标的名称。
取消选中包含界面扩展程序。
创建目标,并记下其软件包 ID。
将广播扩展程序的目标 SDK 更改为 iOS 12.0 或更高版本。
集成 SDK
CocoaPods:将以下子规范添加到您的扩展程序目标:
target 'MyApp' do
  pod 'UJET'
  pod 'UJET/Cobrowse'
end
target 'MyAppExtension' do
  pod 'UJET/CobrowseExtension'
end
如果您使用的是 SwiftPM,请选择 UJETCobrowseExtension 产品并将其添加到您的扩展程序目标中。
设置密钥链共享
您的应用和之前创建的应用扩展程序需要通过 iOS Keychain 共享一些密钥。它们使用自己的密钥链群组来实现此目的,因此与您其余应用的密钥链隔离。
在应用目标和扩展目标中,为 io.cobrowse 密钥链群组添加密钥链共享授权(Keychain Sharing entitlement)。
将软件包 ID 添加到您的 plist 中
获取您之前创建的扩展程序的软件包 ID,然后在应用的 Info.plist(注意:不是扩展程序的 Info.plist)中添加以下条目,并将以下软件包 ID 替换为您自己的软件包 ID:
xml
<key>CBIOBroadcastExtension</key>
<string>your.app.extension.bundle.ID.here</string>
实现扩展程序
Xcode 会将 SampleHandler.m 和 SampleHandler.h(或 SampleHander.swift)文件添加为您之前创建的目标的一部分。将文件的内容替换为以下内容:
Swift:选择 UJETCobrowseExtension 产品并将其添加到您的扩展程序目标中:
import CobrowseIOAppExtension
class SampleHandler: CobrowseIOReplayKitExtension {
}
ObjC
objc// SampleHandler.h
@import CobrowseIOAppExtension;
@interface SampleHandler : CobrowseIOReplayKitExtension
@end// SampleHandler.m
#import "SampleHandler.h"
@implementation SampleHandler
@end
构建并运行您的应用
现在,您可以构建并运行应用了。完整的设备功能仅在实体设备上可用,在 iOS 模拟器中无法使用。
最小化 SDK
在聊天会话或通话进行期间,Contact Center AI Platform SDK 可以最小化。当您希望在收到 SDK 事件(例如点击内容卡片)后将用户引导回应用时,此功能非常有用。为了最大限度地减少 SDK 并吸引用户返回您的应用,您可以使用:
UJET.minimize(nil)
 // Or if you want to take some action once the SDK has been minimized:

UJET.minimize {
  // Add the code you want to run once the SDK has been minimized here
}
问题排查
应用提交被拒
应用提交因在中国境内包含 CallKit 框架而被拒。
如果您的应用因上述原因而被 Apple 拒绝,只需发表评论即可,因为系统旨在针对中国大陆地区的 VoIP 通话停用 CallKit 框架。此功能自 SDK 版本 0.31.1 起生效。
SDK 大小过大
当 SDK 大小过大且难以在 GitHub 上跟踪时
在这篇文章中,他们提供了两种选择。建议使用 Git LFS。
如果您不使用 Bitcode,则从二进制文件中剥离 Bitcode 也是一种选择。在 UJETKit.xcframework 文件夹下运行此命令。
xcrun bitcode_strip -r UJET -o UJET
dyld:未加载库错误
从目标> 构建设置 > 链接中,在 Runpath Search Paths 上添加 @executable_path/Frameworks。
在 iTunes Connect 上提交应用
由于启用了 VoIP 后台模式,Apple 可能会在审核过程中提出以下问题:
用户能否在您的应用中接听 VoIP 通话?
对问题回答是。
启动 SDK 时,提醒通知不可用
请检查以下各项:
使用真实设备,而不是模拟器。
启用推送通知和后台模式 > Voice over IP 功能。
如果这些方法不起作用,请尝试使用分发配置配置文件(临时或 Apple Store)进行构建。
针对测试应用测试推送通知
准备好 VoIP 证书和设备的设备令牌。
在 CCAI 平台门户网站上,请参阅设置 > 开发者设置菜单中的推送通知调试部分。
如果您已为 APNS 设置证书,则无需再次放置证书。
输入您的证书(可选),检查是否为沙盒(可选),然后输入您的测试应用推送通知设备令牌。
发起新对话的时间超过 30 秒
检查您是否正在响应自定义数据的委托方法。您应在请求时返回有效的自定义数据,或者仅在成功块中返回 nil。
使用以下代码段作为配置示例:
public func signPayload(_ payload: [AnyHashable: Any]?, payloadType: UjetPayloadType, success: (String?) -> Void, failure: (Error?) -> Void)
{
    if payloadType == .customData {
        success(nil)
    }
}