
概览
Security Command Center 在 Google Cloud 控制台中提供发现结果的实时通知。本指南介绍了如何使用 Google Cloud 服务 和第三方 API 来扩展 该功能,并在 Slack 中接收近乎实时的通知。 完成本指南后,您无需登录 Google Cloud 控制台即可在配置的 第三方服务中收到有关新发现结果的提醒, 从而加快漏洞和威胁的分类。详细了解 Security Command Center 中不同类型的 漏洞和威胁。
拓扑
在本指南中,您将创建下图所示的配置。

目标
在本指南中,您将执行以下操作:
- 设置 Pub/Sub 主题。
- 设置 Slack。
- 使用 Cloud Run functions 编写代码。
- 配置 Pub/Sub 和 Cloud Run functions 以向 Slack 发送通知,以便在向 Security Command Center 写入新的严重程度为“高”或“严重”的发现结果时发送通知。
- 排查通知问题。
费用
本教程使用 Google Cloud的收费组件,包括:
- Pub/Sub
- Cloud Run functions
- Cloud Build
您可使用价格计算器,根据您的预计使用情况来估算费用。
准备工作
如需完成本指南,您必须拥有以下 Identity and Access Management (IAM) 角色:
- Organization Admin (
roles/resourcemanager.organizationAdmin) - Security Center Admin (
roles/securitycenter.admin) - Security Admin (
roles/iam.securityAdmin) - 具有
serviceusage.services.use权限的角色,例如 Owner (roles/owner)、Editor (roles/editor) 或自定义角色 - Create Service Accounts (
roles/iam.serviceAccountCreator) - Pub/Sub Editor (
roles/pubsub.editor) - Billing Account Administrator (
roles/billing.admin)
Security Command Center 的 IAM 角色可以在组织、文件夹或项目级层授予。您能否查看、修改、创建或更新发现结果、资产和安全来源,取决于您获授予的访问权限级别。如需详细了解 Security Command Center 角色,请参阅访问权限控制。
设置项目
完成以下步骤以创建或选择一个项目。
- 登录您的 Google Cloud 账号。如果您是 Google Cloud的新用户, 请创建一个账号,以评估我们的产品在 实际场景中的表现。新客户还可获享 $300 赠金,用于 运行、测试和部署工作负载。
-
In the Google Cloud console, on the project selector page, select or create a Google Cloud project.
Roles required to select or create a project
- Select a project: Selecting a project doesn't require a specific IAM role—you can select any project that you've been granted a role on.
-
Create a project: To create a project, you need the Project Creator role
(
roles/resourcemanager.projectCreator), which contains theresourcemanager.projects.createpermission. Learn how to grant roles.
-
Verify that billing is enabled for your Google Cloud project.
Enable the Cloud Build API.
Roles required to enable APIs
To enable APIs, you need the Service Usage Admin IAM role (
roles/serviceusage.serviceUsageAdmin), which contains theserviceusage.services.enablepermission. Learn how to grant roles.-
安装 Google Cloud CLI。
-
如果您使用的是外部身份提供方 (IdP),则必须先使用联合身份登录 gcloud CLI。
-
如需初始化 gcloud CLI,请运行以下命令:
gcloud init -
In the Google Cloud console, on the project selector page, select or create a Google Cloud project.
Roles required to select or create a project
- Select a project: Selecting a project doesn't require a specific IAM role—you can select any project that you've been granted a role on.
-
Create a project: To create a project, you need the Project Creator role
(
roles/resourcemanager.projectCreator), which contains theresourcemanager.projects.createpermission. Learn how to grant roles.
-
Verify that billing is enabled for your Google Cloud project.
Enable the Cloud Build API.
Roles required to enable APIs
To enable APIs, you need the Service Usage Admin IAM role (
roles/serviceusage.serviceUsageAdmin), which contains theserviceusage.services.enablepermission. Learn how to grant roles.-
安装 Google Cloud CLI。
-
如果您使用的是外部身份提供方 (IdP),则必须先使用联合身份登录 gcloud CLI。
-
如需初始化 gcloud CLI,请运行以下命令:
gcloud init
预计时间:设置和测试单服务通知大约需要一小时。
设置 Pub/Sub 主题
Pub/Sub 是一种实时消息传递服务,可让您在独立的应用之间发送和接收消息。详细了解 Pub/Sub。
在本部分中,您将配置 Security Command Center 以将发现结果发布到 Pub/Sub 主题。
如需设置和订阅 Pub/Sub 主题,请执行以下操作:
在环境变量中指定您的 Google Cloud 项目。
export PROJECT_ID=PROJECT_ID将 PROJECT_ID 替换为您的项目 ID。
在环境变量中指定您的 Google Cloud 组织。
export ORG_ID=ORG_ID将 ORG_ID 替换为您的组织 ID。
为
gcloud命令设置项目 ID。gcloud config set project PROJECT_ID创建将发布通知的 Pub/Sub 主题。
gcloud pubsub topics create scc-critical-and-high-severity-findings-topic在环境变量中指定主题。
export TOPIC=projects/$PROJECT_ID/topics/scc-critical-and-high-severity-findings-topic创建订阅,以通知 Cloud Run functions 在向主题发布消息时发送聊天消息。
gcloud pubsub subscriptions create scc-critical-and-high-severity-findings-sub \ --topic scc-critical-and-high-severity-findings-topic配置 Security Command Center 以向主题发布通知。可以使用与 ListFindings API 兼容的任何过滤器。
以下过滤条件可发布关于
global位置的有效的严重程度为“高”和“严重”的发现结果的通知。详细了解如何过滤发现结果。gcloud scc notifications create scc-critical-high-severity \ --pubsub-topic=$TOPIC \ --organization=$ORG_ID \ --location=global \ --filter '(severity="HIGH" OR severity="CRITICAL") AND state="ACTIVE"'
接下来,您需要创建或配置聊天应用,以便接收来自 Pub/Sub 的通知。
设置即时通讯应用
本部分介绍了如何使用 Pub/Sub 和 Cloud Run functions 或 Cloud Run functions(第 1 代) 为 Slack 启用近乎实时的通知。
如要向 Slack 频道发送通知,请执行以下操作: * 创建一个新的 Slack 应用,该应用拥有向公共 Slack 频道发布消息的权限。 * 创建和部署 Cloud Run functions 函数,使其在从 Pub/Sub 收到通知时向 Slack 发布聊天消息。
### 创建一个新的 Slack 应用
在此部分中,您将创建一个新的 Slack 应用来接收通知。
- 导航到 Slack API 应用。该页面将在一个新的标签页中打开。
登录或创建账户。
选择创建应用。
将应用名称设置为“SCC Finding Notifier”。
选择您希望 Slack 聊天机器人要向其发布消息的开发 Slack 工作区 ,然后点击创建应用 。
在导航面板中,选择 OAuth 和权限 。
导航到范围 部分。范围分为两类:
- 聊天机器人令牌范围
- 用户令牌范围
在本练习中,您无需添加用户令牌范围。在“聊天机器人令牌范围”下,点击添加 OAuth 范围 并输入以下内容:
chat:writechat:write.public
前往 OAuth 和权限 页面顶部,然后点击将应用安装到工作区 。
在确认对话框中点击允许 。
复制聊天机器人用户 OAuth 访问令牌,以便在 Cloud Functions 函数中使用。
接下来,您将部署一个 Cloud Run functions 函数以向 Slack 群组发送通知。
创建 Slack Cloud Run functions 函数
在本部分中,您将部署一个函数来向 Slack 账号发送通知。本部分中的代码示例采用 Python 语言编写,但您可以使用 Cloud Run functions 支持的任何语言。
在 Google Cloud 控制台中,前往 Cloud Run functions 服务 页面。
选择包含 Pub/Sub 主题的项目的 ID。
点击编写函数,然后填写以下字段:
- 对于 Service 名称 ,输入
slack-chat-high-and-critical-findings。 - 对于区域,选择您要存储服务的区域。
- 对于运行时,选择用于运行函数的 Python 版本。
- 对于 Service 名称 ,输入
点击添加触发器 ,然后选择 Pub/Sub 触发器 。
输入您在设置 Pub/Sub 主题中创建的 Pub/Sub 主题的详细信息,然后点击保存触发器。
点击创建 。系统会显示服务详情。
在来源 标签页的来源 窗格中,点击 requirements.txt 。
在代码编辑器中,添加
requests和functions-framework==3.*:requests functions-framework==3.*在来源 窗格中,点击 main.py 。
在代码编辑器中,将代码替换为以下内容:
  import base64
  import json
  import requests
  import functions_framework

  TOKEN = "BOT_ACCESS_TOKEN"

  @functions_framework.cloud_event
  def send_slack_chat_notification(cloud_event):

      pubsub_message = base64.b64decode(cloud_event.data["message"]["data"]).decode('utf-8').strip()
      message_json = json.loads(pubsub_message)

      finding = message_json['finding']

      requests.post("https://slack.com/api/chat.postMessage", data={
          "token": TOKEN,
          "channel": "#SLACK_CHANNEL_NAME",
          "text": f"A high severity finding {finding['category']} was detected."
      })
替换以下内容:
BOT_ACCESS_TOKEN:您使用 Slack 应用创建的聊天机器人用户 OAuth 访问令牌 。SLACK_CHANNEL_NAME:您要向其发送通知的 Slack 频道。
在函数入口点 字段中,输入代码示例中函数的名称 :
send_slack_chat_notification。点击保存并重新部署 。如果函数名称旁显示绿色对勾标记,则表示相应函数已成功部署。此过程 可能需要几分钟时间。
如果前面的步骤顺利完成,则设置完成,您将开始接收通知。注意事项:
- 对于每个关键或高严重性发现,您都会收到单独的聊天消息。通知的频率或数量取决于组织内的资源。
- 通知会近乎实时地发布和发送。然而,消息的即时性得不到保证,多种因素可能导致延迟,包括 Slack 的问题。
如需更改通知工作流,您可以执行以下操作:
- 通过更新 Cloud Run functions 函数来更改收件人。
- 更新 Pub/Sub 主题的过滤条件,以更改发现结果触发通知。
测试通知
如要测试通知是否已正确配置,请按照以下说明将高严重级别的发现结果在活跃状态和非活跃状态之间切换。
- 转到 Security Command Center“发现结果”页面。
转到“发现结果”页面 - 如果出现提示,请选择您的组织。
- 在快速过滤条件面板中,向下滚动到严重级别部分,然后选择高或严重。发现结果的查询结果面板会相应更新,以仅显示所选严重级别的发现结果。
- 在发现结果的查询结果面板中,通过勾选发现结果名称旁边的复选框选中一个发现结果。
- 在发现结果的查询结果操作栏的更改活跃状态菜单中,选择非活跃。如果当前发现结果查询仅显示活跃发现结果,则系统会从查询结果中移除该发现结果。
- 在快速过滤条件面板中,向下滚动到状态部分,然后更改选项,以仅选择非活跃。发现结果的查询结果面板会相应更新,以仅显示非活跃发现结果。
- 在发现结果的查询结果面板中,选择您标记为非活跃的发现结果。
- 在发现结果的查询结果 操作栏的更改活跃状态 菜单中,选择活跃 。
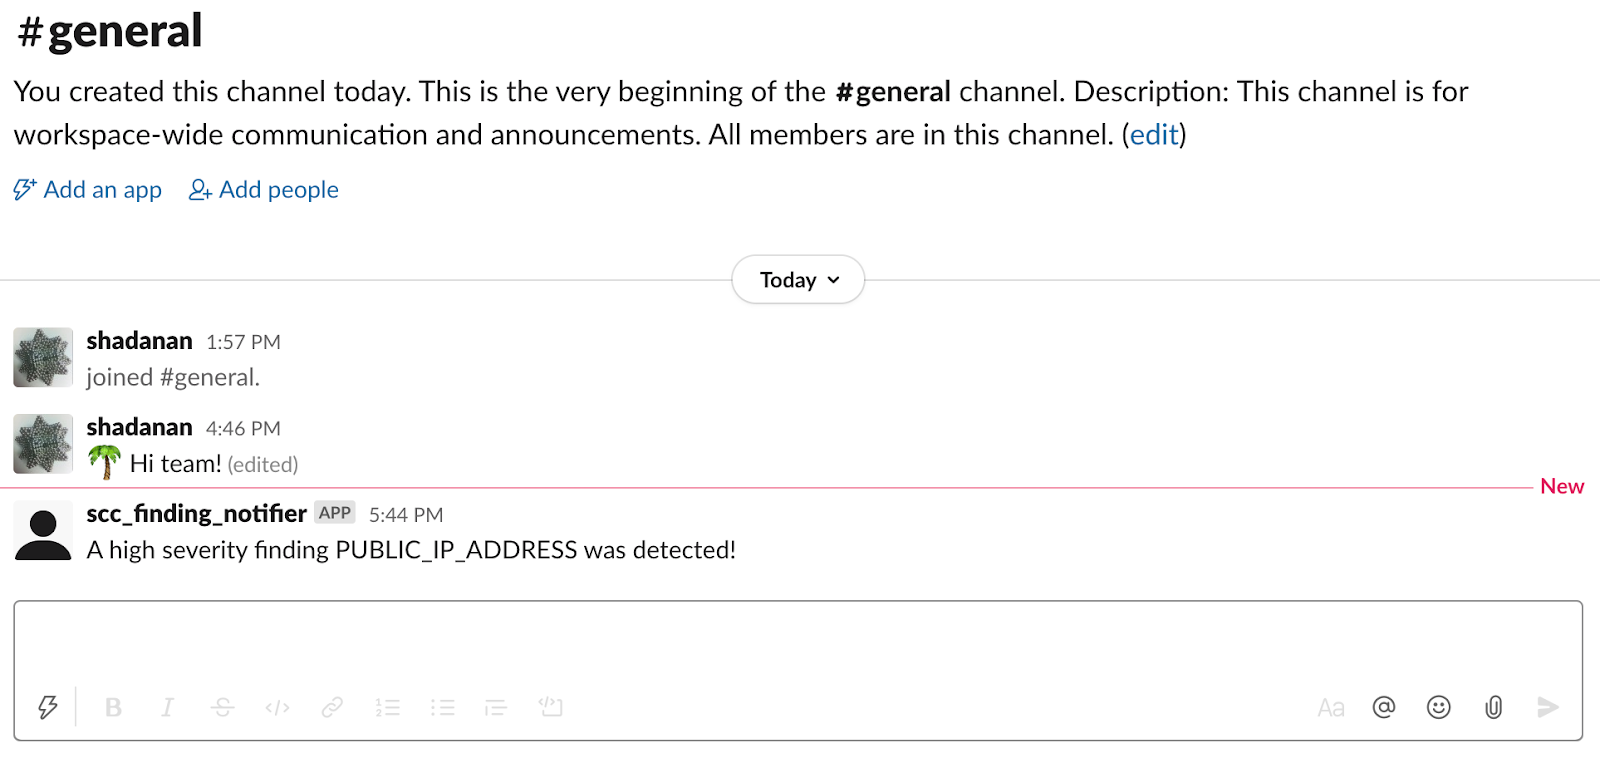
- 查看您的 Slack 消息。系统会显示类似于以下图片的消息:
问题排查
如果聊天消息无法发送或接收,请按照以下步骤识别并解决潜在问题。
1. Check [Stackdriver
logs](https://console.cloud.google.com/projectselector2/logs/viewer) for
your Cloud Run function to determine whether the function is being
invoked. If it is not being invoked, ensure that notifications are set up
correctly.

1. If the Cloud Run function is being invoked, then it might be
crashing. Check for errors in Cloud Run functions using
[Google Cloud console Error Reporting]
(https://console.developers.google.com/errors).
清理
为避免因本教程中使用的资源导致您的 Google Cloud 账号产生费用,请删除包含这些资源的项目,或者保留该项目但删除各个资源。
删除项目
- 在 Google Cloud 控制台中,前往 管理资源 页面。
- 在项目列表中,选择要删除的项目,然后点击删除。
- 在对话框中输入项目 ID,然后点击 关闭以删除项目。
逐个删除资源
删除通知配置:
gcloud scc notifications delete scc-critical-high-severity \
    --organization=ORG_ID \
    --location=global
将 ORG_ID 替换为您的组织 ID。
为了保留配置并暂停通知,您可以在 Cloud Run functions 函数中注释掉
send或post调用。删除 Cloud Run functions 函数:
- 前往 Cloud Run functions。
前往 Cloud Run functions - 点击您要删除的函数旁的复选框。
- 点击删除 。
- 前往 Cloud Run functions。
删除服务账号:
- 转到服务账号页面。
转到“服务账号”页面 - 选择一个项目。
- 选择要删除的服务账号,然后点击删除 。
- 转到服务账号页面。
后续步骤
- 详细了解通知错误。
- 了解如何过滤通知。
- 了解如何修复 Web Security Scanner 和 Security Health Analytics 发现结果。