

Dashboard tabs let you do the following:
- Better organize content: Group related visualizations and tiles into separate tabs.
- Improve data storytelling: Guide viewers through different aspects of your data in a structured way.
- Enhance performance: Load only the tiles on an active tab, potentially speeding up initial dashboard load times.
- Reduce clutter: Consolidate multiple related analyses into a single dashboard.
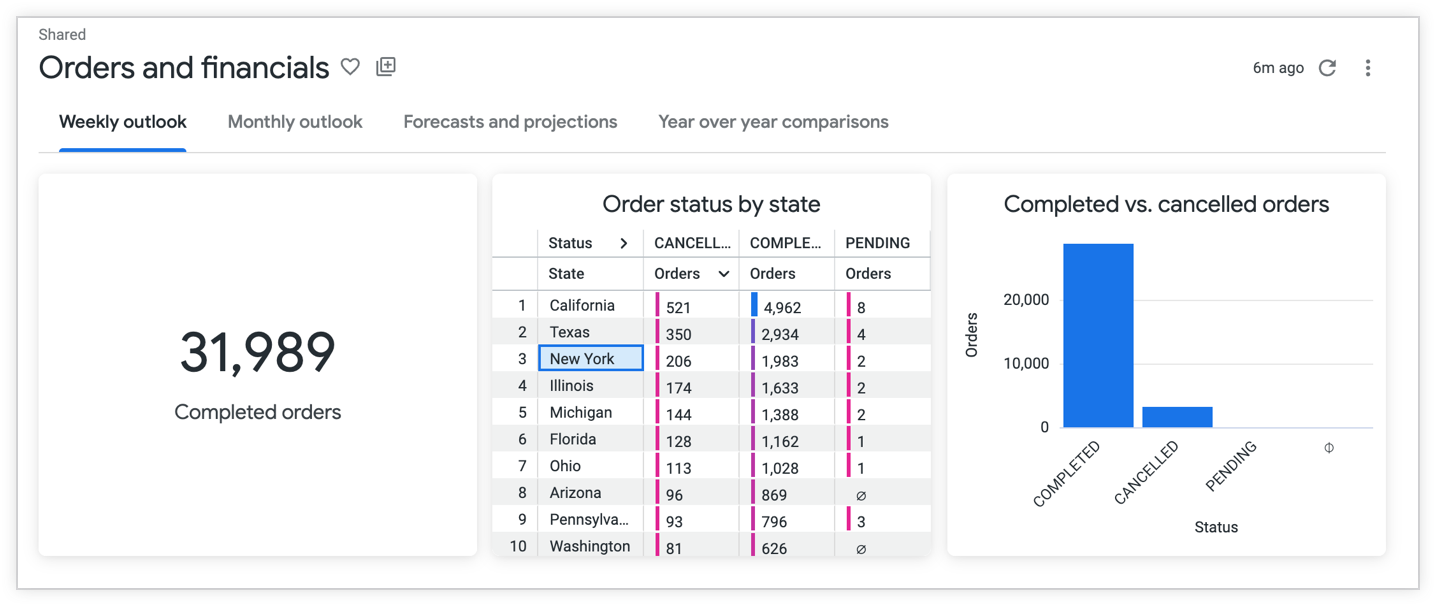
This page includes the following sections:
- User and instance requirements
- Limitations
- Tabbed dashboards features for admins
- Tabbed dashboards features for developers
- Tabbed dashboards features dashboard creators
- Tabbed dashboards features for dashboard viewers
- Related resources
User and instance requirements
To add tabs to dashboards, you must meet the following requirements:
- Your Looker instance must be running Looker 26.4 or later.
- You must have the Admin role to set a Maximum Dashboard Tabs limit for your Looker instance.
To make permanent changes to dashboards that all users will see, you must have the following access level and permissions:
- The Manage Access, Edit access level for the dashboard
- The
save_dashboardsLooker permission to edit the dashboard
To view dashboard tab metrics in Looker's Dashboard System Activity Explore, you must have the Admin role or the
see_system_activitypermission.To view dashboards, you must have the following access levels and permissions:
- The View access level for the folder in which the dashboard resides
- The
see_user_dashboardsLooker permission
Additionally, to view a specific dashboard tile, you must have access to the model that the tile is based on.
Optionally, users must also have the appropriate permissions to send, schedule, and download dashboards.
Optionally, users must also have Manage Access, Edit access to a board to add tab views to a board (available starting in Looker version 26.8).
Limitations
Dashboard tabs have the following limitations:
The default maximum number of tabs is 5. Admins can set a different maximum number of tabs on the Content Guardrails Admin page.
Tiles on a tab will only start loading if a user clicks on the tab. For example, if a dashboard has 3 tabs and a user clicks the first and second tab, the tiles on those tabs will start loading. No tiles on tab 3 will load. Queries execute and queue in the order of the interaction. The per-user query limit still applies.
You cannot control user access to specific tabs.
You cannot specify different themes for different tabs.
You can download or schedule an individual tab beginning in Looker 26.8.
Tabbed dashboard features for admins
Admins can access the following features for managing and monitoring dashboard tabs:
Set a Maximum Dashboard Tabs limit
Looker admins can choose to set a Maximum Dashboard Tabs limit instance-wide.
To set a Maximum Dashboard Tabs limit for your instance, follow these steps:
- In Looker, click the Admin option in the main navigation menu.
- Select the Content Guardrails option under the Performance section to open the Content Guardrails page.
Enter a number into the Maximum Dashboard Tabs field to set a number of maximum tabs, or use the up and down arrows to set a number.
Click Save to save the setting.
Monitor dashboard tab usage with System Activity
If your Looker instance is running Looker 26.8 or later, and you have the appropriate permissions you can monitor dashboard tab usage with Dashboard Tabs metrics on the Dashboard System Activity Explore.
Important: The **Dashboard** System Activity Explore only displays metrics such as the number of dashboard tabs and the dashboards that they appear on. The **Dashboard** System Activity Explore doesn't display metrics such as tab views.
Learn more about using the Dashboard System Activity Explore to monitor dashboard usage.
Tabbed dashboard features for developers
If you have the see_lookml_dashboards and develop permissions, as well as access to the LookML models for any data that you want to use, you can use the tabs parameter in conjunction with the tab_name parameter to add tabs to LookML dashboards. You can also add buttons with navigation to tabs.
See the LookML dashboard parameters page for more information about adding tabs to LookML dashboards.
Tabbed dashboard features for dashboard creators
Dashboard creators who have appropriate access and permissions have the following option for adding tabs to dashboards:
- Add tabs
- Delete tabs
- Duplicate tabs
- Edit tabs
- Apply filters to tiles on different tabs
- Add buttons with navigation to tabs
- Move tiles to different tabs
- Apply a quick layout
- Apply autorefresh to tiles that are on different tabs
Add tabs
To add tabs to user-defined dashboards, follow these steps:
- Open any user-defined dashboard and switch to edit mode.
- Select the + Add button in the top navigation and select the Tabs option.
- Once a tab is created, click the Add button in the tab to add tiles.
You can also save a query tile to a specific dashboard tab directly from an Explore.
Delete tabs
To delete tabs, follow these steps:
- Open a tabbed dashboard and switch to edit mode.
- Select the three-dot menu for a tab, and then select the Delete option.
- In the Delete tab? dialog, click Delete to confirm the action, or click Cancel to cancel the action.
Duplicate tabs
If your Looker instance is running Looker 26.8 or later, you can duplicate tabs. To duplicate a tab, follow these steps:
- Open a tabbed dashboard and switch to edit mode.
- Select the three-dot menu for a tab, and select the Duplicate option.
Once you have duplicated a tab, you can edit the tab.
Edit tabs
You can edit tabs in the following ways:
Rename tabs
To rename a tab, follow these steps:
- Open a tabbed dashboard and switch to edit mode.
- Double-click the tab name and rename the tab.
Press the Enter key (PC) or Return key (Mac) to save the name.
Reorder tabs
To change the order of tabs on a user-defined dashboard, follow these steps:
- Open the tabbed dashboard and switch to edit mode.
- Select the three-dot menu for a tab, and select the > Move right or < Move left option.
Apply filters to tiles on different tabs
To apply filters to dashboard tiles that are on different tabs, follow these steps:
- Open a tabbed dashboard and switch to edit mode.
- Select the Filters button in the top navigation, and then select Add Filter.
- Configure the filter settings in the Add Filter window Settings tab.
Select the Tiles To Update tab, and then select the tiles that you want to apply the filter to. If you don't want to apply the filter to a tile, select the Do Not Filter option from the tile's drop-down menu.
Add buttons with navigation to tabs
If your Looker instance is running Looker 26.8 or later, you can add buttons to help dashboard viewers quickly navigate to specific tabs. This can be helpful for guiding users to a tab that has additional breakdown data about a metric that is displayed on a dashboard's main tab.
Learn more about adding buttons to dashboards.
Move tiles to different tabs
To move a tile to a different tab, follow these steps:
- Open a tabbed dashboard and switch to edit mode.
- Select the three-dot menu for a tile, and select the Move to tab option.
- Select the name of a tab to move the tile.
Apply a quick layout
Quick layouts let you apply a cohesive tile configuration to tabs on a user-defined dashboard without the need to manually resize tiles. There are a few things to know about applying a quick layout to a dashboard with tabs:
- You can apply a different quick layout to each tab.
- Tile sizes change depending on the size of the dashboard.
- Quick layout affects all tiles including text tiles, visualization tiles, Markdown tiles, and buttons.
Learn more about quick layouts.
Apply autorefresh to tiles that are on different tabs
To apply autorefresh for tiles that are on different dashboard tabs, follow these steps:
- Open a tabbed dashboard and switch to edit mode.
- Select the Settings button in the top navigation.
- On the General tab, select the Refresh every option from the Refresh frequency menu to set a refresh interval for the individual tiles on tabs.
Tabbed dashboard features for dashboard viewers
In addition to viewing content on tabbed dashboards, dashboard viewers with appropriate permissions can interact with tabbed dashboards in the following ways:
- Download tabbed dashboards as a PDF
- Schedule tabbed dashboards as a PDF
- Add a dashboard tab view to a board
- Get dashboard links with tab context
Download tabbed dashboards as a PDF
Starting in Looker 26.8, when you download a tabbed dashboard as a PDF, you can specify a specific tab or set of tabs to download. For earlier Looker versions, all of the tabs will appear in the same PDF. The contents of each tab will be organized under a content header with the name of the tab.
Learn more about downloading dashboards as PDFs.
Schedule tabbed dashboards as a PDF
Starting in Looker 26.8, when you schedule a tabbed dashboard as a PDF, you can specify a specific tab or set of tabs to schedule.
Learn more about scheduling and sending dashboards.
Add a dashboard tab view to a board
Starting in Looker 26.8, you can add a dashboard tab view to a board. Content that is curated on boards makes it easier for users to find the information that is most relevant to them.
Learn more about adding content to boards
Get dashboard links with tab context
To get the link for a specific dashboard tab, click a tab and copy the browser URL.
Alternatively, you can get the entire dashboard link by selecting the Get link option from the dashboard's three-dot menu.
Related resources
- Learn more about creating user-defined dashboards.
- Learn how to edit user-defined dashboards.
- Explore options for adding and editing dashboard filters.
- Understand how to view dashboards.