
When the Enhanced Content Cleanup preview feature is enabled, admins and content owners can access an enhanced content management experience in Looker. The Enhanced Content Cleanup preview feature provides the following capabilities:
- Lets admins and users access a new Unused content folder to quickly identify and manage the unused content on a Looker instance.
- Lets admins programmatically schedule content cleanups for an individual piece of content or in bulk, and send automatic notifications to content owners.
- Lets content owners opt out of automated scheduled cleanups of specific content.
- Lets admins and users move content to the trash.
This page provides guidance for enabling and using the Enhanced Content Cleanup feature for your Looker (original) or Looker (Google Cloud core) instance. This page includes the following sections:
- User and instance requirements
- Enabling Enhanced Content Cleanup
- Things to know
- Navigating the Unused content folder
- Content management for admins
- Content management for users
- Related resources
User and instance requirements
To enable and use the Enhanced Content Cleanup preview feature, the following requirements must be met:
- Your Looker (original) or Looker (Google Cloud core) instance must be running Looker 26.6 or later, and your Looker (original) instance must be Looker-hosted.
- You must have the Admin role to enable the Enhanced Content Cleanup preview feature.
- To access the Unused content folder, you must have the
save_dashboardsorsave_lookspermission.
Enabling Enhanced Content Cleanup
The Enhanced Content Cleanup preview feature is disabled by default.
Admins can enable the Enhanced Content Cleanup preview feature by following these steps:
- In Looker, click the Admin option in the main navigation menu.
- Click the Preview option under the General section to open the Preview Features page.
- Click the Enhanced Content Cleanup switch to enable the preview feature.
Things to know
There are several things to know about the Enhanced Content Cleanup preview feature.
- Content is considered "unused" if it meets one of the following criteria:
- If there are 0 views within the selected time period
- If there are no active schedules configured for the piece of content
- If the piece of content is not under a temporary exclusion (marked as active) by the content owner
- Content can still be considered "unused", even if it is certified.
- Looks can still be considered "unused", even if they are saved to dashboards that are not "unused".
- Trashing content from the Unused content folder does not permanently delete the content, but moves it to the Trash folder. Admins can restore content that has been moved to the trash from the Trash folder.
- Admins can see all of the unused content across the instance on the Unused content tab in the Unused content folder. Users will only see the content that they own, and the content to which they have Manage Access, Edit access.
- Users will only see the content that they own, and the content to which they have Manage Access, Edit access on the Scheduled for trashing tab in the Unused content folder.
- The dashboard and Look sections of the Unused content and Scheduled for trashing tabs will display only 30 pieces of content at a time. If there are more than 30 dashboards or 30 Looks, they will be divided across multiple pages for each section. You'll see the page navigation icons > and the text Dashboards (or Looks) 1-30 at the bottom of each section.
- Admins can only bulk schedule 30 pieces of content for trashing per schedule, per type of content. For example, one schedule can only include up to 30 dashboards, or 30 Looks. Looks and dashboards must be scheduled for trashing separately in their individual sections.
- When users opt-out content from scheduled trashing, the content will be ineligible for trash scheduling for 90 days.
Navigating the Unused content folder
Looker admins and users with appropriate permissions can find the Unused content folder in one of two ways:
- By expanding the Folder section of the main navigation panel
- By navigating to the top-level folder from within a folder
Once you have opened the Unused content folder, you will see the following elements:
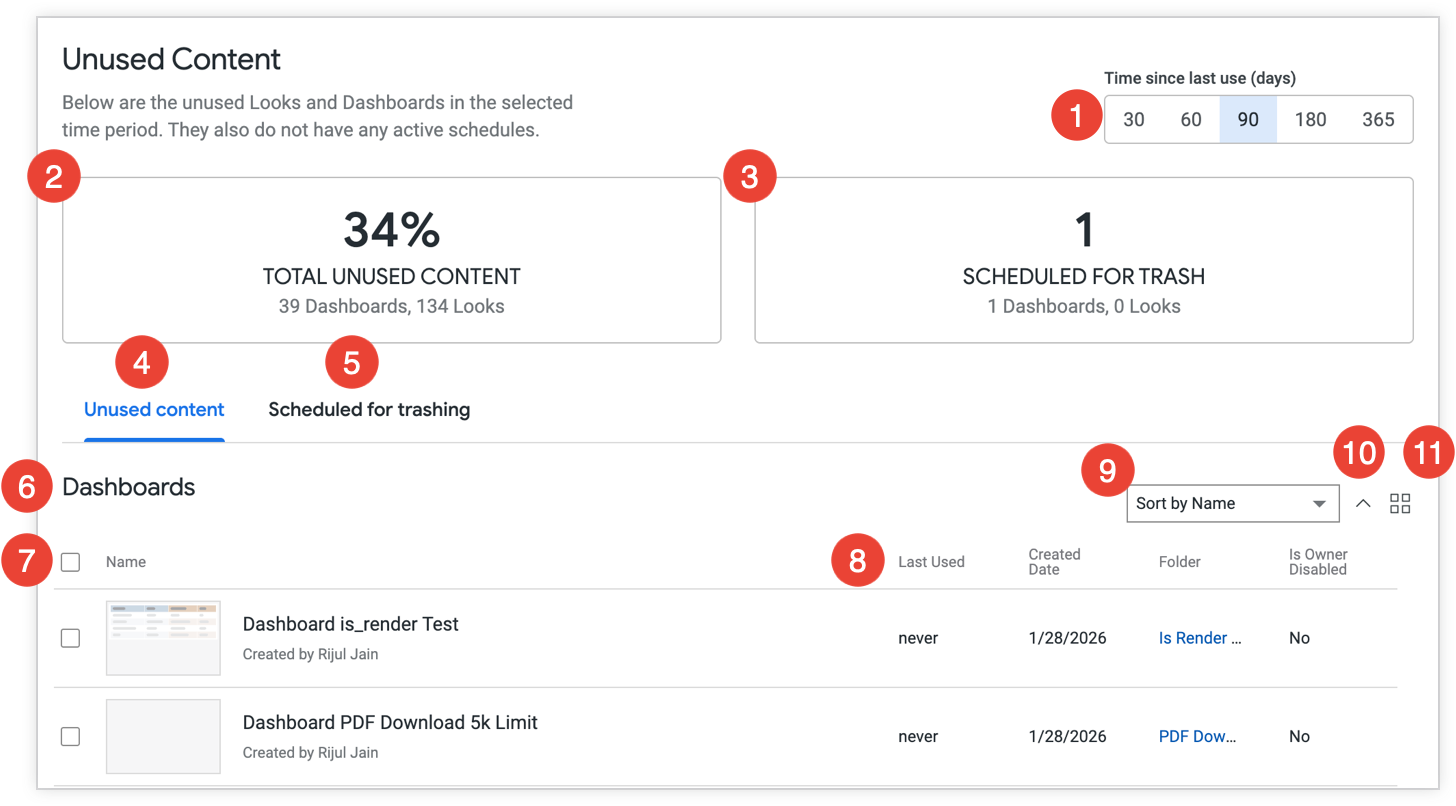
- The Time since last use (days) selector: Filters the Unused content folder to display content that is unused for the selected number of days. 90 days is selected by default.
The Total unused content tile: Displays the percentage of unused content compared to the total content on the instance for the selected timeframe, with the breakdown numbers of dashboards and Looks.
The Scheduled for trash tile: Displays the total number of pieces of content that are scheduled for trashing, with the breakdown number of dashboards and Looks.
The Unused content tab: Lists all unused content for the selected timeframe, organized in a section for Dashboards and a section for Looks.
The Scheduled for trashing tab: Lists all unused content that is scheduled for trashing, organized in a section for Dashboards and a section for Looks.
Section headers: Specifies the type of content that is listed. Content on both the Unused content and Scheduled for trashing tabs is organized under separate sections for Dashboards and Looks, depending on the type of content.
The selection checkboxes: Lets users select or deselect either an individual piece of content by selecting the checkbox inline with the content name, or in bulk by selecting the box inline with the Name subheader.
The content metadata: Displays metadata for each piece of content.
- The content metadata for the Unused content tab include the following:
- Name: The name of the dashboard or Look, and the name of the user that created the content.
- Last Used: The date that the dashboard or Look was last viewed.
- Created Date: The date that the dashboard or Look was created.
- Folder: The name of and link to the folder in which the dashboard or Look is saved.
- Is Owner Disabled: The status of the user that created the content. If the user has been disabled on the instance, the status will display Yes.
- The content metadata for the Scheduled for trashing tab include the following:
- Name: The name of the dashboard or Look, the name of the user that created the content, and the total number of times that each piece of content has been viewed.
- Folder: The name of and link to the folder in which the dashboard or Look is saved.
- Planned Deletion Date: The number of days from today that the content will be trashed.
- The content metadata for the Unused content tab include the following:
The Sort by menu: Displays the option for sorting the content.
- The options for sorting the Unused content tab include the following:
- Name
- Last Used Date
- Created Date
- The options for sorting the Scheduled for trashing tab include the following:
- Name
- Planned Deletion Date
- The options for sorting the Unused content tab include the following:
The ^ Order icon: Lets users sort the content in ascending or descending order. The icon will face downward (v) or upward (^) to indicate the sort direction (ascending or descending).
The Show items in a grid or Show items in a list icon: Lets you display the content in either grid view (as thumbnails) or as a list. Show items in a grid will display if the content is organized in list view, and Show items in a list will display if the content is organized in grid view.
Content management for admins
Admins can use the features of the Unused content folder to perform the following actions:
Scheduling content for trashing
To schedule items for trashing, follow these steps:
- Navigate to the Unused content folder and open the Unused content tab.
- Choose a timeframe from the Time since last use (days) selector. The default selection is 90 days.
If viewing the content as a list, select pieces of content by clicking the checkbox inline with the content name, or select content in bulk by clicking the box inline with the Name subheader. Click the inline checkbox again to deselect a piece of content, or deselect all selected content by clicking the box inline with the Name subheader.
If you are viewing the content as a grid, you cannot select content in bulk. You can select dashboards or Looks by placing your cursor over the content thumbnail and clicking the Select checkbox.
You can click the Show items in a grid or Show items in a list icon to switch between list view or grid view.
Once the content is selected, click Schedule trashing to open the Schedule move to Trash dialog.
Input a number of days, with a minimum of 3 days, into the Move to trash in (days) field. 14 days is the default value.
Input any email addresses into the Notify additional users field if there are other users in addition to the content owner that you want to notify of the scheduled trashing.
Click Schedule Trash to complete the schedule, or click Cancel to cancel.
Once a schedule has been set, the content owner of any dashboards or Looks that are impacted will receive a notification email and will be given the opportunity to opt out of scheduled trashing of their content. Users will also receive a notification in the middle of the cycle, as well as a final warning. If a user chooses to opt out, their content will be removed from the Unused content folder and will be ineligible for trash scheduling for 90 days.
The content that is scheduled for trashing will move to the Scheduled for trashing tab, where you can cancel the scheduled trashing, or trash the content now.
Trashing content from the Unused content folder does not permanently delete the content, but moves it to the Trash folder. Admins can restore content that has been moved to the trash from the Trash folder.
Canceling scheduled trashing
Admins can cancel scheduled trashing for content by following these steps:
- Navigate to the Unused content folder and open the Scheduled for trashing tab.
If viewing the content as a list, select pieces of content by clicking the checkbox inline with the content name, or select content in bulk by clicking the box inline with the Name subheader. Click the inline checkbox again to deselect a piece of content, or deselect all selected content by clicking the box inline with the Name subheader.
If you are viewing the content as a grid, you cannot select content in bulk. You can select dashboards or Looks by placing your cursor over the content thumbnail and clicking the Select checkbox.
You can click the Show items in a grid or Show items in a list icon to switch between list view or grid view.
Once the content is selected, click Mark as active to opt out the content from a scheduled trashing. Alternatively, click Move to unused content.
The content that is marked as active will be removed from the Unused content folder, and will be ineligible for trash scheduling for 90 days. The content that is moved to the Unused content tab will still be eligible for future scheduled trashings. In either case, content owners will no longer see their content on the Scheduled for trashing tab.
Confirm the action in the Mark these items as active? dialog or Move selected items to unused content dialog. Click Cancel to cancel the action.
Trashing content now
In addition to scheduling trashings to occur in the future, admins can choose to trash content now. To trash content now, follow these steps:
- Navigate to the Unused content folder and open either the Unused content tab or the Scheduled for trashing tab.
- If viewing content on the Unused content tab, choose a timeframe from the Time since last use (days) selector. The default selection is 90 days.
If viewing the content as a list, select pieces of content by clicking the checkbox inline with the content name, or select content in bulk by clicking the box inline with the Name subheader. Click the inline checkbox again to deselect a piece of content, or deselect all selected content by clicking the box inline with the Name subheader.
If you are viewing the content as a grid, you cannot select content in bulk. You can select dashboards or Looks by placing your cursor over the content thumbnail and clicking the Select checkbox.
You can click the Show items in a grid or Show items in a list icon to switch between list view or grid view.
Once the content is selected, click Trash now to open the Move selected items to trash dialog.
Click Move to trash to confirm, or Cancel to cancel.
Trashing content from the Unused content folder does not permanently delete the content, but moves it to the Trash folder. Admins can restore content that has been moved to the trash from the Trash folder.
Content management for users
Users that have the required permissions and have either Manage Access, Edit access to content, or own content, can use the features of the Unused content folder to perform the following actions:
Identify and opt-out content from scheduled trashing
Users are automatically alerted by email when a piece of content that they own is scheduled for trashing by an admin. The email that users receive lists the following criteria in a table:
- The name of the content, and a link to the content in Looker.
- The type of content (Look or dashboard).
- The content owner (admins can send notification emails to more users than just the content owner).
- The number of days since the content was last used.
- The number of days until the content will be moved to the trash.
- The Review link to navigate to the Scheduled for trashing tab in the Unused content folder, where the owner can opt the content out from trashing.
Users can also identify when content that they own has been scheduled for trashing by viewing the Scheduled for trashing tab. In addition to content that they own, users can also view and opt-out any content from trashing that they have Manage Access, Edit access to.
To opt a piece of content out from scheduled trashing, follow these steps:
- Navigate to the Unused content folder and open the Scheduled for trashing tab. Alternatively, click the Review link in the notification email to open Scheduled for trashing tab.
If viewing the content as a list, select pieces of content by clicking the checkbox inline with the content name, or select content in bulk by clicking the box inline with the Name subheader. Click the inline checkbox again to deselect a piece of content, or deselect all selected content by clicking the box inline with the Name subheader.
If you are viewing the content as a grid, you cannot select content in bulk. You can select dashboards or Looks by placing your cursor over the content thumbnail and clicking the Select checkbox.
You can click the Show items in a grid or Show items in a list icon to switch between list view or grid view.
Once the content is selected, click Mark as active to open the Mark these items as active? dialog.
Click Mark as active to confirm, or Cancel to cancel.
The content that is marked as active will be removed from the Unused content folder, and will be ineligible for trash scheduling for 90 days.
Trashing content now
In addition to opting content out of scheduled trashing, users can also choose to immediately trash content that they own, or to trash content to which they have Manage Access, Edit access.
To trash content now, follow these steps:
- Navigate to the Unused content folder and open either the Unused content tab or the Scheduled for trashing tab.
- If viewing content on the Unused content tab, choose a timeframe from the Time since last use (days) selector. The default selection is 90 days.
If viewing the content as a list, select pieces of content by clicking the checkbox inline with the content name, or select content in bulk by clicking the box inline with the Name subheader. Click the inline checkbox again to deselect a piece of content, or deselect all selected content by clicking the box inline with the Name subheader.
If you are viewing the content as a grid, you cannot select content in bulk. You can select dashboards or Looks by placing your cursor over the content thumbnail and clicking the Select checkbox.
You can click the Show items in a grid or Show items in a list icon to switch between list view or grid view.
Once the content is selected, click Trash now to open the Move selected items to trash dialog.
Click Move to trash to confirm, or Cancel to cancel.
Trashing content from the Unused content folder does not permanently delete the content, but moves it to the Trash folder. Admins can restore content that has been moved to the trash from the Trash folder.
Related resources
- Learn more about finding and viewing content in Looker
- Learn more about organizing and managing access to content
- Learn more about restoring content from the Trash folder (for admins)