This page explains how a user can filter and limit data in Looker's new Explore experience.
Filters let you narrow an Explore's results to only the data that you're interested in. For example, you can filter an Explore's query results to the last three months or for a certain customer. Looker offers a variety of filter conditions for filtering your data.
Limiting data lets you see a subset of your complete query results. Setting limits on data can be helpful when you want to optimize for speed or performance, especially with large datasets. With Looker, you can limit rows or pivot columns.
Required roles
To view, filter, and limit Explores, you must have the User Looker role or another role that contains the explore permission.
Accessing the new Explore experience
To access the new Explore experience, the New Looker Explore Experience preview feature must be enabled for your instance. If you are not a Looker admin, ask an admin to enable the feature.
From an Explore page, click Try the new Explore to navigate to the new Explore experience for all Explores that you interact with.
Filtering data
Filters let you restrict the data that you're viewing to items of interest. Any field in your Looker instance can become a filter.
A field doesn't need to appear in an Explore query's results for you to filter on it. For example, you can create a query that filters the Order Date to the last 90 days, even though your results contain only Customer and Number of Orders.
You can use any combination of these filter types in your query:
Basic filters are the most commonly used; Looker provides appropriate drop-down lists, calendar widgets, and text fields.
Advanced matches allow for a more advanced filter condition, such as intricate text searches, or a date range that starts in the past and extends for a certain number of days.
Custom filters let you specify detailed business logic, combine
ANDandORlogic, or use Looker functions.
Viewing and editing filters
To view or edit filters in the new Explore experience, open the filter pane by clicking the Filters icon at the top of the Explore window or next to the Configure panel.
You can expand or minimize the filter pane by clicking and dragging from the bottom edge of the filter pane.
You can also scroll within the filter pane to see all filters.
Within the filter pane, you can perform the following tasks:
- Edit filter conditions.
- Add new filters by clicking + Filters, + New Group, or +Custom expression.
- Remove filters by clicking the Remove icon.
- See the LookML for the field that is being filtered by clicking the Filter actions menu and selecting Go to LookML.
- Select between AND and OR logic when there are multiple filters or multiple filter groups in the Explore.
Whenever you add, remove, or make a change to a filter, remember to click Run to update to rerun your query with the update applied.
To close the filter pane, click the Filters icon. When the filter pane is closed, it shows a summary of the Explore's filters.
Filter conditions
Filters can be summarized through their filter conditions. Filter conditions include the following elements:
- The field that is being filtered on (a dimension or a measure).
- The filter operator, such as is between, contains, or is >. The filter operator defines the logical comparison that helps make up the filter logic.
- The filter value, which the data is being compared against.
Filter conditions vary by field type. For example, a filter that uses a time dimension lets you select a time range for the filter value; a numeric dimension provides you with operator options such as is > or is <.
You can change the filter condition for a filter in the filter pane. For example, you can select the operator's drop-down menu to change the filter logic, or edit the filter value in its field. The available filter conditions for a field will be displayed.
When you enter a value for a filter that uses text dimensions (such as a field for customer names), Looker displays a list of existing data values for the field. As you type in the value field, Looker narrows the list to values that include that text.
To filter on a large set of values, paste a list of values into the filter field. The maximum number of values that you can paste may be limited by your browser or other elements in your network, and may be as small as 2,000.
Whenever you change a filter condition, remember to click Run to update to rerun your query with the update applied.
Basic filters
Basic filters consist of a straightforward set of filter conditions that are based on Looker's out-of-the-box drop-down options.
You can add a basic filter in a few different ways:
- In the filter pane, click + Filter to add a basic filter. This action opens the Add Filter dialog, which lets you choose a field on which to create the new filter.
- In the All fields or Fields in use tab in the Configure panel, select a field's Filter by field icon.
- In the Data pane, select the Filter option in a field's data column More menu.
Newly added filters appear in the filter pane. Go to the filter pane to add a filter value and edit the filter condition.
Filters with user attributes
Looker admins can configure user attributes that specify user-specific values. For example, an admin can define a user attribute for a sales region and assign the appropriate values to individual users or groups of users.
Using filters with user attributes lets you automatically customize an Explore or a Look for each user who views it. The matches a user attribute operator provides this user-specific flexibility. For example, you can filter a sales region dimension in an Explore to equal a sales region user attribute. The Explore will filter for the user's specific sales region and automatically adjust to show each user the data for their own sales region.
Advanced matches filters
Advanced matches filters allow for more intricate filter logic and the free entry of text, filter expressions, or values in the filter value field.
To add an advanced matches filter, use the basic filter process to create a filter, and select the matches (advanced) option from the filter's operator drop-down menu.
In the text field, enter your filter expression or other logic. To view all available filter expressions, see the Looker filter expressions documentation page.
To enter a special character in an advanced matches filter expression, add a leading carat (^) before the special character. For example, to enter the comma in the filter expression Santa Cruz, CA, you would enter Santa Cruz ^, CA.
To reference a user attribute in an advanced matches filter, use the following syntax:
{{ _user_attributes['USER_ATTRIBUTE_NAME'] }}
Custom filters
Custom filters let you write the fields, constants, functions, and operators that you need to customize your filtering. Looker lets you build an expression that evaluates as yes or no. When you run the query, Looker only returns the rows for which that condition is yes. You can create one custom filter per Explore.
To add a custom filter, follow these steps:
- Navigate to the filter pane.
- Select + Custom expression.
- Enter a dimension or function to have Looker display a list of functions, operators, and field names to use in your expression. Select a term in the drop-down to add it to your expression. When finished, your custom filter expression must evaluate to
yesorno. - Select Save.
- Select Run to update to run your query with your custom filter applied.
The Creating Looker expressions documentation page explains how to create Looker expressions and how the editor can assist you.
Looker expressions can use as many fields, functions, and operators as your business logic requires. The more complex your condition, the more work your database must do to evaluate it; complex conditions may lengthen query times.
You can create one custom filter per Explore.
To edit a custom filter, click the Edit icon next to the filter to open the custom expression editor.
Multiple filters
When there are multiple filters on an Explore, you have a few options for organizing their filter logic.
By default, Looker places all filters in one group. All filters in that group are connected to one another through AND and OR filter logic.
Sometimes you may want to filter an Explore for multiple conditions that are not directly related, in which case you can create additional filter groups and connect the groups through AND or OR logic.
To add a new filter group, select + New group in the Filters section.
Filtering dimensions: Restricts raw data before calculations
When you filter on a dimension, you restrict the raw data before any calculations are made.
For example, say you've created an Explore to view the status of first-time purchases. The Explore includes the Orders Status and Orders Count fields. Then, you add a filter on an Orders Is First Purchase (Yes/No) dimension with the value YES.
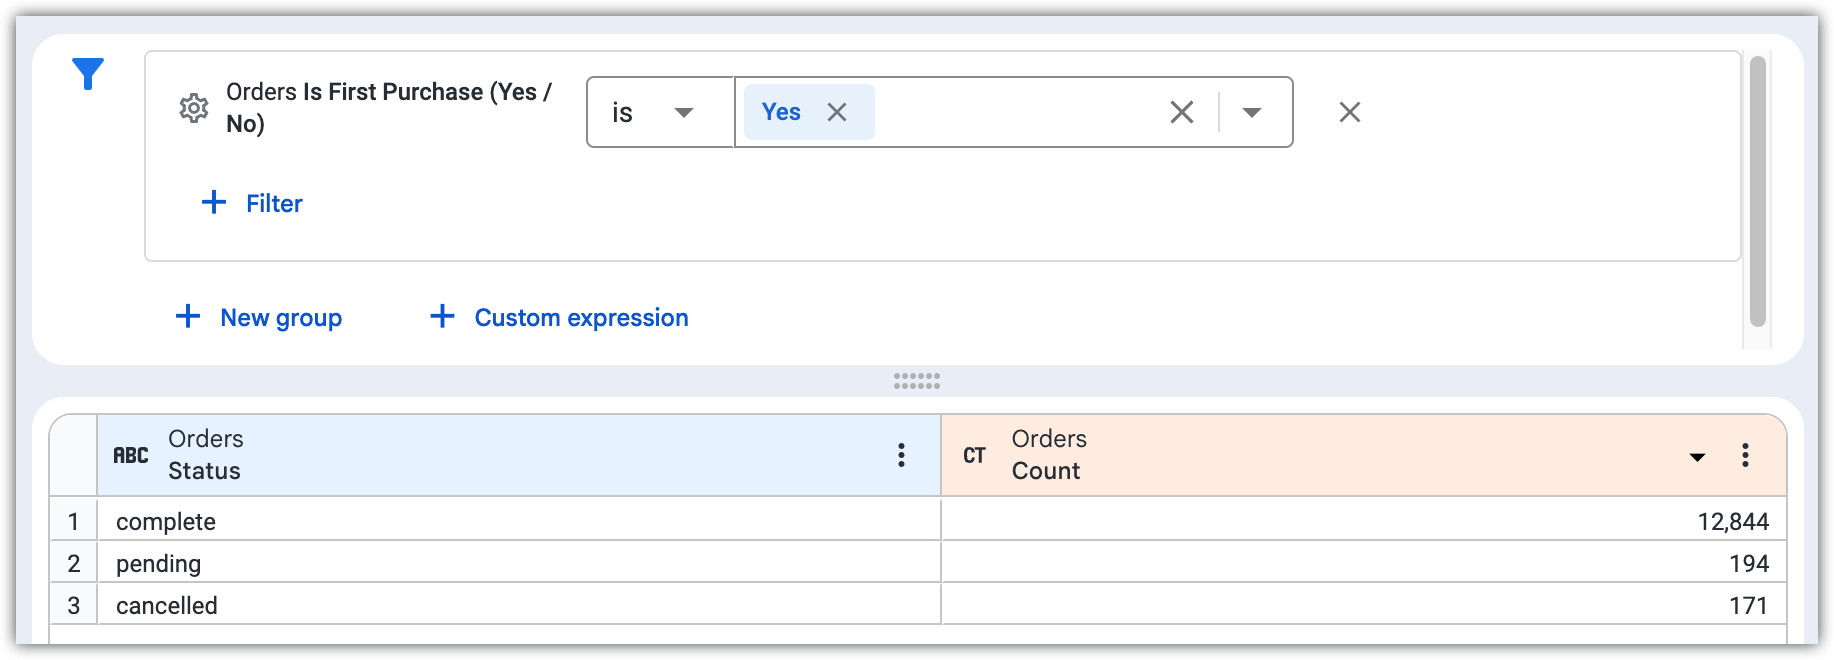
Looker removes all orders that are not first-time orders from the results. The Orders Count measure still counts the orders for each status, but the measure values are lower than if the filter wasn't applied.
Filtering measures: Restricts results after calculating measures
When you filter on a measure, you restrict the results after the measure has been calculated.
For example, say you've created an Explore to view how many orders were placed by city. The Explore includes the Users City and Orders Count fields. Then, you add a filter on the Orders Count measure with the condition is >= 250.
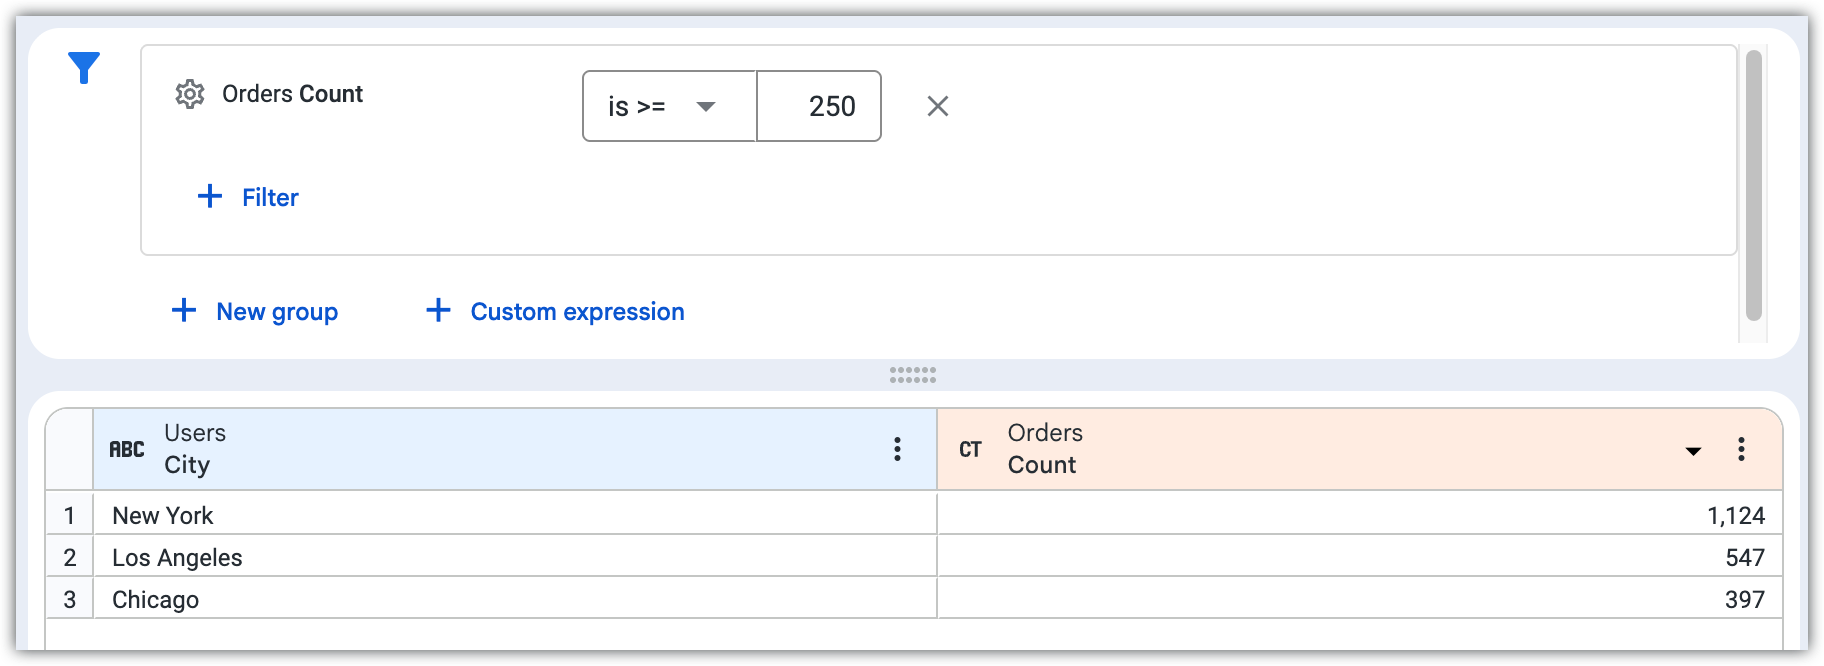
Looker first counts all orders for each city. Then, the filter is applied. The filter limits the dataset to only the cities that had more than 250 orders, but the measure values are the same as if the filter wasn't applied.
You may need to turn off Looker's dimension fill option if Looker is returning null values.
Removing filters
To remove a filter from the Explore, you can perform any of the following actions:
- In the filter pane, select the Remove icon next to the filter.
- In the All fields or Fields in use tab in the Configure panel, select a field's Filter by field icon.
- In the Data pane, select the filter_alt_off Remove Filter option in a field's data column More menu.
Other ways to filter data
Filtering data in an Explore is just one way to filter data. Other ways to filter data with Looker include the following:
- You can set up your Looker dashboards with optional or required filters for your users to filter the data that they see on dashboards. See Adding and editing user-defined dashboard filters for more information.
- Looker developers can specify required filter behavior using LookML. See Creating required filters with LookML for more information.
Limiting data
Looker supports up to 5,000 rows, or up to 50,000 rows if a higher limit is specified by your admin. Looker supports up to 200 columns for pivoted or unpivoted query results. For browser performance, 50 or fewer columns is recommended. Looker sets a default column limit of 50 columns for pivoted query results.
To see a subset of your complete query results, you can set a row limit, a column limit, or both.
Row limits
You can set a row limit of up to 5,000 rows, or up to 50,000 rows if a higher limit is specified by your admin.
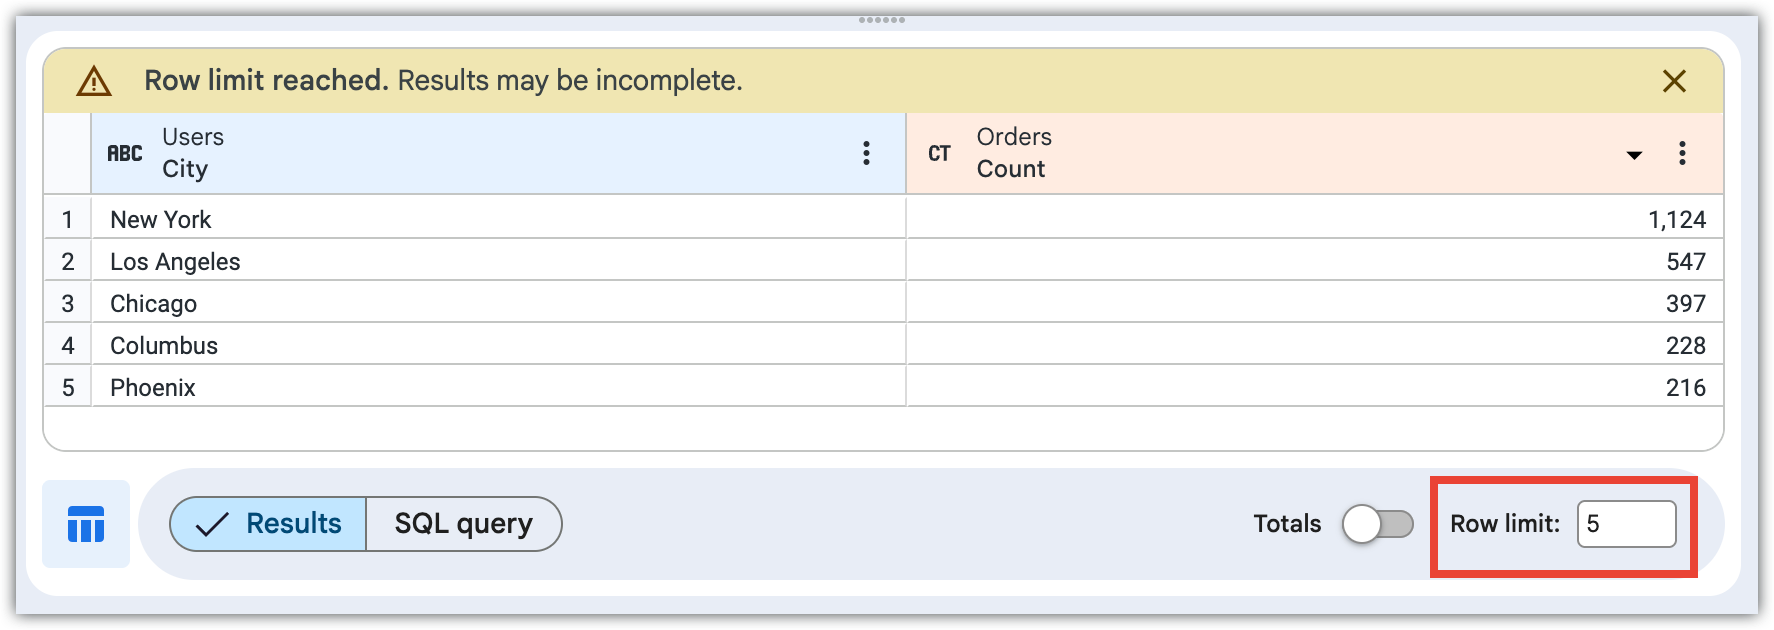
Looker warns you if you might be hiding data by setting a row limit that is too low. The sort order is important: Looker first applies the sort and then applies the limit. For example, in a query that contains the fields Users City and Orders Count, sort by Orders Count and then specify a row limit of 5 to see the cities that had the top five number of orders.
For more information about row limits in other parts of Looker, see the What are all the row limits in Looker? Best Practices page.
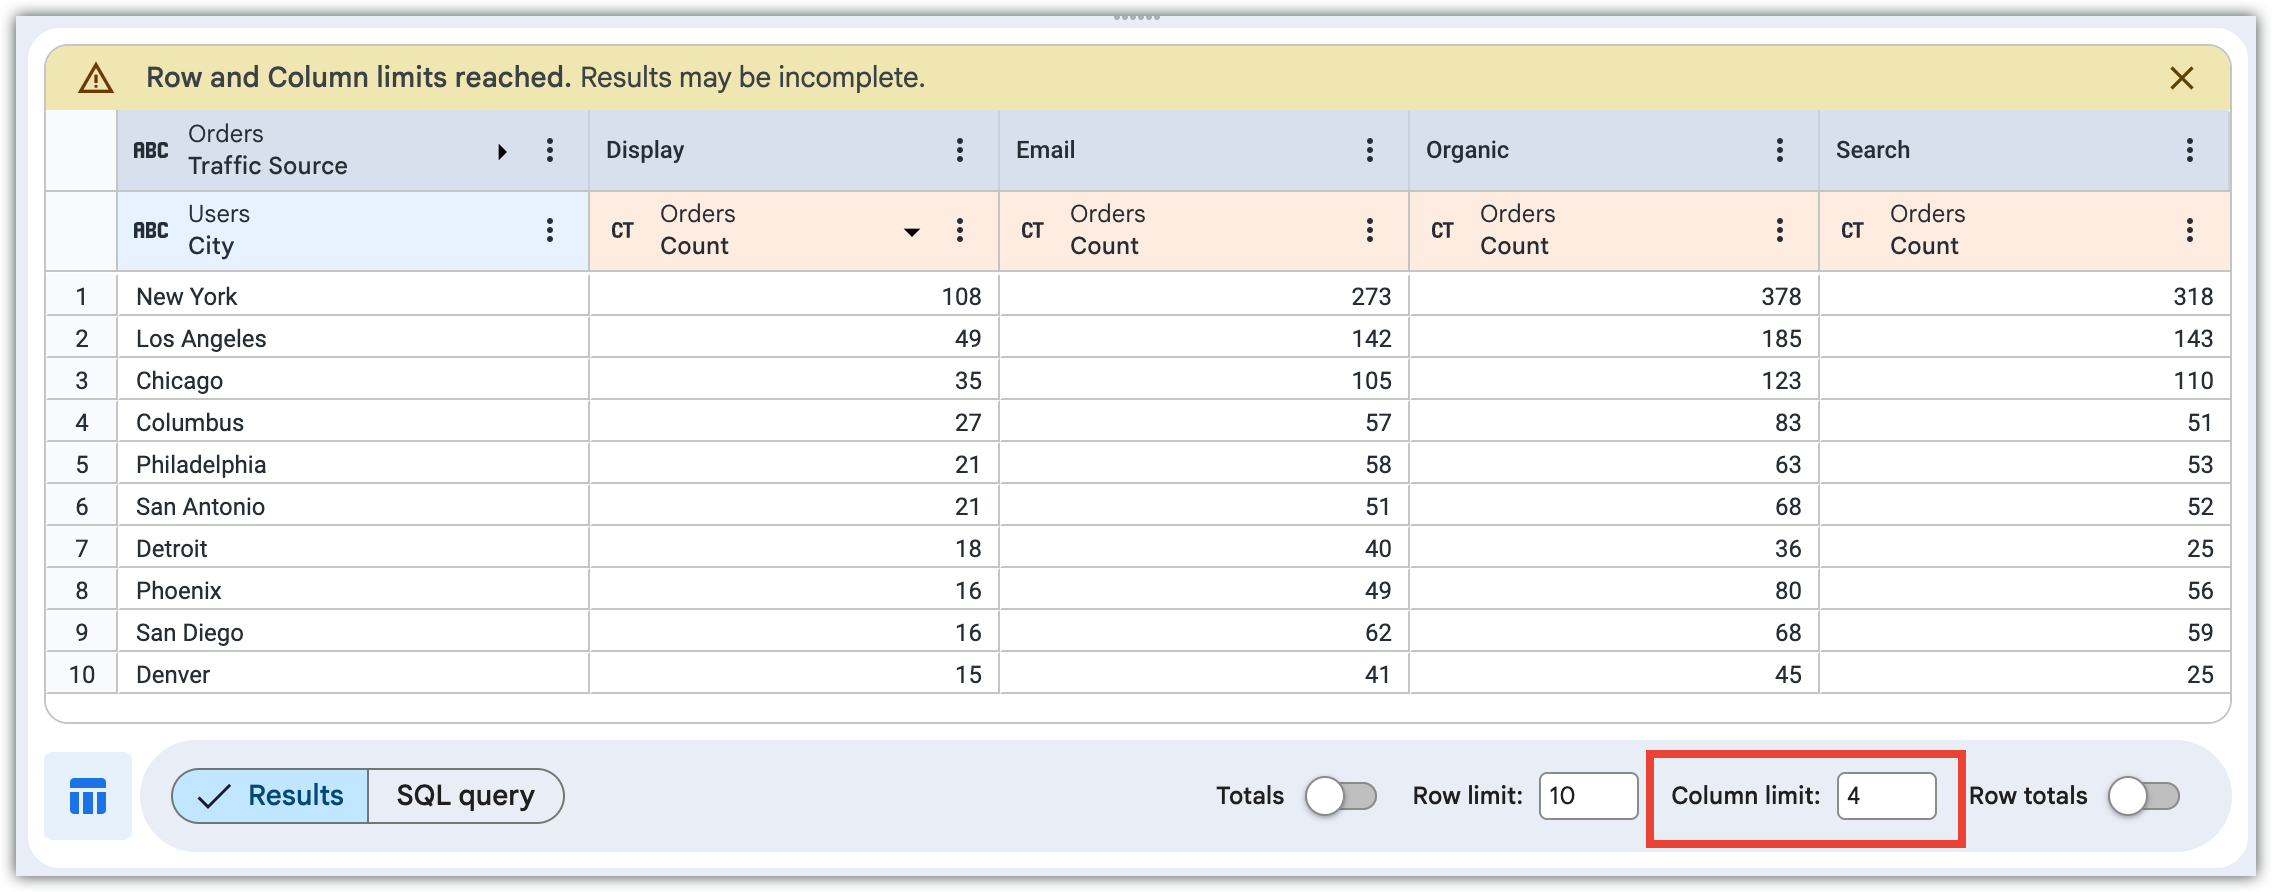
Column limits
If you added a pivot to your query results, Looker sets a default column limit of 50. You can adjust the column limit up to 200 or down to 1.
Dimensions, dimension table calculations, row total columns, and measure table calculations outside of pivots are not counted toward the column limit. Pivoted groups count as one column toward the column limit. As with row limits, the sort order is important: Looker first applies the sort and then applies the limit.
Looker warns you if you might be hiding data by setting a column limit that is too low. For example, in a query that contains the field Orders Count and that is pivoted by the Orders Traffic Source field, if you set a column limit of 4, Looker adds a banner explaining that row and column limits have been reached.