
本教學課程說明如何將使用 Agent Development Kit (ADK) 和 A2UI 擴充功能建構的 Agent-to-Agent (A2A) 代理部署至 Cloud Run。您也會瞭解如何向 Gemini Enterprise 註冊已部署的代理。
本範例使用公開提供的程式碼範例。本教學課程的程式碼範例具有下列資料夾結構。
教學課程資料夾結構
專案的資料夾結構如下:
| 檔案/目錄 | 說明 |
|---|---|
/samples/community/agent/adk/gemini_enterprise/v0_9 |
包含本教學課程的範例設定和資料的目錄。 |
__init__.py |
將目錄標示為 Python 套件。 |
__main__.py |
在本機執行代理的進入點。 |
agent.py |
定義代理、技能和行為。 |
agent_executor.py |
管理執行流程和工具互動。 |
deploy.sh |
用於建構代理程式並部署至 Cloud Run 的指令碼。 |
examples/ |
包含元件範本範例的目錄。 |
gemini_enterprise_composite_catalog.json |
元件目錄,定義標準 Material 和自訂 Gemini Enterprise 元件。 |
main.py |
主要應用程式進入點 (FastAPI 應用程式)。 |
prompt_builder.py |
協助建構模型提示。 |
pyproject.toml |
專案設定和依附元件。 |
examples/0.9/material_table_orders.json |
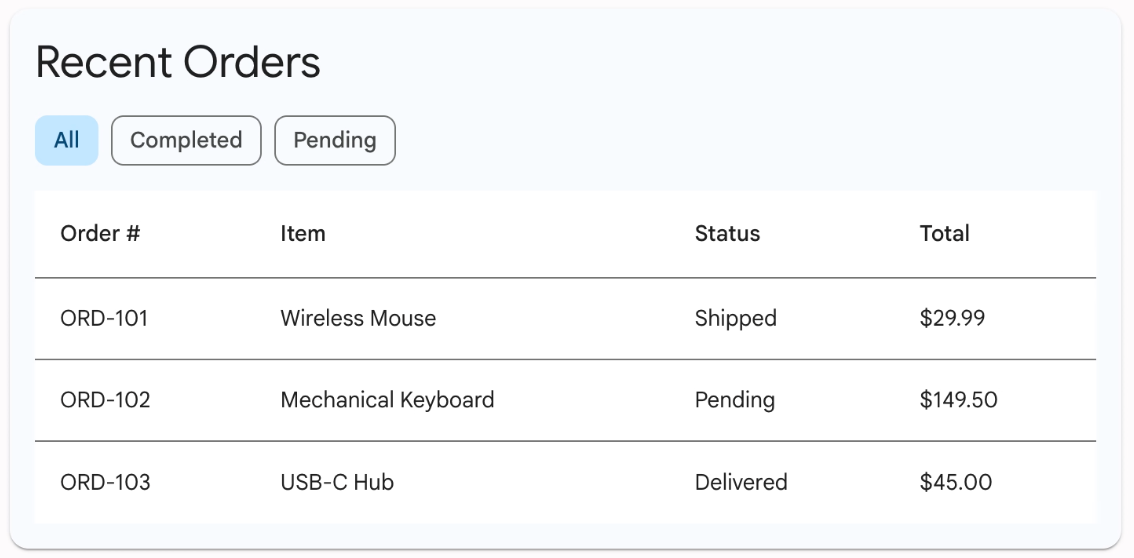
UI 範本範例,內含近期訂單試用版的版面配置和模擬資料。 |
tools.py |
定義代理可使用的工具 (函式)。 |
事前準備
開始之前,請確認您具備以下項目:
現有的 Gemini Enterprise 應用程式。如要建立應用程式,請參閱建立應用程式。
複製存放區,然後前往
v0_9範例目錄:git clone https://github.com/a2ui-project/a2ui.git cd a2ui/samples/community/agent/adk/gemini_enterprise/v0_9
啟用 API
為專案啟用下列 API:
控制台
啟用下列 API:
- Vertex AI API
- Cloud Build API
- Artifact Registry API
- Cloud Run API
- Cloud Logging API
- Discovery Engine API
- Cloud Storage API
- Identity and Access Management (IAM) API
REST
您可以從 Google Cloud 控制台啟用這些 API,也可以使用下列 gcloud CLI 指令:
gcloud services enable aiplatform.googleapis.com cloudbuild.googleapis.com artifactregistry.googleapis.com run.googleapis.com logging.googleapis.com discoveryengine.googleapis.com storage.googleapis.com iam.googleapis.com
授予權限
授予 Cloud Run Invoker (roles/run.invoker) 角色的權限。
gcloud projects add-iam-policy-binding PROJECT_ID \
   --member="serviceAccount:service-PROJECT_NUMBER@gcp-sa-discoveryengine.iam.gserviceaccount.com" \
   --role="roles/run.invoker"
更改下列內容:
- PROJECT_ID:專案的 ID。
- PROJECT_NUMBER:您的 Google Cloud 專案編號。
部署代理
deploy.sh 指令碼會自動執行部署程序。如要部署代理程式,請從專案目錄執行指令碼,並提供 Google Cloud ID 和新服務的名稱。您也可以選擇性指定要使用的 Gemini 模型。
指令碼會執行下列動作:
- 從原始碼建構容器映像檔。
- 推送映像檔至 Artifact Registry。
- 將映像檔部署至 Cloud Run。
- 設定環境變數,包括
MODEL和服務本身的公開AGENT_URL。
chmod +x deploy.sh
./deploy.sh PROJECT_ID a2ui-demo-agent MODEL_NAME
更改下列內容:
- PROJECT_ID:專案的 ID。
- MODEL_NAME:選用。這是指令碼的第三個引數。支援的值為
gemini-2.5-pro和gemini-2.5-flash。 如未提供,指令碼會預設為gemini-2.5-flash。
指令碼執行完畢後,會顯示已部署代理程式的服務網址。您會在下一個步驟中用到這個服務網址。
將代理註冊至 Gemini Enterprise
代理程式部署完成後,您需要向 Gemini Enterprise 註冊,才能讓使用者找到該代理程式。
執行下列 curl 指令,並將預留位置替換為您自己的值:
curl -X POST -H "Authorization: Bearer $(gcloud auth print-access-token)" -H "Content-Type: application/json" https://discoveryengine.googleapis.com/v1alpha/projects/PROJECT_NUMBER/locations/LOCATION/collections/default_collection/engines/ENGINE_ID/assistants/default_assistant/agents -d '{
  "name": "a2ui-demo-agent",
  "displayName": "A2UI v0.9 Demo Agent",
  "description": "A demo agent that showcases A2UI v0.9 UI templates.",
  "a2aAgentDefinition": {
      "jsonAgentCard": "{\"protocolVersion\": \"0.3.0\", \"name\": \"A2UI v0.9 Demo\", \"description\": \"A demo agent that showcases A2UI v0.9 UIs built from the Material component catalog and Gemini Enterprise custom components (Canvas, Iframe). Ask it what can you do? to see the available demos.\", \"url\": \"AGENT_URL\", \"version\": \"1.0.0\", \"capabilities\": {\"streaming\": true, \"preferredTransport\": \"JSONRPC\", \"extensions\": [{\"uri\": \"https://a2ui.org/a2a-extension/a2ui/v0.9\", \"description\": \"Ability to render A2UI v0.9\", \"required\": false, \"params\": {\"supportedCatalogIds\": [\"https://www.gstatic.com/vertexaisearch/a2ui/v0_9/gemini_enterprise_composite_catalog.json\"]}}]}, \"skills\": [{\"id\": \"a2ui_demo\", \"name\": \"A2UI v0.9 Component Demo\", \"description\": \"Demonstrates A2UI v0.9 UIs built from the Material catalog and Gemini Enterprise custom components: cards, forms & inputs, tabs, tables, progress indicators, dialogs & menus, the Canvas side panel, and the Iframe (IFrameSrcdoc / IFrameUrl) components.\"}], \"defaultInputModes\": [\"text/plain\"], \"defaultOutputModes\": [\"text/plain\"]}"
    }
}'
更改下列內容:
PROJECT_NUMBER:您的 Google Cloud 專案編號。LOCATION:資料儲存庫的多區域:global、us或euENGINE_ID:要註冊代理程式的應用程式 ID。AGENT_URL:已部署代理程式的服務網址。
取消註冊代理程式 (選用)
如要取消註冊代理程式,請執行下列 curl 指令:
curl -X DELETE -H "Authorization: Bearer $(gcloud auth print-access-token)" -H "Content-Type: application/json" https://discoveryengine.googleapis.com/v1alpha/projects/PROJECT_NUMBER/locations/LOCATION/collections/default_collection/engines/ENGINE_ID/assistants/default_assistant/agents/AGENT_ID
更改下列內容:
PROJECT_NUMBER:您的 Google Cloud 專案編號。LOCATION:資料儲存庫的多區域:global、us或euENGINE_ID:代理程式註冊的應用程式 ID。AGENT_ID:要刪除的代理程式 ID。
在 Gemini Enterprise 網頁應用程式中使用代理程式
建立並註冊代理後,即可在 Gemini Enterprise 網頁應用程式中使用代理並與之互動。
取得網頁應用程式網址
如要使用服務專員,請先取得網頁應用程式網址。Gemini Enterprise 管理員可以按照下列步驟取得並分享網頁應用程式網址:
前往 Google Cloud 控制台的「Gemini Enterprise」頁面。
按一下您向代理程式註冊的應用程式名稱。
按一下「Integrations」。
複製「您的網頁應用程式連結:」,並分享給機構中的使用者。
使用代理程式
如要使用及與代理互動,請按照下列步驟操作:
- 在新瀏覽器分頁中開啟網頁應用程式網址。
- 在網頁應用程式的導覽選單中,按一下「代理」。
- 前往「來自貴機構」部分,然後點選您建立的代理程式。
- 系統會開啟代理的對話介面。開始提問並與服務專員互動。
舉例來說,您可以使用 Show me the recent orders table 等提示,取得範例資料中近期訂單的相關資訊。如以下範例所示,代理程式會從 material_table_orders.json 擷取訂單資訊,並使用自訂 UI 元件在即時通訊中顯示清單: