

This page explains how a Gemini Enterprise administrator can configure granular, resource-level IAM permissions to restrict access to specific Gemini Enterprise apps and data stores using either the Google Cloud console, the Google Cloud CLI, or the REST API.
If you only need to restrict end-user access at the app level without configuring data store permissions or custom project-level roles, see Configure access controls for apps.
Overview
By default, IAM permissions granted at the Google Cloud project level apply across all Gemini Enterprise apps and data stores in the project. If your organization needs to restrict users to specific apps or data stores within a single project, you can use resource-level access controls.
Resource-level access controls let administrators:
- Grant users access to specific apps and linked data stores without exposing other apps in the same project.
- Delegate app administration or read-only monitoring for specific apps without granting broad project-wide administrative rights.
- Enforce organizational data boundaries and compliance policies.
How access controls work
To grant resource-level access, administrators must configure two role bindings for each target user or group. Permissions are evaluated independently: to receive answers from a data store in an app, a user must be granted permissions on both the target app and the target data store.
| Role-binding level | Role type | Purpose, scope, and example roles |
|---|---|---|
| Project level | Custom role |
The custom roles that you create in this guide grant permissions required for the user to authenticate or load console listing pages across the project without exposing specific app or data store content. Example roles: |
| Resource level | Predefined role |
The predefined roles that you assign on the app or data store resource grant operational permissions, such as chatting, configuring settings, or viewing analytics, strictly on that resource. Example roles:
|
Example scenario
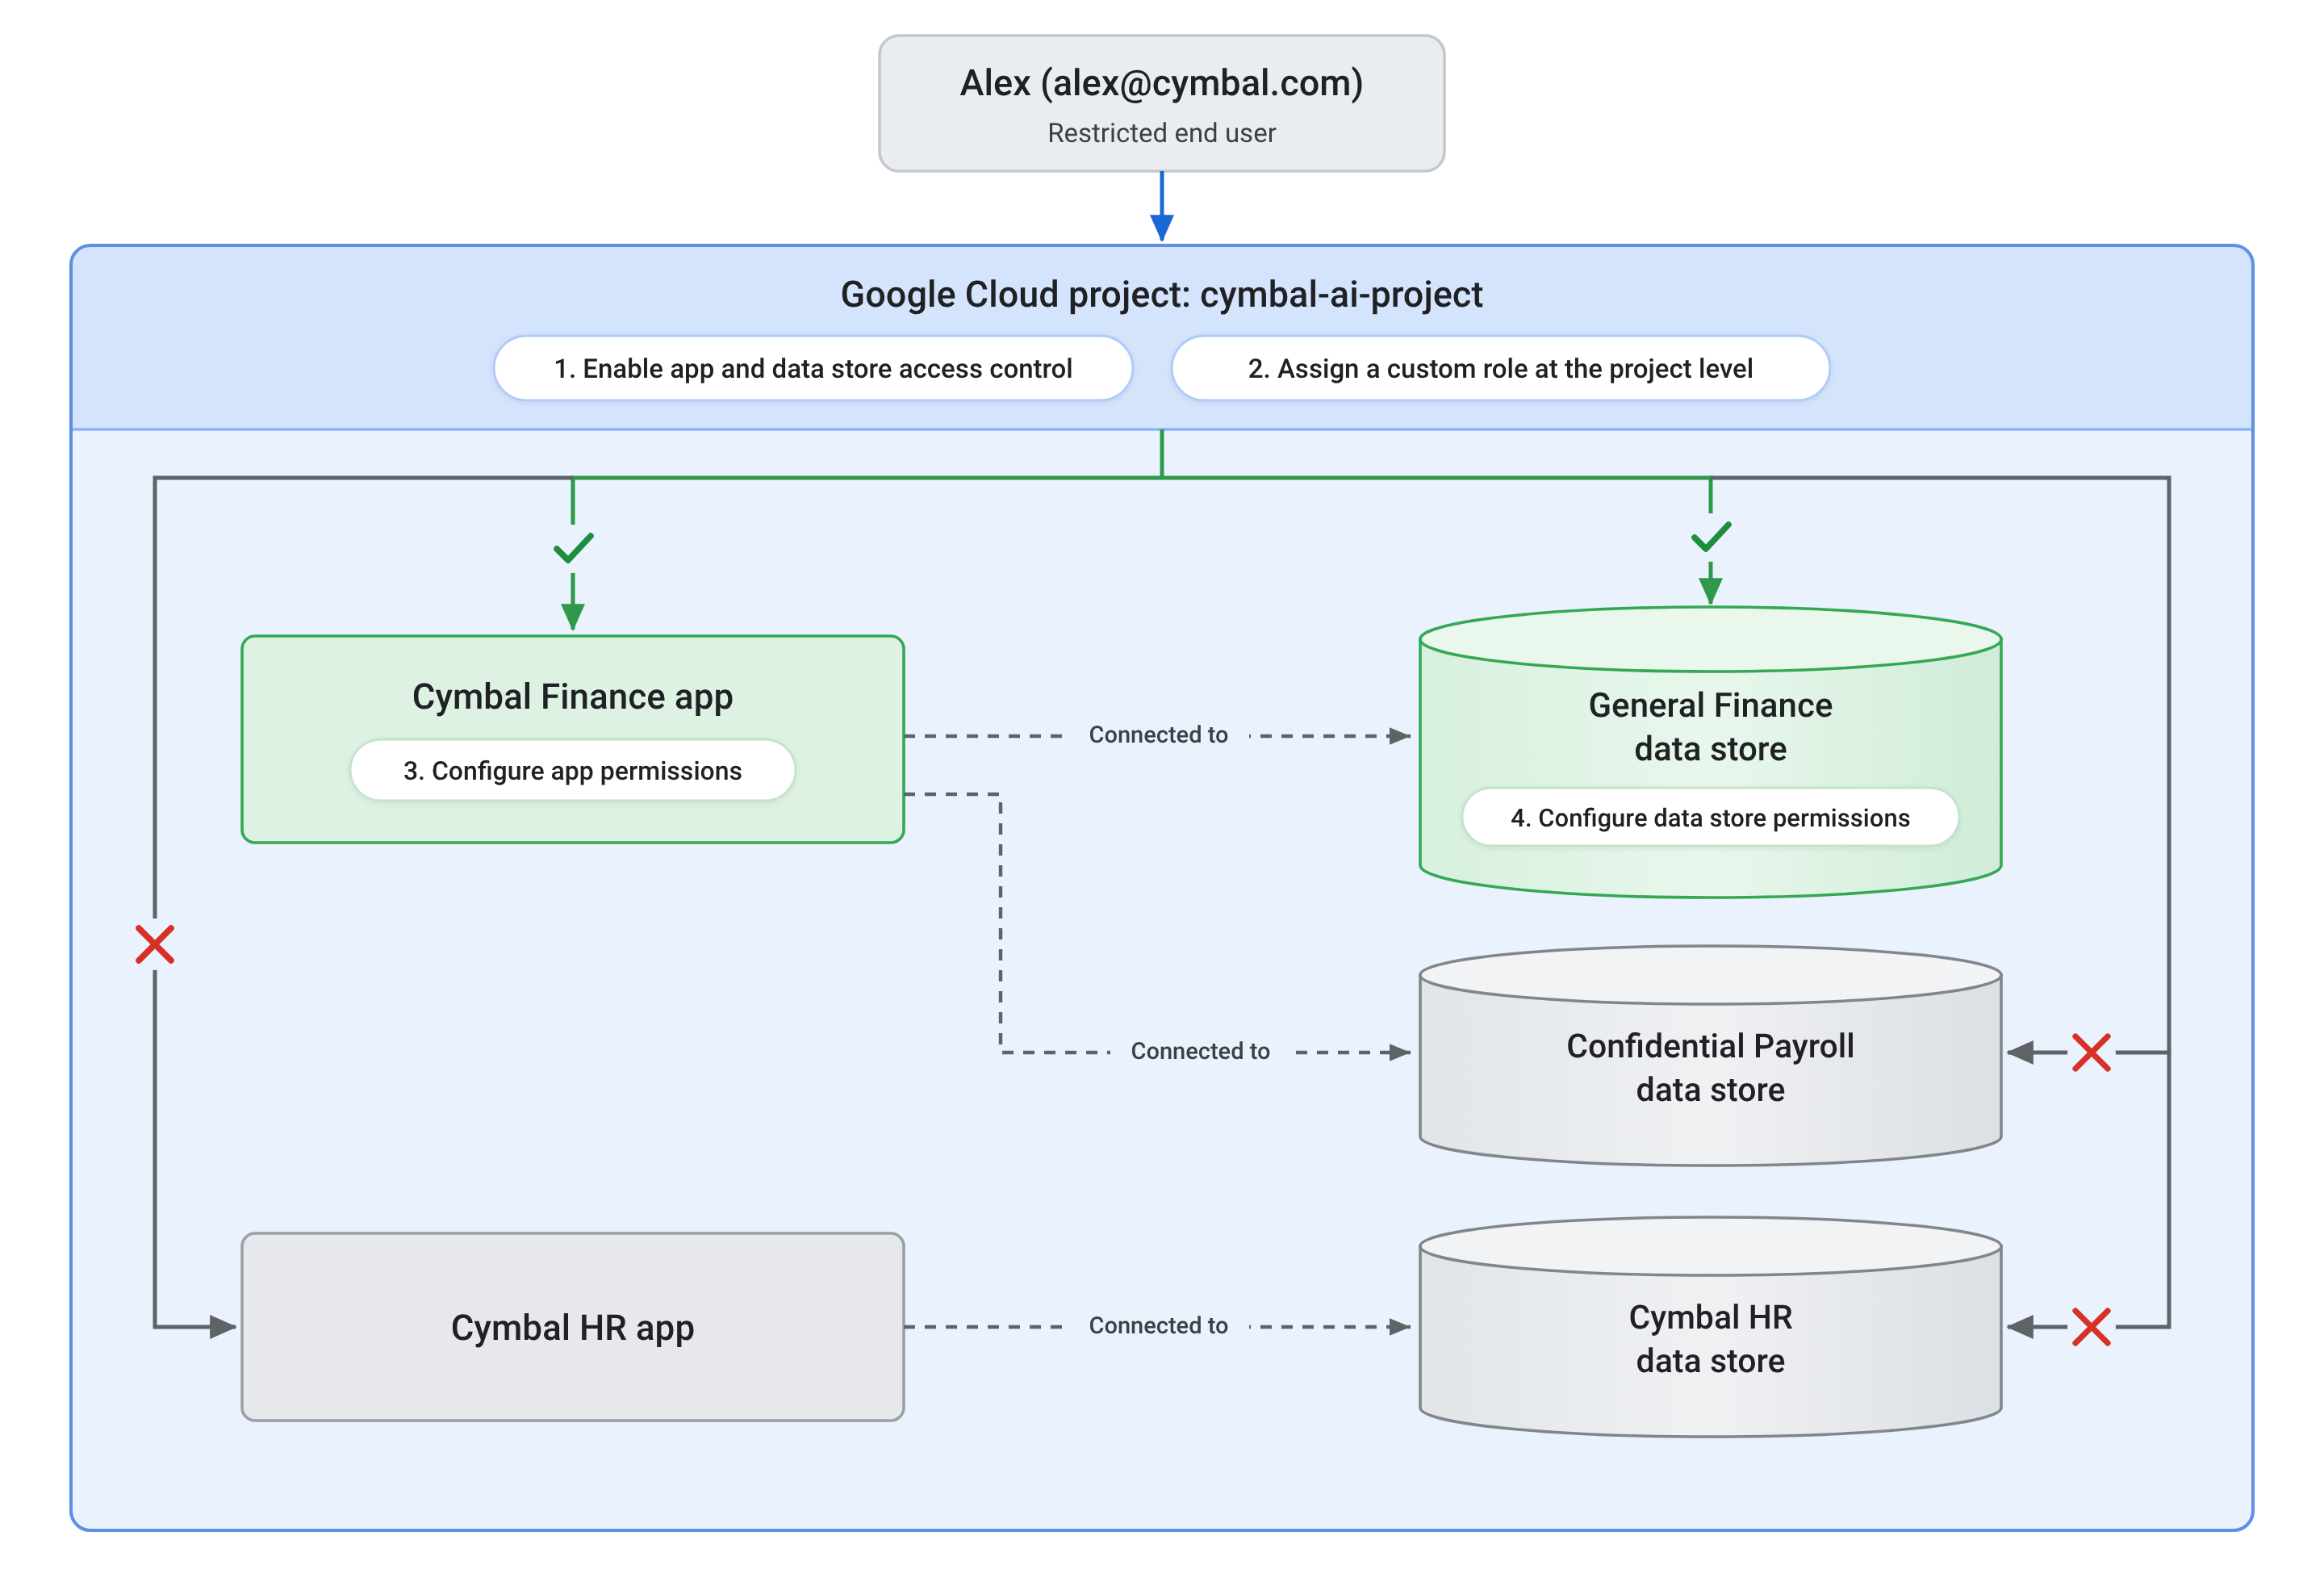
Consider a Google Cloud project at Cymbal named cymbal-ai-project
containing two apps and multiple data stores:
| Example scenario: Restricting access across apps and data stores | |
|---|---|
| Context | A Google Cloud project at Cymbal named cymbal-ai-project
contains two apps:
|
| Goal | Grant Alex (alex@cymbal.com) access to use the
Cymbal Finance app and query only the
General Finance data store, while denying access to the
Confidential Payroll data store and the
Cymbal HR app. |
| Required configurations |
Follow these steps to configure access controls:
|
| Result | When Alex signs in, they can open the Cymbal Finance app and query the General Finance data store. Even though the Confidential Payroll data store is connected to the same app, Alex can't view or query it. Attempts to access the Cymbal HR app or query the Cymbal HR data store are also denied. |
The following diagram illustrates how project-level settings and independent resource-level IAM permissions work together in this scenario:
Before you begin
- Confirm that you have the
Gemini Enterprise Admin
(
roles/discoveryengine.agentspaceAdmin) role. - Ensure that users who need restricted access aren't assigned the project-level Discovery Engine roles.
- Create the required custom project-level roles for your target personas in Create custom project-level roles.
Enable app and data store access control
Before you can configure granular permissions on apps and data stores or view
the User permissions tab in the Google Cloud console, enable app and data store
access control on your project by calling the projects.patch method:
curl -X PATCH \
  -H "Authorization: Bearer $(gcloud auth print-access-token)" \
  -H "Content-Type: application/json" \
  -H "x-goog-user-project: PROJECT_ID" \
  "https://ENDPOINT_LOCATION-discoveryengine.googleapis.com/v1alpha/projects/PROJECT_ID?updateMask=customer_provided_config.resource_access_control_config.data_store_access_control_enabled" \
  -d '{
    "customer_provided_config": {
      "resource_access_control_config": {
        "data_store_access_control_enabled": true
      }
    }
  }'
Replace the following:
PROJECT_ID: the ID of your Google Cloud project.ENDPOINT_LOCATION: the multi-region for your API request. Specify one of the following values:usfor the US multi-regioneufor the EU multi-regionglobalfor the Global location
Create custom project-level roles
Custom project-level roles grant permissions without exposing all project resources. You only need to create each custom role once per Google Cloud project.
Create a custom restricted end user role
The customRestrictedEndUser role grants project-level permissions required for
end users to load the Gemini Enterprise authorization endpoint and
developer tools configuration (discoveryengine.locations.buildAuthorizationUrl
and discoveryengine.devToolsConfigs.get). It doesn't grant access to inspect
or query specific apps or data stores.
Console
To create the custom role in the Google Cloud console, follow these steps:
In the Google Cloud console, go to the Roles page.
Select your Google Cloud project.
Click + Create custom role.
Enter the role details:
- Title:
Custom Gemini Enterprise Restricted End User - Description:
Base project-level permissions to access
Gemini Enterprise apps
. - Role ID:
customRestrictedEndUser - Role launch stage: Select General Availability
- Title:
Click + Add permissions.
Filter and select the following permissions:
discoveryengine.devToolsConfigs.getdiscoveryengine.locations.buildAuthorizationUrl
Click Add.
Click Create.
gcloud
To create the custom role using the Google Cloud CLI, follow these steps:
Run
gcloud iam roles describeto verify whether the role exists in your project:gcloud iam roles describe customRestrictedEndUser --project=PROJECT_IDReplace
PROJECT_IDwith the ID of your Google Cloud project.Run
gcloud iam roles createto create the role:gcloud iam roles create customRestrictedEndUser \ --project=PROJECT_ID \ --title="Custom Gemini Enterprise Restricted End User" \ --description="Base project-level permissions to access Gemini Enterprise apps." \ --stage=GA \ --permissions=discoveryengine.devToolsConfigs.get,discoveryengine.locations.buildAuthorizationUrlReplace
PROJECT_IDwith the ID of your Google Cloud project.
REST
To create the custom role using the REST API, call the roles.create method:
curl -X POST \
  -H "Authorization: Bearer $(gcloud auth print-access-token)" \
  -H "Content-Type: application/json" \
  -d '{
    "roleId": "customRestrictedEndUser",
    "role": {
      "title": "Custom Gemini Enterprise Restricted End User",
      "description": "Base project-level permissions to access Gemini Enterprise apps.",
      "stage": "GA",
      "includedPermissions": [
        "discoveryengine.devToolsConfigs.get",
        "discoveryengine.locations.buildAuthorizationUrl"
      ]
    }
  }' \
  "https://iam.googleapis.com/v1/projects/PROJECT_ID/roles"
Replace PROJECT_ID with the ID of your Google Cloud
project.
Create a custom restricted administrator role
The customRestrictedAdmin role grants project-level permissions required
for delegated administrators and viewers to view resource listings and sidebars
in the Google Cloud console without granting access to view or modify specific
app or data store contents. To delegate administrative control over a specific
app or data store, assign this custom role at the project level, and then assign
Gemini Enterprise Admin
(roles/discoveryengine.agentspaceAdmin) directly on the target resource.
Console
To create the custom role in the Google Cloud console, follow these steps:
In the Google Cloud console, go to the Roles page.
Select your Google Cloud project.
Click + Create role.
Enter the role details:
- Title:
Custom Gemini Enterprise Restricted Admin - Description:
Base project-level permissions to list and view
Gemini Enterprise configuration pages
. - Role ID:
customRestrictedAdmin - Role launch stage: Select General Availability.
- Title:
Click + Add permissions.
Filter and select the following permissions:
discoveryengine.aclConfigs.getdiscoveryengine.collections.listdiscoveryengine.dataStores.listdiscoveryengine.devToolsConfigs.getdiscoveryengine.engines.listdiscoveryengine.licenseConfigs.listdiscoveryengine.locations.buildAuthorizationUrldiscoveryengine.locations.getConnectorSourcediscoveryengine.locations.listConnectorSourcesdiscoveryengine.projects.getdiscoveryengine.userStores.listUserLicensesresourcemanager.projects.get
Click Add.
Click Create.
gcloud
To create the custom role using the Google Cloud CLI, follow these steps:
Run
gcloud iam roles describeto verify whether the role exists in your project:gcloud iam roles describe customRestrictedAdmin --project=PROJECT_IDReplace
PROJECT_IDwith the ID of your Google Cloud project.Run
gcloud iam roles createto create the role:gcloud iam roles create customRestrictedAdmin \ --project=PROJECT_ID \ --title="Custom Gemini Enterprise Restricted Admin" \ --description="Base project-level permissions to list and view Gemini Enterprise configuration pages." \ --stage=GA \ --permissions=discoveryengine.aclConfigs.get,discoveryengine.collections.list,discoveryengine.dataStores.list,discoveryengine.devToolsConfigs.get,discoveryengine.engines.list,discoveryengine.licenseConfigs.list,discoveryengine.locations.buildAuthorizationUrl,discoveryengine.locations.getConnectorSource,discoveryengine.locations.listConnectorSources,discoveryengine.projects.get,discoveryengine.userStores.listUserLicenses,resourcemanager.projects.getReplace
PROJECT_IDwith the ID of your Google Cloud project.
REST
To create the custom role using the REST API, call the roles.create method:
curl -X POST \
  -H "Authorization: Bearer $(gcloud auth print-access-token)" \
  -H "Content-Type: application/json" \
  -d '{
    "roleId": "customRestrictedAdmin",
    "role": {
      "title": "Custom Gemini Enterprise Restricted Admin",
      "description": "Base project-level permissions to list and view Gemini Enterprise configuration pages.",
      "stage": "GA",
      "includedPermissions": [
        "discoveryengine.aclConfigs.get",
        "discoveryengine.collections.list",
        "discoveryengine.dataStores.list",
        "discoveryengine.devToolsConfigs.get",
        "discoveryengine.engines.list",
        "discoveryengine.licenseConfigs.list",
        "discoveryengine.locations.buildAuthorizationUrl",
        "discoveryengine.locations.getConnectorSource",
        "discoveryengine.locations.listConnectorSources",
        "discoveryengine.projects.get",
        "discoveryengine.userStores.listUserLicenses",
        "resourcemanager.projects.get"
      ]
    }
  }' \
  "https://iam.googleapis.com/v1/projects/PROJECT_ID/roles"
Replace PROJECT_ID with the ID of your Google Cloud
project.
Update an existing custom role
If a custom role already exists in your project and you need to add missing permissions, update the role:
Console
To update a custom role in the Google Cloud console, follow these steps:
In the Google Cloud console, go to the Roles page.
Select the Google Cloud project in which you created the custom role.
Select the Custom tab or filter the list to locate your custom role (
customRestrictedEndUserorcustomRestrictedAdmin).Click the name of the custom role.
Click Edit role.
Click + Add permissions.
Search for and select the permissions you want to add, and then click Add.
Click Save.
gcloud
To update an existing custom role using the Google Cloud CLI, run
gcloud iam roles update:
For the restricted end user role, run the following command:
gcloud iam roles update customRestrictedEndUser \
  --project=PROJECT_ID \
  --add-permissions=discoveryengine.devToolsConfigs.get,discoveryengine.locations.buildAuthorizationUrl
Replace
PROJECT_IDwith the ID of your Google Cloud project.For the restricted administrator role, run the following command:
gcloud iam roles update customRestrictedAdmin \
  --project=PROJECT_ID \
  --add-permissions=discoveryengine.locations.buildAuthorizationUrl,discoveryengine.locations.listConnectorSources
Replace
PROJECT_IDwith the ID of your Google Cloud project.
REST
To update a custom role using the REST API, call the roles.patch method.
Note that roles.patch replaces the includedPermissions list; specify
all permissions that you want the role to include:
For the restricted end user role, run the following command:
curl -X PATCH \
  -H "Authorization: Bearer $(gcloud auth print-access-token)" \
  -H "Content-Type: application/json" \
  -d '{
    "includedPermissions": [
      "discoveryengine.devToolsConfigs.get",
      "discoveryengine.locations.buildAuthorizationUrl"
    ]
  }' \
  "https://iam.googleapis.com/v1/projects/PROJECT_ID/roles/customRestrictedEndUser?updateMask=includedPermissions"
Replace
PROJECT_IDwith the ID of your Google Cloud project.For the restricted administrator role, run the following command:
curl -X PATCH \
  -H "Authorization: Bearer $(gcloud auth print-access-token)" \
  -H "Content-Type: application/json" \
  -d '{
    "includedPermissions": [
      "discoveryengine.aclConfigs.get",
      "discoveryengine.collections.list",
      "discoveryengine.dataStores.list",
      "discoveryengine.devToolsConfigs.get",
      "discoveryengine.engines.list",
      "discoveryengine.licenseConfigs.list",
      "discoveryengine.locations.buildAuthorizationUrl",
      "discoveryengine.locations.getConnectorSource",
      "discoveryengine.locations.listConnectorSources",
      "discoveryengine.projects.get",
      "discoveryengine.userStores.listUserLicenses",
      "resourcemanager.projects.get"
    ]
  }' \
  "https://iam.googleapis.com/v1/projects/PROJECT_ID/roles/customRestrictedAdmin?updateMask=includedPermissions"
Replace
PROJECT_IDwith the ID of your Google Cloud project.
Assign a custom role at the project level
Assign the custom project roles to a target user or group.
Console
To assign the custom role using the Google Cloud console, follow these steps:
In the Google Cloud console, go to the IAM page.
Select the Google Cloud project in which you created the custom role.
Click Grant Access to add a new principal or edit an existing one.
In New principals, enter the user or group email address.
Select the custom role created for your persona, such as one of the following:
- Custom Gemini Enterprise Restricted End User
- Custom Gemini Enterprise Restricted Admin
Click Save.
gcloud
To assign the custom role using the Google Cloud CLI, run the following command:
gcloud projects add-iam-policy-binding PROJECT_ID \
  --member="user:USER_EMAIL" \
  --role="projects/PROJECT_ID/roles/CUSTOM_ROLE_ID"
Replace the following:
PROJECT_ID: the ID of your Google Cloud project.CUSTOM_ROLE_ID: the ID of the custom role you want to assign:customRestrictedEndUserorcustomRestrictedAdmin.USER_EMAIL: the email address of the user or group.
REST
To assign the custom role using the Cloud Resource Manager API, complete the following steps using a read-modify-write pattern:
Get the current IAM policy using the
getIamPolicymethod to retrieve the current policy and itsetag:curl -X POST \ -H "Authorization: Bearer $(gcloud auth print-access-token)" \ -H "Content-Type: application/json" \ -d '{}' \ "https://cloudresourcemanager.googleapis.com/v1/projects/PROJECT_ID:getIamPolicy"Replace
PROJECT_IDwith the ID of your Google Cloud project.Set the updated IAM policy using the
setIamPolicymethod with your updated policy payload:curl -X POST \ -H "Authorization: Bearer $(gcloud auth print-access-token)" \ -H "Content-Type: application/json" \ -d '{ "policy": { "etag": "ETAG", "bindings": [ { "role": "EXISTING_ROLE", "members": [ "user:EXISTING_USER_EMAIL" ] }, { "role": "projects/PROJECT_ID/roles/CUSTOM_ROLE_ID", "members": [ "user:USER_EMAIL" ] } ] } }' \ "https://cloudresourcemanager.googleapis.com/v1/projects/PROJECT_ID:setIamPolicy"Replace the following:
ETAG: theetagvalue you got as the response when you used thegetIamPolicymethod.EXISTING_ROLEandEXISTING_USER_EMAIL: the existing role and principal bindings returned by thegetIamPolicymethod that you want to retain.PROJECT_ID: the ID of your Google Cloud project.CUSTOM_ROLE_ID: the ID of the custom project-level role you want to assign. Specify one of the following:customRestrictedEndUser: grants the project permissions for end users to authenticate and access apps.customRestrictedAdmin: grants the project permissions for administrators to view resource listings in the Google Cloud console.
USER_EMAIL: the email address of the user or group.
Configure app permissions
Grant resource-level permissions on the target app resource using the Google Cloud console or the REST API.
If you want to assign a custom role instead of a predefined role in the
app-level IAM policy, ensure that the custom role includes all
permissions of the corresponding predefined role, such as
Gemini Enterprise User
(roles/discoveryengine.agentspaceUser) or
Gemini Enterprise Admin
(roles/discoveryengine.agentspaceAdmin).
Console
To configure app permissions in the Google Cloud console, follow these steps:
In the Google Cloud console, go to the Gemini Enterprise > Apps page.
Select your target app.
Click User permissions and click Add user.
Select the role for the user or group:
- User: Assigns
Gemini Enterprise User
(
roles/discoveryengine.agentspaceUser). - Admin: Assigns
Gemini Enterprise Admin
(
roles/discoveryengine.agentspaceAdmin). - Viewer: Assigns
Gemini Enterprise Viewer
(
roles/discoveryengine.agentspaceViewer).
- User: Assigns
Gemini Enterprise User
(
Click Save.
REST
To configure app permissions using the REST API, complete the following steps using a read-modify-write pattern:
Get the current IAM policy using the
getIamPolicymethod to retrieve the current policy and itsetag:curl -X GET \ -H "Authorization: Bearer $(gcloud auth print-access-token)" \ -H "Content-Type: application/json" \ "https://ENDPOINT_LOCATION-discoveryengine.googleapis.com/v1/projects/PROJECT_ID/locations/LOCATION/collections/default_collection/engines/APP_ID:getIamPolicy"Replace the following:
PROJECT_ID: the ID of your project.ENDPOINT_LOCATION: the multi-region for your API request. Specify one of the following values:usfor the US multi-regioneufor the EU multi-regionglobalfor the Global location
LOCATION: the multi-region of your data store:global,us, oreu.APP_ID: the ID of the app that you want to configure.
Set the updated IAM policy using the
setIamPolicymethod with your updated policy payload:curl -X POST \ -H "Authorization: Bearer $(gcloud auth print-access-token)" \ -H "Content-Type: application/json" \ -d '{ "policy": { "etag": "ETAG", "bindings": [ { "role": "EXISTING_ROLE", "members": [ "user:EXISTING_USER_EMAIL" ] }, { "role": "PREDEFINED_ROLE", "members": [ "user:USER_EMAIL" ] } ] } }' \ "https://ENDPOINT_LOCATION-discoveryengine.googleapis.com/v1/projects/PROJECT_ID/locations/LOCATION/collections/default_collection/engines/APP_ID:setIamPolicy"Replace the following:
ETAG: theetagvalue you got as the response when you used thegetIamPolicymethod.EXISTING_ROLEandEXISTING_USER_EMAIL: the existing role and principal bindings returned by thegetIamPolicymethod that you want to retain.USER_EMAIL: the email address of the user or group (for example,alex@example.com).- To grant access, add user emails to the
membersarray, each prefixed withuser:. Avoid extra spaces before or after the email address. - To revoke access, remove the user email address from the
membersarray.
- To grant access, add user emails to the
PREDEFINED_ROLE: the predefined role that you want to assign to the app. For example, Gemini Enterprise User (roles/discoveryengine.agentspaceUser) for end users, Gemini Enterprise Admin (roles/discoveryengine.agentspaceAdmin) for administrators, or Gemini Enterprise Viewer (roles/discoveryengine.agentspaceViewer) for viewers. For more information, see Predefined roles.PROJECT_ID: the ID of your Google Cloud project.ENDPOINT_LOCATION: the multi-region for your API request. Specify one of the following values:usfor the US multi-regioneufor the EU multi-regionglobalfor the Global location
LOCATION: the multi-region of your data store:global,us, oreu.APP_ID: the ID of the app that you want to configure.
Configure data store permissions
To configure data permissions, grant resource-level permissions on the target data store using the Google Cloud console or the REST API. End users can only connect to and query data stores to which they have been explicitly granted permissions.
If you want to assign a custom role instead of a predefined role in the
data store IAM policy, ensure that the custom role includes all
permissions of the corresponding predefined role, such as
Gemini Enterprise User
(roles/discoveryengine.agentspaceUser) or
Gemini Enterprise Admin
(roles/discoveryengine.agentspaceAdmin).
For third-party connectors that enforce end-user document permissions, end user access to individual documents continues to be governed by the access control lists (ACLs) synced from the source system (granting IAM access doesn't bypass source ACLs).
To find data stores, collections, and entity IDs, see Get data store and entity details.
Console
To configure data store permissions in the Google Cloud console, follow these steps. Permissions assigned to a data store in the Google Cloud console automatically propagate to any underlying child entities:
In the Google Cloud console, go to the Gemini Enterprise > Data Stores page.
Click the name of your data store.
Click User permissions > Add user.
Select the role for the user or group:
- User: Assigns
Gemini Enterprise User
(
roles/discoveryengine.agentspaceUser). - Admin: Assigns
Gemini Enterprise Admin
(
roles/discoveryengine.agentspaceAdmin). - Viewer: Assigns
Gemini Enterprise Viewer
(
roles/discoveryengine.agentspaceViewer).
- User: Assigns
Gemini Enterprise User
(
Click Save.
REST
To configure data store permissions using the REST API, expand the section that matches your data store configuration:
Data stores with entities
Use this option for third-party connectors that contain multiple entity types, such as Jira, Salesforce, Confluence, or SharePoint Online. When using the REST API, permissions don't automatically cascade from the parent connector collection to child entities. You must grant the same permissions on both the parent collection resource and on all underlying entity data stores (don't configure permissions for only a subset of entities).
Follow these steps to configure permissions for data stores with entities:
-
Get the current IAM policy for the data connector collection:
Call
getIamPolicyto retrieve the current policy and itsetag:curl -X GET \ -H "Authorization: Bearer $(gcloud auth print-access-token)" \ "https://ENDPOINT_LOCATION-discoveryengine.googleapis.com/v1/projects/PROJECT_ID/locations/LOCATION/collections/COLLECTION_ID:getIamPolicy"
Replace the following:
PROJECT_ID: The ID of your Google Cloud project.ENDPOINT_LOCATION: the multi-region for your API request. Specify one of the following values:usfor the US multi-regioneufor the EU multi-regionglobalfor the Global location
LOCATION: the multi-region of your data store:global,us, oreu.COLLECTION_ID: the collection ID of the data connector. For more information, see Get data store and entity details.
-
Set the updated IAM policy on the data connector collection:
Call
setIamPolicyincluding theetagand the role binding:curl -X POST \ -H "Authorization: Bearer $(gcloud auth print-access-token)" \ -H "Content-Type: application/json" \ -d '{ "policy": { "etag": "ETAG", "bindings": [ { "role": "EXISTING_ROLE", "members": [ "user:EXISTING_USER_EMAIL" ] }, { "role": "PREDEFINED_ROLE", "members": [ "user:USER_EMAIL" ] } ] } }' \ "https://ENDPOINT_LOCATION-discoveryengine.googleapis.com/v1/projects/PROJECT_ID/locations/LOCATION/collections/COLLECTION_ID:setIamPolicy"
Replace the following:
ETAG: theetagvalue you got as the response when you used thegetIamPolicymethod in step 1.EXISTING_ROLEandEXISTING_USER_EMAIL: the existing role and principal bindings returned by thegetIamPolicymethod that you want to retain.USER_EMAIL: the email address of the user or group.PREDEFINED_ROLE: the predefined role that you want to assign to the collection. For example, Gemini Enterprise User (roles/discoveryengine.agentspaceUser) for end users, Gemini Enterprise Admin (roles/discoveryengine.agentspaceAdmin) for administrators, or Gemini Enterprise Viewer (roles/discoveryengine.agentspaceViewer) for viewers. For more information, see Predefined roles.PROJECT_ID: The ID of your Google Cloud project.ENDPOINT_LOCATION: the multi-region for your API request. Specify one of the following values:usfor the US multi-regioneufor the EU multi-regionglobalfor the Global location
LOCATION: the multi-region of your data store:global,us, oreu.COLLECTION_ID: the collection ID of the data connector.
-
Get the current IAM policy for an entity data store:
In Gemini Enterprise, child entity data stores reside under
default_collectionand are prefixed with the connector collection ID. CallgetIamPolicyon the entity data store underdefault_collection:curl -X GET \ -H "Authorization: Bearer $(gcloud auth print-access-token)" \ "https://ENDPOINT_LOCATION-discoveryengine.googleapis.com/v1/projects/PROJECT_ID/locations/LOCATION/collections/default_collection/dataStores/DATA_STORE_ENTITY_ID:getIamPolicy"
Replace the following:
PROJECT_ID: The ID of your Google Cloud project.ENDPOINT_LOCATION: the multi-region for your API request. Specify one of the following values:usfor the US multi-regioneufor the EU multi-regionglobalfor the Global location
LOCATION: the multi-region of your data store:global,us, oreu.DATA_STORE_ENTITY_ID: the ID of the entity data store (for example,DataConnector3_entityA). For more information, see Get data store and entity details.
-
Set the updated IAM policy on the entity data store:
Call
setIamPolicyon the entity data store including theetag:curl -X POST \ -H "Authorization: Bearer $(gcloud auth print-access-token)" \ -H "Content-Type: application/json" \ -d '{ "policy": { "etag": "ETAG", "bindings": [ { "role": "EXISTING_ROLE", "members": [ "user:EXISTING_USER_EMAIL" ] }, { "role": "PREDEFINED_ROLE", "members": [ "user:USER_EMAIL" ] } ] } }' \ "https://ENDPOINT_LOCATION-discoveryengine.googleapis.com/v1/projects/PROJECT_ID/locations/LOCATION/collections/default_collection/dataStores/DATA_STORE_ENTITY_ID:setIamPolicy"
Replace the following:
ETAG: theetagvalue you got as the response when you used thegetIamPolicymethod in step 3.EXISTING_ROLEandEXISTING_USER_EMAIL: the existing role and principal bindings returned by thegetIamPolicymethod that you want to retain.USER_EMAIL: the email address of the user or group.PREDEFINED_ROLE: the predefined role that you want to assign to the entity data store. For example, Gemini Enterprise User (roles/discoveryengine.agentspaceUser) for end users, Gemini Enterprise Admin (roles/discoveryengine.agentspaceAdmin) for administrators, or Gemini Enterprise Viewer (roles/discoveryengine.agentspaceViewer) for viewers. For more information, see Predefined roles.PROJECT_ID: The ID of your Google Cloud project.ENDPOINT_LOCATION: the multi-region for your API request. Specify one of the following values:usfor the US multi-regioneufor the EU multi-regionglobalfor the Global location
LOCATION: the multi-region of your data store:global,us, oreu.DATA_STORE_ENTITY_ID: the ID of the entity data store.
Repeat steps 3 and 4 for each entity data store under the data connector. If you later configure the connector to sync additional entity types, configure IAM policies on each newly created entity data store.
Data stores without entities
Use this option for standalone data stores, such as Cloud Storage,
BigQuery, or data sources that don't contain entities. Set
permissions directly on the single data store resource under
default_collection.
Follow these steps to configure permissions for data stores without entities:
-
Get the current IAM policy for the data store:
Call
getIamPolicyto retrieve the current policy and itsetag:curl -X GET \ -H "Authorization: Bearer $(gcloud auth print-access-token)" \ "https://ENDPOINT_LOCATION-discoveryengine.googleapis.com/v1/projects/PROJECT_ID/locations/LOCATION/collections/default_collection/dataStores/DATA_STORE_ID:getIamPolicy"
Replace the following:
PROJECT_ID: The ID of your Google Cloud project.ENDPOINT_LOCATION: the multi-region for your API request. Specify one of the following values:usfor the US multi-regioneufor the EU multi-regionglobalfor the Global location
LOCATION: the multi-region of your data store:global,us, oreu.DATA_STORE_ID: the ID of the data store. For more information, see Get data store and entity details.
-
Set the updated IAM policy on the data store:
Call
setIamPolicyincluding theetagand the role binding:curl -X POST \ -H "Authorization: Bearer $(gcloud auth print-access-token)" \ -H "Content-Type: application/json" \ -d '{ "policy": { "etag": "ETAG", "bindings": [ { "role": "EXISTING_ROLE", "members": [ "user:EXISTING_USER_EMAIL" ] }, { "role": "PREDEFINED_ROLE", "members": [ "user:USER_EMAIL" ] } ] } }' \ "https://ENDPOINT_LOCATION-discoveryengine.googleapis.com/v1/projects/PROJECT_ID/locations/LOCATION/collections/default_collection/dataStores/DATA_STORE_ID:setIamPolicy"
Replace the following:
ETAG: theetagvalue you got as the response when you used thegetIamPolicymethod in step 1.EXISTING_ROLEandEXISTING_USER_EMAIL: the existing role and principal bindings returned by thegetIamPolicymethod that you want to retain.USER_EMAIL: the email address of the user or group.PREDEFINED_ROLE: the predefined role that you want to assign to the data store. For example, Gemini Enterprise User (roles/discoveryengine.agentspaceUser) for end users, Gemini Enterprise Admin (roles/discoveryengine.agentspaceAdmin) for administrators, or Gemini Enterprise Viewer (roles/discoveryengine.agentspaceViewer) for viewers. For more information, see Predefined roles.PROJECT_ID: The ID of your Google Cloud project.ENDPOINT_LOCATION: the multi-region for your API request. Specify one of the following values:usfor the US multi-regioneufor the EU multi-regionglobalfor the Global location
LOCATION: the multi-region of your data store:global,us, oreu.DATA_STORE_ID: the ID of the data store.
Grant access to Gemini Notebook Enterprise and AI developer tools features
Restricted users who are assigned customRestrictedEndUser at the project
level lose access to features like AI developer tools and
Gemini Notebook Enterprise because their project role contains only
base authorization permissions.
Granting the full
Gemini Enterprise User
(roles/discoveryengine.agentspaceUser) role at the project level overrides
isolation and exposes all apps and data stores in the project. Instead,
administrators can grant narrow, feature-specific roles at the project level.
Grant access to Gemini Notebook Enterprise
Grant the
Cloud NotebookLM User
(roles/discoveryengine.notebookLmUser) role to allow restricted users to
create and use notebooks without exposing apps or data stores:
Console
To grant access using the Google Cloud console, follow these steps:
In the Google Cloud console, go to the IAM page.
Select your Google Cloud project.
Locate the user or group in the permissions list, and then click Edit principal. Alternatively, click Grant access to add a new user.
In the Assign roles section, click Add another role.
In the Select a role field, search for and select Cloud NotebookLM User (
roles/discoveryengine.notebookLmUser).Click Save.
gcloud
To grant access using the Google Cloud CLI, run the following command:
gcloud projects add-iam-policy-binding PROJECT_ID \
  --member="user:USER_EMAIL" \
  --role="roles/discoveryengine.notebookLmUser"
Replace the following:
PROJECT_ID: the ID of your Google Cloud project.USER_EMAIL: the email address of the user or group.
REST
To grant access using the REST API, update the project IAM
policy using the setIamPolicy method:
Get the current IAM policy using the
getIamPolicymethod to retrieve the current policy and itsetag:curl -X POST \ -H "Authorization: Bearer $(gcloud auth print-access-token)" \ -H "Content-Type: application/json" \ -d '{}' \ "https://cloudresourcemanager.googleapis.com/v1/projects/PROJECT_ID:getIamPolicy"Replace
PROJECT_IDwith the ID of your Google Cloud project.Set the updated IAM policy using the
setIamPolicymethod with theroles/discoveryengine.notebookLmUserrole:curl -X POST \ -H "Authorization: Bearer $(gcloud auth print-access-token)" \ -H "Content-Type: application/json" \ -d '{ "policy": { "etag": "ETAG", "bindings": [ { "role": "EXISTING_ROLE", "members": [ "user:EXISTING_USER_EMAIL" ] }, { "role": "roles/discoveryengine.notebookLmUser", "members": [ "user:USER_EMAIL" ] } ] } }' \ "https://cloudresourcemanager.googleapis.com/v1/projects/PROJECT_ID:setIamPolicy"Replace the following:
ETAG: theetagvalue from thegetIamPolicyresponse.EXISTING_ROLEandEXISTING_USER_EMAIL: the existing role and principal bindings returned by thegetIamPolicymethod that you want to retain.PROJECT_ID: the ID of your Google Cloud project.USER_EMAIL: the email address of the user or group.
Grant access to AI developer tools
Grant the
Gemini for Google Cloud User
(roles/cloudaicompanion.user) and
User role for Business AI Code API
(roles/businessaicode.user) roles to enable AI developer tools without
exposing Gemini Enterprise apps or data stores:
Console
To grant access using the Google Cloud console, follow these steps:
In the Google Cloud console, go to the IAM page.
Select your Google Cloud project.
Locate the user or group in the permissions list, and then click Edit principal. Alternatively, click Grant access to add a new user.
In the Assign roles section, assign each of the following roles:
- Gemini for Google Cloud User (
roles/cloudaicompanion.user) - User role for Business AI Code API (
roles/businessaicode.user)
- Gemini for Google Cloud User (
Click Save.
gcloud
To grant access using the Google Cloud CLI, run the following commands:
gcloud projects add-iam-policy-binding PROJECT_ID \
  --member="user:USER_EMAIL" \
  --role="roles/cloudaicompanion.user"

gcloud projects add-iam-policy-binding PROJECT_ID \
  --member="user:USER_EMAIL" \
  --role="roles/businessaicode.user"
Replace the following:
PROJECT_ID: the ID of your Google Cloud project.USER_EMAIL: the email address of the user or group.
REST
To grant access using the REST API, update the project IAM
policy using the setIamPolicy method:
Get the current IAM policy using the
getIamPolicymethod to retrieve the current policy and itsetag:curl -X POST \ -H "Authorization: Bearer $(gcloud auth print-access-token)" \ -H "Content-Type: application/json" \ -d '{}' \ "https://cloudresourcemanager.googleapis.com/v1/projects/PROJECT_ID:getIamPolicy"Replace
PROJECT_IDwith the ID of your Google Cloud project.Set the updated IAM policy using the
setIamPolicymethod with theroles/cloudaicompanion.userandroles/businessaicode.userroles:curl -X POST \ -H "Authorization: Bearer $(gcloud auth print-access-token)" \ -H "Content-Type: application/json" \ -d '{ "policy": { "etag": "ETAG", "bindings": [ { "role": "EXISTING_ROLE", "members": [ "user:EXISTING_USER_EMAIL" ] }, { "role": "roles/cloudaicompanion.user", "members": [ "user:USER_EMAIL" ] }, { "role": "roles/businessaicode.user", "members": [ "user:USER_EMAIL" ] } ] } }' \ "https://cloudresourcemanager.googleapis.com/v1/projects/PROJECT_ID:setIamPolicy"Replace the following:
ETAG: theetagvalue from thegetIamPolicyresponse.EXISTING_ROLEandEXISTING_USER_EMAIL: the existing role and principal bindings returned by thegetIamPolicymethod that you want to retain.PROJECT_ID: the ID of your Google Cloud project.USER_EMAIL: the email address of the user or group.
What's next?
If you want to delete an app with an IAM policy, you can remove the users from the policy before deleting the app. For more information, see Best practices for deleting an app with an IAM policy.