將本機 SSD 磁碟新增至運算執行個體

本機 SSD 磁碟是專為快取或暫存處理空間等暫存用途而設計,本機 SSD 磁碟位於執行 Compute Engine 執行個體的實體機器上,因此只能在執行個體建立程序中建立。本機 SSD 磁碟無法做為開機裝置。

對於支援本機 SSD 磁碟的第 3 代機器系列和後續版本 (不含 G4 和 M3),Compute Engine 會在您建立執行個體時,自動附加特定數量的本機 SSD 磁碟。這些機器系列提供本機 SSD 儲存空間的方式如下:

  • H4D、C4、C4A、C4D、C4N、C3 和 C3D:對於這些機器系列,本機 SSD 儲存空間僅適用於以 -lssd 結尾的機器類型,例如 c3-standard-88-lssd。
  • Z4D、Z3、A4X Max、A4X、A4、A3 和 A2 Ultra 機器系列:這些機器系列的所有機型都隨附本機 SSD 儲存空間。

對於支援本機 SSD 磁碟的 G4、M3、第一代和第二代機型,您必須在建立運算執行個體時,指定要附加的本機 SSD 磁碟數量。

建立本機 SSD 磁碟後,您必須格式化並掛接裝置,才能使用。

如要瞭解各種機器類型可用的本機 SSD 儲存空間大小,以及可附加至運算執行個體的本機 SSD 磁碟數量,請參閱「選擇有效的本機 SSD 磁碟數量」。

事前準備

  • 使用本機 SSD 磁碟前,請先查看本機 SSD 限制。
  • 請參閱本機 SSD 磁碟的資料保存情境。
  • 如要將本機 SSD 磁碟新增至已連結 GPU 的運算執行個體,請參閱「 本機 SSD 磁碟可用性」。
  • 如果尚未設定驗證,請先完成設定。驗證可確認您的身分,以便存取 Google Cloud 服務和 API。如要從本機開發環境執行程式碼或範例,請選取下列其中一個選項,向 Compute Engine 進行驗證:

    請根據您打算如何使用本頁範例,選取對應的分頁標籤:

    控制台

    使用 Google Cloud 控制台存取 Google Cloud 服務和 API 時,不需要設定驗證。

    gcloud

    1. 安裝 Google Cloud CLI。 完成後,執行下列指令來初始化 Google Cloud CLI:

      gcloud init

      若您採用的是外部識別資訊提供者 (IdP),請先 使用聯合身分登入 gcloud CLI。

  • 設定預設區域和可用區。
  • Terraform

    如要在本機開發環境中使用本頁的 Terraform 範例,請安裝並初始化 gcloud CLI,然後使用使用者憑證設定應用程式預設憑證。

    1. 安裝 Google Cloud CLI。

    2. 若您採用的是外部識別資訊提供者 (IdP),請先 使用聯合身分登入 gcloud CLI。

    3. 如果您使用的是本機殼層,請為使用者帳戶建立本機驗證憑證:

      gcloud auth application-default login

      如果您使用的是 Cloud Shell,則不必執行這項操作。

      如果系統傳回驗證錯誤,且您使用外部識別資訊提供者 (IdP),請確認您已 使用聯合身分登入 gcloud CLI。

    詳情請參閱「 為本機開發環境設定驗證機制」。

    Go

    如要在本機開發環境中使用本頁面的 Go 範例,請安裝並初始化 gcloud CLI,然後使用使用者憑證設定應用程式預設憑證。

    1. 安裝 Google Cloud CLI。

    2. 若您採用的是外部識別資訊提供者 (IdP),請先 使用聯合身分登入 gcloud CLI。

    3. 如果您使用本機殼層,請為使用者帳戶建立本機驗證憑證:

      gcloud auth application-default login

      如果您使用 Cloud Shell,則不需要執行這項操作。

      如果系統傳回驗證錯誤,且您使用外部識別資訊提供者 (IdP),請確認您已 使用聯合身分登入 gcloud CLI。

    詳情請參閱「 為本機開發環境設定驗證機制」。

    Java

    如要在本機開發環境中使用本頁的 Java 範例,請安裝並初始化 gcloud CLI,然後使用使用者憑證設定應用程式預設憑證。

    1. 安裝 Google Cloud CLI。

    2. 如果您使用外部識別資訊提供者 (IdP),請先 使用聯合身分登入 gcloud CLI。

    3. 如果您使用本機殼層,請為使用者帳戶建立本機驗證憑證:

      gcloud auth application-default login

      如果您使用的是 Cloud Shell,則不必執行這項操作。

      如果系統傳回驗證錯誤,且您使用的是外部識別資訊提供者 (IdP),請確認您已 使用聯合身分登入 gcloud CLI。

    詳情請參閱「 為本機開發環境設定驗證機制」。

    Python

    如要在本機開發環境中使用本頁的 Python 範例,請安裝並初始化 gcloud CLI,然後使用使用者憑證設定應用程式預設憑證。

    1. 安裝 Google Cloud CLI。

    2. 若您採用的是外部識別資訊提供者 (IdP),請先 使用聯合身分登入 gcloud CLI。

    3. 如果您使用的是本機殼層,請為使用者帳戶建立本機驗證憑證:

      gcloud auth application-default login

      如果您使用的是 Cloud Shell,則不必執行這項操作。

      如果系統傳回驗證錯誤,且您使用的是外部識別資訊提供者 (IdP),請確認您已 使用聯合身分登入 gcloud CLI。

    詳情請參閱「 設定本機開發環境的驗證機制」。

    REST

    如要在本機開發環境中使用本頁的 REST API 範例,請使用您提供給 gcloud CLI 的憑證。

      安裝 Google Cloud CLI。

      如果您使用外部識別資訊提供者 (IdP),請先 使用聯合身分登入 gcloud CLI。

    詳情請參閱 Google Cloud 驗證說明文件中的「使用 REST 進行驗證」。

建立含有本機 SSD 磁碟的運算執行個體

您可以使用Google Cloud console、gcloud CLI 或 Compute Engine API,建立具有本機 SSD 儲存空間的運算執行個體。

控制台

  1. 前往「Create an instance」(建立執行個體) 頁面。

    前往「Create an instance」(建立執行個體)

  2. 指定運算執行個體的名稱、區域和可用區。您也可以視需要新增標記或標籤。

  3. 在「機器設定」部分,選擇包含目標機型的機器家族。

  4. 從「Series」(系列) 清單中選取系列,然後選擇機型。

    • 如果是 H4D、C4、C4A、C4D、C4N、C3 和 C3D,請選擇結尾為 -lssd 的機型。
    • Z4D、Z3、A4X Max、A4X、A4、A3 和 A2 Ultra 機型都隨附本機 SSD 儲存空間。
    • 如果是 G4、M3,或第一代和第二代機器系列,請在選取機型後執行下列操作:
      1. 展開「Advanced options」(進階選項) 區段。
      2. 展開「磁碟」,點選「新增本機 SSD」,然後執行下列操作:
        1. 在「設定本機 SSD」頁面中,選擇磁碟介面類型。
        2. 從「磁碟容量」清單中選取所需磁碟數量。
        3. 按一下 [儲存]。
  5. 繼續建立運算執行個體。

  6. 使用本機 SSD 磁碟建立執行個體後,您必須格式化並掛接每個裝置,才能使用磁碟。

gcloud

  • 如要為 Z4D、Z3、A4X Max、A4X、A4、A3 和 A2 Ultra 機器系列建立附加本機 SSD 磁碟的運算執行個體,請按照建立執行個體的指示,使用該系列任何可用的機型建立執行個體。

  • 如要為 H4D、C4、C4A、C4D、C4N、C3 和 C3D 機器系列建立附加本機 SSD 磁碟的運算執行個體,請按照建立執行個體的指示操作,並指定結尾為 -lssd 的機型。

    舉例來說,您可以建立兩個使用 NVMe 磁碟介面的本機 SSD 磁碟,並將其附加至 C3 執行個體,如下所示:

    gcloud compute instances create example-c3-instance \
       --zone ZONE \
       --machine-type c3-standard-8-lssd \
       --image-project IMAGE_PROJECT \
       --image-family IMAGE_FAMILY
    
  • 對於 G4、M3 以及第一代和第二代機器系列,如要建立附加本機 SSD 磁碟的運算執行個體,請按照操作說明建立執行個體,但使用 --local-ssd 旗標建立及附加本機 SSD 磁碟。如要建立多個本機固態硬碟磁碟,請新增更多 --local-ssd 旗標。您也可以選擇為每個 --local-ssd 旗標設定介面和裝置名稱的值。

    舉例來說,您可以建立具有四個本機 SSD 磁碟的 M3 執行個體,並指定磁碟介面類型,如下所示:

    gcloud compute instances create INSTANCE_NAME \
       --machine-type m3-ultramem-64 \
       --zone ZONE \
       --local-ssd interface=INTERFACE_TYPE,device-name=DEVICE-NAME \
       --local-ssd interface=INTERFACE_TYPE,device-name=DEVICE-NAME \
       --local-ssd interface=INTERFACE_TYPE,device-name=DEVICE-NAME \
       --local-ssd interface=INTERFACE_TYPE \
       --image-project IMAGE_PROJECT \
       --image-family IMAGE_FAMILY
    

更改下列內容:

  • INSTANCE_NAME:新運算執行個體的名稱
  • ZONE:要建立執行個體的可用區。如果您已設定 gcloud CLI compute/zone 屬性或環境變數 CLOUDSDK_COMPUTE_ZONE,則這個旗標為選用。
  • INTERFACE_TYPE:要用於本機 SSD 磁碟的磁碟介面類型。如果您要建立 G4 或 M3 執行個體,或是開機磁碟映像檔含有最佳化 NVMe 驅動程式,請指定 nvme。針對其他圖片指定 scsi。
  • DEVICE-NAME:選用:這個名稱代表要在客體作業系統符號連結 (symlink) 中使用的磁碟名稱。
  • IMAGE_FAMILY:要安裝在開機磁碟上的可用映像檔系列之一
  • IMAGE_PROJECT:映像檔系列所屬的映像檔專案

您可以將本機 SSD 磁碟連接至使用第一代或第二代機器類型建立的運算執行個體,方法是針對不同分割區使用 nvme 和 scsi 的組合。nvme 裝置的效能取決於執行個體的開機磁碟映像檔。第 3 代以上的運算執行個體僅支援 NVMe 磁碟介面。

建立具有本機 SSD 磁碟的運算執行個體後,您必須格式化並掛接每個裝置,才能使用。

Terraform

如要建立附加本機 SSD 磁碟的運算執行個體,可以使用 google_compute_instance 資源。


# Create a VM with a local SSD for temporary storage use cases

resource "google_compute_instance" "default" {
  name         = "my-vm-instance-with-scratch"
  machine_type = "n2-standard-8"
  zone         = "us-central1-a"

  boot_disk {
    initialize_params {
      image = "debian-cloud/debian-13"
    }
  }

  # Local SSD interface type; NVME for image with optimized NVMe drivers or SCSI
  # Local SSD are 375 GiB in size
  scratch_disk {
    interface = "SCSI"
  }

  network_interface {
    network = "default"
    access_config {}
  }
}

如要瞭解如何套用或移除 Terraform 設定,請參閱「基本 Terraform 指令」。

如要產生 Terraform 程式碼,請使用 Google Cloud 控制台中的「對等程式碼」元件。
  1. 前往 Google Cloud 控制台的「VM instances」(VM 執行個體) 頁面。

    前往 VM 執行個體

  2. 點選「建立執行個體」。
  3. 指定所需參數。
  4. 按一下頁面頂端或底部的「對等程式碼」,然後點選「Terraform」分頁標籤,即可查看 Terraform 程式碼。

Go

Go

在試用這個範例之前,請先按照「使用用戶端程式庫的 Compute Engine 快速入門導覽課程」中的 Go 設定說明操作。詳情請參閱 Compute Engine Go API 參考文件。

如要向 Compute Engine 進行驗證,請設定應用程式預設憑證。詳情請參閱「設定用戶端程式庫的驗證機制」。

import (
	"context"
	"fmt"
	"io"

	compute "cloud.google.com/go/compute/apiv1"
	computepb "cloud.google.com/go/compute/apiv1/computepb"
	"google.golang.org/protobuf/proto"
)

// createWithLocalSSD creates a new VM instance with Debian 10 operating system and a local SSD attached.
func createWithLocalSSD(w io.Writer, projectID, zone, instanceName string) error {
	// projectID := "your_project_id"
	// zone := "europe-central2-b"
	// instanceName := "your_instance_name"

	ctx := context.Background()
	instancesClient, err := compute.NewInstancesRESTClient(ctx)
	if err != nil {
		return fmt.Errorf("NewInstancesRESTClient: %w", err)
	}
	defer instancesClient.Close()

	imagesClient, err := compute.NewImagesRESTClient(ctx)
	if err != nil {
		return fmt.Errorf("NewImagesRESTClient: %w", err)
	}
	defer imagesClient.Close()

	// List of public operating system (OS) images: https://cloud.google.com/compute/docs/images/os-details.
	newestDebianReq := &computepb.GetFromFamilyImageRequest{
		Project: "debian-cloud",
		Family:  "debian-12",
	}
	newestDebian, err := imagesClient.GetFromFamily(ctx, newestDebianReq)
	if err != nil {
		return fmt.Errorf("unable to get image from family: %w", err)
	}

	req := &computepb.InsertInstanceRequest{
		Project: projectID,
		Zone:    zone,
		InstanceResource: &computepb.Instance{
			Name: proto.String(instanceName),
			Disks: []*computepb.AttachedDisk{
				{
					InitializeParams: &computepb.AttachedDiskInitializeParams{
						DiskSizeGb:  proto.Int64(10),
						SourceImage: newestDebian.SelfLink,
						DiskType:    proto.String(fmt.Sprintf("zones/%s/diskTypes/pd-standard", zone)),
					},
					AutoDelete: proto.Bool(true),
					Boot:       proto.Bool(true),
					Type:       proto.String(computepb.AttachedDisk_PERSISTENT.String()),
				},
				{
					InitializeParams: &computepb.AttachedDiskInitializeParams{
						DiskType: proto.String(fmt.Sprintf("zones/%s/diskTypes/local-ssd", zone)),
					},
					AutoDelete: proto.Bool(true),
					Type:       proto.String(computepb.AttachedDisk_SCRATCH.String()),
				},
			},
			MachineType: proto.String(fmt.Sprintf("zones/%s/machineTypes/n1-standard-1", zone)),
			NetworkInterfaces: []*computepb.NetworkInterface{
				{
					Name: proto.String("global/networks/default"),
				},
			},
		},
	}

	op, err := instancesClient.Insert(ctx, req)
	if err != nil {
		return fmt.Errorf("unable to create instance: %w", err)
	}

	if err = op.Wait(ctx); err != nil {
		return fmt.Errorf("unable to wait for the operation: %w", err)
	}

	fmt.Fprintf(w, "Instance created\n")

	return nil
}

Java

Java

在試用這個範例之前,請先按照「使用用戶端程式庫的 Compute Engine 快速入門導覽課程」中的 Java 設定說明操作。詳情請參閱「Compute Engine Java API 參考文件」。

如要向 Compute Engine 進行驗證,請設定應用程式預設憑證。詳情請參閱「設定用戶端程式庫的驗證機制」。


import com.google.cloud.compute.v1.AttachedDisk;
import com.google.cloud.compute.v1.AttachedDiskInitializeParams;
import com.google.cloud.compute.v1.Image;
import com.google.cloud.compute.v1.ImagesClient;
import com.google.cloud.compute.v1.Instance;
import com.google.cloud.compute.v1.InstancesClient;
import com.google.cloud.compute.v1.NetworkInterface;
import com.google.cloud.compute.v1.Operation;
import java.io.IOException;
import java.util.ArrayList;
import java.util.List;
import java.util.concurrent.ExecutionException;
import java.util.concurrent.TimeUnit;
import java.util.concurrent.TimeoutException;

public class CreateWithLocalSsd {

  public static void main(String[] args)
      throws IOException, ExecutionException, InterruptedException, TimeoutException {
    // TODO(developer): Replace these variables before running the sample.
    // projectId: project ID or project number of the Cloud project you want to use.
    String projectId = "your-project-id";
    // zone: name of the zone to create the instance in. For example: "us-west3-b"
    String zone = "zone-name";
    // instanceName: name of the new virtual machine (VM) instance.
    String instanceName = "instance-name";

    createWithLocalSsd(projectId, zone, instanceName);
  }

  // Create a new VM instance with Debian 13 operating system and SSD local disk.
  public static void createWithLocalSsd(String projectId, String zone, String instanceName)
      throws IOException, ExecutionException, InterruptedException, TimeoutException {

    int diskSizeGb = 10;
    boolean boot = true;
    boolean autoDelete = true;
    String diskType = String.format("zones/%s/diskTypes/pd-standard", zone);
    // Get the latest debian image.
    Image newestDebian = getImageFromFamily("debian-cloud", "debian-13");
    List<AttachedDisk> disks = new ArrayList<>();

    // Create the disks to be included in the instance.
    disks.add(
        createDiskFromImage(diskType, diskSizeGb, boot, newestDebian.getSelfLink(), autoDelete));
    disks.add(createLocalSsdDisk(zone));

    // Create the instance.
    Instance instance = createInstance(projectId, zone, instanceName, disks);

    if (instance != null) {
      System.out.printf("Instance created with local SSD: %s", instance.getName());
    }

  }

  // Retrieve the newest image that is part of a given family in a project.
  // Args:
  //    projectId: project ID or project number of the Cloud project you want to get image from.
  //    family: name of the image family you want to get image from.
  private static Image getImageFromFamily(String projectId, String family) throws IOException {
    // Initialize client that will be used to send requests. This client only needs to be created
    // once, and can be reused for multiple requests. After completing all of your requests, call
    // the `imagesClient.close()` method on the client to safely
    // clean up any remaining background resources.
    try (ImagesClient imagesClient = ImagesClient.create()) {
      // List of public operating system (OS) images: https://cloud.google.com/compute/docs/images/os-details
      return imagesClient.getFromFamily(projectId, family);
    }
  }

  // Create an AttachedDisk object to be used in VM instance creation. Uses an image as the
  // source for the new disk.
  //
  // Args:
  //    diskType: the type of disk you want to create. This value uses the following format:
  //        "zones/{zone}/diskTypes/(pd-standard|pd-ssd|pd-balanced|pd-extreme)".
  //        For example: "zones/us-west3-b/diskTypes/pd-ssd"
  //
  //    diskSizeGb: size of the new disk in gigabytes.
  //
  //    boot: boolean flag indicating whether this disk should be used as a
  //    boot disk of an instance.
  //
  //    sourceImage: source image to use when creating this disk.
  //    You must have read access to this disk. This can be one of the publicly available images
  //    or an image from one of your projects.
  //    This value uses the following format: "projects/{project_name}/global/images/{image_name}"
  //
  //    autoDelete: boolean flag indicating whether this disk should be deleted
  //    with the VM that uses it.
  private static AttachedDisk createDiskFromImage(String diskType, int diskSizeGb, boolean boot,
      String sourceImage, boolean autoDelete) {

    AttachedDiskInitializeParams attachedDiskInitializeParams =
        AttachedDiskInitializeParams.newBuilder()
            .setSourceImage(sourceImage)
            .setDiskSizeGb(diskSizeGb)
            .setDiskType(diskType)
            .build();

    AttachedDisk bootDisk = AttachedDisk.newBuilder()
        .setInitializeParams(attachedDiskInitializeParams)
        // Remember to set auto_delete to True if you want the disk to be deleted when you delete
        // your VM instance.
        .setAutoDelete(autoDelete)
        .setBoot(boot)
        .build();

    return bootDisk;
  }

  // Create an AttachedDisk object to be used in VM instance creation. The created disk contains
  // no data and requires formatting before it can be used.
  // Args:
  //    zone: The zone in which the local SSD drive will be attached.
  private static AttachedDisk createLocalSsdDisk(String zone) {

    AttachedDiskInitializeParams attachedDiskInitializeParams =
        AttachedDiskInitializeParams.newBuilder()
            .setDiskType(String.format("zones/%s/diskTypes/local-ssd", zone))
            .build();

    AttachedDisk disk = AttachedDisk.newBuilder()
        .setType(AttachedDisk.Type.SCRATCH.name())
        .setInitializeParams(attachedDiskInitializeParams)
        .setAutoDelete(true)
        .build();

    return disk;
  }

  // Send an instance creation request to the Compute Engine API and wait for it to complete.
  // Args:
  //    projectId: project ID or project number of the Cloud project you want to use.
  //    zone: name of the zone to create the instance in. For example: "us-west3-b"
  //    instanceName: name of the new virtual machine (VM) instance.
  //    disks: a list of compute.v1.AttachedDisk objects describing the disks
  //           you want to attach to your new instance.
  private static Instance createInstance(String projectId, String zone, String instanceName,
      List<AttachedDisk> disks)
      throws IOException, ExecutionException, InterruptedException, TimeoutException {
    // Initialize client that will be used to send requests. This client only needs to be created
    // once, and can be reused for multiple requests. After completing all of your requests, call
    // the `instancesClient.close()` method on the client to safely
    // clean up any remaining background resources.
    try (InstancesClient instancesClient = InstancesClient.create()) {

      // machineType: machine type of the VM being created. This value uses the
      // following format: "zones/{zone}/machineTypes/{type_name}".
      // For example: "zones/europe-west3-c/machineTypes/f1-micro"
      String typeName = "n1-standard-1";
      String machineType = String.format("zones/%s/machineTypes/%s", zone, typeName);

      // networkLink: name of the network you want the new instance to use.
      // For example: "global/networks/default" represents the network
      // named "default", which is created automatically for each project.
      String networkLink = "global/networks/default";

      // Collect information into the Instance object.
      Instance instance = Instance.newBuilder()
          .setName(instanceName)
          .setMachineType(machineType)
          .addNetworkInterfaces(NetworkInterface.newBuilder().setName(networkLink).build())
          .addAllDisks(disks)
          .build();

      Operation response = instancesClient.insertAsync(projectId, zone, instance)
          .get(3, TimeUnit.MINUTES);

      if (response.hasError()) {
        throw new Error("Instance creation failed ! ! " + response);
      }
      System.out.println("Operation Status: " + response.getStatus());
      return instancesClient.get(projectId, zone, instanceName);
    }

  }

}

Python

Python

在試用這個範例之前,請先按照「使用用戶端程式庫的 Compute Engine 快速入門導覽課程」中的 Python 設定操作說明進行操作。詳情請參閱「Compute Engine Python API 參考文件」。

如要向 Compute Engine 進行驗證,請設定應用程式預設憑證。詳情請參閱「設定用戶端程式庫的驗證機制」。

from __future__ import annotations

import re
import sys
from typing import Any
import warnings

from google.api_core.extended_operation import ExtendedOperation
from google.cloud import compute_v1


def get_image_from_family(project: str, family: str) -> compute_v1.Image:
    """
    Retrieve the newest image that is part of a given family in a project.

    Args:
        project: project ID or project number of the Cloud project you want to get image from.
        family: name of the image family you want to get image from.

    Returns:
        An Image object.
    """
    image_client = compute_v1.ImagesClient()
    # List of public operating system (OS) images: https://cloud.google.com/compute/docs/images/os-details
    newest_image = image_client.get_from_family(project=project, family=family)
    return newest_image


def disk_from_image(
    disk_type: str,
    disk_size_gb: int,
    boot: bool,
    source_image: str,
    auto_delete: bool = True,
) -> compute_v1.AttachedDisk:
    """
    Create an AttachedDisk object to be used in VM instance creation. Uses an image as the
    source for the new disk.

    Args:
         disk_type: the type of disk you want to create. This value uses the following format:
            "zones/{zone}/diskTypes/(pd-standard|pd-ssd|pd-balanced|pd-extreme)".
            For example: "zones/us-west3-b/diskTypes/pd-ssd"
        disk_size_gb: size of the new disk in gigabytes
        boot: boolean flag indicating whether this disk should be used as a boot disk of an instance
        source_image: source image to use when creating this disk. You must have read access to this disk. This can be one
            of the publicly available images or an image from one of your projects.
            This value uses the following format: "projects/{project_name}/global/images/{image_name}"
        auto_delete: boolean flag indicating whether this disk should be deleted with the VM that uses it

    Returns:
        AttachedDisk object configured to be created using the specified image.
    """
    boot_disk = compute_v1.AttachedDisk()
    initialize_params = compute_v1.AttachedDiskInitializeParams()
    initialize_params.source_image = source_image
    initialize_params.disk_size_gb = disk_size_gb
    initialize_params.disk_type = disk_type
    boot_disk.initialize_params = initialize_params
    # Remember to set auto_delete to True if you want the disk to be deleted when you delete
    # your VM instance.
    boot_disk.auto_delete = auto_delete
    boot_disk.boot = boot
    return boot_disk


def local_ssd_disk(zone: str) -> compute_v1.AttachedDisk():
    """
    Create an AttachedDisk object to be used in VM instance creation. The created disk contains
    no data and requires formatting before it can be used.

    Args:
        zone: The zone in which the local SSD drive will be attached.

    Returns:
        AttachedDisk object configured as a local SSD disk.
    """
    disk = compute_v1.AttachedDisk()
    disk.type_ = compute_v1.AttachedDisk.Type.SCRATCH.name
    initialize_params = compute_v1.AttachedDiskInitializeParams()
    initialize_params.disk_type = f"zones/{zone}/diskTypes/local-ssd"
    disk.initialize_params = initialize_params
    disk.auto_delete = True
    return disk


def wait_for_extended_operation(
    operation: ExtendedOperation, verbose_name: str = "operation", timeout: int = 300
) -> Any:
    """
    Waits for the extended (long-running) operation to complete.

    If the operation is successful, it will return its result.
    If the operation ends with an error, an exception will be raised.
    If there were any warnings during the execution of the operation
    they will be printed to sys.stderr.

    Args:
        operation: a long-running operation you want to wait on.
        verbose_name: (optional) a more verbose name of the operation,
            used only during error and warning reporting.
        timeout: how long (in seconds) to wait for operation to finish.
            If None, wait indefinitely.

    Returns:
        Whatever the operation.result() returns.

    Raises:
        This method will raise the exception received from `operation.exception()`
        or RuntimeError if there is no exception set, but there is an `error_code`
        set for the `operation`.

        In case of an operation taking longer than `timeout` seconds to complete,
        a `concurrent.futures.TimeoutError` will be raised.
    """
    result = operation.result(timeout=timeout)

    if operation.error_code:
        print(
            f"Error during {verbose_name}: [Code: {operation.error_code}]: {operation.error_message}",
            file=sys.stderr,
            flush=True,
        )
        print(f"Operation ID: {operation.name}", file=sys.stderr, flush=True)
        raise operation.exception() or RuntimeError(operation.error_message)

    if operation.warnings:
        print(f"Warnings during {verbose_name}:\n", file=sys.stderr, flush=True)
        for warning in operation.warnings:
            print(f" - {warning.code}: {warning.message}", file=sys.stderr, flush=True)

    return result


def create_instance(
    project_id: str,
    zone: str,
    instance_name: str,
    disks: list[compute_v1.AttachedDisk],
    machine_type: str = "n1-standard-1",
    network_link: str = "global/networks/default",
    subnetwork_link: str = None,
    internal_ip: str = None,
    external_access: bool = False,
    external_ipv4: str = None,
    accelerators: list[compute_v1.AcceleratorConfig] = None,
    preemptible: bool = False,
    spot: bool = False,
    instance_termination_action: str = "STOP",
    custom_hostname: str = None,
    delete_protection: bool = False,
) -> compute_v1.Instance:
    """
    Send an instance creation request to the Compute Engine API and wait for it to complete.

    Args:
        project_id: project ID or project number of the Cloud project you want to use.
        zone: name of the zone to create the instance in. For example: "us-west3-b"
        instance_name: name of the new virtual machine (VM) instance.
        disks: a list of compute_v1.AttachedDisk objects describing the disks
            you want to attach to your new instance.
        machine_type: machine type of the VM being created. This value uses the
            following format: "zones/{zone}/machineTypes/{type_name}".
            For example: "zones/europe-west3-c/machineTypes/f1-micro"
        network_link: name of the network you want the new instance to use.
            For example: "global/networks/default" represents the network
            named "default", which is created automatically for each project.
        subnetwork_link: name of the subnetwork you want the new instance to use.
            This value uses the following format:
            "regions/{region}/subnetworks/{subnetwork_name}"
        internal_ip: internal IP address you want to assign to the new instance.
            By default, a free address from the pool of available internal IP addresses of
            used subnet will be used.
        external_access: boolean flag indicating if the instance should have an external IPv4
            address assigned.
        external_ipv4: external IPv4 address to be assigned to this instance. If you specify
            an external IP address, it must live in the same region as the zone of the instance.
            This setting requires `external_access` to be set to True to work.
        accelerators: a list of AcceleratorConfig objects describing the accelerators that will
            be attached to the new instance.
        preemptible: boolean value indicating if the new instance should be preemptible
            or not. Preemptible VMs have been deprecated and you should now use Spot VMs.
        spot: boolean value indicating if the new instance should be a Spot VM or not.
        instance_termination_action: What action should be taken once a Spot VM is terminated.
            Possible values: "STOP", "DELETE"
        custom_hostname: Custom hostname of the new VM instance.
            Custom hostnames must conform to RFC 1035 requirements for valid hostnames.
        delete_protection: boolean value indicating if the new virtual machine should be
            protected against deletion or not.
    Returns:
        Instance object.
    """
    instance_client = compute_v1.InstancesClient()

    # Use the network interface provided in the network_link argument.
    network_interface = compute_v1.NetworkInterface()
    network_interface.network = network_link
    if subnetwork_link:
        network_interface.subnetwork = subnetwork_link

    if internal_ip:
        network_interface.network_i_p = internal_ip

    if external_access:
        access = compute_v1.AccessConfig()
        access.type_ = compute_v1.AccessConfig.Type.ONE_TO_ONE_NAT.name
        access.name = "External NAT"
        access.network_tier = access.NetworkTier.PREMIUM.name
        if external_ipv4:
            access.nat_i_p = external_ipv4
        network_interface.access_configs = [access]

    # Collect information into the Instance object.
    instance = compute_v1.Instance()
    instance.network_interfaces = [network_interface]
    instance.name = instance_name
    instance.disks = disks
    if re.match(r"^zones/[a-z\d\-]+/machineTypes/[a-z\d\-]+$", machine_type):
        instance.machine_type = machine_type
    else:
        instance.machine_type = f"zones/{zone}/machineTypes/{machine_type}"

    instance.scheduling = compute_v1.Scheduling()
    if accelerators:
        instance.guest_accelerators = accelerators
        instance.scheduling.on_host_maintenance = (
            compute_v1.Scheduling.OnHostMaintenance.TERMINATE.name
        )

    if preemptible:
        # Set the preemptible setting
        warnings.warn(
            "Preemptible VMs are being replaced by Spot VMs.", DeprecationWarning
        )
        instance.scheduling = compute_v1.Scheduling()
        instance.scheduling.preemptible = True

    if spot:
        # Set the Spot VM setting
        instance.scheduling.provisioning_model = (
            compute_v1.Scheduling.ProvisioningModel.SPOT.name
        )
        instance.scheduling.instance_termination_action = instance_termination_action

    if custom_hostname is not None:
        # Set the custom hostname for the instance
        instance.hostname = custom_hostname

    if delete_protection:
        # Set the delete protection bit
        instance.deletion_protection = True

    # Prepare the request to insert an instance.
    request = compute_v1.InsertInstanceRequest()
    request.zone = zone
    request.project = project_id
    request.instance_resource = instance

    # Wait for the create operation to complete.
    print(f"Creating the {instance_name} instance in {zone}...")

    operation = instance_client.insert(request=request)

    wait_for_extended_operation(operation, "instance creation")

    print(f"Instance {instance_name} created.")
    return instance_client.get(project=project_id, zone=zone, instance=instance_name)


def create_with_ssd(
    project_id: str, zone: str, instance_name: str
) -> compute_v1.Instance:
    """
    Create a new VM instance with Debian 10 operating system and SSD local disk.

    Args:
        project_id: project ID or project number of the Cloud project you want to use.
        zone: name of the zone to create the instance in. For example: "us-west3-b"
        instance_name: name of the new virtual machine (VM) instance.

    Returns:
        Instance object.
    """
    newest_debian = get_image_from_family(project="debian-cloud", family="debian-12")
    disk_type = f"zones/{zone}/diskTypes/pd-standard"
    disks = [
        disk_from_image(disk_type, 10, True, newest_debian.self_link, True),
        local_ssd_disk(zone),
    ]
    instance = create_instance(project_id, zone, instance_name, disks)
    return instance

REST

使用 instances.insert method,從映像檔系列或特定版本的作業系統映像檔建立運算執行個體。

  • 如要為 Z4D、Z3、A4X Max、A4X、A4、A3 和 A2 Ultra 機器系列建立附加本機 SSD 磁碟的運算執行個體,請建立使用該系列任何可用機型的執行個體。
  • 如要為 H4D、C4、C4A、C4D、C4N、C3 和 C3D 機器系列建立附加本機 SSD 磁碟的運算執行個體,請指定以 -lssd 結尾的執行個體類型。

    以下範例要求酬載會建立 C3 執行個體,並搭配 Ubuntu 開機磁碟和兩個本機 SSD 磁碟:

    {
     "machineType":"zones/us-central1-c/machineTypes/c3-standard-8-lssd",
     "name":"c3-with-local-ssd",
     "disks":[
        {
           "type":"PERSISTENT",
           "initializeParams":{
              "sourceImage":"projects/ubuntu-os-cloud/global/images/family/ubuntu-2204-lts"
           },
           "boot":true
        }
     ],
     "networkInterfaces":[
        {
           "network":"global/networks/default"
    }
     ]
    }
    
  • 如果是 G4、M3,以及第 1 代和第 2 代機器系列,如要建立附加本機 SSD 磁碟的運算執行個體,可以在建立執行個體時使用 initializeParams 屬性新增本機 SSD 磁碟。此外,您也必須提供下列屬性:

    • diskType:設為本機 SSD
    • autoDelete:設定為 true。
    • type:設為 SCRATCH。

    下列屬性無法與本機 SSD 磁碟搭配使用:

    • diskName
    • sourceImage 屬性
    • diskSizeGb

    以下是要求酬載範例,可建立具有開機磁碟和四個本機 SSD 磁碟的 M3 執行個體:

    {
     "machineType":"zones/us-central1-f/machineTypes/m3-ultramem-64",
     "name":"local-ssd-instance",
     "disks":[
        {
         "type":"PERSISTENT",
         "initializeParams":{
            "sourceImage":"projects/ubuntu-os-cloud/global/images/family/ubuntu-2204-lts"
         },
         "boot":true
        },
        {
           "type":"SCRATCH",
           "initializeParams":{
              "diskType":"zones/us-central1-f/diskTypes/local-ssd"
           },
           "autoDelete":true,
           "interface": "NVME"
        },
        {
           "type":"SCRATCH",
           "initializeParams":{
              "diskType":"zones/us-central1-f/diskTypes/local-ssd"
           },
           "autoDelete":true,
           "interface": "NVME"
        },
        {
           "type":"SCRATCH",
           "initializeParams":{
              "diskType":"zones/us-central1-f/diskTypes/local-ssd"
           },
           "autoDelete":true,
           "interface": "NVME"
        },
        {
           "type":"SCRATCH",
           "initializeParams":{
              "diskType":"zones/us-central1-f/diskTypes/local-ssd"
           },
           "autoDelete":true,
           "interface": "NVME"
        },
     ],
     "networkInterfaces":[
        {
           "network":"global/networks/default"
        }
     ]
    }
    

建立本機 SSD 磁碟後,您必須先格式化並掛接每個裝置,才能使用。

如要進一步瞭解如何使用 REST 建立執行個體,請參閱 Compute Engine API。

格式化及掛接本機 SSD 磁碟

您可以個別格式化及掛接每個本機 SSD 磁碟,也可以將多個本機 SSD 磁碟合併為單一邏輯磁碟區。

格式化及掛接個別本機 SSD 磁碟

如要將本機 SSD 磁碟連接至運算執行個體,最簡單的方法是格式化每個裝置並掛接單一磁碟分割區。或者,您也可以將多個分區合併為單一邏輯磁碟區。

Linux 執行個體

在 Linux 執行個體上格式化及掛接新的本機 SSD 磁碟。您可以使用任何所需的分區格式和設定。這個範例會建立單一 ext4 分區。

  1. 前往「VM instances」(VM 執行個體) 頁面。

    前往 VM 執行個體

  2. 找到已連接新本機 SSD 的運算執行個體,點選旁邊的「SSH」SSH按鈕。瀏覽器會開啟執行個體的終端機連線。

  3. 在終端機中,使用 find 指令找出要掛接的本機 SSD 磁碟。

    $ find /dev/ | grep google-local-nvme-ssd
    

    SCSI 模式下的本機 SSD 磁碟具有標準名稱,例如 google-local-ssd-0。NVMe 模式的本機 SSD 磁碟名稱類似 google-local-nvme-ssd-0,如以下輸出內容所示:

     $ find /dev/ | grep google-local-nvme-ssd
    
     /dev/disk/by-id/google-local-nvme-ssd-0
    
  4. 使用 ext4 檔案系統格式化本機 SSD 磁碟。這個指令會刪除本機 SSD 磁碟中的所有現有資料。

    $ sudo mkfs.ext4 -F /dev/disk/by-id/[SSD_NAME]
    

    將 [SSD_NAME] 替換為要格式化的本機 SSD 磁碟 ID。例如,指定 google-local-nvme-ssd-0 即可格式化執行個體上的第一個 NVMe 本機 SSD 磁碟。

  5. 使用 mkdir 指令建立目錄,您可在其中掛接裝置。

    $ sudo mkdir -p /mnt/disks/[MNT_DIR]
    

    將 [MNT_DIR] 替換為要掛接本機 SSD 磁碟的目錄路徑。

  6. 將本機 SSD 磁碟掛接到運算執行個體。

    $ sudo mount /dev/disk/by-id/[SSD_NAME] /mnt/disks/[MNT_DIR]
    

    更改下列內容:

    • [SSD_NAME]:要掛接的本機 SSD 磁碟 ID。
    • [MNT_DIR]:要掛接本機 SSD 磁碟的目錄。
  7. 設定對裝置的讀取與寫入存取權。在此範例中,授予所有使用者對裝置的寫入存取權。

    $ sudo chmod a+w /mnt/disks/[MNT_DIR]
    

    將 [MNT_DIR] 替換為掛接本機 SSD 磁碟的目錄。

您也可以選擇將本機 SSD 磁碟新增至 /etc/fstab 檔案,這樣執行個體重新啟動時,裝置就會自動重新掛接。如果執行個體停止運作,這個項目不會保留本機 SSD 磁碟上的資料。詳情請參閱「本機 SSD 資料持續性」。

指定項目 /etc/fstab 檔案時,請務必加入 nofail 選項,讓執行個體即使在無本機 SSD 時仍可繼續啟動。舉例來說,如果您為開機磁碟建立快照,並建立未附加任何本機固態硬碟磁碟的新執行個體,執行個體可以繼續啟動程序,不會無限期暫停。

  1. 建立 /etc/fstab 項目。請使用 blkid 指令在裝置上尋找檔案系統的 UUID,並透過掛接選項編輯 /etc/fstab 檔案,以加入該 UUID。只要一個指令,就能完成這個步驟。

    舉例來說,如果是 NVMe 模式的本機 SSD,請使用下列指令:

    $ echo UUID=`sudo blkid -s UUID -o value /dev/disk/by-id/google-local-nvme-ssd-0` /mnt/disks/[MNT_DIR] ext4 discard,defaults,nofail 0 2 | sudo tee -a /etc/fstab
    

    如果本機 SSD 採用非 NVMe 模式 (例如 SCSI),請使用下列指令:

    $ echo UUID=`sudo blkid -s UUID -o value /dev/disk/by-id/google-local-ssd-0` /mnt/disks/[MNT_DIR] ext4 discard,defaults,nofail 0 2 | sudo tee -a /etc/fstab
    

    將 [MNT_DIR] 替換為掛接本機 SSD 的目錄。

  2. 使用 cat 指令驗證 /etc/fstab 項目是否正確:

    $ cat /etc/fstab
    

如果您從這個執行個體的開機磁碟建立快照,並用來建立沒有本機 SSD 磁碟的獨立執行個體,請編輯 /etc/fstab 檔案,然後移除這個本機 SSD 磁碟的項目。即使已設定 nofail 選項,仍請將 /etc/fstab 檔案與附加至執行個體的分區保持同步,並在建立開機磁碟快照前移除這些項目。

Windows 執行個體

在 Windows 執行個體上,使用 Windows 磁碟管理工具格式化及掛接本機 SSD 磁碟。

  1. 透過遠端桌面協定連線至執行個體。在本範例中,請前往「VM instances」(VM 執行個體) 頁面,然後按一下已連接本機 SSD 磁碟的執行個體旁的「RDP」RDP按鈕。輸入使用者名稱和密碼後,會開啟一個伺服器桌面介面視窗。

  2. 在 Windows [Start] (開始) 按鈕上按一下滑鼠右鍵,然後選取 [Disk Management] (磁碟管理)。

    在 Windows「開始」按鈕的右鍵選單中選取 Windows 磁碟管理工具。

  3. 如果先前未初始化本機固態硬碟,工具會提示您為新磁碟區選取磁碟區配置架構。請選取 [GPT],然後按一下 [OK] (確定)。

    在磁碟初始化視窗中,選取磁碟分區配置。

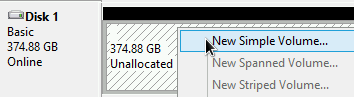
  4. 本機 SSD 磁碟初始化後,在未分配的磁碟空間上按一下滑鼠右鍵,然後選取「New Simple Volume」(新增簡單磁碟區)。

    以已連接的磁碟建立新簡單磁碟區。

  5. 請按照「New Simple Volume Wizard」(新增簡單磁碟區精靈) 中的操作說明,設定新的磁碟區。您可以使用任何想要的磁碟分區格式,但在此範例中請選取 NTFS。此外,請選取「Perform a quick format」,加快格式化程序。

    在「New Simple Volume Wizard」(新增簡單磁碟區精靈) 中,選取磁碟分區格式類型。

  6. 完成精靈設定且磁碟區格式化完畢後,請檢查新的本機 SSD 磁碟,確認狀態為 Healthy。

    查看 Windows 辨識的磁碟清單,確認本機 SSD 的狀態為「良好」。

大功告成!現在可以將檔案寫入本機 SSD 磁碟。

格式化多個本機 SSD 磁碟,並掛接至單一邏輯磁碟區

與 Google Cloud Hyperdisk 和 Persistent Disk 磁碟區不同,本機 SSD 磁碟容量固定,您可將其連結至執行個體。如要將多個本機 SSD 磁碟合併為單一邏輯磁碟區,您必須自行定義這些分區的磁碟區管理。

Linux 執行個體

使請用 mdadm 建立 RAID 0 陣列。本範例會透過單一 ext4 檔案系統將陣列格式化,但您可套用任何偏好的檔案系統。

  1. 前往「VM instances」(VM 執行個體) 頁面。

    前往 VM 執行個體

  2. 找到已連接新本機 SSD 磁碟的執行個體,然後點選旁邊的「SSH」SSH按鈕。瀏覽器會開啟對於執行個體的終端機連線。

  3. 在終端機中,安裝 mdadm 工具。這個 mdadm 安裝程序包含會停止指令碼的使用者提示,因此請手動執行這個程序。

    Debian 與 Ubuntu:

    $ sudo apt update && sudo apt install mdadm --no-install-recommends
    

    CentOS 與 RHEL:

    $ sudo yum install mdadm -y
    

    SLES 與 openSUSE:

    $ sudo zypper install -y mdadm
    

  4. 使用 find 指令,找出要一併掛接的所有本機 SSD 磁碟。

    在本例中,執行個體有八個 NVMe 模式的本機 SSD 分區:

    $  find /dev/ | grep google-local-nvme-ssd
    
     /dev/disk/by-id/google-local-nvme-ssd-7
     /dev/disk/by-id/google-local-nvme-ssd-6
     /dev/disk/by-id/google-local-nvme-ssd-5
     /dev/disk/by-id/google-local-nvme-ssd-4
     /dev/disk/by-id/google-local-nvme-ssd-3
     /dev/disk/by-id/google-local-nvme-ssd-2
     /dev/disk/by-id/google-local-nvme-ssd-1
     /dev/disk/by-id/google-local-nvme-ssd-0
    

    find 不保證排序。只要輸出行數與預期的 SSD 磁碟數量相符,裝置的列出順序不同也沒關係。SCSI 模式的本機 SSD 磁碟具有標準名稱,例如 google-local-ssd。NVMe 模式下的本機 SSD 磁碟名稱類似 google-local-nvme-ssd。

  5. 使用 mdadm 將多個本機 SSD 磁碟合併為名為 /dev/md0 的單一陣列。這個範例會以 NVMe 模式合併八個本機 SSD 磁碟。如果是 SCSI 模式的本機 SSD 磁碟,請指定從 find 指令取得的名稱:

    $ sudo mdadm --create /dev/md0 --level=0 --raid-devices=8 \
     /dev/disk/by-id/google-local-nvme-ssd-0 \
     /dev/disk/by-id/google-local-nvme-ssd-1 \
     /dev/disk/by-id/google-local-nvme-ssd-2 \
     /dev/disk/by-id/google-local-nvme-ssd-3 \
     /dev/disk/by-id/google-local-nvme-ssd-4 \
     /dev/disk/by-id/google-local-nvme-ssd-5 \
     /dev/disk/by-id/google-local-nvme-ssd-6 \
     /dev/disk/by-id/google-local-nvme-ssd-7
    
    mdadm: Defaulting to version 1.2 metadata
    mdadm: array /dev/md0 started.


    您可以使用 mdadm --detail 確認陣列的詳細資料。新增 --prefer=by-id 旗標後,系統會使用 /dev/disk/by-id 路徑列出裝置。

     sudo mdadm --detail --prefer=by-id /dev/md0
     

    陣列中每個裝置的輸出內容應與下方類似。

     ...
     Number   Major   Minor   RaidDevice State
        0      259      0         0      active sync   /dev/disk/by-id/google-local-nvme-ssd-0
     ...
     

  6. 將整個 /dev/md0 陣列格式化為 ext4 檔案系統。

    $ sudo mkfs.ext4 -F /dev/md0
    
  7. 請建立可掛接 /dev/md0 的目錄。在此範例中,會建立 /mnt/disks/ssd-array 目錄:

    $ sudo mkdir -p /mnt/disks/[MNT_DIR]
    

    將 [MNT_DIR] 替換為要掛接本機 SSD 陣列的目錄。

  8. 將 /dev/md0 陣列掛接到 /mnt/disks/ssd-array 目錄:

    $ sudo mount /dev/md0 /mnt/disks/[MNT_DIR]
    

    將 [MNT_DIR] 替換為要掛接本機 SSD 陣列的目錄。

  9. 設定對裝置的讀取與寫入存取權。在此範例中,授予所有使用者對裝置的寫入存取權。

    $ sudo chmod a+w /mnt/disks/[MNT_DIR]
    

    將 [MNT_DIR] 替換為掛接本機 SSD 陣列的目錄。

您也可以選擇將本機 SSD 磁碟新增至 /etc/fstab 檔案,這樣執行個體重新啟動時,裝置就會自動重新掛接。如果執行個體停止運作,這個項目不會保留本機 SSD 磁碟上的資料。詳情請參閱「本機 SSD 資料持續性」。

指定項目 /etc/fstab 檔案時,請務必加入 nofail 選項,這樣即使本機 SSD 磁碟不存在,執行個體也能繼續啟動。舉例來說,如果您為開機磁碟建立快照,並建立未附加任何本機固態硬碟的新執行個體,執行個體可以繼續啟動程序,不會無限期暫停。

  1. 建立 /etc/fstab 項目。請使用 blkid 指令在裝置上尋找檔案系統的 UUID,並透過掛接選項編輯 /etc/fstab 檔案,以加入該 UUID。指定 nofail 選項,即使本機 SSD 磁碟無法使用,系統也能啟動。您可以使用單一指令完成這個步驟。例如:

    $ echo UUID=`sudo blkid -s UUID -o value /dev/md0` /mnt/disks/[MNT_DIR] ext4 discard,defaults,nofail 0 2 | sudo tee -a /etc/fstab
    

    將 [MNT_DIR] 替換為掛接本機 SSD 陣列的目錄。

  2. 如果您在 /etc/fstab 檔案中使用 /dev/md0 等裝置名稱,而非 UUID,則需要編輯 /etc/mdadm/mdadm.conf 檔案,確保陣列在啟動時自動重新組合。如要這樣做,請完成下列兩個步驟:

    1. 請確認磁碟陣列會在運算執行個體啟動時自動掃描並重新組裝。
      $ sudo mdadm --detail --scan | sudo tee -a /etc/mdadm/mdadm.conf
      
    2. 更新 initramfs,以便在提早啟動程序中使用陣列。
      $ sudo update-initramfs -u
      
  3. 使用 cat 指令驗證 /etc/fstab 項目是否正確:

    $ cat /etc/fstab
    

如果您從這個執行個體的開機磁碟建立快照,並用來建立不含本機 SSD 磁碟的獨立執行個體,請編輯 /etc/fstab 檔案,然後移除這個本機 SSD 磁碟陣列的項目。即使已設定 nofail 選項,仍請將 /etc/fstab 檔案與附加至執行個體的分區保持同步,並在建立開機磁碟快照前移除這些項目。

Windows 執行個體

使用 Windows 磁碟管理工具,在 Windows 執行個體上格式化及掛接本機 SSD 磁碟陣列。

  1. 透過遠端桌面協定連線至執行個體。在本範例中,請前往「VM instances」(VM 執行個體) 頁面,然後按一下已連接本機 SSD 磁碟的執行個體旁的「RDP」RDP按鈕。輸入使用者名稱和密碼後,會開啟一個伺服器桌面介面視窗。

  2. 在 Windows [Start] (開始) 按鈕上按一下滑鼠右鍵,然後選取 [Disk Management] (磁碟管理)。

    在 Windows「開始」按鈕的右鍵選單中選取 Windows 磁碟管理工具。

  3. 如果先前未初始化本機固態硬碟,工具會提示您為新磁碟分割區選取磁碟分割區配置。請選取 [GPT],然後按一下 [OK] (確定)。
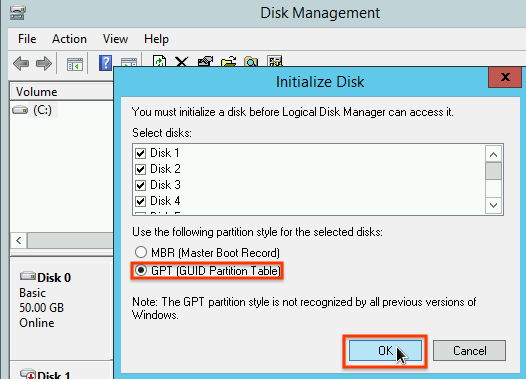
    在磁碟初始化視窗中,選取磁碟分區配置。

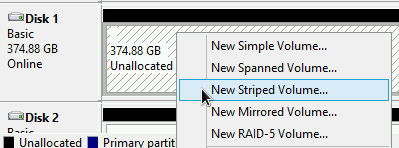
  4. 本機 SSD 磁碟初始化後,請對未分配的磁碟空間按一下滑鼠右鍵,然後選取「新增條紋磁碟區」。

    以已連接的磁碟建立新簡單磁碟區。

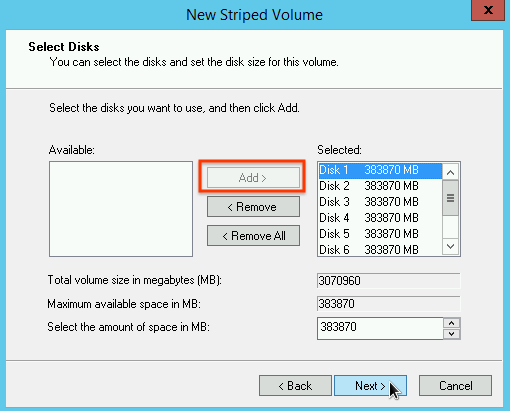
  5. 選取要納入條紋陣列的本機 SSD 磁碟。在本範例中,請選取所有分區,將其合併為單一本機 SSD 磁碟。

    選取要納入陣列的本機 SSD 分區。

  6. 請按照「New Striped Volume Wizard」(新增等量磁碟區精靈) 中的操作說明,設定新磁碟區。您可以使用任何想要的磁碟分區格式,但在此範例中請選取 NTFS。此外,選取「執行快速格式化」可加快格式化程序。

    在「New Striped Volume Wizard」(新增等量磁碟區精靈) 中,選取磁碟分區格式類型。

  7. 完成精靈設定且磁碟區格式化完畢後,請檢查新的本機 SSD 磁碟,確認狀態為 Healthy。

    查看 Windows 辨識的磁碟清單,確認本機 SSD 的狀態為「正常」。

您現在可以將檔案寫入本機 SSD 磁碟。

後續步驟