
プロアクティブ生成ナレッジ アシストは、進行中の会話を追い、検索語句の候補と回答を前もって提案します。プロアクティブな生成ナレッジ アシストは、検索コンテキスト、複数の候補クエリをサポートしており、開始イベントをカスタマイズできます。
検索コンテキスト
プロアクティブ生成ナレッジ アシストは、検索クエリとコンテキストを生成します。会話から Key-Value ペアとして情報を抽出し、検索コンテキストを改善して、検索クエリに対するより適切な回答を提供します。
検索コンテキストを無効にすることもできます。シナリオによっては、検索コンテキストの使用をオプトアウトして、クエリ自体のみを使用できます。これは disable_query_search_context フィールドで制御します。このフィールドが true に設定されている場合、プロアクティブな生成型ナレッジ アシストは検索コンテキストを生成しますが、ナレッジベースに送信される検索クエリには追加しません。
複数の推奨クエリ
プロアクティブ生成ナレッジ アシストは、会話で取り上げられたさまざまなトピックについて、複数の関連性の高いクエリを生成できます。プライマリ クエリを使用してナレッジの自動検索を行い、必要に応じてエージェントが使用できる追加のクエリをレスポンスで提供します。
イベントの開始をカスタマイズする
デフォルトでは、CUSTOMER_MESSAGE を押すと、プロアクティブ生成ナレッジ アシストから候補が表示されます。新しい Proactive 生成ナレッジ アシストの候補を生成するイベントを定義するには、suggestion_trigger_event フィールドで次のいずれかの値オプションを選択します。
CUSTOMER_MESSAGE: エンドユーザーから受信したデフォルトのメッセージをそのまま使用します。AGENT_MESSAGE: 人間のエージェントによってメッセージが送信されます。END_OF_UTTERANCE: プロアクティブ生成ナレッジ アシストがユーザーの発話の終了を検出します。
プロアクティブ生成ナレッジ アシストを実装する
プロアクティブ生成ナレッジ アシストの使用を開始する手順は次のとおりです。
ステップ 1: 会話プロファイルを作成する
Agent Assist コンソールまたは API を使用して会話プロファイルを作成します。Agent Assist コンソールを使用して会話プロファイルを作成することをおすすめします。
コンソール
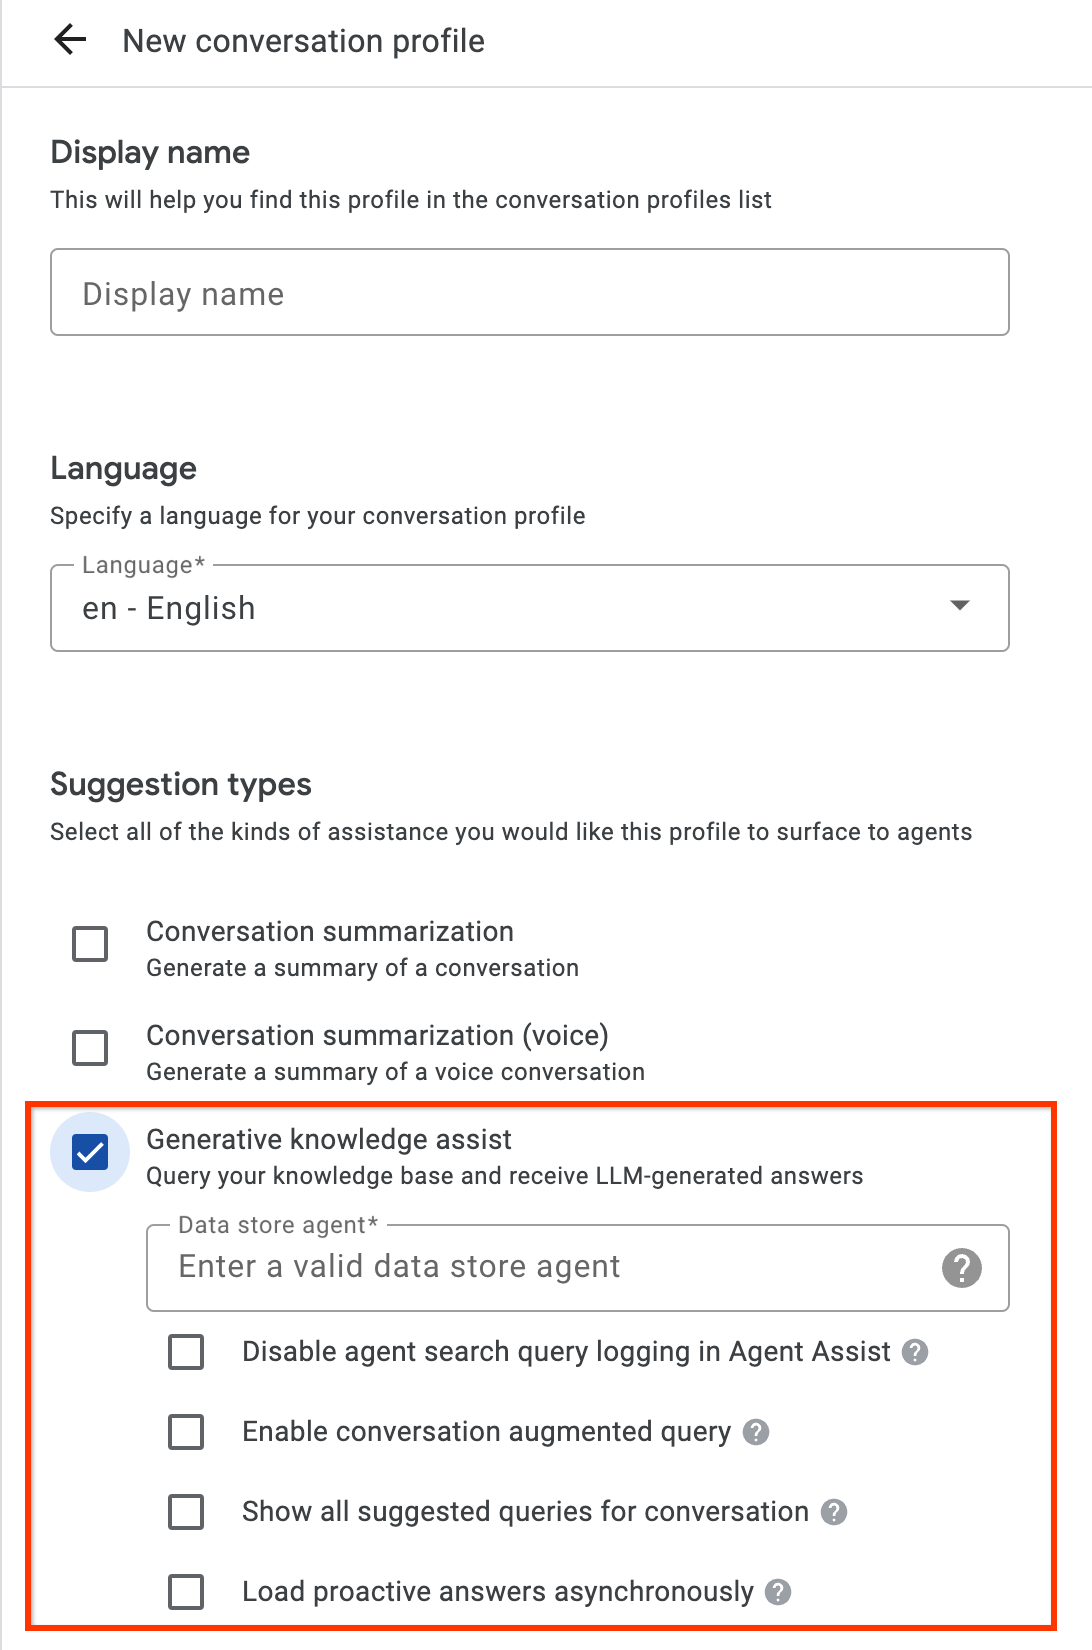
- [生成ナレッジ アシスト] の提案タイプを有効にして、前の手順のフローベースのデータストア エージェントまたはハンドブックベースのデータストア エージェントにリンクします。これにより、フローベースのデータストア エージェントまたはハンドブックベースのデータストア エージェントが、人間のエージェントからの質問と回答の提案をプロアクティブに提供し、手動検索クエリに回答できるようになります。
- 省略可: [会話のすべての候補クエリを表示] チェックボックスをオンにすると、ナレッジ ドキュメントから回答が見つからなかった場合でも、フローベースのデータストア エージェントまたはプレイブックベースのデータストア エージェントがこれらのクエリをすべて表示します。これは、進行中の会話から取得できるクエリをテストするためのものです。
- 省略可: [事前対応の回答を非同期で読み込む] チェックボックスをオンにすると、クエリ候補のみを取得できます。提案されたクエリは、SearchKnowledge API に手動で送信できます。また、Agent Assist コンソールのシミュレータと UI モジュールで自動的に送信することもできます。
API
次の手順では、HumanAgentAssistantConfig オブジェクトを使用して ConversationProfile を作成します。これらの操作は、Agent Assist コンソールを使用して行うこともできます。
会話プロファイルを作成するには、ConversationProfile リソースの create メソッドを呼び出し、`baseline_model_version` を更新します。
リクエストのデータを使用する前に、次のように置き換えます。- PROJECT_ID: プロジェクト ID
- LOCATION_ID: ロケーションの ID
- AGENT_ID: 前のステップのフローベースのデータストア エージェントまたはプレイブック ベースのデータストア エージェントの ID
 {
  "name": "projects/PROJECT_ID/locations/LOCATION/conversationProfiles/PROFILE_ID",
  "human_agent_assistant_config": {
    "human_agent_suggestion_config": {
      "feature_configs": [
        {
          "suggestion_feature": {
            "type": "KNOWLEDGE_ASSIST"
          },
          "query_config": {
            "dialogflow_query_source": {
              "agent": "projects/PROJECT_ID/locations/LOCATION/agents/AGENT_ID"
            }
          },
          "conversation_model_config": {
            "baseline_model_version": "2.0"
          }
        "disable_query_search_context": false,
    "enableQuerySuggestionWhenNoAnswer": false,
    "suggestion_trigger_event": "END_OF_UTTERANCE",
        }
      ]
    }
  }
}
ステップ 2: ランタイムに会話を処理する
プロアクティブな生成ナレッジ アシストは、会話をランタイムで処理し、現在の会話のコンテキストと回答に基づいて検索語句をプロアクティブに提案します。
会話を作成する
まず、会話を作成する必要があります。
REST
会話を作成するには、Conversation リソースの create メソッドを呼び出します。
リクエストのデータを使用する前に、次のように置き換えます。
- PROJECT_ID: 実際の Cloud プロジェクトの ID
- LOCATION_ID: 地域 ID
- CONVERSATION_PROFILE_ID: 会話プロファイルの作成時に受け取った ID
HTTP メソッドと URL:
POST https://dialogflow.googleapis.com/v2/projects/PROJECT_ID/locations/LOCATION_ID/conversations
リクエストの本文(JSON):
{
  "conversationProfile": "projects/PROJECT_ID/locations/LOCATION_ID/conversationProfiles/CONVERSATION_PROFILE_ID",
}
リクエストを送信するには、次のいずれかのオプションを展開します。
次のような JSON レスポンスが返されます。
{
  "name": "projects/PROJECT_ID/locations/LOCATION_ID/conversations/CONVERSATION_ID",
  "lifecycleState": "IN_PROGRESS",
  "conversationProfile": "projects/PROJECT_ID/locations/LOCATION_ID/conversationProfiles/CONVERSATION_PROFILE_ID",
  "startTime": "2018-11-05T21:05:45.622Z"
}
conversations の後のパスセグメントには、新しい会話 ID が含まれます。
Python
詳細については、Agent Search Python API リファレンス ドキュメントをご覧ください。
Agent Search に対する認証を行うには、アプリケーションのデフォルト認証情報を設定します。詳細については、ローカル開発環境の認証の設定をご覧ください。
ユーザー参加者を作成する
候補を表示するには、ユーザーとエージェントの参加者を会話に追加します。まず、ユーザーを会話の参加者に追加します。
REST
ユーザー参加者を作成するには、Participant リソースの create メソッドを呼び出します。
リクエストのデータを使用する前に、次のように置き換えます。
- PROJECT_ID: 実際の Cloud プロジェクトの ID
- LOCATION_ID: 地域 ID
- CONVERSATION_ID: 会話 ID
HTTP メソッドと URL:
POST https://dialogflow.googleapis.com/v2/projects/PROJECT_ID/locations/LOCATION_ID/conversations/CONVERSATION_ID/participants
リクエストの本文(JSON):
{
  "role": "END_USER",
}
リクエストを送信するには、次のいずれかのオプションを展開します。
次のような JSON レスポンスが返されます。
{
  "name": "projects/PROJECT_ID/locations/LOCATION_ID/conversations/CONVERSATION_ID/participants/PARTICIPANT_ID",
  "role": "END_USER"
}
participants の後のパスセグメントには、新しいユーザー参加者 ID が含まれます。
Python
詳細については、Agent Search Python API リファレンス ドキュメントをご覧ください。
Agent Search に対する認証を行うには、アプリケーションのデフォルト認証情報を設定します。詳細については、ローカル開発環境の認証の設定をご覧ください。
エージェント参加者を作成する
エージェントの参加者を会話に追加します。
REST
エージェントの参加者を作成するには、Participant リソースの create メソッドを呼び出します。
リクエストのデータを使用する前に、次のように置き換えます。
- PROJECT_ID: 実際の Cloud プロジェクトの ID
- LOCATION_ID: 地域 ID
- CONVERSATION_ID: 会話 ID
HTTP メソッドと URL:
POST https://dialogflow.googleapis.com/v2/projects/PROJECT_ID/locations/LOCATION_ID/conversations/CONVERSATION_ID/participants
リクエストの本文(JSON):
{
  "role": "HUMAN_AGENT",
}
リクエストを送信するには、次のいずれかのオプションを展開します。
次のような JSON レスポンスが返されます。
{
  "name": "projects/PROJECT_ID/locations/LOCATION_ID/conversations/CONVERSATION_ID/participants/PARTICIPANT_ID",
  "role": "HUMAN_AGENT"
}
participants の後のパスセグメントには、新しい人間のエージェントの参加者 ID が含まれます。
Python
詳細については、Agent Search Python API リファレンス ドキュメントをご覧ください。
Agent Search に対する認証を行うには、アプリケーションのデフォルト認証情報を設定します。詳細については、ローカル開発環境の認証の設定をご覧ください。
エージェントからのメッセージを追加して分析する
いずれかの参加者が会話でメッセージを入力するたびに、API にメッセージを送信して処理する必要があります。データストア エージェントは、人間のエージェントとユーザーのメッセージの分析に基づいて提案を行います。以下の例では、人間のエージェントが「ご用件はなんでしょうか?」という質問をして会話を開始します。
レスポンスでは候補がまだ返されていません。
REST
会話に人間のエージェントのメッセージを追加して分析するには、Participant リソースの analyzeContent メソッドを呼び出します。
リクエストのデータを使用する前に、次のように置き換えます。
- PROJECT_ID: プロジェクト ID
- CONVERSATION_ID: 会話 ID
- PARTICIPANT_ID: 人間のエージェントの参加者 ID
HTTP メソッドと URL:
POST https://dialogflow.googleapis.com/v2/projects/PROJECT_ID/conversations/CONVERSATION_ID/participants/PARTICIPANT_ID:analyzeContent
リクエストの本文(JSON):
{
  "textInput": {
    "text": "How may I help you?",
    "languageCode": "en-US"
  }
}
リクエストを送信するには、次のいずれかのオプションを展開します。
次のような JSON レスポンスが返されます。
{
  "message": {
    "name": "projects/PROJECT_ID/conversations/CONVERSATION_ID/messages/MESSAGE_ID",
    "content": "How may I help you?",
    "languageCode": "en-US",
    "participant": "PARTICIPANT_ID",
    "participantRole": "HUMAN_AGENT",
    "createTime": "2020-02-13T00:01:30.683Z"
  }
}
Python
詳細については、Agent Search Python API リファレンス ドキュメントをご覧ください。
Agent Search に対する認証を行うには、アプリケーションのデフォルト認証情報を設定します。詳細については、ローカル開発環境の認証の設定をご覧ください。
提案のためにユーザーからのメッセージを追加する
エージェントに対して、お客様は「返品の払い戻しはいつになりますか?」と質問します。今回は、API レスポンスに、ナレッジ ドキュメントに基づく提案されたクエリと生成 AI の回答が含まれています。
REST
会話のユーザー メッセージを追加して分析するには、Participant リソースの analyzeContent メソッドを呼び出します。
リクエストのデータを使用する前に、次のように置き換えます。
- PROJECT_ID: プロジェクト ID
- CONVERSATION_ID: 会話 ID
- PARTICIPANT_ID: エンドユーザーの参加者 ID
HTTP メソッドと URL:
POST https://dialogflow.googleapis.com/v2/projects/PROJECT_ID/conversations/CONVERSATION_ID/participants/PARTICIPANT_ID:analyzeContent
リクエストの本文(JSON):
{
  "textInput": {
    "text": "When can I get my return refund?",
    "languageCode": "en-US"
  }
}
リクエストを送信するには、次のいずれかのオプションを展開します。
次のような JSON レスポンスが返されます。
{
  "message": {
    "name": "projects/PROJECT_ID/conversations/CONVERSATION_ID/messages/MESSAGE_ID",
    "content": "When can I get my return refund?",
    "languageCode": "en-US",
    "participant": "PARTICIPANT_ID",
    "participantRole": "END_USER",
    "createTime": "2020-02-13T00:07:35.925Z"
  },
  "humanAgentSuggestionResults": [
    {
      "suggestKnowledgeAssistResponse": {
        "knowledgeAssistAnswer": {
          "suggestedQuery": {
            "queryText": "Refund processing time"
          },
          "suggestedQueryAnswer": {
            "answerText": "After your return is processed, you receive your refund in 7 days. The refund amount should be for the full value of the items returned, but doesn't include shipping & service fees.",
            "generativeSource": {
              "snippets": [
                {
                  "title": "Returns & refunds - Help",
                  "uri": "https://example.com/",
                  "text": "When the package with your return arrives at the seller's return center, it may take up to 7 additional business days to process. Check the status of your refund with the return tracking number found on your orders page."
                }
              ]
            },
          },
          "answerRecord": "projects/PROJECT_ID/answerRecords/ANSWER_RECORD_ID"
        },
      }
    }
  ]
}
Python
詳細については、Agent Search Python API リファレンス ドキュメントをご覧ください。
Agent Search に対する認証を行うには、アプリケーションのデフォルト認証情報を設定します。詳細については、ローカル開発環境の認証の設定をご覧ください。
会話を完了する
会話が終わったら、API を使用して会話を完了します。
REST
会話を完了するには、conversations リソースの complete メソッドを呼び出します。
リクエストのデータを使用する前に、次のように置き換えます。
- PROJECT_ID: GCP プロジェクト ID
- CONVERSATION_ID: 会話の作成時に受け取った ID
HTTP メソッドと URL:
POST https://dialogflow.googleapis.com/v2/projects/PROJECT_ID/conversations/CONVERSATION_ID:complete
リクエストを送信するには、次のいずれかのオプションを展開します。
次のような JSON レスポンスが返されます。
{
  "name": "projects/PROJECT_ID/conversations/CONVERSATION_ID",
  "lifecycleState": "COMPLETED",
  "conversationProfile": "projects/PROJECT_ID/conversationProfiles/CONVERSATION_PROFILE_ID",
  "startTime": "2018-11-05T21:05:45.622Z",
  "endTime": "2018-11-06T03:50:26.930Z"
}
Python
詳細については、Agent Search Python API リファレンス ドキュメントをご覧ください。
Agent Search に対する認証を行うには、アプリケーションのデフォルト認証情報を設定します。詳細については、ローカル開発環境の認証の設定をご覧ください。
シミュレータ
フローベースのデータストア エージェントまたはプレイブック ベースのデータストア エージェントは、Agent Assist シミュレータでテストできます。

上記の例では、フローベースのデータストア エージェントが次の提案を行っています。
- 提案されたクエリ: Refund processing time(払い戻しの処理時間)。
- 生成 AI が生成した回答: 返品手続きが完了すると、7 日以内に払い戻しが行われます。払い戻し額は、返品された商品の全額となりますが、送料とサービス料は含まれません。
- 関連するナレッジ ドキュメントのタイトル: 返品と払い戻し - ヘルプ。
ステップ 3: Pub/Sub 候補の通知
候補の通知を受け取るには、会話プロファイルの作成時に notificationConfig フィールドを設定します。このオプションでは、Pub/Sub を使用し、会話が進行して新しい候補が利用可能になったときに、候補の通知をアプリケーションに送信します。
AnalyzeContent API を介して統合している場合は、ConversationProfile で disable_high_latency_features_sync_delivery 構成を有効にして、AnalyzeContent API がプロアクティブな生成ナレッジ アシストの候補を待たずに応答し、Pub/Sub を介して候補を配信するようにできます。
この構成は、Agent Assist コンソールから有効にすることもできます。

Customer Experience Insights を通じてデータにアクセスする
また、プロアクティブ生成ナレッジ アシストで生成されたクエリと回答は、カスタマー エクスペリエンス分析情報に自動的に入力されます。このデータにアクセスするには、Dialogflow ランタイムの統合を有効にするの手順に沿って操作します。
フィードバックを送信
フィードバックを送信する手順については、Agent Assist にフィードバックを送信するをご覧ください。
エージェントの質問に答える
以下は、エージェントの質問への回答に関するフィードバックを送信するための JSON リクエストの例です。
{
 "name": "projects/PROJECT_ID/locations/LOCATION_ID/answerRecords/ANSWER_RECORD_ID",
 "answerFeedback": {
   "displayed": true
   "clicked": true
   "correctnessLevel": "FULLY_CORRECT"
   "agentAssistantDetailFeedback": {
     "knowledgeSearchFeedback": {
       "answerCopied": true
       "clickedUris": [
         "url_1",
         "url_2",
         "url_3",
       ]
     }
   }
 }
}
Q&A をプロアクティブに提案する
以下は、プロアクティブな提案に関するフィードバックを送信するための JSON リクエストの例です。
{
 "name": "projects/PROJECT_ID/locations/LOCATION_ID/answerRecords/ANSWER_RECORD_ID",
 "answerFeedback": {
   "displayed": true
   "clicked": true
   "correctnessLevel": "FULLY_CORRECT"
   "agentAssistantDetailFeedback": {
     "knowledgeAssistFeedback": {
       "answerCopied": true
       "clickedUris": [
         "url_1",
         "url_2",
         "url_3",
       ]
     }
   }
 }
}