
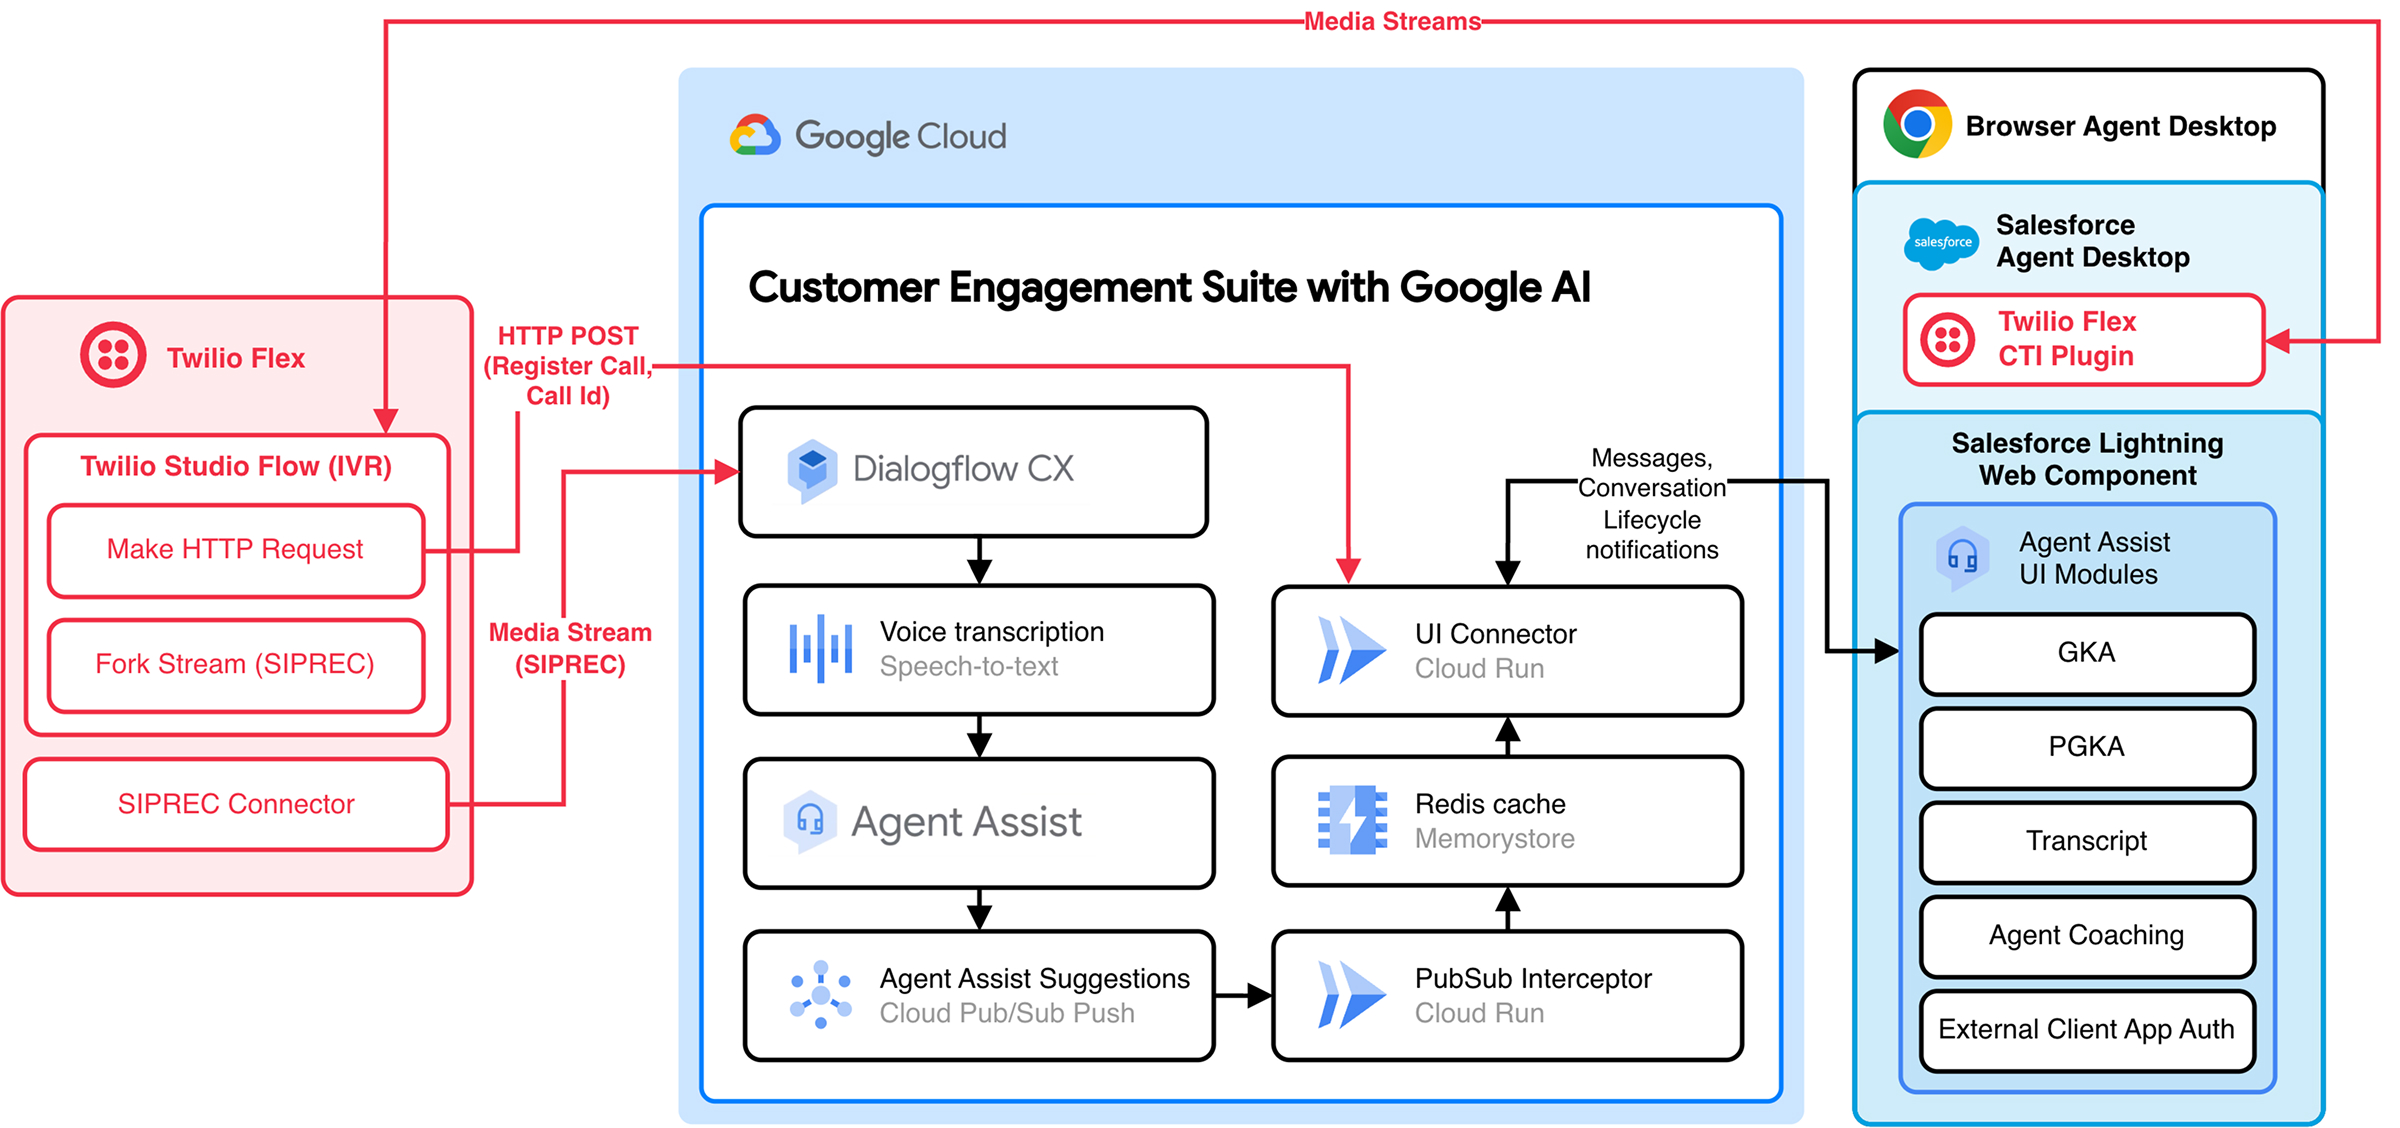
This voice integration uses the Twilio Open CTI integration to bring a Twilio Flex call center into your Salesforce instance.
Agent Assist uses the media stream from the Twilio Flex call to provide suggestions to your agents in the Salesforce Lightning Service Console.
Before you begin
To integrate Agent Assist UI modules with Salesforce, you need access to the following resources:
-
Follow the recommended installation instructions for your operating system.
-
Follow the recommended installation instructions for your operating system.
-
Install the
gcloudcommand as instructed and authenticate usinggcloud auth login. Salesforce
Sign in at your instance URL or the Salesforce sign-in page and note the following:
- Your Salesforce My Domain URL. Follow these steps to find the My
Domain URL:
- Navigate to the menu bar > Setup menu.
- Click Setup.
- In the Quick Find box, enter My Domain. The domain name is
in the following format:
MY-DOMAIN-NAME.develop.my.salesforce.com.
- Your Salesforce organization ID. Follow these steps to find the
organization ID:
- Navigate to the menu bar > Setup menu.
- Click Setup.
- In the Quick Find box, enter Company Information. Note: These integration steps have been tested with Salesforce Developer Edition only. Differences in feature licenses and the Salesforce interface might arise if you use another edition.
- Your Salesforce My Domain URL. Follow these steps to find the My
Domain URL:
Agent Assist integration backend
- Follow the instructions to set up the integration.
- Before running the deploy script, configure the following environment
variables with
deploy.shor in an.envfile at the project root:AUTH_OPTION: Set this toSalesforceLWC.SALESFORCE_DOMAIN: A domain name similar toYOUR_SUBDOMAIN.develop.lightning.force.com. You noted this value in the Salesforce prerequisite. Note that you shouldn't includehttps://.SALESFORCE_ORGANIZATION_ID: You noted this value in the Salesforce prerequisite.APP_AUTH_OPTION: Set this toTwilio.TWILIO_ACCOUNT_SID: Set this to your Twilio Account SID.
Step 1: Set up Twilio Flex
Twilio Flex serves as the softphone in this integration. You can sign in to the Twilio console to set up a Flex account. Visit the Twilio setup page to get detailed instructions on how to create a Flex account.
Install SIPREC connector add-on
The SIPREC connector add-on allows your Twilio Flex account to make SIPREC forks of voice call media streams to Agent Assist. Follow these steps to install the SIPREC connector add-on.
- Navigate to Twilio Home > Marketplace > Catalog > Twilio > Siprec Connector.
- Click Install > the Terms and conditions acknowledgment checkbox > Install.
- On the Configure tab, configure the plugin with the following details:
- Unique Name:
SipRec1 - Session Recording Server:
sip:+<GTP-provisioned-phone-number>@216.239.36.145:5672;transport=tls;secure=true;edge=umatilla
- See the telephony integration documentation for more details on provisioning a GTP number. You can ignore the SBC configuration and validation steps, because they're complete for the Twilio Siprec connector.
- Unique Name:
- Navigate to Twilio Home > Functions and Assets.
- If Functions and Assets is not visible in the sidebar, pin it from Explore Products.
- Click Create Service.
- Name the new service
ui-connector-auth. - In the editor that appears, click Add + > Add Function.
- Name the function
conversation-name. - Click , and change the function visibility to Public.
- Copy and paste the entire contents of
ui-connector-auth.jsfrom the GitHub repository into the editor. - Click Save.
- Click Deploy All.
Configure IVR with Flex Studio
The IVR consists of configuring a programmatic call flow with Twilio Studio to make the SIPREC fork of the media stream to Agent Assist. It also makes an HTTP post to share the phone number and conversation ID with Agent Assist. Follow these steps to configure IVR with Flex Studio.
- Navigate to the Twilio Console.
- Click Develop > Phone Numbers > Manage > Active Numbers. There should be one row in the table with the default Twilio number provisioned for your Flex Account.
- In the Voice - Studio Workflow section, click Voice IVR.
- Drag a Make HTTP Request widget into the flow.
- Disconnect Incoming Call from the SendCallToAgent widget's input.
- Connect Incoming Call to the Make HTTP Request widget's input.
- Configure the Make HTTP Request widget with the following details:
- Widget Name:
register_twilio - Request Method:
POST - Request URL:
<your-ui-connector-cloud-run-url>.run.app/register-app - Content type: Application/JSON
- Request body:
{
"accountSid": "<yourTwilioAccountSid>",
"authToken": "<yourTwilioAccountAuthToken>"
}
- Widget Name:
- Drag a Run Function widget into the flow.
- Connect the Success and Fail outputs of the
register_twiliowidget to the input of the Run Function widget. - Create a widget with the following details:
- Widget Name:
conversation_name - Service:
ui-connector-auth - Environment:
ui - Function:
conversation-name - Function Parameters:
- token:
{{ widgets.register_twilio.parsed.token }} - endpoint:
<your-ui-connector-cloud-run-url>.run.app/conversation-name - phone:
{{ trigger.call.From | replace_first:'+','' }} - conversationName:
projects/<project>/locations/<location>/conversations/TW-{{ trigger.call.From | replace_first:'+','' }}-{{ trigger.call.CallSid }}
- token:
- Widget Name:
- Drag a Fork Stream widget from the sidebar into the flow.
- Connect the Success and Fail outputs of the Make HTTP Request widget to the input of the Fork Stream widget.
- Connect the Next node of the Fork Stream widget to the SendCallToAgent widget.
Configure the Fork Stream widget as follows:
- Stream Action: Start
- Stream Type: Siprec
- Connector Name:
Siprec1 - Tracks: Both Tracks
Stream Parameters:
- Key:
conversation Value:
projects/<gcp-project-id>/conversations/TW-{{trigger.call.From | replace_first:'+','' }}-{{trigger.call.CallSid}}
- Key:
Click Save > Publish.
Account details
Follow this step to collect your Twilio Flex account details. You need this information to configure the Flex CTI in Salesforce later.
- Navigate to Twilio Home >
Account Dashboard, and write down the following
information:
- Account SID
- My Twilio phone number
Step 2: Set up your Salesforce development project
To start integrating Agent Assist UI modules, follow these steps.
Run the following code to clone the Agent Assist integration repository and open your project:
git clone https://github.com/GoogleCloudPlatform/agent-assist-integrations
cd salesforce/aa-lwc
Run the following commands to download the UI modules JavaScript files which you deploy later as Static Resources. Salesforce requires static resources to load third-party JavaScript.
npm run generate-static-resources
npm install
Step 3: Set up your Salesforce environment
You can integrate Agent Assist UI modules in a specific environment, such as production or development. Salesforce calls these environments organizations (orgs).
Configure your org with the Salesforce CLI
Follow these steps to use the Salesforce CLI to configure your org for Agent Assist integration.
- Run the following code and authenticate the CLI using the Salesforce login details you normally use.
npm run login
- Run the following code to deploy the LWC to the org.
npm run deploy
Step 4: Create an external client app
The Salesforce LWC uses the client credentials OAuth 2.0 flow to authenticate you. An external client app enables the client credentials flow. Use the app's consumer key and consumer secret to configure the Salesforce LWC to authenticate users with Salesforce.
- Navigate to the menu bar > Setup menu, then click Setup. In the
Quick Find box, enter External Client App Manager.
- Click External Client App Manager > New External Client App >
Create, then enter the following information.
- External Client App Name:
lwc auth - API Name:
lwc_auth - Contact Email:
your_email@example.com - API (Enable OAuth Settings) > Enable OAuth: Selected
- API (Enable OAuth Settings) > Callback URL:
https://login.salesforce.com/services/oauth2/callback - API (Enable OAuth Settings) > Selected OAuth Scopes: Access the identity URL service
- API (Enable OAuth Settings) > Enable Client Credentials Flow: Selected
- External Client App Name:
- Click Create.
- Click External Client App Manager > New External Client App >
Create, then enter the following information.
- Navigate to the menu bar > Setup menu, then click Setup. In the
Quick Find box, enter External Client App Manager.
- Click your external client app's name > Edit.
- Navigate to OAuth Policies > OAuth Flows and External Client App Enhancements.
- Ensure Enable Client Credentials Flow is selected.
- For Run As, enter your login username.
- Click Save.
- Navigate to the menu bar > Setup menu, then click Setup. In the
Quick Find box, enter External Client App Manager.
- Click your external client app's name > Edit.
- Navigate to OAuth Settings > App Settings > Consumer Key and Secret.
- Enter the verification code sent to your email.
- Copy the consumer key and consumer secret somewhere secure. You will need these for a later step.
Establish CORS and content security policies
- Navigate to the menu bar > Setup menu, then click Setup.
- In the Quick Find box, enter CORS, then click Edit.
- Select Enable CORS for OAuth endpoints.
- Click Save.
- Navigate to the menu bar > Setup menu, then click Setup.
- In the Quick Find box, enter Trusted URLs, then click New Trusted URL.
- Enter the following information:
- API Name:
ui_connector - URL: Enter the URL of the UI Connector Cloud Run Service
endpoint you deployed with your Agent Assist Integration
Backend. You can find this URL in the
Cloud Run console. For example:
https://UI_CONNECTOR_SUBDOMAIN.GCP_REGION.run.app. - CSP Directives: Select all checkboxes.
- Click Save & New.
- API Name:
- Enter the following information:
- API Name:
ui_connector_wss - URL: Enter the URL of the UI connector Cloud Run Service
endpoint you deployed with your Agent Assist Integration
Backend. You can find this URL in the
Cloud Run console. Change the protocol to
wss, for WebSockets traffic. For example:
wss://UI_CONNECTOR_SUBDOMAIN.GCP_REGION.run.app. - CSP Directives: Select all checkboxes.
- Click Save & New.
- API Name:
- Enter the following information:
- API Name:
salesforce_domain - URL: Enter the URL of your Salesforce Domain with the following
format:
https://YOUR_SUBDOMAIN.my.salesforce.com. - CSP Directives: Select all checkboxes.
- Click Save & New.
- API Name:
- Enter the following information:
- API Name:
twilio_flex - URL:
https://flex.twilio.com - CSP Directives: Select all checkboxes.
- Click Save.
- API Name:
Step 5: Install Twilio Flex CTI plugin
Salesforce provides Salesforce Open CTI to allow integration of third-party softphones with your Salesforce instance.
Twilio Flex CTI uses Salesforce Open CTI to allow you to use Flex directly within your Salesforce instance. Follow Twilio's instructions to set up Twilo Flex CTI in your Salesforce instance.
Step 6: Install the Salesforce Lightning Web Component
Follow these steps to use the Lightning Experience Editor to add the Salesforce Lightning Web Component into the contact page where your Twilio Flex CTI opens when a new call comes in.
- Navigate to the Service Console, and select Contacts.
- Select a contact record.
- Click the Setup menu > Edit Page.
- Click Template > Change.
- Select Header and Two Equal Regions.
- Click Next.
- Map each region to a new region.
- Click Done.
- From the Components sidebar, move the
agentAssistContainerModuleinto the sidebar. Note: Thenpm deploycommand provided this component. - Click the component you placed in the previous step and fill in the form
fields as follows to add configuration details.
- endpoint: The URL of your
Agent Integration Backend
UI connector, such as a URL from the
Cloud Run console, like:
https://UI_CONNECTOR_ENDPOINT.GCP_REGION.run.app - channel: Indicate that the integration is for
voice. - platform: Indicate that the platform is
twilio. - conversationProfile: Your
Agent Assist conversation profile
resource name (example:
projects/GCP_PROJECT_ID/locations/GCP_REGION/conversationProfiles/CONVERSATION_PROFILE_ID) - consumerKey: The external client app consumer key from a previous step.
- consumerSecret: The external client app consumer secret a previous step.
- containerHeight: The height of the Agent Assist container.
- endpoint: The URL of your
Agent Integration Backend
UI connector, such as a URL from the
Cloud Run console, like:
Step 7: Test the integration
You can test the voice integration with a test call to the Salesforce call center.
- Sign in to Twilio Flex from your Service Console.
- Call your Twilio Flex number. You made a note of this in Step 1.
- In your Service Console, accept the call. The screen should open a new or existing contact page for the number that called.
- If it is a new contact page, save the contact. When the contact page loads, the Salesforce Lightning Web Component should load in the sidebar.
- Test both sides of the conversation, ensuring that Agent Assist features are working as you've configured them.