
Overview
Security Command Center provides real-time notifications of findings in the Google Cloud console. This guide describes how to use Google Cloud services and third-party APIs to extend that functionality and receive near real-time notifications in Slack. When you complete the guide, you get alerts about new findings in configured third-party services without logging into the Google Cloud console, allowing for faster triaging of vulnerabilities and threats. Learn more about the different types of vulnerabilities and threats in Security Command Center.
Topology
In this guide, you create the configuration that is illustrated in the following diagram.

Objectives
In this guide, you do the following:
- Set up a Pub/Sub topic.
- Set up Slack.
- Write code in Cloud Run functions.
- Configure Pub/Sub and Cloud Run functions to send notifications to Slack whenever a new high or critical severity finding is written to Security Command Center.
- Troubleshoot notification problems.
Costs
This tutorial uses billable components of Google Cloud, including:
- Pub/Sub
- Cloud Run functions
- Cloud Build
Use the pricing calculator to generate a cost estimate based on your projected usage.
Before you begin
To complete this guide, you must have the following Identity and Access Management (IAM) roles:
- Organization Admin (
roles/resourcemanager.organizationAdmin) - Security Center Admin (
roles/securitycenter.admin) - Security Admin (
roles/iam.securityAdmin) - A role with the
serviceusage.services.usepermission, such as Owner (roles/owner), Editor (roles/editor), or a custom role - Create Service Accounts (
roles/iam.serviceAccountCreator) - Pub/Sub Editor (
roles/pubsub.editor) - Billing Account Administrator (
roles/billing.admin)
The IAM roles for Security Command Center can be granted at the organization, folder, or project level. Your ability to view, edit, create, or update findings, assets, and security sources depends on the level that you're granted access for. To learn more about Security Command Center roles, see Access control.
Setting up a project
Complete the following steps to create or select a project.
- Sign in to your Google Cloud account. If you're new to Google Cloud, create an account to evaluate how our products perform in real-world scenarios. New customers also get $300 in free credits to run, test, and deploy workloads.
-
In the Google Cloud console, on the project selector page, select or create a Google Cloud project.
Roles required to select or create a project
- Select a project: Selecting a project doesn't require a specific IAM role—you can select any project that you've been granted a role on.
-
Create a project: To create a project, you need the Project Creator role
(
roles/resourcemanager.projectCreator), which contains theresourcemanager.projects.createpermission. Learn how to grant roles.
-
Verify that billing is enabled for your Google Cloud project.
Enable the Cloud Build API.
Roles required to enable APIs
To enable APIs, you need the
serviceusage.services.enablepermission. If you created the project, then you likely already have this permission through the Owner role (roles/owner). Otherwise, you can get this permission through the Service Usage Admin role (roles/serviceusage.serviceUsageAdmin). Learn how to grant roles.-
Install the Google Cloud CLI.
-
If you're using an external identity provider (IdP), you must first sign in to the gcloud CLI with your federated identity.
-
To initialize the gcloud CLI, run the following command:
gcloud init -
In the Google Cloud console, on the project selector page, select or create a Google Cloud project.
Roles required to select or create a project
- Select a project: Selecting a project doesn't require a specific IAM role—you can select any project that you've been granted a role on.
-
Create a project: To create a project, you need the Project Creator role
(
roles/resourcemanager.projectCreator), which contains theresourcemanager.projects.createpermission. Learn how to grant roles.
-
Verify that billing is enabled for your Google Cloud project.
Enable the Cloud Build API.
Roles required to enable APIs
To enable APIs, you need the
serviceusage.services.enablepermission. If you created the project, then you likely already have this permission through the Owner role (roles/owner). Otherwise, you can get this permission through the Service Usage Admin role (roles/serviceusage.serviceUsageAdmin). Learn how to grant roles.-
Install the Google Cloud CLI.
-
If you're using an external identity provider (IdP), you must first sign in to the gcloud CLI with your federated identity.
-
To initialize the gcloud CLI, run the following command:
gcloud init
Estimated time: it takes approximately one hour to set up and test notifications for a single service.
Setting up a Pub/Sub topic
Pub/Sub is a real-time messaging service that enables messages to be sent and received between independent applications. Learn more about Pub/Sub.
In this section, you configure Security Command Center to publish findings to a Pub/Sub topic.
To set up and subscribe to a Pub/Sub topic:
Specify your Google Cloud project in an environment variable.
export PROJECT_ID=PROJECT_IDReplace PROJECT_ID with your project ID.
Specify your Google Cloud organization in an environment variable.
export ORG_ID=ORG_IDReplace ORG_ID with your organization ID.
Set the project ID for
gcloudcommands.gcloud config set project PROJECT_IDCreate the Pub/Sub topic where notifications are published.
gcloud pubsub topics create scc-critical-and-high-severity-findings-topicSpecify the topic in an environment variable.
export TOPIC=projects/$PROJECT_ID/topics/scc-critical-and-high-severity-findings-topicCreate the subscription that notifies Cloud Run functions to send a chat message when messages are published to the topic.
gcloud pubsub subscriptions create scc-critical-and-high-severity-findings-sub \ --topic scc-critical-and-high-severity-findings-topicConfigure Security Command Center to publish notifications to the topic. Any filter compatible with the ListFindings API can be used.
The following filter publishes notifications for active high and critical severity findings in the
globallocation. Learn more about filtering findings.gcloud scc notifications create scc-critical-high-severity \ --pubsub-topic=$TOPIC \ --organization=$ORG_ID \ --location=global \ --filter '(severity="HIGH" OR severity="CRITICAL") AND state="ACTIVE"'
Next, you create or configure your chat app to receive notifications from Pub/Sub.
Setting up a messaging app
This section describes how to use Pub/Sub and Cloud Run functions or Cloud Run functions (1st gen) to enable near real-time notifications for Slack.
To send notifications to a Slack channel, you do the following:
- Create a new Slack app with sufficient privileges to post messages to a public Slack channel.
- Create and deploy a Cloud Run function that posts chat messages to Slack when notifications are received from Pub/Sub.
Create a new Slack app
In this section, you create a new Slack app to receive notifications.
- Navigate to Slack API apps. The page opens in a new tab.
Sign in or create an account.
Select Create an App.
Set App Name to "SCC Finding Notifier."
Select the Development Slack Workspace where you'd like the Slack Bot to post messages, and then click Create App.
In the navigation panel, select OAuth & Permissions.
Navigate to the Scopes section. Scopes fall into two categories:
- Bot Token Scopes
- User Token Scopes
For this exercise, you don't need to add a User Token Scope. Under Bot Token Scopes, click Add an OAuth Scope and enter:
chat:writechat:write.public
Go to the top of the OAuth & Permissions page and click Install App to Workspace.
In the confirmation dialog, click Allow.
Copy the Bot User OAuth Access Token for use in the Cloud Function.
Next, you deploy a Cloud Run function to send notifications to a Slack group.
Create the Slack Cloud Run function
In this section, you deploy a function to send notifications to your Slack account. The code sample in this section is written in Python, but you can use any language that is supported by Cloud Run functions.
In the Google Cloud console, go to Cloud Run functions Services page.
Select the ID of the project that contains the Pub/Sub topic.
Click Write a function, and fill in the fields:
- For Service name, enter
slack-chat-high-and-critical-findings. - For Region, select the region where you want to store the service.
- For Runtime, select the Python version to use to run your function.
- For Service name, enter
Click Add trigger and select Pub/Sub trigger.
Enter the details of the Pub/Sub topic that you created in Setting up a Pub/Sub topic, and click Save trigger.
Click Create. The service details are displayed.
In the Source pane of the Source tab, click requirements.txt.
In the code editor, add
requestsandfunctions-framework==3.*:requests functions-framework==3.*In the Source pane, click main.py.
In the code editor, replace the code with the following:
import base64
import json
import requests
import functions_framework

TOKEN = "BOT_ACCESS_TOKEN"

@functions_framework.cloud_event
def send_slack_chat_notification(cloud_event):

    pubsub_message = base64.b64decode(cloud_event.data["message"]["data"]).decode('utf-8').strip()
    message_json = json.loads(pubsub_message)

    finding = message_json['finding']

    requests.post("https://slack.com/api/chat.postMessage", data={
        "token": TOKEN,
        "channel": "#SLACK_CHANNEL_NAME",
        "text": f"A high severity finding {finding['category']} was detected."
    })
Replace the following:
BOT_ACCESS_TOKEN: the Bot User OAuth Access Token that you created with the Slack app.SLACK_CHANNEL_NAME: the Slack channel where you want to send the notifications.
In the Function entry point field, enter the name of the function in the code sample:
send_slack_chat_notification.Click Save and redeploy. If a green check mark appears next to the function name, your function has been successfully deployed. This process can take a few minutes.
If the preceding steps completed without errors, the setup is complete and you start receiving notifications. Keep in mind:
- You receive a separate chat message for each individual critical or high severity finding. The frequency or number of notifications depends on the resources within your organization.
- Notifications are published and sent in near real time. However, the immediacy of messages is not guaranteed and multiple factors can cause delays, including issues with Slack.
To change the notifications workflow, you can do the following:
- Change recipients by updating your Cloud Run function.
- Change which findings trigger notifications by updating the filter for the Pub/Sub topic.
Testing notifications
To test whether notifications are properly configured, follow these instructions to toggle high severity findings between active and inactive states.
- Go to the Security Command Center Findings page.
Go to the Findings page - Select your organization, if prompted.
- In the Quick filters panel, scroll down to the Severity section and select either High or Critical. The Findings query results panel updates to show findings of only the selected severity.
- In the Findings query results panel, select a finding by checking the box next to its name.
- From the Change active state menu in the Findings query results action bar, select Inactive. If the current findings query shows only active findings, the finding is removed from the query results.
- In the Quick filters panel, go to the State section and change the selections so that only Inactive is selected. The Findings query results panel updates to show only inactive findings.
- In the Findings query results panel, select the finding that you marked inactive.
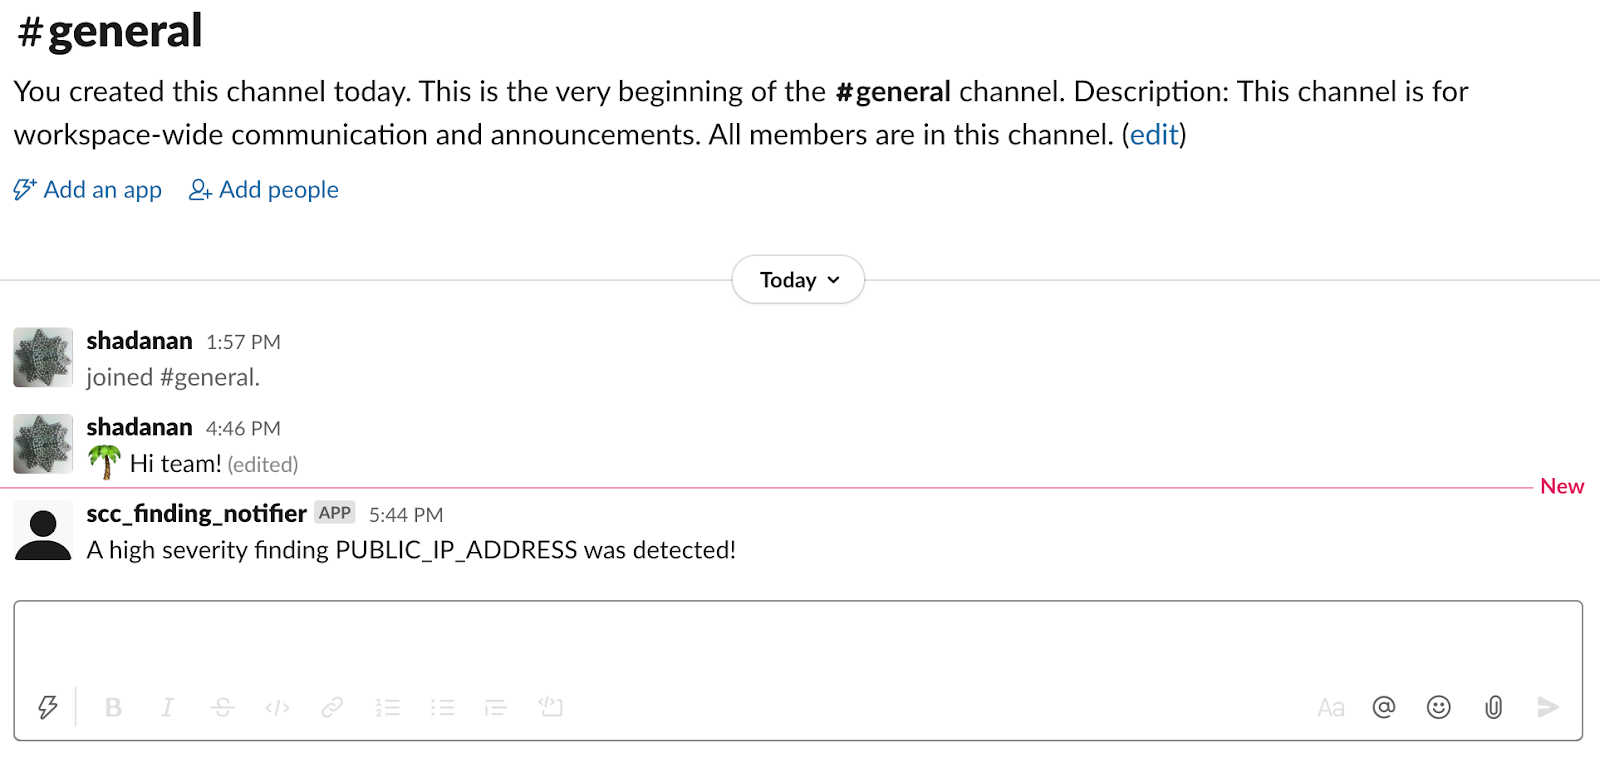
- From the Change active state menu in the Findings query results action bar, select Active.
- Check your Slack messages. A message similar to the following image is displayed:
Troubleshooting
If chat messages are not being sent or received, follow these steps to identify and resolve potential issues.
Check Stackdriver logs for your Cloud Run function to determine whether the function is being invoked. If it is not being invoked, ensure that notifications are set up correctly.
If the Cloud Run function is being invoked, then it might be crashing. Check for errors in Cloud Run functions using Google Cloud console Error Reporting.
Cleaning up
To avoid incurring charges to your Google Cloud account for the resources used in this tutorial, either delete the project that contains the resources, or keep the project and delete the individual resources.
Deleting the project
- In the Google Cloud console, go to the Manage resources page.
- In the project list, select the project that you want to delete, and then click Delete.
- In the dialog, type the project ID, and then click Shut down to delete the project.
Deleting individual resources
Delete your notification configuration:
gcloud scc notifications delete scc-critical-high-severity \
    --organization=ORG_ID \
    --location=global
Replace ORG_ID with your organization ID.
To maintain your configuration and temporarily pause notifications, comment out the
sendorpostcalls in your Cloud Run function.Delete your Cloud Run function:
- Go to Cloud Run functions.
Go to Cloud Run functions - Click the checkbox next to the function you want to delete.
- Click Delete .
- Go to Cloud Run functions.
Delete the service account:
- Go to the Service accounts page.
Go to the Service accounts page - Select a project.
- Select the service account you want to delete, and then click Delete .
- Go to the Service accounts page.
What's next
- Read more about notification errors.
- Learn about filtering notifications.
- Learn how to remediate Web Security Scanner and Security Health Analytics findings.