
Data agents let you curate the Conversational Analytics experience for your users. With agents, you can provide Conversational Analytics with context and instructions to enable it to answer questions more effectively for specific use cases. Agents empower analysts to map business terms to specific fields, specify the best fields for filtering, and define custom calculations.
This page guides you through the following processes:
- Create and edit data agents
- Share data agents with other users
- Publish data agents to other applications
- Delete data agents
Learn how and when Gemini for Google Cloud uses your data.
Before you begin
The use of Conversational Analytics is managed through a combination of content access, data access, and feature access. Think of a data agent as another type of Looker content — like a dashboard, Look, or folder. To interact with data agents, you must be assigned a Looker role that has the required permissions for the models that underlie the individual Explore or that the data agent will query. In some cases, you will also need access to the agent itself. For more information about the permissions and access that are required to manage and user data agents, see the permissions table on the Set up Conversational Analytics in Looker documentation page.
Create and edit data agents
To create a new data agent, follow these steps:
- Navigate to the Conversations page.
- In the Agents tab, select + New agent. Or, in the left panel, select sparkManage agents, and then select + New agent.
On the New agent page, provide the following information about your data agent.
- Agent name: Enter a name for the agent. The name should be unique and descriptive.
- Agent description: Briefly describe what this agent can do and the data that it uses. Users will see this description when they select the agent to start a conversation or when you share the agent with them, so make sure that the description clearly explains the agent's purpose and how it can be helpful.
- Data: Follow these steps to connect to up to five existing Looker Explores:
- In the Data field, click + Select Explores.
- In the Search Explores window, click the Explores that you want to include in the data agent. These Explores will appear in the Selected Explores panel of the window.
- To add the selected Explore to the data agent, click Save.
Instructions: Provide context to help Conversational Analytics understand how to interact with your data and provide accurate and relevant responses. For examples of the types of context that you can provide, see Writing agent instructions.
Optionally, to enable Advanced Analytics for all conversations with your agent, select Enable Advanced Analytics.
Optionally, you can test your agent to refine your instructions and its settings.
To save your new data agent, click Save.
After you save the data agent, you can share the agent with other users and start a conversation with the agent.
Write agent instructions
When you create a data agent, you can add free-form instructions that define your data agent's core behavior and provide it with foundational context to consider before processing a user's prompt.
Here are some examples of the types of context that you can provide in the Instructions field:
- Key fields: The most important fields for analysis
- Excluded fields: Fields that the data agent should avoid
- Filtering and grouping: Fields that the agent should use to filter and group data
- Golden queries: Pairs of natural language questions and their corresponding Explore queries
- Persona: A role or expertise, character, or tone that you assign to the agent
For tips and best practices for writing agent instructions, see the Best practices for configuring Conversational Analytics in Looker documentation page.
Define a Looker golden query
To define each Looker golden query for a given Explore, provide values for both of the following fields:
natural_language_questions: The natural language question that a user might asklooker_query: The Looker golden query that corresponds to the natural language question
For the natural_language_questions field, consider the questions a user might ask about that Explore, and write those questions in natural language. You can
include more than one question in this field's value. You can obtain the value
for the looker_query field from the Explore's query metadata.
Golden queries support the following fields:
model(string): The LookML model that was used to generate the query. This is a required field.explore(string): The Explore that was used to generate the query. This is a required field.fields[](string): The fields to retrieve from the Explore, including dimensions and measures. This is an optional field.filters[](string): The filters to apply to the Explore. This is an optional field.sorts[](string): The sorting to apply to the Explore. This is an optional field.limit(string): The data row limit to apply to the Explore. This is an optional field.
You can retrieve the Explore's query metadata directly from the Explore by following these steps:
- In the Explore, select the Explore actions menu, and then select Get LookML.
- Select the Dashboard tab.
- Copy the query details from the LookML. For example, the following image shows the LookML for an Explore called Order Items:
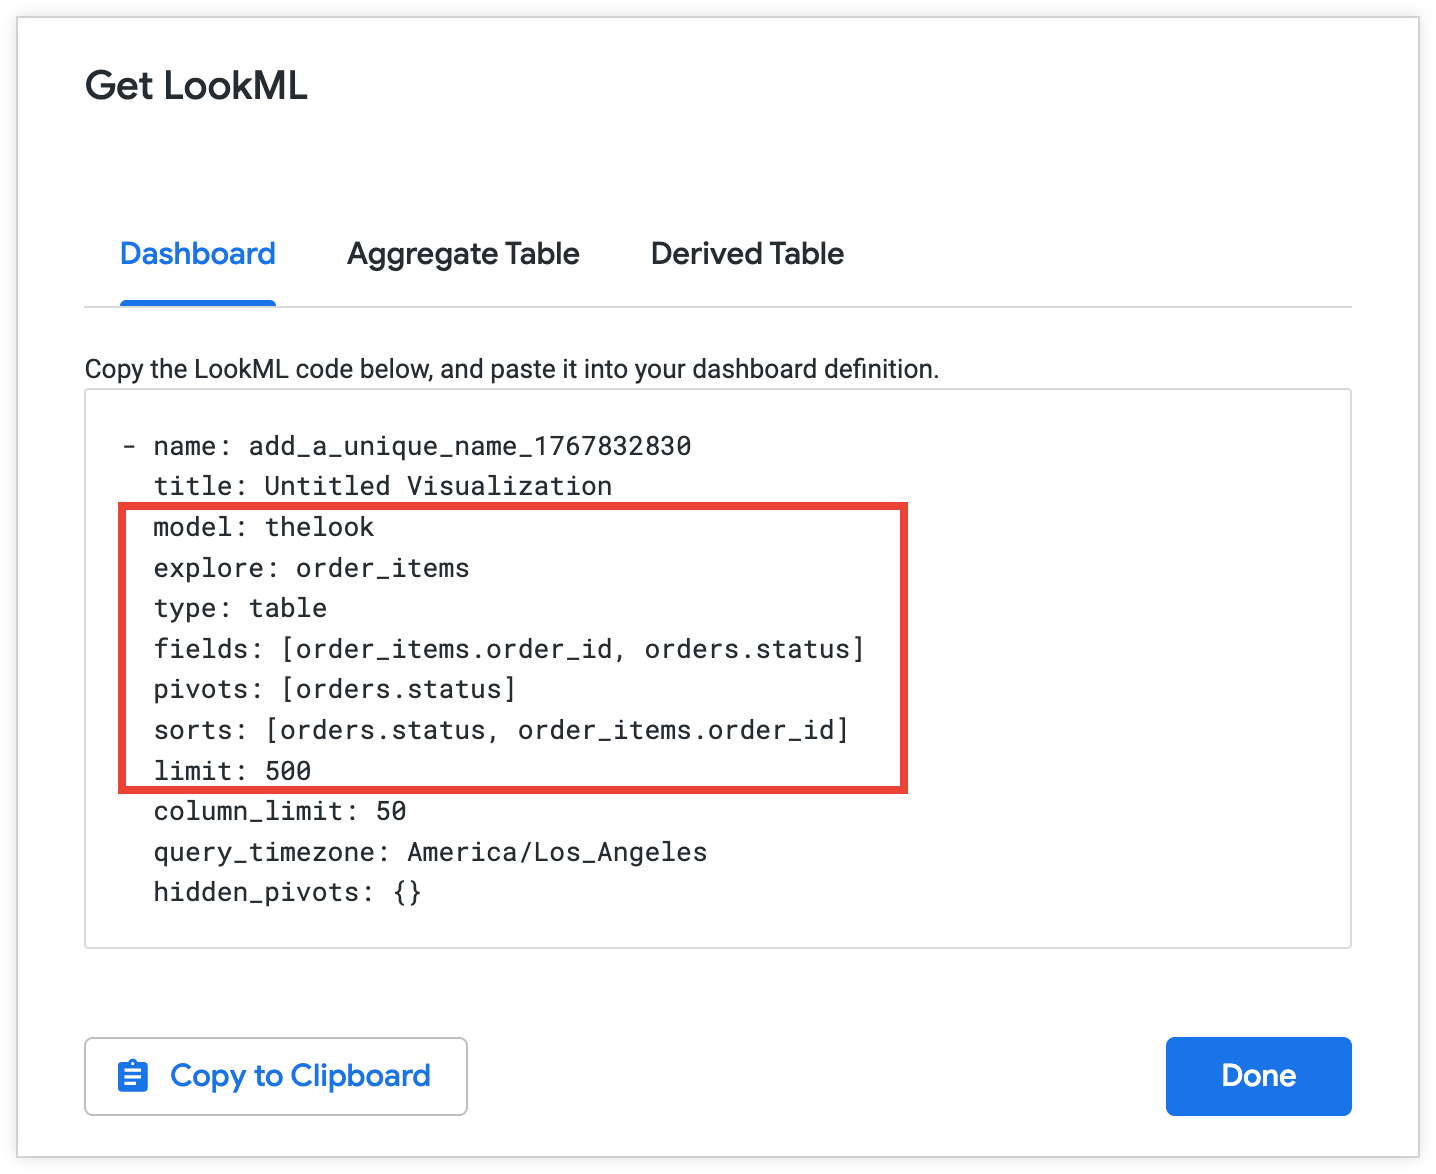
Copy the selected metadata for use in your Looker golden query:
  model: thelook
  explore: order_items
  fields: [order_items.order_id, orders.status]
  sorts: [orders.status, order_items.order_id]
  limit: 500
Test an agent
When you're creating or editing an agent, the agent details page includes the Preview your agent pane. You can test agent settings and instructions by starting a conversation with the agent.
You must click Update for a change to be reflected in the preview. If the save status is Not saved, any updates to settings won't be reflected in the preview.
Edit an existing data agent
To edit an existing data agent, follow these steps:
- On the Conversations page, select sparkManage agents.
- On the Manage agents page, select the data agent that you want to edit.
- Update the details about the agent as needed. You can modify the details that you specified when you created the agent, including the Agent name, Agent description, Data, and Instructions fields. You can also opt to enable the Code Interpreter for your agent.
- To save your changes, click Update.
Share data agents
Sharing lets other users chat with your agent and its Explores. You can share a data agent with other users by granting content access to the agent. Only a user with the appropriate permissions and content access can share an agent. Once an agent is created, it may take a few minutes for it to become shareable.
To share a data agent, follow these steps:
- On the Conversations page, select sparkManage agents in the left panel.
- Open the menu for the chosen agent by clicking its More options icon, and then click Share.
- Once you have added an individual or groups to the Who can access this agent section, and chosen what level of permissions they should have, click Add to place them in the shared list.
- If you want new users or groups to receive a notification email, select the Email the people you have just added checkbox.
- After all changes have been made, click Save.
You can also share an agent that you've just created or one that you're editing by clicking Share on the agent settings page and following the aforementioned steps.
Revoke access to a data agent
To revoke access to an agent, follow these steps:
- On the Conversations page, click sparkManage agents in the left panel.
- Open the menu for the chosen agent by clicking its More options icon, and then click Share.
- Click the X next to the user or groups that should have their access removed.
- After all changes have been made, click Save.
If the removed users have an ongoing conversation, they will still have access for a minute or two while the changes propagate.
If a user tries to ask more questions once access to an agent is removed, then that user will see the message The agent in this conversation may not be shared with you, or may have been deleted. You can view any past conversations with the agent, but can't ask new questions.
Publish a data agent
You can publish your data agent in Gemini Enterprise, making your agent's predefined context and analytics available to a broader audience, including users who may not be familiar with the Looker interface. Gemini Enterprise serves as a central hub where users can manage data agents that were created across Google Cloud applications, which helps users to find the best agent for their analytical needs.
Before you begin
The procedure to create a data agent in Looker and make it available to users in Gemini Enterprise involves tasks that are performed in the Looker instance, on the Gemini Enterprise page in the Google Cloud console, and in the Gemini Enterprise instance.
Users with the following roles must follow the steps that are described in the associated sections:
- Data agent editors (Looker capability): Publish the agent in Looker.
- Discovery Engine Admin (IAM role): Grant access to the agent in the Google Cloud console.
- Gemini Enterprise User (IAM role); Data agent user (Looker capability): Chat with the agent in the Gemini Enterprise instance.
Before you can publish an agent, the following requirements must be met:
- A Looker admin must enable the Publish to Gemini Enterprise setting on the Gemini in Looker page in the Admin panel.
- A Looker admin must grant you a role that contains the
publish_agent_externallypermission. You must also be able to edit a data agent. - The Looker service account on the Google Cloud project that hosts the Gemini Enterprise engine must be granted the Discovery Engine Admin Identity and Access Management role. Granting this role assigns a Gemini Enterprise license to the account when the first data agent is published. If no Gemini Enterprise licenses are available to assign to the Looker service account, the Gemini Enterprise engine's page in the Google Cloud console displays the error "Failed to allocate quota for agent creation." A user with the Discovery Engine Admin Identity and Access Management role must then provision a new Gemini Enterprise license or reassign an existing license for the Looker service account.
Publish a data agent to Gemini Enterprise
To complete the steps that are described in this section, you must have a Looker role that contains the publish_agent_externally permission and the appropriate permissions and content access to edit data agents.
To publish an agent, follow these steps:
- Edit the agent.
- Select Publish settings to open the Agent publish settings window.
- In the Agent publish settings window, enable the Gemini Enterprise setting and select Update. Enabling this setting publishes the agent to the Gemini Enterprise instance that is displayed on the Gemini in Looker page in the Admin panel.
- Once you've published your agent, you can select Share to grant other Looker users access to your data agent, or select Start conversation to open a new conversation with the data agent.
Grant users access to the agent in Gemini Enterprise
To complete the steps that are described in this section, you must have the Discovery Engine Admin Identity and Access Management role for the Google Cloud project that contains the Gemini Enterprise engine.
To be able to chat with an agent in Gemini Enterprise, a user must have access to the Gemini Enterprise instance and to the individual agent.
To grant a user access to the Gemini Enterprise instance, a Discovery Engine Admin must assign the user the Gemini Enterprise User IAM role for the Google Cloud project that contains the Gemini Enterprise engine.
To grant a user access to an individual agent, the Discovery Engine Admin must complete the following steps in the Google Cloud console:
- Navigate to the Google Cloud project that contains the Gemini Enterprise engine.
- Open the Gemini Enterprise product page.
- Select the Apps page from the main navigation, and then select the name of the Gemini Enterprise instance.
- In the main navigation, select Agents.
- Select the agent that you want to grant access to.
- Select the User permissions tab.
- Select Add user.
- In the Add user permissions roles to agent window, add each user and assign them the Agent User role.
Chat with the agent in Gemini Enterprise
To complete the steps that are described in this section, you must have the Gemini Enterprise User Identity and Access Management role for the Google Cloud project that contains the Gemini Enterprise engine. You must also have the appropriate permissions and content access to chat with the agent in the Looker instance.
To chat with a data agent in a Gemini Enterprise instance, follow these steps:
- Open your Gemini Enterprise instance.
- Select Agents in the main navigation.
- On the Agents page, select that agent that you would like to chat with. When you select an agent, a conversation window opens where you can ask questions about your data.
The first time you chat with an agent, you must authorize the agent's access to your Looker identity.
Delete a data agent
To delete a data agent, follow these steps:
- On the Conversations page, click sparkManage agents in the left panel.
- Open the menu for the chosen agent by clicking its More options icon, and then click Delete.
- In the Delete agent? window, click Move to trash to delete the data agent.
Agents that are moved to the trash will be permanently deleted after 30 days. You can permanently delete a data agent manually, or you can restore a data agent from the trash before it is permanently deleted. If you take no action, the agent will be deleted permanently after 30 days automatically.
Permanently delete a data agent
To permanently delete a data agent, follow these steps:
- Navigate to the Conversations page.
- In the left navigation panel, expand the Trash section.
- To open the menu for the chosen agent, select its icon, and then click Delete Permanently.
- In the Are you sure? window, click Delete forever.
Restore a data agent from the trash
To restore a data agent from the trash, follow these steps:
- Navigate to Conversations page.
- In the left navigation panel, expand the Trash section.
- To open the menu for the chosen agent, select its icon, and then click Restore.
Related resources
Conversational Analytics in Looker overview: The landing page for Conversational Analytics with a list of key features links to all Conversational Analytics documentation.
Query an Explore in natural language: Start a conversation with a Looker Explore to ask about Explore data using natural language.
Best practices for configuring Conversational Analytics in Looker: Strategies and best practices to help Looker administrators and LookML developers successfully configure optimize Conversational Analytics.
Enable Advanced Analytics: Advanced Analytics within Conversational Analytics translates your natural language questions into Python code and executes that code. Compared to standard SQL-based queries, the Advance Analytics feature's use of Python enables more complex analysis and visualizations.