


本教程演示了如何使用 Backup for GKE 将 GKE 中的有状态应用从附加了 Persistent Disk 卷的旧版机器类型(例如 N2)迁移到附加了 Hyperdisk 卷的新版机器类型(例如 N4)。如需详细了解支持 Hyperdisk 的机器类型,请参阅 Compute Engine 文档。
为了演示迁移,本教程使用 Sakila 数据库和 World 数据库来提供示例数据集。Sakila 是 MySQL 提供的一个示例数据库,表示一家虚构的 DVD 租赁店。World 数据库包含有关国家/地区和城市的数据。本教程使用不同命名空间中的两个不同数据集来模拟复杂的多租户环境。
本教程适用于负责创建和分配存储空间以及管理数据安全和数据访问权限的存储专家和存储管理员。如需详细了解我们在 Google Cloud内容中提及的常见角色和示例任务,请参阅常见的 GKE 用户角色和任务。
部署架构
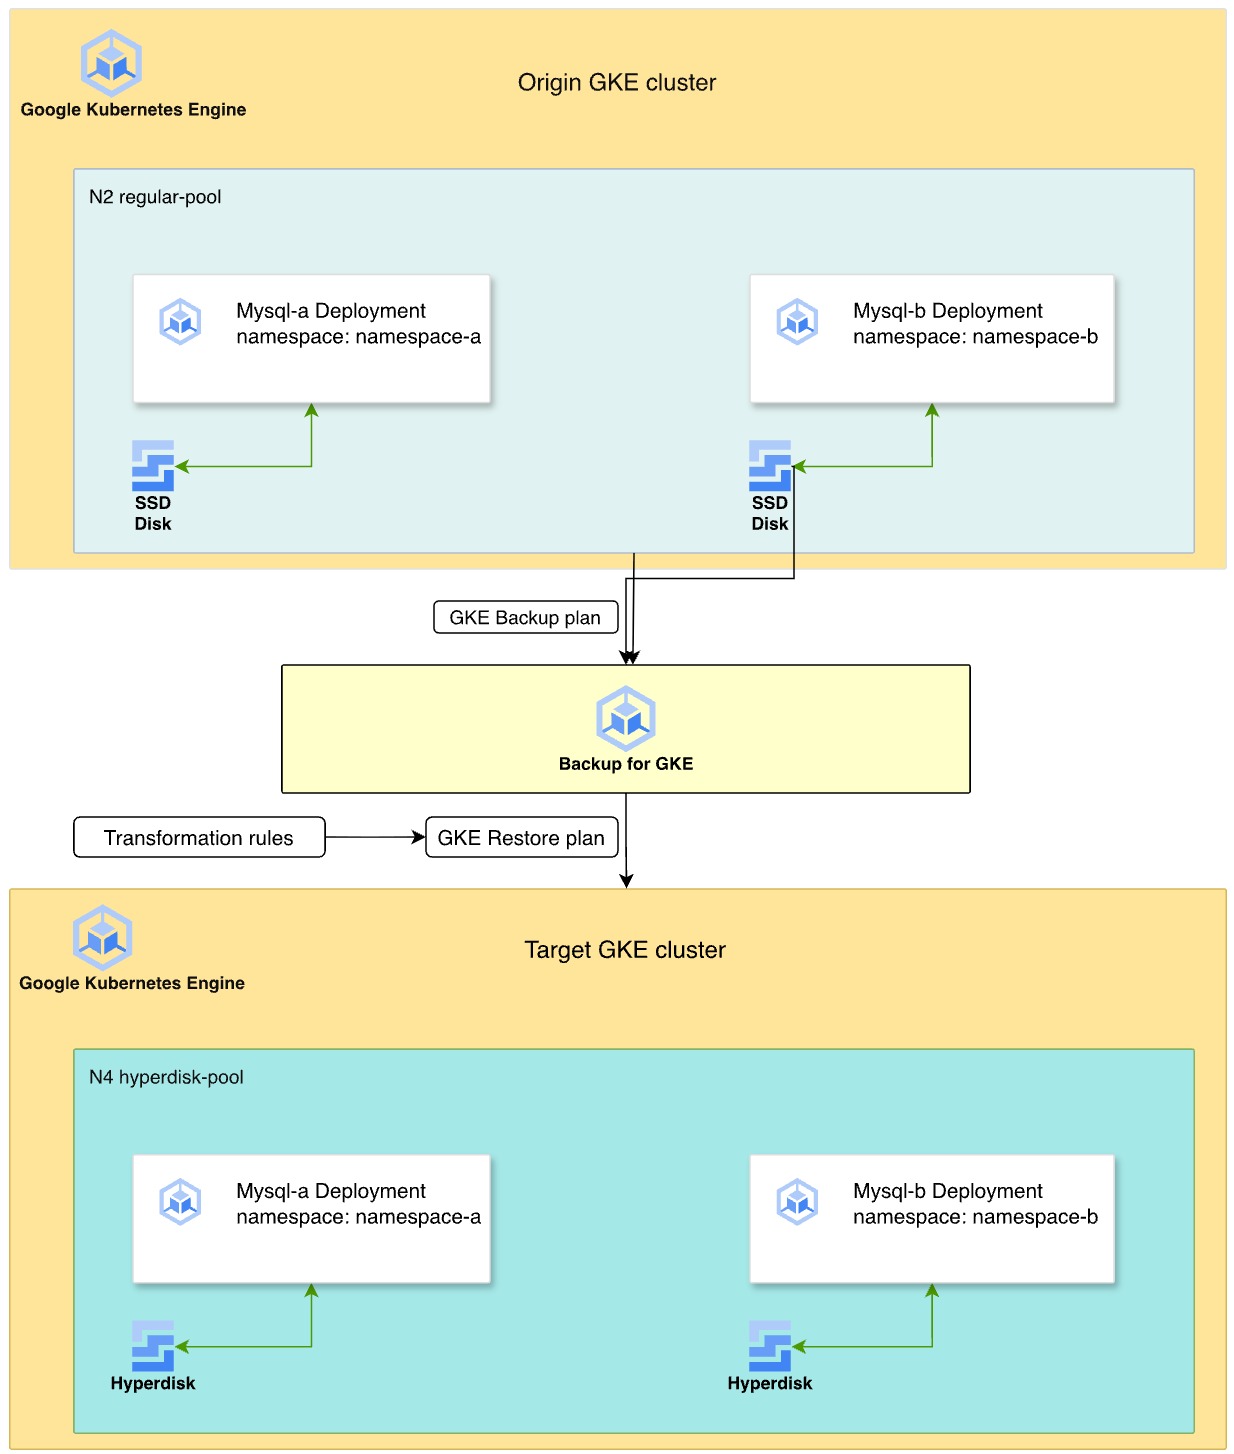
下图展示了使用 Backup for GKE 将有状态 MySQL 工作负载从 N2 机器类型上的 Persistent Disk 迁移到 N4 机器类型上的 Hyperdisk 的过程。
- 源集群:两个 MySQL 部署位于单独的命名空间(
namespace-a和namespace-b)中,位于 N2 机器系列节点池池上。这些部署使用 SSD 永久性磁盘来存储数据。 - 备份策略:您可以在集群上启用 Backup for GKE 代理,并创建备份方案来捕获命名空间、卷数据和 Secret。然后,您执行手动备份以创建时间点恢复点。
- 转换和恢复:您可以使用转换规则来定义恢复方案,以使资源适应目标环境。这些规则执行以下操作:
- 将
StorageClass从premium-rwo(PD) 交换为名为balanced-storage的 Hyperdisk 存储类别。 - 修改 pod 亲和性规则,以帮助确保恢复的工作负载调度到新的 N4 节点池。
- 将
- 目标环境:您预配了一个新的 GKE 集群,其中包含 N4 机器类型。恢复过程会根据备份将磁盘重新创建为 Hyperdisk 卷,并将 MySQL 实例部署到兼容的 N4 节点上。
目标
在本教程中,您将学习如何执行以下操作:
- 准备 GKE 有状态应用以进行备份。
- 启用 Backup for GKE 插件。
- 创建备份方案并备份源集群。
- 创建使用转换规则将存储迁移到 Hyperdisk 的恢复方案。
- 将工作负载恢复到新集群并验证数据。
费用
在本文档中,您将使用 Google Cloud的以下收费组件:
- GKE
- Compute Engine (Persistent Disk and Hyperdisk)
- Backup for GKE
如需根据您的预计使用情况来估算费用,请使用价格计算器。
准备工作
- 登录您的 Google Cloud 账号。如果您是 Google Cloud新手,请 创建一个账号来评估我们的产品在实际场景中的表现。新客户还可获享 $300 赠金,用于运行、测试和部署工作负载。
-
In the Google Cloud console, on the project selector page, select or create a Google Cloud project.
Roles required to select or create a project
- Select a project: Selecting a project doesn't require a specific IAM role—you can select any project that you've been granted a role on.
-
Create a project: To create a project, you need the Project Creator role
(
roles/resourcemanager.projectCreator), which contains theresourcemanager.projects.createpermission. Learn how to grant roles.
-
Verify that billing is enabled for your Google Cloud project.
Enable the Compute Engine, GKE, Backup for GKE, and IAM APIs.
Roles required to enable APIs
To enable APIs, you need the Service Usage Admin IAM role (
roles/serviceusage.serviceUsageAdmin), which contains theserviceusage.services.enablepermission. Learn how to grant roles.-
In the Google Cloud console, on the project selector page, select or create a Google Cloud project.
Roles required to select or create a project
- Select a project: Selecting a project doesn't require a specific IAM role—you can select any project that you've been granted a role on.
-
Create a project: To create a project, you need the Project Creator role
(
roles/resourcemanager.projectCreator), which contains theresourcemanager.projects.createpermission. Learn how to grant roles.
-
Verify that billing is enabled for your Google Cloud project.
Enable the Compute Engine, GKE, Backup for GKE, and IAM APIs.
Roles required to enable APIs
To enable APIs, you need the Service Usage Admin IAM role (
roles/serviceusage.serviceUsageAdmin), which contains theserviceusage.services.enablepermission. Learn how to grant roles.-
确保您在项目中拥有以下一个或多个角色: roles/container.admin、roles/iam.serviceAccountAdmin、roles/compute.admin、roles/gkebackup.admin、roles/monitoring.viewer
检查角色
-
在 Google Cloud 控制台中,前往 IAM 页面。
转到 IAM - 选择项目。
-
在主账号列中,找到标识您或您所属群组的所有行。如需了解您属于哪些群组,请与您的管理员联系。
- 对于指定或包含您的所有行,请检查角色列以查看角色列表是否包含所需的角色。
授予角色
-
在 Google Cloud 控制台中,前往 IAM 页面。
转到 IAM - 选择项目。
- 点击 授予访问权限。
-
在新的主账号字段中,输入您的用户标识符。 这通常是 Google 账号的电子邮件地址。
- 点击选择角色,然后搜索相应角色。
- 如需授予其他角色,请点击 添加其他角色,然后添加其他各个角色。
- 点击 Save(保存)。
-
设置 Cloud Shell
-
在 Google Cloud 控制台中,激活 Cloud Shell。
Cloud Shell 会话随即会启动并显示命令行提示符。该会话可能需要几秒钟来完成初始化。
- 设置默认项目:
gcloud config set project PROJECT_ID将
PROJECT_ID替换为您的项目 ID。
设置环境
在本部分中,您将准备环境变量并克隆示例代码库。
为项目、集群名称和可用区设置环境变量:
export PROJECT_ID=PROJECT_ID
export KUBERNETES_CLUSTER_PREFIX=backup-gke-migration
export TARGET_CLUSTER_PREFIX=restore-gke-migration
export ZONE=us-central1-a
将
PROJECT_ID替换为您的 Google Cloud项目 ID。克隆示例代码库并导航到相应目录:
git clone https://github.com/GoogleCloudPlatform/kubernetes-engine-samples
cd kubernetes-engine-samples/databases/backup-migration
创建源 GKE 集群
创建一个可用区级集群,该集群的节点池使用 N2 机器类型并挂接了 Persistent Disk 卷。
创建集群:
gcloud container clusters create ${KUBERNETES_CLUSTER_PREFIX}-cluster \
  --location ${ZONE} \
  --node-locations ${ZONE} \
  --shielded-secure-boot \
  --shielded-integrity-monitoring \
  --machine-type "e2-micro" \
  --num-nodes "1"
为源工作负载创建具有
n2-standard-4机器类型的节点池:gcloud container node-pools create regular-pool \ --cluster ${KUBERNETES_CLUSTER_PREFIX}-cluster \ --machine-type n2-standard-4 \ --zone ${ZONE} \ --num-nodes 1在源集群上启用 Backup for GKE 插件:
gcloud container clusters update ${KUBERNETES_CLUSTER_PREFIX}-cluster \
  --project=${PROJECT_ID}  \
  --location=${ZONE} \
  --update-addons=BackupRestore=ENABLED
获取集群的凭据:
gcloud container clusters get-credentials ${KUBERNETES_CLUSTER_PREFIX}-cluster --zone ${ZONE}验证 Backup for GKE 代理是否已启用:
gcloud container clusters describe ${KUBERNETES_CLUSTER_PREFIX}-cluster \
  --project=${PROJECT_ID}  \
  --location=${ZONE}
输出类似于以下内容,并确认备份代理已启用:
addonsConfig:
  gkeBackupAgentConfig:
    enabled: true
部署包含示例数据的 MySQL
在单独的命名空间中部署两个 MySQL 数据库,以模拟生产环境。
创建
namespace-a和namespace-b命名空间:kubectl create namespace namespace-a kubectl create namespace namespace-b在
namespace-a和namespace-b中部署 MySQL 工作负载:部署
mysql-a-deployment.yaml文件:kubectl apply -f manifests/02-mysql/mysql-a-deployment.yaml -n namespace-a以下清单在
namespace-a中创建了一个 MySQL Pod,该 Pod 在regular-pool节点上具有动态配置的 Persistent Disk SSD 磁盘。root 密码设置为migration:部署
mysql-b-deployment.yaml文件:kubectl apply -f manifests/02-mysql/mysql-b-deployment.yaml -n namespace-b以下清单在
namespace-b中创建了一个 MySQL Pod,该 Pod 在regular-pool节点上具有动态配置的 Persistent Disk SSD 磁盘。root 密码设置为migration:
部署 MySQL 客户端 Pod 以上传示例数据集:
kubectl apply -f manifests/02-mysql/mysql-client.yaml
kubectl wait pods mysql-client --for condition=Ready --timeout=300s
以下清单部署了一个 MySQL 客户端 Pod:
连接到客户端 Pod:
kubectl exec -it mysql-client -- bash在 Pod 内,下载 Sakila 和 World 示例数据集:
curl --output dataset.tgz "https://downloads.mysql.com/docs/sakila-db.tar.gz"
tar -xvzf dataset.tgz -C ./

curl --output world-db.tar.gz "https://downloads.mysql.com/docs/world-db.tar.gz"
tar xvzf world-db.tar.gz -C ./
将 Sakila 数据集导入
mysql-a数据库:mysql -u root -h mysql-a.namespace-a -p # Enter password: migration SOURCE /sakila-db/sakila-schema.sql; SOURCE /sakila-db/sakila-data.sql;验证导入的 Sakila 数据:
USE sakila;
SELECT table_name, table_rows FROM INFORMATION_SCHEMA.TABLES WHERE TABLE_SCHEMA = 'sakila';
退出 MySQL:
exit将 World 数据集导入到
mysql-b数据库中:mysql -u root -h mysql-b.namespace-b -p # Enter password: migration SOURCE /world-db/world.sql;验证导入的 World 数据:
USE world;
SELECT table_name, table_rows FROM INFORMATION_SCHEMA.TABLES WHERE TABLE_SCHEMA = 'world';
输出类似于以下内容:
+-----------------+------------+
| table_name      | table_rows |
+-----------------+------------+
| city            |       4079 |
| country         |        239 |
| countrylanguage |        984 |
+-----------------+------------+
退出 MySQL:
exit退出客户端 Pod shell:
exit
备份 GKE 集群
备份整个集群,包括 Secret 和卷。
创建备份方案:
gcloud beta container backup-restore backup-plans create main-plan \ --project=${PROJECT_ID} \ --location=us-central1 \ --cluster=projects/${PROJECT_ID}/locations/${ZONE}/clusters/${KUBERNETES_CLUSTER_PREFIX}-cluster \ --selected-namespaces=namespace-a,namespace-b,default \ --include-secrets \ --include-volume-data \ --target-rpo-minutes=1440 \ --backup-retain-days=7 \ --backup-delete-lock-days=3 \ --locked--selected-namespaces:备份特定命名空间,以避免与系统资源发生冲突。--include-volume-data:有助于确保 Persistent Disk 数据得到备份。--target-rpo-minutes:配置基于恢复点目标 (RPO) 的备份时间表。RPO 是可能丢失数据的最长可接受时间窗口,它决定了备份频率。如果设置为1440分钟(1 天),系统会安排每天运行备份。
创建备份:
gcloud beta container backup-restore backups create first-backup \
    --project=${PROJECT_ID} \
    --location=us-central1 \
    --backup-plan=main-plan \
    --wait-for-completion
等待输出显示
Backup state: SUCCEEDED。验证备份是否已创建:
gcloud beta container backup-restore backups list \
    --project=${PROJECT_ID} \
    --location=us-central1 \
    --backup-plan=main-plan
使用 Hyperdisk 转换进行恢复
将备份恢复到新集群。恢复操作会将存储从 Persistent Disk 转换为 Hyperdisk,并将工作负载迁移到 N4 节点。
在 N4 节点上创建目标 GKE 集群:
gcloud container clusters create ${TARGET_CLUSTER_PREFIX}-cluster \
  --location ${ZONE} \
  --node-locations ${ZONE} \
  --shielded-secure-boot \
  --shielded-integrity-monitoring \
  --machine-type "e2-micro" \
  --num-nodes "1"
创建具有
n4-standard-4机器类型的节点池,这些机器类型是 Hyperdisk 所必需的:gcloud container node-pools create hyperdisk-pool \ --cluster ${TARGET_CLUSTER_PREFIX}-cluster \ --machine-type n4-standard-4 \ --zone ${ZONE} \ --num-nodes 1获取目标集群的凭据:
gcloud container clusters get-credentials ${TARGET_CLUSTER_PREFIX}-cluster --zone ${ZONE}应用名为
balanced-storage的 HyperdiskStorageClass:kubectl apply -f manifests/01-storage-class/storage-class-hdb.yaml以下清单定义了一个 Hyperdisk
StorageClass:查看
manifests/03-transformation-rule/volume.yaml文件中的转换规则。此文件定义了在恢复期间如何修改资源:- PVC 转换:将
storageClassName更改为balanced-storage(Hyperdisk)。 - 部署转换:更新节点亲和性,以在
n4-standard-4节点上调度 Pod。
- PVC 转换:将
使用以下转换规则创建恢复方案:
gcloud beta container backup-restore restore-plans create main-restore \
  --project=${PROJECT_ID} \
  --location=us-central1 \
  --backup-plan=projects/${PROJECT_ID}/locations/us-central1/backupPlans/main-plan \
  --cluster=projects/${PROJECT_ID}/locations/${ZONE}/clusters/${TARGET_CLUSTER_PREFIX}-cluster \
  --namespaced-resource-restore-mode=merge-replace-on-conflict \
  --all-namespaces \
  --cluster-resource-conflict-policy=use-existing-version  \
  --cluster-resource-scope-selected-group-kinds=cluster-resource-scope-all-group-kinds \
  --volume-data-restore-policy=restore-volume-data-from-backup \
  --transformation-rules-file=manifests/03-transformation-rule/volume.yaml
执行恢复:
gcloud beta container backup-restore restores create first-restore \
   --project=${PROJECT_ID} \
   --location=us-central1 \
   --restore-plan=main-restore \
   --backup=projects/${PROJECT_ID}/locations/us-central1/backupPlans/main-plan/backups/first-backup
验证迁移
验证应用是否在新集群上运行,以及数据是否完整无缺。
检查 Pod 是否正在运行:
kubectl get pods -A连接到新集群上的 MySQL 客户端 Pod:
# Verify that the client Pod is running
kubectl apply -f manifests/02-mysql/mysql-client.yaml
kubectl wait pods mysql-client --for condition=Ready --timeout=300s
kubectl exec -it mysql-client -- bash
在
namespace-a中验证恢复的 Sakila 数据库:mysql -u root -h mysql-a.namespace-a -p # Password: migration USE sakila; SELECT table_name, table_rows FROM INFORMATION_SCHEMA.TABLES WHERE TABLE_SCHEMA = 'sakila';在
namespace-b中验证恢复的 World 数据库:mysql -u root -h mysql-b.namespace-b -p # Password: migration USE world; SELECT table_name, table_rows FROM INFORMATION_SCHEMA.TABLES WHERE TABLE_SCHEMA = 'world';
清理
为避免因本教程中使用的资源导致您的 Google Cloud 账号产生费用,请删除包含这些资源的项目,或者保留项目但删除各个资源。
删除 GKE 集群:
gcloud container clusters delete ${KUBERNETES_CLUSTER_PREFIX}-cluster --location ${ZONE} --quiet
gcloud container clusters delete ${TARGET_CLUSTER_PREFIX}-cluster --location ${ZONE} --quiet
删除备份和恢复方案:
# Delete the restore plan
gcloud beta container backup-restore restore-plans delete main-restore \
    --project=${PROJECT_ID} \
    --location=us-central1 \
    --quiet

# Delete the Backup
gcloud beta container backup-restore backups delete first-backup \
    --project=${PROJECT_ID} \
    --location=us-central1 \
    --backup-plan=main-plan \
    --quiet

# Delete the backup plan
gcloud beta container backup-restore backup-plans delete main-plan \
    --project=${PROJECT_ID} \
    --location=us-central1 \
    --quiet
后续步骤
- 详细了解 Backup for GKE。
- 请参阅 Hyperdisk 存储池。