
Migración de Snowflake a BigQuery: Descripción general
En este documento, se muestra cómo migrar tus datos de Snowflake a BigQuery.
Para obtener un marco de trabajo general para migrar de otros almacenes de datos a BigQuery, consulta Descripción general: Migra almacenes de datos a BigQuery.
Descripción general de la migración de Snowflake a BigQuery
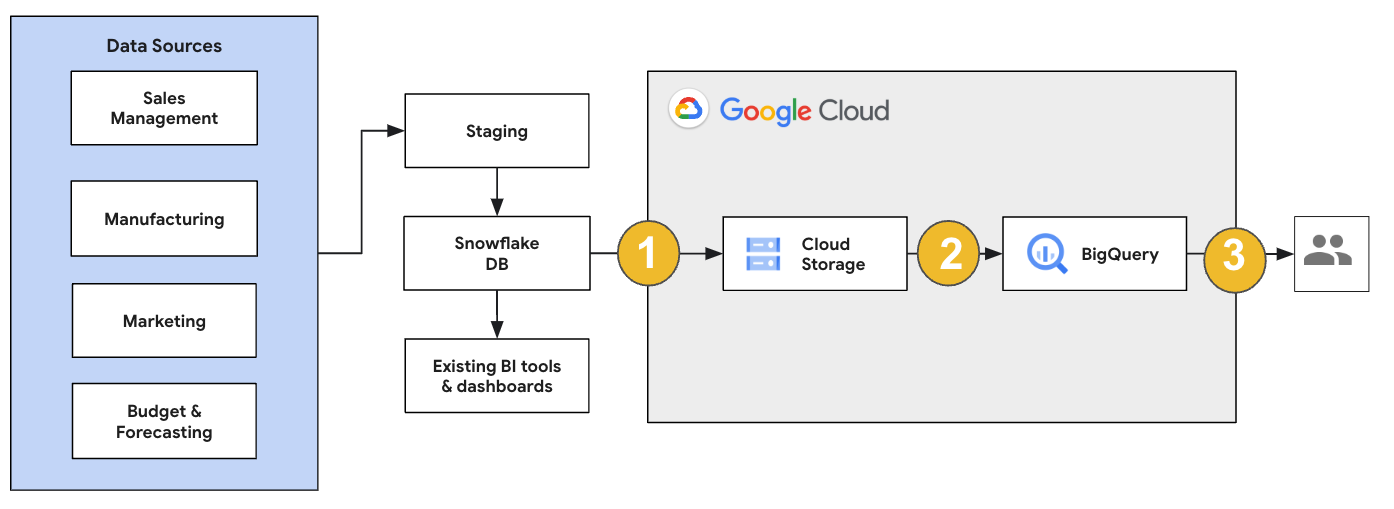
Para una migración de Snowflake, te recomendamos que configures una arquitectura de migración que afecte de forma mínima las operaciones existentes. En el siguiente ejemplo, se muestra una arquitectura en la que puedes reutilizar tus herramientas y procesos existentes mientras descargas otras cargas de trabajo en BigQuery.
También puedes validar informes y paneles en comparación con versiones anteriores. Para obtener más información, consulta Migra almacenes de datos a BigQuery: verifica y valida.
Migra cargas de trabajo individuales
Cuando planifiques tu migración a Snowflake, te recomendamos que migres las siguientes cargas de trabajo de forma individual y en el siguiente orden:
Migra el esquema
Comienza por replicar los esquemas necesarios de tu entorno de Snowflake en BigQuery. Te recomendamos que uses el Servicio de migración de BigQuery para migrar tu esquema. El Servicio de migración de BigQuery admite una amplia variedad de patrones de diseño de modelos de datos, como el esquema en estrella o el esquema de copo de nieve, lo que elimina la necesidad de actualizar tus canalizaciones de datos ascendentes para un esquema nuevo. El Servicio de migración de BigQuery también ofrece migración de esquemas automatizada, incluidas las capacidades de extracción y traducción de esquemas, para optimizar tu proceso de migración.
Migra consultas en SQL
Para migrar tus consultas de SQL, el Servicio de migración de BigQuery ofrece varias funciones de traducción de SQL para automatizar la conversión de tus consultas de SQL de Snowflake a SQL de GoogleSQL, como el traductor de SQL por lotes para traducir consultas de forma masiva, el traductor de SQL interactivo para traducir consultas individuales y la API de traducción de SQL. Estos servicios de traducción también incluyen funciones mejoradas con Gemini para simplificar aún más el proceso de migración de tus consulta en SQL.
A medida que traduzcas tus consultas en SQL, revisa cuidadosamente las consultas traducidas para verificar que los tipos de datos y las estructuras de las tablas se manejen correctamente. Para ello, te recomendamos que crees una amplia variedad de casos de prueba con diferentes situaciones y datos. Luego, ejecuta estos casos de prueba en BigQuery para comparar los resultados con los originales de Snowflake. Si hay diferencias, analiza y corrige las consultas convertidas.
Migrar datos
Existen varias formas de configurar tu canalización de migración de datos para transferir tus datos a BigQuery. En general, estas canalizaciones siguen el mismo patrón:
Extrae los datos de tu fuente: copia los archivos extraídos desde tu fuente hasta un almacenamiento de etapa de pruebas en tu entorno local. Para obtener más información, consulta Migra almacenes de datos a BigQuery: extrae los datos de origen.
Transfiere datos a un bucket de etapa de pruebas de Cloud Storage: después de terminar de extraer los datos desde tu fuente, transfiérelos a un bucket temporal en Cloud Storage. Según la cantidad de datos que transfieras y el ancho de banda de red disponible, tienes varias opciones.
Es importante verificar que la ubicación del conjunto de datos de BigQuery y la fuente de datos externa, o el bucket de Cloud Storage, estén en la misma región.
Carga datos del bucket de Cloud Storage en BigQuery: Tus datos ahora están en un bucket de Cloud Storage. Existen varias opciones para subir los datos a BigQuery. Esas opciones dependen de cuánto tengan que transformarse los datos. Como alternativa, puedes transformar tus datos dentro de BigQuery si sigues el enfoque de ELT.
Cuando importas tus datos de forma masiva desde un archivo JSON, Avro o CSV, BigQuery detecta de manera automática el esquema para que no tengas que predefinirlo. Para obtener una descripción general detallada del proceso de migración del esquema en las cargas de trabajo de EDW, consulta Proceso de migración del esquema y los datos.
Para obtener una lista de las herramientas que admiten una migración de datos de Snowflake, consulta Herramientas de migración.
Para ver ejemplos de extremo a extremo de cómo configurar una canalización de migración de datos de Snowflake, consulta Ejemplos de canalización de migración de Snowflake.
Optimiza el esquema y las consultas
Después de la migración del esquema, puedes probar el rendimiento y realizar optimizaciones según los resultados. Por ejemplo, puedes ingresar la partición a fin de que tus datos sean más eficientes para administrar y consultar. La partición de tablas te permite mejorar el rendimiento de las consultas y el control de costos mediante la partición por tiempo de transferencia, marca de tiempo o rango de números enteros. Para obtener más información, consulta Introducción a tablas con particiones.
Las tablas agrupadas son otra optimización del esquema. Puedes agrupar tus tablas en clústeres para organizar los datos de la tabla según el contenido del esquema de la tabla, lo que mejora el rendimiento de las consultas que usan cláusulas de filtro o las que agregan datos. Para obtener más información, consulta Introducción a las tablas agrupadas en clústeres.
Tipos de datos, propiedades y formatos de archivo admitidos
Snowflake y BigQuery admiten la mayoría de los mismos tipos de datos, aunque a veces usan nombres diferentes. Para obtener una lista completa de los tipos de datos compatibles en Snowflake y BigQuery, consulta Tipos de datos. También puedes usar herramientas de traducción de SQL, como el traductor de SQL interactivo, la API de traducción de SQL o el traductor de SQL por lotes, para traducir diferentes dialectos de SQL a GoogleSQL.
Para obtener más información sobre los tipos de datos admitidos en BigQuery, consulta Tipos de datos de GoogleSQL.
Snowflake puede exportar datos en los siguientes formatos de archivo. Puedes cargar los siguientes formatos directamente en BigQuery:
- Carga datos de CSV desde Cloud Storage.
- Carga datos de Parquet desde Cloud Storage.
- Carga datos JSON desde Cloud Storage.
- Consulta datos de Apache Iceberg.
Herramientas de migración
En la siguiente lista, se describen las herramientas que puedes usar para migrar datos de Snowflake a BigQuery. Para ver ejemplos de cómo se pueden usar estas herramientas juntas en una canalización de migración de Snowflake, consulta Ejemplos de canalizaciones de migración de Snowflake.
- Comando
COPY INTO <location>: Usa este comando en Snowflake para extraer datos de una tabla de Snowflake directamente en un bucket de Cloud Storage especificado. Para obtener un ejemplo de extremo a extremo, consulta Snowflake a BigQuery (snowflake2bq) en GitHub. - Apache Sqoop: para extraer datos de Snowflake en HDFS o Cloud Storage, envía los trabajos de Hadoop con el controlador JDBC de Sqoop y Snowflake. Sqoop se ejecuta en un entorno de Dataproc.
- JDBC de Snowflake: usa este controlador con la mayoría de las herramientas o aplicaciones cliente que son compatibles con JDBC.
Puedes usar las siguientes herramientas genéricas para migrar datos de Snowflake a BigQuery:
- El conector del Servicio de transferencia de datos de BigQuery para Snowflake Versión preliminar: Realiza una transferencia por lotes automatizada de datos de Cloud Storage a BigQuery.
- Google Cloud CLI: Esta herramienta de línea de comandos copia los archivos descargados de Snowflake en Cloud Storage.
- Herramienta de línea de comandos de bq: Interactúa con BigQuery a través de esta herramienta de línea de comandos. Entre los casos de uso comunes, se incluyen la creación de esquemas de tablas de BigQuery, la carga de datos de Cloud Storage en tablas y la ejecución de consultas.
- Bibliotecas cliente de Cloud Storage: copia los archivos descargados de Snowflake en Cloud Storage con una herramienta personalizada que use las bibliotecas cliente de Cloud Storage.
- Bibliotecas cliente de BigQuery: interactúa con BigQuery mediante una herramienta personalizada compilada sobre la biblioteca cliente de BigQuery.
- Programador de consultas de BigQuery: Programa consultas de SQL recurrentes con esta función integrada de BigQuery.
- Cloud Composer: usa este entorno de Apache Airflow completamente administrado para organizar los trabajos de carga y las transformaciones de BigQuery.
Para obtener más información sobre la carga de datos en BigQuery, consulta Carga datos en BigQuery.
Ejemplos de canalizaciones de migración de Snowflake
En las siguientes secciones, se muestran ejemplos de cómo migrar tus datos de Snowflake a BigQuery con tres procesos diferentes: ELT, ETL y herramientas de socios.
Extracción, carga y transformación
Puedes configurar un proceso de extracción, carga y transformación (ELT) con dos métodos:
- Usa una canalización para extraer datos de Snowflake y cargarlos en BigQuery
- Extrae datos de Snowflake con otros Google Cloud productos.
Usa una canalización para extraer datos de Snowflake
Para extraer datos de Snowflake y cargarlos directamente en Cloud Storage, usa la herramienta snowflake2bq.
Luego, puedes cargar tus datos de Cloud Storage en BigQuery con una de las siguientes herramientas:
- El conector del Servicio de transferencia de datos de BigQuery para Cloud Storage
- El comando
LOADcon la herramienta de línea de comandos de bq - Bibliotecas cliente de la API de BigQuery
Otras herramientas para extraer datos de Snowflake
También puedes usar las siguientes herramientas para extraer datos de Snowflake:
- Dataflow
- Cloud Data Fusion
- Dataproc
- Conector de BigQuery para Apache Spark
- Conector de Snowflake para Apache Spark
- Conector BigQuery de Hadoop
- El controlador JDBC de Snowflake y Sqoop para extraer datos de Snowflake en Cloud Storage:
Otras herramientas para cargar datos en BigQuery
También puedes usar las siguientes herramientas para cargar datos en BigQuery:
- Dataflow
- Cloud Data Fusion
- Dataproc
- Dataprep by Trifacta
Extracción, transformación y carga
Si deseas transformar tus datos antes de cargarlos en BigQuery, considera las siguientes herramientas:
- Dataflow
- Clona el código de la plantilla de JDBC a BigQuery y modifícala para agregar transformaciones de Apache Beam.
- Cloud Data Fusion
- Crea una canalización reutilizable y transforma tus datos con los complementos de CDAP.
- Dataproc
- Transforma tus datos con Spark SQL o un código personalizado en cualquiera de los lenguajes compatibles de Spark, como Scala, Java, Python o R.
Herramientas de socios para la migración
Hay varios proveedores que se especializan en el espacio de migración de EDW. Para obtener una lista de los socios clave y las soluciones proporcionadas, consulta Socios de BigQuery.
Instructivo de exportación de Snowflake
En el siguiente instructivo, se muestra una exportación de datos de muestra de Snowflake a BigQuery que usa el comando COPY INTO <location> de Snowflake.
Para obtener un proceso detallado y paso a paso que incluya muestras de código, consulta la Google Cloud herramienta Snowflake de servicios profesionales para BigQuery.
Prepárate para la exportación
Para preparar tus datos de Snowflake para una exportación, extráelos en un bucket de Cloud Storage o de Amazon Simple Storage Service (Amazon S3) con los siguientes pasos:
Cloud Storage
En este instructivo, se prepara el archivo en formato PARQUET.
Usa instrucciones de SQL de Snowflake para crear una especificación de formato de archivo con nombre.
create or replace file format NAMED_FILE_FORMAT
    type = 'PARQUET'
Reemplaza
NAMED_FILE_FORMATpor un nombre para el formato de archivo. Por ejemplo,my_parquet_unload_formatCrea una integración con el comando
CREATE STORAGE INTEGRATION.create storage integration INTEGRATION_NAME type = external_stage storage_provider = gcs enabled = true storage_allowed_locations = ('BUCKET_NAME')
Reemplaza lo siguiente:
INTEGRATION_NAME: Es un nombre para la integración de almacenamiento. Por ejemplo,gcs_intBUCKET_NAME: Es la ruta de acceso al bucket de Cloud Storage. Por ejemplo,gcs://mybucket/extract/
Recupera la cuenta de servicio de Cloud Storage para Snowflake con el comando
DESCRIBE INTEGRATION.desc storage integration INTEGRATION_NAME;
El resultado es similar a este:
+-----------------------------+---------------+-----------------------------------------------------------------------------+------------------+
| property                    | property_type | property_value                                                              | property_default |
+-----------------------------+---------------+-----------------------------------------------------------------------------+------------------|
| ENABLED                     | Boolean       | true                                                                        | false            |
| STORAGE_ALLOWED_LOCATIONS   | List          | gcs://mybucket1/path1/,gcs://mybucket2/path2/                               | []               |
| STORAGE_BLOCKED_LOCATIONS   | List          | gcs://mybucket1/path1/sensitivedata/,gcs://mybucket2/path2/sensitivedata/   | []               |
| STORAGE_GCP_SERVICE_ACCOUNT | String        | service-account-id@iam.gserviceaccount.com                 |                  |
+-----------------------------+---------------+-----------------------------------------------------------------------------+------------------+
Otorga a la cuenta de servicio que aparece como
STORAGE_GCP_SERVICE_ACCOUNTacceso de lectura y escritura al bucket especificado en el comando de integración de almacenamiento. En este ejemplo, otorga a la cuenta de servicioservice-account-id@acceso de lectura y escritura al bucket<var>UNLOAD_BUCKET</var>.Crea una etapa externa de Cloud Storage que haga referencia a la integración que creaste anteriormente.
create or replace stage STAGE_NAME
    url='UNLOAD_BUCKET'
    storage_integration = INTEGRATION_NAME
    file_format = NAMED_FILE_FORMAT;
Reemplaza lo siguiente:
STAGE_NAME: Es un nombre para el objeto de etapa de Cloud Storage. Por ejemplo,my_ext_unload_stage
Amazon S3
En el siguiente ejemplo, se muestra cómo transferir datos de una tabla de Snowflake a un bucket de Amazon S3:
En Snowflake, configura un objeto de integración de almacenamiento para permitir que Snowflake escriba en un bucket de Amazon S3 al que se hace referencia en una etapa de Cloud Storage externa.
Este paso implica configurar los permisos de acceso al bucket de Amazon S3, crear el rol de IAM de los servicios web de Amazon (AWS) y crear una integración de almacenamiento en Snowflake con el comando
CREATE STORAGE INTEGRATION:create storage integration INTEGRATION_NAME type = external_stage storage_provider = s3 enabled = true storage_aws_role_arn = 'arn:aws:iam::001234567890:role/myrole' storage_allowed_locations = ('BUCKET_NAME')
Reemplaza lo siguiente:
INTEGRATION_NAME: Es un nombre para la integración de almacenamiento. Por ejemplo,s3_intBUCKET_NAME: Es la ruta de acceso al bucket de Amazon S3 en el que se cargarán los archivos. Por ejemplo,s3://unload/files/
Recupera el usuario de IAM de AWS con el comando
DESCRIBE INTEGRATION.desc integration INTEGRATION_NAME;
El resultado es similar a este:
+---------------------------+---------------+================================================================================+------------------+
| property                  | property_type | property_value                                                                 | property_default |
+---------------------------+---------------+================================================================================+------------------|
| ENABLED                   | Boolean       | true                                                                           | false            |
| STORAGE_ALLOWED_LOCATIONS | List          | s3://mybucket1/mypath1/,s3://mybucket2/mypath2/                                | []               |
| STORAGE_BLOCKED_LOCATIONS | List          | s3://mybucket1/mypath1/sensitivedata/,s3://mybucket2/mypath2/sensitivedata/    | []               |
| STORAGE_AWS_IAM_USER_ARN  | String        | arn:aws:iam::123456789001:user/abc1-b-self1234                                 |                  |
| STORAGE_AWS_ROLE_ARN      | String        | arn:aws:iam::001234567890:role/myrole                                          |                  |
| STORAGE_AWS_EXTERNAL_ID   | String        | MYACCOUNT_SFCRole=                                                   |                  |
+---------------------------+---------------+================================================================================+------------------+
Crea un rol que tenga el privilegio
CREATE STAGEpara el esquema y el privilegioUSAGEpara la integración de almacenamiento:CREATE role ROLE_NAME; GRANT CREATE STAGE ON SCHEMA public TO ROLE ROLE_NAME; GRANT USAGE ON INTEGRATION s3_int TO ROLE ROLE_NAME;
Reemplaza
ROLE_NAMEpor un nombre para el rol. Por ejemplo,myroleOtorga al usuario de IAM de AWS permisos para acceder al bucket de Amazon S3 y crea una etapa externa con el comando
CREATE STAGE:USE SCHEMA mydb.public; create or replace stage STAGE_NAME url='BUCKET_NAME' storage_integration = INTEGRATION_NAMEt file_format = NAMED_FILE_FORMAT;
Reemplaza lo siguiente:
STAGE_NAME: Es un nombre para el objeto de etapa de Cloud Storage. Por ejemplo,my_ext_unload_stage
Exporta datos de Snowflake
Después de preparar tus datos, puedes transferirlos a Google Cloud.
Usa el comando COPY INTO para copiar datos de la tabla de base de datos de Snowflake en un bucket de Cloud Storage o Amazon S3 especificando el objeto de etapa externa, STAGE_NAME.
    copy into @STAGE_NAME/d1
    from TABLE_NAME;
Reemplaza TABLE_NAME por el nombre de tu tabla de base de datos de Snowflake.
Como resultado de este comando, los datos de la tabla se copian en el objeto de etapa de pruebas, que está vinculado al bucket de Cloud Storage o Amazon S3. El archivo incluye el prefijo d1.
Otros métodos de exportación
Para usar Azure Blob Storage en tus exportaciones de datos, sigue los pasos detallados en Descarga en Microsoft Azure. Luego, transfiere los archivos exportados a Cloud Storage con el Servicio de transferencia de almacenamiento.
Precios
Cuando planifiques tu migración de Snowflake, ten en cuenta el costo de transferir y almacenar datos, y de usar servicios en BigQuery. Para obtener más información, consulta Precios.
Es posible que se apliquen costos de salida por transferir datos fuera de Snowflake o AWS. También puede haber costos adicionales cuando se transfieren datos entre regiones o entre diferentes proveedores de servicios en la nube.