
舉例來說,UI 元件可為內嵌應用程式建立資訊主頁的索引標籤式導覽功能,進而提升應用程式的實用性:
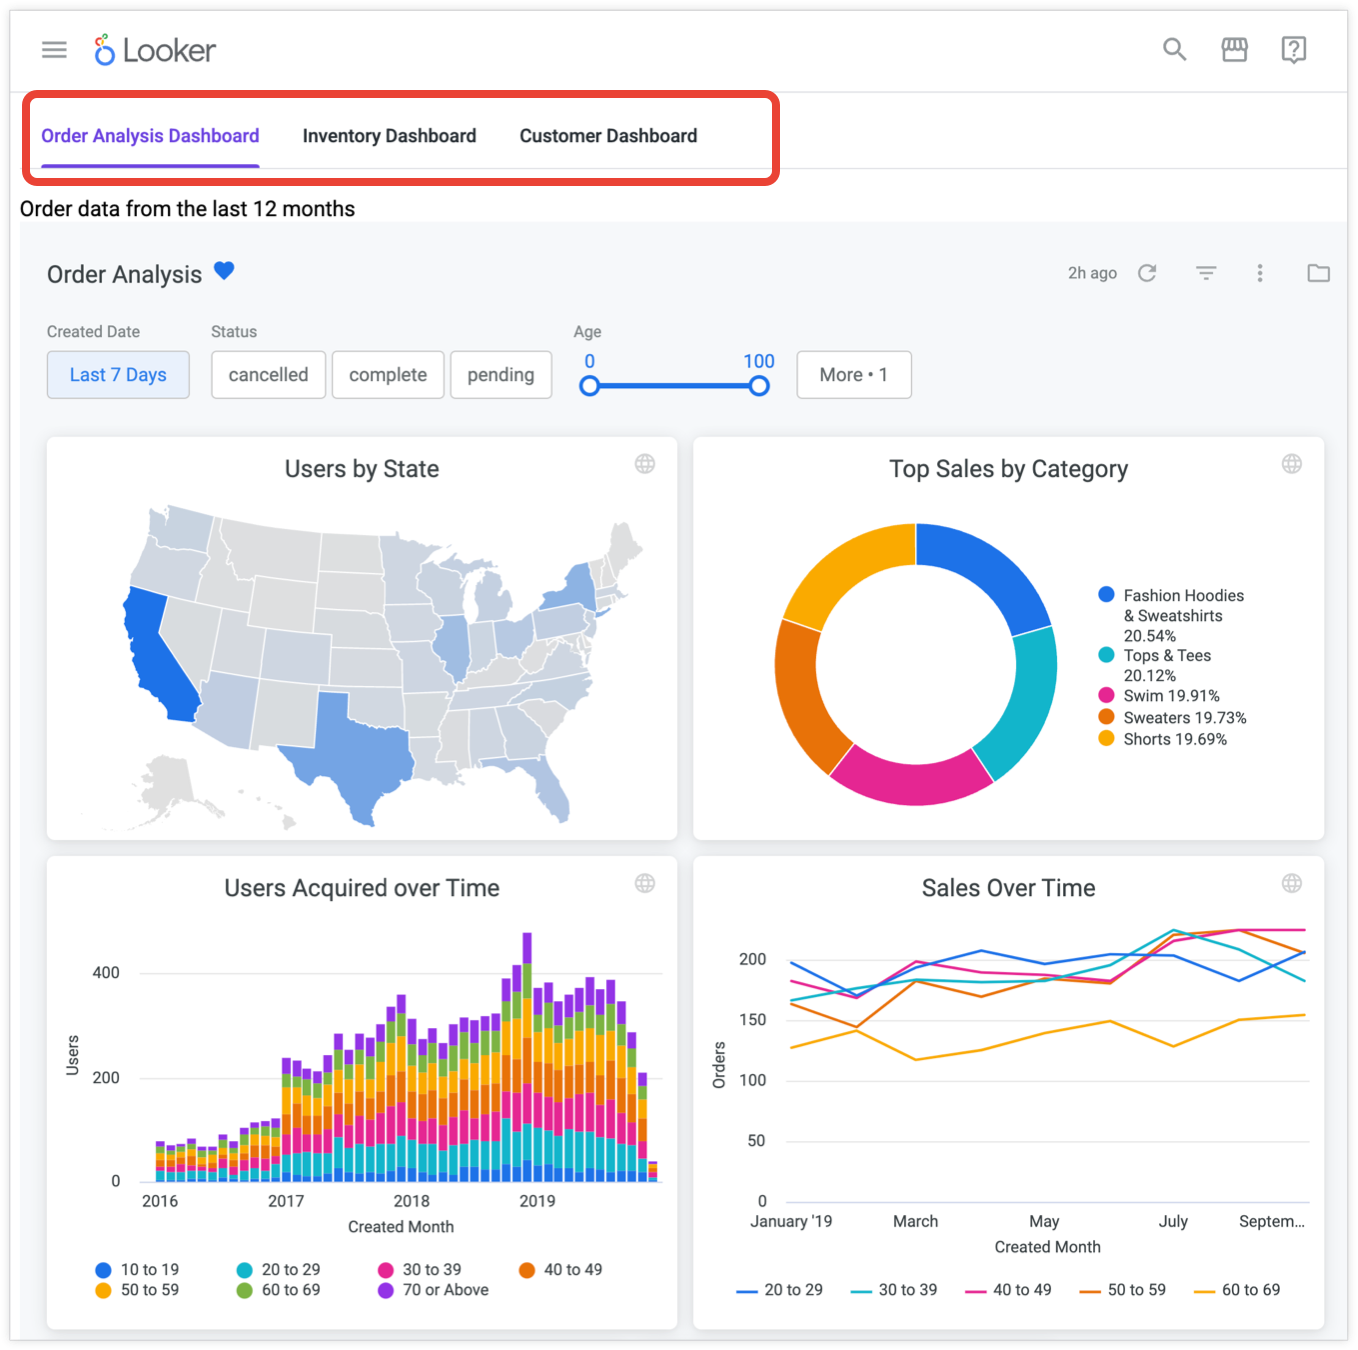
以下範例會將分頁式資訊主頁新增至使用 Looker 擴充功能架構建構的基本 TypeScript 擴充功能。
如要完成這個範例,請確認設定符合需求,然後按照下列步驟操作:
- 建構基本的 TypeScript 擴充功能。
- 建立檔案
src/Dashboards.tsx來連結及儲存資訊主頁。 - 建立檔案
src/Tabs.tsx來儲存Tabs元件。 - 取代
src/App.tsx中的 HelloWorld 參照。 - 使用嵌入授權更新
manifest.lkml檔案。 - 將擴充功能發布至 Looker 執行個體。
需求條件
開始前,請先準備好下列項目:
- 您必須有權存取已啟用擴充功能架構的 Looker 執行個體。
- 您必須具備
develop權限。 - 您應該在 Looker 中建立數個使用者定義的資訊主頁,以便放置在 UI 分頁中。
- 無論您是在擴充架構中建構,還是使用自己的獨立 React 應用程式,都必須透過 Looker API 進行驗證,並存取 Looker SDK 物件。如需更多資訊,請參閱 Looker API 驗證或擴充架構。
- 這個範例使用 Looker 嵌入 SDK。如要允許嵌入 SDK 對執行個體執行作業,請在「管理」面板的「嵌入」頁面中,將
http://localhost:8080加入「嵌入網域允許清單」。 請確認您已安裝 Looker Components NPM 套件。如要瞭解如何安裝及使用元件套件,請參閱 GitHub 和 NPM 上的 README 文件:
步驟 1:建立基本的 TypeScript 擴充功能
如要建構擴充功能,請按照「建構 Looker 擴充功能簡介」說明文件頁面的操作說明進行。如要將擴充功能設為 TypeScript 擴充功能,請進行下列修改:
- 如果使用
create-looker-extension工具建立擴充功能範本,請選擇 React 做為架構,並選擇 TypeScript 做為語言。 - 如果您複製 Git 存放區來建立擴充功能範本,請在第二個步驟中前往
extension-examples/react/TypeScript/helloworld-ts目錄。
步驟 2:建立 src/Dashboards.tsx 檔案,連結及儲存資訊主頁
在新的擴充功能的 src 目錄中,建立 Dashboards.tsx 檔案。這個檔案會連結並儲存您在 Looker 中建立的資訊主頁。
在檔案中貼上以下程式碼。這段程式碼會建立可重複使用的資訊主頁元件。
執行個體網址的程式碼中只有一個位置,https://mycompany.looker.com。請將此網址變更為您的 Looker 執行個體網址。
import React, { useCallback } from "react";
import { LookerEmbedSDK } from "@looker/embed-sdk";
import styled from "styled-components";

export const EmbeddedDashboard = (props: { id: number | string }) => {
 const [dashboard, setDashboard] = React.useState();
 const setupDashboard = (dashboard: any) => {
   setDashboard(dashboard);
 };
 const embedCtrRef = useCallback((el) => {
   const hostUrl = "https://mycompany.looker.com";
   if (el && hostUrl) {
     el.innerHTML = "";
     LookerEmbedSDK.init(hostUrl);
     LookerEmbedSDK.createDashboardWithId(props.id)
       .withNext()
       .appendTo(el)
       .build()
       .connect()
       .then(setupDashboard)
       .catch((error) => {
         console.error("Connection error", error);
       });
   }
 }, []);
 return <EmbedContainer ref={embedCtrRef}></EmbedContainer>;
};

export const EmbedContainer = styled.div`
 width: 100%;
 height: 95vh;
 & > iframe {
   width: 100%;
   height: 100%;
 }
`;
在上述程式碼範例中,會發生下列情況:
匯入陳述式會帶入必要的依附元件。
import React, { useCallback } from "react";
import { LookerEmbedSDK } from "@looker/embed-sdk";
import styled from "styled-components";
下一個程式碼區塊會建立
EmbeddedDashboard物件,這是包含資訊主頁 iframe 的EmbedContainer物件。這個元件可重複使用,只要傳遞不同的id屬性,就能用於任何資訊主頁。iframe 是透過傳遞給 Looker 嵌入 SDK 的資訊主頁 ID 產生。請務必將https://mycompany.looker.com/更新為 Looker 執行個體網址。export const EmbeddedDashboard = (props: { id: number | string }) => { const [dashboard, setDashboard] = React.useState(); const setupDashboard = (dashboard: any) => { setDashboard(dashboard); }; const embedCtrRef = useCallback((el) => { const hostUrl = "https://mycompany.looker.com/"; if (el && hostUrl) { el.innerHTML = ""; LookerEmbedSDK.init(hostUrl); LookerEmbedSDK.createDashboardWithId(props.id) .withNext() .appendTo(el) .build() .connect() .then(setupDashboard) .catch((error) => { console.error("Connection error", error); }); } }, []); return <EmbedContainer ref={embedCtrRef}></EmbedContainer>; };最後一個區塊會設定 EmbedContainer 的樣式。
  export const EmbedContainer = styled.div`
    width: 100%;
    height: 95vh;
    & > iframe {
      width: 100%;
      height: 100%;
    }
`;
步驟 3:建立檔案 src/Tabs.tsx 來儲存 Tabs 元件
在新的擴充功能 src 目錄中,建立 Tabs.tsx 檔案。這個檔案會儲存 Tabs 元件,並參照每個資訊主頁的 Looker 資訊主頁 ID。
然後在該檔案中貼上以下程式碼 (後續章節會說明程式碼的作用):
import React from "react";
import { ComponentsProvider, Tabs2, Tab2 } from "@looker/components";
import { EmbeddedDashboard } from "./Dashboards";

export const Tabs = () => (
 <ComponentsProvider>
   <Tabs2>
     <Tab2 id="5" label="Order Analysis Dashboard">
      Order data from the last 12 months
       <EmbeddedDashboard1 id={5} />
     </Tab2>
     <Tab2 id="2" label="Inventory Dashboard">
       Current global inventory
       <EmbeddedDashboard2 id={2} />
     </Tab2>
     <Tab2 id="7" label="Customer Dashboard">
       Anonymized customer data
       <EmbeddedDashboard3 id={7} />
     </Tab2>
   </Tabs2>
 </ComponentsProvider>
)
在上述程式碼範例中,會發生下列情況:
匯入陳述式會帶入必要的依附元件和元件,以及在
Dashboards.tsx檔案中建立的EmbeddedDashboard物件。import React from "react"; import { ComponentsProvider, Tabs2, Tab2 } from "@looker/components"; import { EmbeddedDashboard } from "./Dashboard";匯出陳述式會提供
Tabs物件,方便匯入其他元件。export const Tabs = () => (ComponentsProvider會包裝個別元件,協助設定主題。<ComponentsProvider> </ComponentsProvider>Tabs2元件及其子項元件Tab2會建立三個分頁,並將這些分頁連結至 Looker 資訊主頁。<Tabs2> <Tab2 id="5" label="Order Analysis Dashboard"> Order data from the last 12 months <EmbeddedDashboard id={5} /> </Tab2> <Tab2 id="2" label="Inventory Dashboard"> Current global inventory <EmbeddedDashboard id={2} /> </Tab2> <Tab2 id="7" label="Customer Dashboard"> Anonymized customer data <EmbeddedDashboard id={7} /> </Tab2> </Tabs2>Tab2的id屬性會接受專屬分頁 ID。請視需要更新環境的 ID。label屬性會接受顯示在每個分頁上的標籤。請視您使用的資訊主頁更新 ID。- 放在 Tab2 標記內的字串會顯示在該分頁的內容區域頂端。視需要更新或移除字串。
EmbeddedDashboard物件會放在分頁中。這些物件的id屬性會接受要內嵌在該分頁中的資訊主頁 ID。建構自己的分頁式資訊主頁時,請將這個值替換為要使用的資訊主頁 ID。您可以在dashboards/後的網址中找到數字資訊主頁 ID。舉例來說,如果網址是https://example.looker.com/dashboards/61?Recording+Date=10+weeks&Country=US,資訊主頁 ID 就是61。
步驟 4:在 src/App.tsx 中取代 HelloWorld 參照
前往 src 目錄中的 App.tsx 檔案,然後移除 HelloWorld 匯入陳述式:
import { HelloWorld } from './HelloWorld'
並替換為:
import { Tabs } from './Tabs'
此外,在 src/App.tsx 檔案中,將 <HelloWorld/> 替換為 <Tabs/>。
您也可以選擇刪除這個目錄中的 HelloWorld.tsx 檔案,因為您不再需要使用該檔案。
步驟 5:使用嵌入授權更新 manifest.lkml 檔案
在 LookML 專案的 manifest.lkml 檔案中,將下列授權新增至授權部分:
use_embeds: yes
manifest.lkml 檔案應如下所示:
application: name {
  label: "label"
  url: "http://localhost:8080/bundle.js"
  # file: "bundle.js
  entitlements: {
    core_api_methods: ["me"] #Add more entitlements here as you develop new functionality
    use_embeds: yes
  }
}
現在您可以前往擴充功能,該擴充功能會顯示在左側導覽面板的「應用程式」資料夾中。如果您已使用 yarn develop 啟動本機開發伺服器,即可查看內嵌的標籤式資訊主頁。
步驟 6:將擴充功能發布至 Looker 執行個體
如要向其他 Looker 使用者顯示擴充功能,請按照下列步驟將擴充功能發布至 Looker 執行個體:
- 開發伺服器執行後,請前往
localhost:8080/bundle.js。 - 將瀏覽器視窗的內容儲存為電腦本機的
.js檔案。 - 請確認您處於開發模式,然後將
.js檔案拖曳至擴充功能專案。儲存變更。 - 在
manifest.lkml檔案中,註解排除url: "http://localhost:8080/bundle.js"行。 - 在
manifest.lkml檔案中,取消註解# file: "bundle.js"行,並確認檔案名稱與上傳至專案的.js檔案名稱相符。儲存變更。 - 修訂並部署變更。
變更部署完成後,您就不需要啟動本機開發伺服器來查看擴充功能,Looker 執行個體的使用者只要前往主導覽面板的「應用程式」資料夾,就能看到擴充功能。