
Dialogflow CX のカスタム ペイロードを使用すると、プレーン テキスト ベースのチャットやインタラクションを超えて、仮想エージェントのエクスペリエンスを強化できます。Dialogflow CX でカスタム ペイロードを使用すると、カスタム レスポンスと引用をレンダリングするように仮想エージェントを構成できます。
カスタム レスポンス メッセージ タイプ
カスタム レスポンスを使用すると、次のメッセージ タイプをレンダリングできます。
テキスト
インライン ボタン
ボタンが動かない
画像
動画
ドキュメント
複雑なビュー(1 つ以上のメッセージ タイプの組み合わせ)
カスタム アクションを使用すると、仮想エージェントは次の操作を実行できます。
人間のエージェントへのエスカレーション
人間のエージェントへの計画的な転送
サポート セッションを終了する
コンタクト センター AI プラットフォーム(CCAI Platform)ペイロード
Dialogflow CX でカスタム ペイロードとして使用されます。次の例は、Dialogflow CX を使用して webSDK のレスポンスの形式を示しています。
{
  "ujet": {
    "type": "text|inline_button|sticky_button|image|video|document|complex|action",
    "action": "escalation|end",
    "title": "message displayed on the top of the message",
    "escalation_reason": "by_consumer|by_virtual_agent",
    "session_variable": {
      "capture_target": "payload|end_user_response",
      "capture_key": "key",
      "payload": {
      }
    },
    "messages": [
      "Hello",
      "How can I help you?"
    ],
    "buttons": [
      {
        "title": "Button 1",
        "action": "quick_reply"
      },
      {
        "title": "Button 2",
        "action": "quick_reply"
      }
    ],
    "images": [
      {
        "url": "https://image.url",
        "text": "an alternate text for an image for when failed to load an image"
      },
      {
        "url": "https://image.url",
        "text": "an alternate text for an image"
      }
    ],
    "videos": [
      {
        "url": "https://video.url",
        "text": "an alternate text for a video for when failed to load a video"
      },
      {
        "url": "https://video.url",
        "text": "an alternate text for a video"
      }
    ],
    "documents": [
      {
        "url": "https://document.url",
        "text": "an alternate text for a document for when failed to load a document"
      },
      {
        "url": "https://document.url",
        "text": "an alternate text for a document"
      }
    ],
    "components": [
      {
        "type": "text",
        "messages": [
          "We need the information for helping you.",
          "Could you please choose the following options?"
        ]
      },
      {
        "type": "inline_button",
        "buttons": [
          {
            "title": "Button 1",
            "action": "quick_reply"
          },
          {
            "title": "Button 2",
            "action": "quick_reply"
          }
        ]
      },
      {
        "type": "image",
        "images": [
          {
            "url": "https://image.url",
            "text": "an alternate text for an image for when failed to load an image"
          },
          {
            "url": "https://image.url",
            "text": "an alternate text for an image"
          }
        ]
      }
    ]
  }
}
カスタム ペイロードのチャット メッセージ形式
CCAI Platform SDK とともに使用して、適切な UI を表示します。Dialogflow CX のカスタム ペイロード形式も同様ですが、ルートに「ujet」フィールドはありません。
詳しくは、以下の例をご覧ください。
例
以降のセクションでは、Dialogflow CX で使用できるペイロードの例を示します。
テキスト
{
  "ujet": {
    "type": "text",
    "messages": [
      "Hello",
      "How can I help you?"
    ]
  }
}
同じキューへのエスカレーション
仮想エージェント別:
{
  "ujet": {
    "type": "action",
    "action": "escalation",
    "escalation_reason": "by_virtual_agent"
  }
}
エンドユーザー別:
{
  "ujet": {
    "type": "action",
    "action": "escalation",
    "escalation_reason": "by_consumer"
  }
}
escalation_reason の値はダッシュボードに表示されます。
対象のキューへのエスカレーション
仮想エージェント別:
{
  "ujet": {
    "type": "action",
    "action": "escalation",
    "escalation_reason": "by_virtual_agent",
    "menu_id": 100,
    "language": "ko"
  }
}
エンドユーザー別:
{
  "ujet": {
      "type": "action",
      "action": "escalation",
      "escalation_reason": "by_consumer",
      "menu_id": 100,
      "language": "ko"
  }
}
escalation_reason の値はダッシュボードに表示されます。
会話を終了
{
  "ujet": {
    "type": "action",
    "action": "end"
  }
}
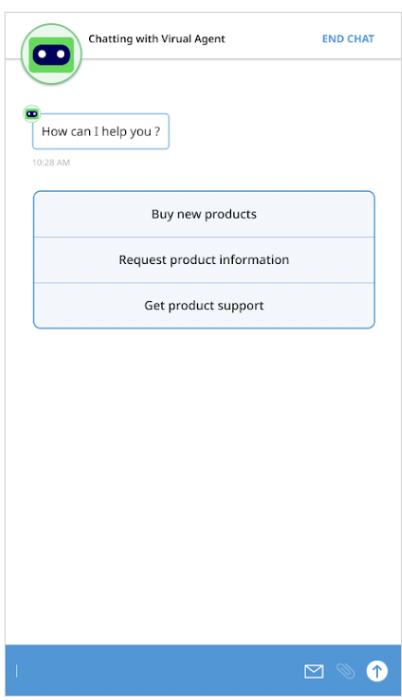
インライン ボタン
{
  "ujet": {
    "type": "inline_button",
    "title": "Select a menu",
    "buttons": [
      {
        "title": "Lorem Ipsum",
        "action": "quick_reply"
      },
      {
        "title": "Lorem Ipsum Dolor Sit Amet",
        "action": "escalation"
      }
    ]
  }
}
例
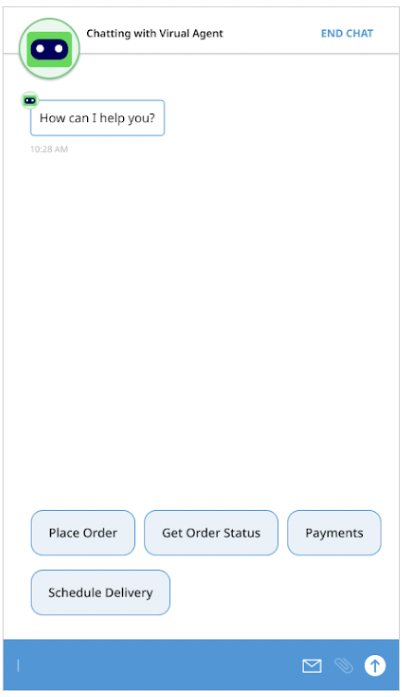
固定ボタン
{
  "ujet": {
    "type": "sticky_button",
    "title": "Select a menu",
    "buttons": [
      {
        "title": "Lorem Ipsum",
        "action": "quick_reply"
      },
      {
        "title": "Lorem Ipsum Dolor Sit Amet",
        "action": "escalation"
      }
    ]
  }
}
例
画像ビュー
{
  "ujet": {
    "type": "image",
    "title": "Please see the following images",
    "images": [
      {
        "url": "https://image1.url",
        "text": "an alternate text for an image for when failed to load an image"
      },
      {
        "url": "https://image2.url",
        "text": "an alternate text for an image"
      }
    ]
  }
}
動画の視聴
{
  "ujet": {
    "type": "video",
    "title": "Please see the following videos",
    "videos": [
      {
        "url": "https://video1.url",
        "text": "an alternate text for a video for when failed to load a video"
      },
      {
        "url": "https://video2.url",
        "text": "an alternate text for a video"
      }
    ]
  }
}
ドキュメントの閲覧
{
  "ujet": {
    "type": "document",
    "title": "Please see the following document",
    "documents": [
      {
        "url": "https://document1.url",
        "text": "an alternate text for a document for when failed to load a document"
      },
      {
        "url": "https://document2.url",
        "text": "an alternate text for a document"
      }
    ]
  }
}
複雑なビュー
{
  "ujet": {
    "type": "complex",
    "type": "Welcome to CCAI Platform world!",
    "components": [
      {
        "type": "text",
        "messages": [
          "We need the information for helping you.",
          "Could you please choose the following options?"
        ]
      },
      {
        "type": "inline_button",
        "buttons": [
          {
            "title": "Button 1",
            "action": "quick_reply"
          },
          {
            "title": "Button 2",
            "action": "quick_reply"
          }
        ]
      },
      {
        "type": "image",
        "images": [
          {
            "url": "https://image1.url",
            "text": "an alternate text for an image for when failed to load an image"
          },
          {
            "url": "https://image2.url",
            "text": "an alternate text for an image"
          }
        ]
      }
    ]
  }
}
Dialogflow でカスタム ペイロードを構成する
Dialogflow を使用してカスタム ペイロードを構成する方法については、カスタム ペイロード レスポンス(Dialogflow ES)または カスタム ペイロード(Dialogflow CX)リソースをご覧ください。
詳細については、カスタム ペイロード処理用のカスタム セッション変数をご覧ください。
仮想エージェントから電話番号または SIP エンドポイントへの転送
Dialogflow CX カスタム ペイロードを使用すると、音声仮想エージェントから指定した電話番号または SIP エンドポイントに通話を転送できます。接続に成功すると、仮想エージェントが通話から削除され、通話が続行されます。接続に失敗すると、転送失敗のメッセージが再生され、通話は仮想エージェントと続行されます。
仮想エージェントの転送は、内部通話と外部通話の両方で機能します。仮想エージェントの転送は、レポートで Planned Transfers として記録されます。
電話番号に通話を転送する
仮想エージェントから電話番号に電話を転送するには、次のコードサンプルのような Dialogflow CX ペイロードを使用します。
{
  "ujet": {
    "type": "action",
    "action": "deflection",
    "deflection_type" : "phone",
    "phone_number": "+16509424879"
  }
}
SIP エンドポイントに電話を転送する
仮想エージェントから SIP エンドポイントに通話を転送できます。オプションで呼び出しタイムアウトを設定できます。
呼び出しタイムアウト
着信タイムアウトを構成するには、sip_ring_timeout フィールドを追加します。これにより、内線またはユニファイド コミュニケーション(UC)宛先への通話が切断される前に応答されるまでの時間が十分に確保されます。これは Twilio ユーザーのみを対象としています。Twilio は、構成した呼び出しタイムアウトに約 5 秒を追加します。
例
仮想エージェントから SIP エンドポイントに電話を転送するには、次のコードサンプルに似た Dialogflow ペイロードを使用します。
{
  "ujet": {
    "type": "action",
    "action": "deflection",
    "deflection_type" : "sip",
    "sip_uri": "SIP_ENDPOINT",
    "sip_ring_timeout": SIP_RINGING_TIMEOUT
  }
}
次のように置き換えます。
SIP_ENDPOINT: 通話の転送先となる SIP エンドポイント。sip:1-999-123-4567@voip-provider.example.netのような形式になります。SIP_RINGING_TIMEOUT: 省略可。通話がタイムアウトするまでの呼び出し時間(秒単位)。有効な値:10~600(両端を含む)。この範囲外の値を設定すると、システムはデフォルトの着信タイムアウトである 30 秒を使用します。デフォルト: 30 秒。
SIP REFER メソッドを使用して SIP エンドポイントに電話を転送する
SIP REFER メソッドを使用して仮想エージェントから SIP エンドポイントに電話を転送するには、次のコードサンプルのような Dialogflow CX ペイロードを使用します。SIP REFER メソッドを使用すると、ヘッダー プロパティを使用して有用な情報を渡すことができます。
{
    "ujet": {
       "type": "action",
       "action": "deflection",
       "deflection_type" : "sip"
       "sip_uri": "sip:1-999-123-4567@voip-provider.example.net"
       "sip_refer": true
       "sip_parameters": {
       "x-header": "value",
       "x-header": "value"
       }
    }
}
カスタム ペイロード処理用のカスタム セッション変数
カスタム セッション変数を使用して、インテント レスポンスとエンドユーザー レスポンスから値をキャプチャし、それらをすべて収集して、コメントとして CRM にアップロードします。詳細については、カスタム セッション変数用の Dialogflow ペイロードをご覧ください。
エンドユーザーの回答からキャプチャする
Flow
CCAI Platform は、Dialogflow CX にレスポンスをリクエストします。
Dialogflow CX は、フルフィルメントによってお客様のサーバーにコールバックすることがあります。
お客様のサーバーは、レスポンスの session_variable フィールドに入力することになっています。
Dialogflow CX は、capture_target =
end_user_responseのsession_variableフィールドを含むカスタム ペイロードを含むレスポンスを返します。エンドユーザーがメッセージを送信します。
CCAI Platform は、前の手順で送信されたエンドユーザー メッセージを保持します。
仮想エージェントがチャットから離脱すると、チャット セッションでキャプチャされたすべてのセッション変数がコメントとして CRM に投稿されます。
カスタム ペイロード形式
{
  "ujet": {
    "session_variable": {
      "capture_target": "end_user_response",
      "capture_key": "key"
    }
  }
}
仮想エージェントがカスタム ペイロードを送信した直後のエンドユーザーの次のメッセージは、キー「key」のセッション変数としてキャプチャされます。
インテント レスポンスからキャプチャする
Flow
CCAI Platform は、Dialogflow CX にレスポンスをリクエストします。
Dialogflow CX は、フルフィルメントによって顧客のサーバーにコールバックする場合があります。
お客様のサーバーは、レスポンスの
session_variableフィールドに入力することになっています。
Dialogflow CX は、
capture_target = "payload"を含むsession_variableフィールドを含むカスタム ペイロードを含むレスポンスを返します。CCAI プラットフォーム サーバーは、ステップ 2 で
payloadオブジェクトを保持します。
仮想エージェントがチャットを終了すると、CCAI プラットフォームは、チャット セッションでキャプチャされたすべてのセッション変数をコメントとして CRM に投稿します。
カスタム ペイロード形式
{
  "ujet": {
    "session_variable": {
      "capture_target": "payload",
      "capture_type": [
        "comment",
        "agent"
      ],
      "payload": {
        "status": "STATUS",
        "order_id": "ORDER_ID",
        "personal_id": "PERSONAL_ID"
      },
        "invisible_to_agent": ["INVISIBLE_TO_AGENT"],
        "display_order_in_adapter": ["DISPLAY_ORDER_IN_ADAPTER"]
    }
  }
}
次のように置き換えます。
STATUS: 注文のステータスORDER_ID: 注文 IDPERSONAL_ID: エンドユーザーの識別子。INVISIBLE_TO_AGENT: エージェント アダプタに表示しないプロパティの配列。たとえば、ここで"personal_id"の値を指定すると、personal_idプロパティがエージェント アダプターに表示されなくなります。詳細については、仮想エージェントのセッション変数を確認するをご覧ください。DISPLAY_ORDER_IN_ADAPTER: エージェント アダプタと CRM レコードにセッション変数が表示される順序を指定するプロパティの配列。詳細については、仮想エージェントのセッション変数を確認するをご覧ください。
CRM でのカスタム セッション変数のアップロード
各セッション変数について、サーバーはすべてのセッション変数を内部的に収集し、仮想エージェントが終了したときに CRM にアップロードすることになっています。
CRM メッセージの例
    ###########################

    Chat ID: 1
    Menu ID: 1
    Chatbot Platform: Platform Name
    Chatbot Workflow: Workflow Name
    Virtual Agent: Virtual Agent Name

    ###########################

    Intent: Intent Captured from End User Response
    Captured At: 2020-06-25 14:54:19

    Captured Variables
    request: Cancel Order

    ###########################

    Intent: Intent Captured from Payload
    Captured At: 2020-06-25 14:58:23

    Captured Variables
    status: Cancelled
    order_id: #12345

    ###########################
シナリオの例
以下は、仮想エージェントとエンドユーザーの間で交換されるさまざまなステップとメッセージを示す会話の例です。
ステップ 1
仮想エージェントからのチャット メッセージ
How can I help you?
(Button) Show my orders
(Button) Cancel an order
インテント レスポンス(カスタム ペイロード)
{
  "ujet": {
    "type": "inline_button",
    "title": "How can I help you?",
    "buttons": [
      {
        "title": "Show my orders",
        "action": "quick_reply"
      },
      {
        "title": "Cancel an order",
        "action": "quick_reply"
      }
    ]
  }
}
キャプチャされたセッション変数
なし
ステップ 2
エンドユーザーからのチャット メッセージ
Click "Cancel an order" button.
キャプチャされたセッション変数
なし
ステップ 3
仮想エージェントからのチャット メッセージ
Can you provide the order id please
インテント レスポンス(カスタム ペイロード)
{
  "ujet": {
    "type": "text"
    "messages": [
      "Can you provide the order id please"
    ],
    "session_variable": {
       "capture_target": "end_user_response",
       "capture_key": "order_id";
    }
  }
}
キャプチャされたセッション変数
なし
ステップ 4
エンドユーザーからのチャット メッセージ
Order id is #12345
キャプチャされたセッション変数
order_id: "Order ID is #12345"
ステップ 5
仮想エージェントからのチャット メッセージ
Order #12345 is cancelled.
Do you need anything else?
インテント レスポンス(カスタム ペイロード)
{
  "ujet": {
    "type": "text",
    "messages": [
      "Order #12345 is canceled.",
      "Do you need anything else?"
    ],
    "session_variable": {
      "capture_target": "payload",
      "capture_type": [
        "agent",
        "comment",
        "event"
      ],
      "payload": {
        "order_id": "#12345",
        "order_status": "cancelled"
      }
    }
  }
}
キャプチャされたセッション変数
order_id: "#12345",
order_status: canceled
ステップ 6
エンドユーザーからのチャット メッセージ
I would like to speak with a human agent.
ステップ 7
仮想エージェントからのチャット メッセージ
Virtual Agent is left from the conversation.
{
  "ujet": {
    "type": "escalation",
    "escalation_reason": "by_consumer"
  }
}
CRM でのカスタム セッション変数のアップロード
前のシナリオから、CRM チケットに次のコメントが投稿されます。
    ---------------------------------

    Chat ID: 1
    Menu ID: 1
    Chatbot Platform: Platform Name
    Chatbot Workflow: Workflow Name
    Virtual Agent: Virtual Agent Name

    --------------------------------

    Intent: Intent Captured from End User Response
    Captured At: 2020-06-25 14:54:19

    Captured Variables
    order_id: Order id is #12345.

    --------------------------------

    Intent: Intent Captured from Payload
    Captured At: 2020-06-25 14:58:23

    Captured Variables
    order_id: #12345
    order_status: canceled

    --------------------------------
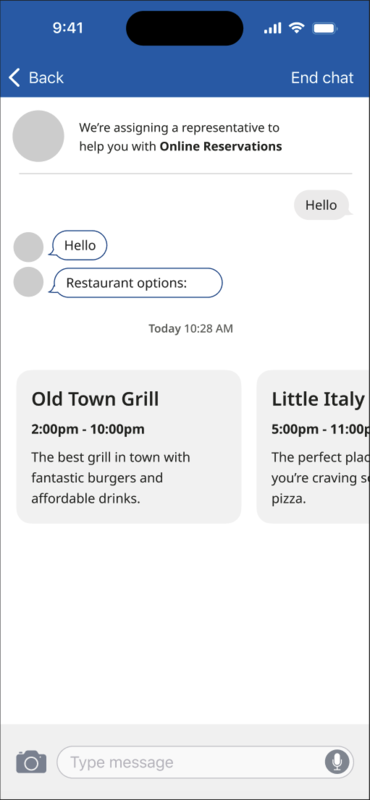
コンテンツ カードを構成する
コンテンツ カードは、簡潔で視覚的に魅力的なコンテンツをカード形式で表示し、エンドユーザーが提示された情報を簡単に利用できるようにします。Dialogflow CX を使用してコンテンツ カードを作成し、タイトル、サブタイトル、本文でカスタマイズできます。
次の例では、コンテンツ カードを使用して、エンドユーザーにレストランの選択肢を表示しています。
コンテンツ カードのプロパティ
| プロパティ名 | 説明 | 必須 | タイプ |
|---|---|---|---|
title |
カードのタイトル。 | ○ | 文字列 |
subtitle |
カードのサブタイトル。 | いいえ | 文字列 |
body |
コンテンツ カードの説明。 | ○ | 文字列 |
link |
ウェブページのリンクまたはディープリンク。SDK は OS の機能を使用して開きます。 | いいえ | 文字列 |
event_params |
クリック イベントに関する追加情報を含む辞書。SDK はこれを使用します。 | いいえ | 辞書 |
Dialogflow CX ペイロード: 検証を追加してコンテンツ カードのタイプを受け入れる
特定の Dialogflow CX ペイロード タイプは、エンドユーザーからのメッセージがチャットボット サーバー経由で受信されたときにコンテンツ カードを処理します。Dialogflow CX ペイロードの例を次に示します。
{
  "ujet": {
    "type": "content_card",
    "cards": [
      {
        "title": "Title",
        "subtitle": "Subtitle",
        "body": "Body",
        "link": "app://page",
        "event_params": {} # for deep-link click event
      }
    ]
  }
}
CRM チャット履歴のコンテンツ カードに関する情報
カードのタイトル情報は、エンドユーザーがクリックしたカードを追跡するためにログに記録されます。この情報は CRM のチャット履歴に記録されます。
次の例では、CRM のチャット メッセージの履歴にコンテンツ カードの操作が表示されています。
[Chat message history]
ID: 305   |   2023-07-06     PDT
--------------------------------------------------
[01:13:32     VA]     Welcome message

[01:14:35     Mobile U.]     Content Cards:
- Title 1
- Title 2
ログ コンテンツ カードのタイトルのクリック イベント
エンドユーザーがコンテンツ カードのタイトルをクリックしたときにログを記録するには、次の形式でイベントをキャプチャします。
{end_user_name} clicked on the '{title}' card.
Note Title: Content Card click
Note Comment: 'John Doe' clicked on the 'See our new website' card.
エンドユーザー イベント API を使用してコンテンツ カードのクリック イベントを作成する
エンドユーザーがコンテンツ カードのタイトルをクリックしたときに、クリックされたカードのタイトルとともに指定された URL に POST リクエストを送信することで、このイベントを記録できます。
API エンドポイント: POST /api/v2/chat/:id/end_user_event
使用方法: コンテンツ カードのクリック イベントを作成します。
URL: /api/v2/chats/:id/end_user_event
メソッド: POST
パラメータ:
| フィールド | タイプ | 説明 |
|---|---|---|
event |
オブジェクト | |
event.name |
文字列 | コンテンツ カードのクリック イベントには content_card_clicked を使用します。 |
event.payload |
オブジェクト | |
event.payload.title |
文字列 | クリックされたカードのタイトルを入力します。 |
(省略可)end_user_name |
文字列 | エンドユーザーの名前を入力します。空白のままにすると、名前は CRM から取得されます。 |
リクエストの例:
{
  "event": {
    "name": "content_card_clicked",
    "payload": {
      "title": "New our website"
    }
  },
  "end_user_name": "consumer 1"   ## optional
}
回答: Status: 202 Accepted