

If your Compute Engine virtual machine (VM) instance needs additional storage space or increased performance limits, you can increase the size of your Persistent Disk. You can increase the disk size at any time, whether or not the disk is attached to a running VM.
This page discusses how to change the size of a Persistent Disk. To increase the size of a Google Cloud Hyperdisk volume, see Modify the size and provisioned performance of a Hyperdisk volume.
When you create a custom Linux image, custom Windows image, or a Fedora CoreOS image, you need to manually increase the size of the boot and non-boot disks. If you're using a public image (except for Fedora CoreOS images), Compute Engine automatically resizes the boot disks.
Increasing the size of a disk doesn't delete or modify disk data, but as a best practice, before you make any changes to the file system or partitions, always back up your disk by creating a snapshot.
Compute Engine manages the hardware behind Persistent Disks, so that you can add and resize your disks without handling striping or redundancy.
Before you begin
-
If you haven't already, set up authentication.
Authentication verifies your identity for access to Google Cloud services and APIs. To run
code or samples from a local development environment, you can authenticate to
Compute Engine by selecting one of the following options:
Select the tab for how you plan to use the samples on this page:
Console
When you use the Google Cloud console to access Google Cloud services and APIs, you don't need to set up authentication.
gcloud
-
Install the Google Cloud CLI. After installation, initialize the Google Cloud CLI by running the following command:
gcloud initIf you're using an external identity provider (IdP), you must first sign in to the gcloud CLI with your federated identity.
- Set a default region and zone.
Terraform
To use the Terraform samples on this page in a local development environment, install and initialize the gcloud CLI, and then set up Application Default Credentials with your user credentials.
-
Install the Google Cloud CLI.
-
If you're using an external identity provider (IdP), you must first sign in to the gcloud CLI with your federated identity.
-
If you're using a local shell, then create local authentication credentials for your user account:
gcloud auth application-default login
You don't need to do this if you're using Cloud Shell.
If an authentication error is returned, and you are using an external identity provider (IdP), confirm that you have signed in to the gcloud CLI with your federated identity.
For more information, see Set up authentication for a local development environment.
REST
To use the REST API samples on this page in a local development environment, you use the credentials you provide to the gcloud CLI.
Install the Google Cloud CLI.
If you're using an external identity provider (IdP), you must first sign in to the gcloud CLI with your federated identity.
For more information, see Authenticate for using REST in the Google Cloud authentication documentation.
-
Required roles and permissions
To get the permission that you need to resize a Persistent Disk, ask your administrator to grant you the following IAM roles on the project:
- Compute Instance Admin (v1) (
roles/compute.instanceAdmin.v1) -
To connect to a VM that can run as a service account:
Service Account User (v1) (
roles/iam.serviceAccountUser)
For more information about granting roles, see Manage access to projects, folders, and organizations.
This predefined role contains the
compute.disks.update
permission,
which is required to
resize a Persistent Disk.
You might also be able to get this permission with custom roles or other predefined roles.
Decrease the size of a disk
You can't decrease the size of a Persistent Disk. You must replace the disk with a new, smaller disk. To do so, create a blank disk that has a smaller size, then copy the contents from the original disk to the new disk. You can then use the new disk instead of the original.
To replace a disk with a smaller disk, follow these steps:
- Create a blank Persistent Disk and specify the size you want. Make sure the new disk is large enough to contain the data from the source disk.
- Attach both disks to the same instance. For instructions, see Attach a non-boot disk to a VM.
- Format and mount the new disk. See the instructions for Linux and Windows instances.
- Copy the data from the original disk to the new disk using
utilities available for your operating system (OS). For example, for Linux,
you can use
rsyncordd. For Windows instances, you can userobocopy. - Verify that the new disk has all the data and is working as expected.
- Update your application or OS to use the new disk.
- After you confirm that the migration is successful, you can detach and delete the original, larger disk.
Size limits for Persistent Disk volumes
The size you specify for a Persistent Disk volume must be within the ranges listed in following table.
| Disk type | Minimum size | Maximum size | Default size |
|---|---|---|---|
| Balanced Persistent Disk | Zonal: 10 GiB Regional: 10 GiB |
64 TiB | 100 GiB |
| Performance (SSD) Persistent Disk | Zonal: 10 GiB Regional: 10 GiB |
64 TiB | 100 GiB |
| Standard Persistent Disk | Zonal: 10 GiB Regional: 200 GiB |
64 TiB | 500 GiB |
| Extreme Persistent Disk | 500 GiB | 64 TiB | 1 TiB |
Increase the size of a Persistent Disk volume
To increase the size of a boot or non-boot disk, use the following procedures:
Console
In the Google Cloud console, go to the Disks page.
In the list of disks in your project, click the name of the disk that you want to resize.
On the disk details page, click Edit. You might need to click the More actions menu and then Edit.
In the Size field, enter the new size for your disk. Disks with MBR partition tables can only resize up to 2 TB.
Click Save to apply your changes to the disk.
The new disk size is displayed in the list of disks.
gcloud
Use the gcloud compute disks resizecommand
and specify the --size flag with the new disk size, in gibibytes (GiB).
gcloud compute disks resize DISK_NAME \
    --size DISK_SIZE \
    --zone=ZONE
Replace the following:
DISK_NAME: the name of the disk that you are resizing.DISK_SIZE: the new size, in gibibytes (GiB), for the disk. Disks with MBR partition tables can resize only up to 2 TB.ZONE: For zonal Persistent Disk, specify the zone where the disk is located.For Regional Persistent Disk, use instead the
--region=REGIONflag and specify the region where the regional disk is located.
Terraform
Choose one of the following options to resize either zonal disks or Regional Persistent Disk:
Zonal disk
To change the size of a Persistent Disk, you can use the
google_compute_disk resource and use
the size parameter.
If you include the size parameter along with the
image or snapshot parameter, the
size value must be equal to or greater than the size of the
image or snapshot.
If you omit the image and snapshot
parameters, you can set the size parameter to less than the
existing disk size. If you do this, Terraform destroys the disk and
creates a new empty Persistent Disk.
Regional Persistent Disk
To change the size of a Regional Persistent Disk, you can use the
google_compute_region_disk resource
and use the size parameter.
If you include the size parameter along with the
image or snapshot parameter, the
size value must be equal to or greater than the size of the
image or snapshot.
If you omit the image and snapshot
parameters, you can set the size parameter to less than the
existing disk size. If you do this, Terraform destroys the disk and
creates a new empty RegionalPersistent Disk.
To learn how to apply or remove a Terraform configuration, see Basic Terraform commands.
REST
To resize a Persistent Disk, construct a POST request to the
compute.disks.resize method.
POST https://compute.googleapis.com/compute/v1/projects/PROJECT_ID/zones/ZONE/disks/DISK_NAME/resize
{
  "sizeGb": "DISK_SIZE"
}
To resize a Regional Persistent Disk, construct a POST request to the
compute.regionDisks.resize method.
POST https://compute.googleapis.com/compute/v1/projects/PROJECT_ID/regions/REGION/disks/DISK_NAME/resize
{
   "sizeGb": "DISK_SIZE"
}
Replace the following:
PROJECT_ID: your project ID.ZONE: For zonal Persistent Disk: the zone where the disk is located.REGION: For Regional Persistent Disk: the region where the disk is located.DISK_NAME: the name of the disk to resize.DISK_SIZE: the new size, in gibibytes (GiB), for the disk. Disks with MBR partition tables can resize only up to 2 TB.
Resize the file system and partitions
After you increase the size of a disk, you might need to resize its file system and partitions. The following is additional information for boot and non-boot disks:
Boot disks: If you're using a custom Linux image, custom Windows image, or a Fedora CoreOS image, you must manually resize the root partition and file system. For instances with public images (except for Fedora CoreOS images), Compute Engine automatically resizes the root partition and file system after you increase the size of the boot disk and you don't need to restart the instance.
Non-boot disks: After increasing the size of the disk, you must extend the file system on the disk to use the added space.
The following examples shows how to manually resize the root partition and file system of a boot disk, and how to manually resize the file system of a non-boot data disk with no partition table. Both examples assume that the attached disks were previously formatted and mounted.
Linux instances
In the Google Cloud console, go to the VM instances page.
Find the instance that the disk that you resized is attached to. Click SSH. The browser opens a terminal connection to the instance.
Use the
dfandlsblkcommands to list the size of the file system and find the device names for your disks.$ sudo df -Th Filesystem Type Size Used Avail Use% Mounted on udev devtmpfs 3.9G 0 3.9G 0% /dev /dev/nvme0n1p1 ext4 9.7G 2.0G 7.2G 22% / /dev/nvme0n1p15 vfat 124M 12M 113M 10% /boot/efi /dev/nvme0n2 ext4 98G 24K 98G 1% /mnt/disks/data
$ sudo lsblk

NAME        MAJ:MIN   RM  SIZE RO TYPE MOUNTPOINT
nvme0n1      259:0    0   20G  0 disk
├─nvme0n1p1  259:5    0  9.9G  0 part /
├─nvme0n1p14 259:6    0    3M  0 part
└─nvme0n1p15 259:7    0  124M  0 part /boot/efi
nvme0n2      259:4    0  100G  0 disk /mnt/disks/data
This example includes the following disks:
- Boot disk: The
/dev/nvme0n1p1partition is on a boot disk that has been resized to 20 GB. The partition table and the file system provide only 9.9 GB to the operating system. - Non-boot data disk: The
/dev/nvme0n2non-boot data disk has no partition table, but the file system on that disk provides 100 GB to the operating system. The mount directory for this disk is/mnt/disks/data.
Make note of the Type column in the
dfcommand output, which indicates if your disk uses anext4orxfsfile system.- Boot disk: The
Verify the partition type:
sudo parted -l
The first time you run this command after resizing a disk, you might see a message similar to the following:
Warning: Not all of the space available to /dev/nvme0n1 appears to be
used, you can fix the GPT to use all of the space (an extra 20971520
blocks) or continue with the current setting?
Fix/Ignore?
If you enter
Fix, the OS will automatically repartition the disk to make the additional space available to the OS. Skip ahead to the last step if you don't have any additional disks to modify.If you choose not to use the automatic fix option, or it isn't available, view the information for the disk you want to repartition:
sudo parted -l /dev/DEVICE_NAME
Look for field: Partition Table, if the value is
msdosthen the disk has an MBR partition type. This means the maximum size of such a disk would be 2 TB.For a boot disk, resize the root partition and file system on the disk. This example assumes the VM image does not support automatic root partitioning and file system resizing.
Resize the root partition by using
parted. For example, the following commands expand partition 1 of the device to the maximum possible size:Open
partedon the device:sudo parted /dev/DEVICE_NAME
Replace
DEVICE_NAMEwith the device name for the boot disk, for example,nvme0n1At the prompt, enter:
(parted) resizepartAt the
Partition number?prompt, enter:1
At the
Warning: Partition /dev/DEVICE_NAMEp1 is being
used. Are you sure you want to continue?
prompt, enter:Yes
At the
End?prompt, enter100%
At the
(parted)prompt, enter:(parted) quit
View the new partition table using
parted -l.sudo parted -l /dev/DEVICE_NAME Model: nvme_card-pd (nvme) Disk /dev/DEVICE_NAME: 21.5GB Sector size (logical/physical): 512B/512B Partition Table: gpt Disk Flags: Number Start End Size File system Name Flags 14 1049kB 4194kB 3146kB bios_grub 15 4194kB 134MB 130MB fat16 boot, esp 1 134MB 21.5GB 21.3GB ext4Extend the file system:
If you are using
ext4, then use theresize2fscommand:sudo resize2fs /dev/PARTITION_NAME
Replace
PARTITION_NAMEwith the partition name for the boot disk, for example,nvme0n1p1.If you are using
xfs, then use thexfs_growfscommand:sudo xfs_growfs -d /
If you are using btrfs, then use the
btrfscommand:sudo btrfs filesystem resize max /
For a non-boot data disk, resize the file system on the disk.
If you are using
ext4, then use theresize2fscommand to extend the file system:sudo resize2fs /dev/PARTITION_NAME
Replace
PARTITION_NAMEwith the partition name for the data disk. In this example, the partition name is/dev/nvme0n2p1.If you are using
xfs, use thexfs_growfscommand to extend the file system:sudo xfs_growfs MOUNT_DIR
If you are using btrfs, use the
btrfscommand to extend the file system:sudo btrfs filesystem resize max MOUNT_DIR
Replace MOUNT_DIR with the mount point of the device. You can find the mount point listed in the
MOUNTPOINTcolumn in the output of thelsblkcommand.
Use the
dfcommand to verify that the file system is extended. For example:df -h /dev/PARTITION_NAME Filesystem Size Used Avail Use% Mounted on /dev/nvme0n2p1 118G 70M 118G 1% /mnt/disks/data
Windows VMs
Use the Windows Disk Management utility to resize partitions on a Windows instance.
In the Google Cloud console, go to the VM instances page.
Find the instance that has the resized disk. Click the RDP button for the instance. The browser opens an RDP connection to the instance.
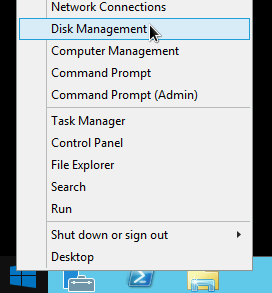
Right-click the Windows Start button and select Disk Management to open the Disk Management tool.
Show the disks partition type by running the following command in Powershell:
Get-Disk
In the Partition Style column, if the value is MBR then the disk has an MBR partition type. This means the maximum size of such a disk would be 2 TB.
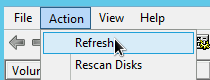
Refresh the Disk Management tool so that it recognizes the additional space on the disk. At the top of the Disk Management window, click Action and select Refresh.
On the disk that you resized, right-click the formatted partition and select Extend Volume.
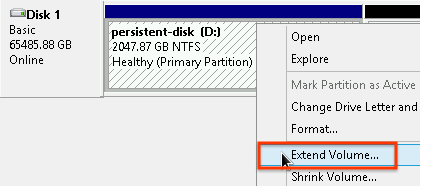
Follow the instructions in the Extend Volume Wizard to extend your existing partition to include the extra disk space. If the existing partition is formatted in NTFS, then the maximum partition size is limited by its cluster size settings.
After you complete the Extend Volume Wizard and the volume finishes formatting, check the Status column on the list of attached disks to ensure that the new disk has a Healthy status.

You don't need to restart your instance after you complete this process. You can start using the added disk space.