
Local SSD disks are designed for temporary storage use cases such as caches or scratch processing space. Because Local SSD disks are located on the physical machine where your Compute Engine instance is running, they can be created only during the compute instance creation process. Local SSD disks can't be used as boot devices.
For third generation machine series and later that support Local SSD disks (excluding G4 and M3), Compute Engine automatically attaches a specific number of Local SSD disks when you create your instance. These machine series offer Local SSD storage in the following ways:
- H4D, C4, C4A, C4D, C3, and C3D: For these machine series, Local SSD storage
is available only with the machine types that end in
-lssd, such asc3-standard-88-lssd. - Z3, A4X Max, A4X, A4, A3, and A2 Ultra machine series: For these machine series, every machine type comes with Local SSD storage.
For G4, M3, first generation, and second generation machine types that support Local SSD disks, you must specify the number of Local SSD disks to attach when you create the compute instance.
After creating a Local SSD disk, you must format and mount the device before you can use it.
For information about the amount of Local SSD storage available with various machine types, and the number of Local SSD disks you can attach to a compute instance, see Choosing a valid number of Local SSD disks.
Before you begin
- Review the Local SSD limitations before using Local SSD disks.
- Review the data persistence scenarios for Local SSD disks.
- If you are adding Local SSD disks to compute instances that have attached GPUs, see Local SSD disk availability.
-
If you haven't already, set up authentication.
Authentication verifies your identity for access to Google Cloud services and APIs. To run
code or samples from a local development environment, you can authenticate to
Compute Engine by selecting one of the following options:
Select the tab for how you plan to use the samples on this page:
Console
When you use the Google Cloud console to access Google Cloud services and APIs, you don't need to set up authentication.
gcloud
-
Install the Google Cloud CLI. After installation, initialize the Google Cloud CLI by running the following command:
gcloud initIf you're using an external identity provider (IdP), you must first sign in to the gcloud CLI with your federated identity.
- Set a default region and zone.
Terraform
To use the Terraform samples on this page in a local development environment, install and initialize the gcloud CLI, and then set up Application Default Credentials with your user credentials.
-
Install the Google Cloud CLI.
-
If you're using an external identity provider (IdP), you must first sign in to the gcloud CLI with your federated identity.
-
If you're using a local shell, then create local authentication credentials for your user account:
gcloud auth application-default login
You don't need to do this if you're using Cloud Shell.
If an authentication error is returned, and you are using an external identity provider (IdP), confirm that you have signed in to the gcloud CLI with your federated identity.
For more information, see Set up authentication for a local development environment.
Go
To use the Go samples on this page in a local development environment, install and initialize the gcloud CLI, and then set up Application Default Credentials with your user credentials.
-
Install the Google Cloud CLI.
-
If you're using an external identity provider (IdP), you must first sign in to the gcloud CLI with your federated identity.
-
If you're using a local shell, then create local authentication credentials for your user account:
gcloud auth application-default login
You don't need to do this if you're using Cloud Shell.
If an authentication error is returned, and you are using an external identity provider (IdP), confirm that you have signed in to the gcloud CLI with your federated identity.
For more information, see Set up authentication for a local development environment.
Java
To use the Java samples on this page in a local development environment, install and initialize the gcloud CLI, and then set up Application Default Credentials with your user credentials.
-
Install the Google Cloud CLI.
-
If you're using an external identity provider (IdP), you must first sign in to the gcloud CLI with your federated identity.
-
If you're using a local shell, then create local authentication credentials for your user account:
gcloud auth application-default login
You don't need to do this if you're using Cloud Shell.
If an authentication error is returned, and you are using an external identity provider (IdP), confirm that you have signed in to the gcloud CLI with your federated identity.
For more information, see Set up authentication for a local development environment.
Python
To use the Python samples on this page in a local development environment, install and initialize the gcloud CLI, and then set up Application Default Credentials with your user credentials.
-
Install the Google Cloud CLI.
-
If you're using an external identity provider (IdP), you must first sign in to the gcloud CLI with your federated identity.
-
If you're using a local shell, then create local authentication credentials for your user account:
gcloud auth application-default login
You don't need to do this if you're using Cloud Shell.
If an authentication error is returned, and you are using an external identity provider (IdP), confirm that you have signed in to the gcloud CLI with your federated identity.
For more information, see Set up authentication for a local development environment.
REST
To use the REST API samples on this page in a local development environment, you use the credentials you provide to the gcloud CLI.
Install the Google Cloud CLI.
If you're using an external identity provider (IdP), you must first sign in to the gcloud CLI with your federated identity.
For more information, see Authenticate for using REST in the Google Cloud authentication documentation.
-
Create a compute instance with Local SSD disks
You can create a compute instance with Local SSD storage using the Google Cloud console, the gcloud CLI, or the Compute Engine API.
Console
Go to the Create an instance page.
Specify the name, region, and zone for your compute instance. Optionally, add tags or labels.
In the Machine configuration section, choose the machine family that contains your target machine type.
Select a series from the Series list, then choose the machine type.
- For H4D, C4, C4A, C4D, C3, and C3D, choose a machine type that ends in
-lssd. - For Z3, A4X Max, A4X, A4, A3, and A2 Ultra, every machine type comes with Local SSD storage.
- For G4, M3, or first and second generation machine series, after
selecting the machine type, do the following:
- Expand the Advanced options section.
- Expand Disks, click Add Local SSD, and do the following:
- On the Configure Local SSD page, choose the disk interface type.
- Select the number of disks you want from the Disk capacity list.
- Click Save.
- For H4D, C4, C4A, C4D, C3, and C3D, choose a machine type that ends in
Continue with the compute instance creation process.
After creating the instance with Local SSD disks, you must format and mount each device before you can use the disks.
gcloud
For the Z3, A4X Max, A4X, A4, A3, and A2 Ultra machine series, to create a compute instance with attached Local SSD disks, create an instance that uses any of the available machine types for that series by following the instructions to create an instance.
For the H4D, C4, C4A, C4D, C3, and C3D machine series, to create a compute instance with attached Local SSD disks, follow the instructions to create an instance, and specify a machine type that ends in
-lssd.For example, you can create a C3 instance with two Local SSD disks that use the NVMe disk interface as follows:
gcloud compute instances create example-c3-instance \
   --zone ZONE \
   --machine-type c3-standard-8-lssd \
   --image-project IMAGE_PROJECT \
   --image-family IMAGE_FAMILY
For G4, M3, and first and second generation machine series, to create a compute instance with attached Local SSD disks, follow the instructions to create an instance, but use the
--local-ssdflag to create and attach a Local SSD disk. To create multiple Local SSD disks, add more--local-ssdflags. Optionally, you can also set values for the interface and the device name for each--local-ssdflag.For example, you can create a M3 instance with four Local SSD disks and specify the disk interface type as follows:
gcloud compute instances create INSTANCE_NAME \
   --machine-type m3-ultramem-64 \
   --zone ZONE \
   --local-ssd interface=INTERFACE_TYPE,device-name=DEVICE-NAME \
   --local-ssd interface=INTERFACE_TYPE,device-name=DEVICE-NAME \
   --local-ssd interface=INTERFACE_TYPE,device-name=DEVICE-NAME \
   --local-ssd interface=INTERFACE_TYPE \
   --image-project IMAGE_PROJECT \
   --image-family IMAGE_FAMILY
Replace the following:
- INSTANCE_NAME: the name for the new compute instance
- ZONE: the zone to create the instance in. This flag
is optional if you have configured the gcloud CLI
compute/zoneproperty or the environment variableCLOUDSDK_COMPUTE_ZONE. - INTERFACE_TYPE: the disk interface type that you
want to use for the Local SSD disk. If you're creating a G4 or M3
instance, or if your boot disk image has
optimized NVMe drivers,
then specify
nvme. Specifyscsifor other images. - DEVICE-NAME: Optional: A name that indicates the disk name to use in the guest operating system symbolic link (symlink).
- IMAGE_FAMILY: one of the available image families that you want installed on the boot disk
- IMAGE_PROJECT: the image project that the image family belongs to
You can attach Local SSD disks to a compute instance created
using a first or second generation machine type using a combination of
nvme and scsi for different partitions. Performance for the nvme
device depends on the boot disk image for your instance. Third generation
and later compute instances support only the NVMe disk interface.
After creating a compute instance with Local SSD disks, you must format and mount each device before you can use it.
Terraform
To create a compute instance with attached Local SSD disks, you can
use the
google_compute_instance resource.
To learn how to apply or remove a Terraform configuration, see Basic Terraform commands.
To generate the Terraform code, you can use the Equivalent code component in the Google Cloud console.- In the Google Cloud console, go to the VM instances page.
- Click Create instance.
- Specify the parameters you want.
- At the top or bottom of the page, click Equivalent code, and then click the Terraform tab to view the Terraform code.
Go
Go
Before trying this sample, follow the Go setup instructions in the Compute Engine quickstart using client libraries. For more information, see the Compute Engine Go API reference documentation.
To authenticate to Compute Engine, set up Application Default Credentials. For more information, see Set up authentication for client libraries.
Java
Java
Before trying this sample, follow the Java setup instructions in the Compute Engine quickstart using client libraries. For more information, see the Compute Engine Java API reference documentation.
To authenticate to Compute Engine, set up Application Default Credentials. For more information, see Set up authentication for client libraries.
Python
Python
Before trying this sample, follow the Python setup instructions in the Compute Engine quickstart using client libraries. For more information, see the Compute Engine Python API reference documentation.
To authenticate to Compute Engine, set up Application Default Credentials. For more information, see Set up authentication for client libraries.
REST
Use the instances.insert method
to create a compute instance from an image family or from a specific
version of an operating system image.
- For the Z3, A4X Max, A4X, A4, A3, and A2 Ultra machine series, to create a compute instance that has attached Local SSD disks, create an instance that uses any of the available machine types for that series.
For the H4D, C4, C4A, C4D, C3, and C3D machine series, to create a compute instance that has attached Local SSD disks, specify an instance type that ends in
-lssd.Here is a sample request payload that creates a C3 instance with an Ubuntu boot disk and two Local SSD disks:
{
 "machineType":"zones/us-central1-c/machineTypes/c3-standard-8-lssd",
 "name":"c3-with-local-ssd",
 "disks":[
    {
       "type":"PERSISTENT",
       "initializeParams":{
          "sourceImage":"projects/ubuntu-os-cloud/global/images/family/ubuntu-2204-lts"
       },
       "boot":true
    }
 ],
 "networkInterfaces":[
    {
       "network":"global/networks/default"
}
 ]
}
For G4, M3, and first and second generation machine series, to create a compute instance with attached Local SSD disks, you can add Local SSD disks during instance creation by using the
initializeParamsproperty. You must also provide the following properties:diskType: Set to Local SSDautoDelete: Set to truetype: Set toSCRATCH
The following properties can't be used with Local SSD disks:
diskNamesourceImagepropertydiskSizeGb
Here is a sample request payload that creates a M3 instance with a boot disk and four Local SSD disks:
{
 "machineType":"zones/us-central1-f/machineTypes/m3-ultramem-64",
 "name":"local-ssd-instance",
 "disks":[
    {
     "type":"PERSISTENT",
     "initializeParams":{
        "sourceImage":"projects/ubuntu-os-cloud/global/images/family/ubuntu-2204-lts"
     },
     "boot":true
    },
    {
       "type":"SCRATCH",
       "initializeParams":{
          "diskType":"zones/us-central1-f/diskTypes/local-ssd"
       },
       "autoDelete":true,
       "interface": "NVME"
    },
    {
       "type":"SCRATCH",
       "initializeParams":{
          "diskType":"zones/us-central1-f/diskTypes/local-ssd"
       },
       "autoDelete":true,
       "interface": "NVME"
    },
    {
       "type":"SCRATCH",
       "initializeParams":{
          "diskType":"zones/us-central1-f/diskTypes/local-ssd"
       },
       "autoDelete":true,
       "interface": "NVME"
    },
    {
       "type":"SCRATCH",
       "initializeParams":{
          "diskType":"zones/us-central1-f/diskTypes/local-ssd"
       },
       "autoDelete":true,
       "interface": "NVME"
    },
 ],
 "networkInterfaces":[
    {
       "network":"global/networks/default"
    }
 ]
}
After creating a Local SSD disk, you must format and mount each device before you can use it.
For more information on creating an instance using REST, see the Compute Engine API.
Formatting and mounting a Local SSD disk
You can format and mount each Local SSD disk individually, or you can combine multiple Local SSD disks into a single logical volume.
Format and mount individual Local SSD disks
The easiest way to connect Local SSD disks to your compute instance is to format and mount each device with a single partition. Alternatively, you can combine multiple partitions into a single logical volume.
Linux instances
Format and mount the new Local SSD disk on your Linux instance. You can use
any partition format and configuration that you need. This example creates
a single ext4 partition.
Go to the VM instances page.
Click the SSH button next to the instance that has the new attached Local SSD. The browser opens a terminal connection to the instance.
In the terminal, use the
findcommand to identify the Local SSD disk that you want to mount.$ find /dev/ | grep google-local-nvme-ssdLocal SSD disks in SCSI mode have standard names like
google-local-ssd-0. Local SSD disks in NVMe mode have names likegoogle-local-nvme-ssd-0, as shown in the following output:$ find /dev/ | grep google-local-nvme-ssd /dev/disk/by-id/google-local-nvme-ssd-0
Format the Local SSD disk with an
ext4file system. This command deletes all existing data from the Local SSD disk.$ sudo mkfs.ext4 -F /dev/disk/by-id/[SSD_NAME]Replace
[SSD_NAME]with the ID of the Local SSD disk that you want to format. For example, specifygoogle-local-nvme-ssd-0to format the first NVMe Local SSD disk on the instance.Use the
mkdircommand to create a directory where you can mount the device.$ sudo mkdir -p /mnt/disks/[MNT_DIR]Replace
[MNT_DIR]with the directory path where you want to mount your Local SSD disk.Mount the Local SSD disk to the compute instance.
$ sudo mount /dev/disk/by-id/[SSD_NAME] /mnt/disks/[MNT_DIR]Replace the following:
[SSD_NAME]: the ID of the Local SSD disk that you want to mount.[MNT_DIR]: the directory where you want to mount your Local SSD disk.
Configure read and write access to the device. For this example, grant write access to the device for all users.
$ sudo chmod a+w /mnt/disks/[MNT_DIR]Replace
[MNT_DIR]with the directory where you mounted your Local SSD disk.
Optionally, you can add the Local SSD disk to the /etc/fstab file so that
the device automatically mounts again when the instance restarts. This
entry does not preserve data on your Local SSD disk if the instance stops.
See Local SSD data persistence
for complete details.
When you specify the entry /etc/fstab file, be sure to include the
nofail option so that the instance can continue to boot even if the
Local SSD is not present. For example, if you take a snapshot of the boot
disk and create a new instance without any Local SSD disks attached, the
instance can continue through the startup process and not pause
indefinitely.
Create the
/etc/fstabentry. Use theblkidcommand to find the UUID for the file system on the device and edit the/etc/fstabfile to include that UUID with the mount options. You can complete this step with a single command.For example, for a Local SSD in NVMe mode, use the following command:
$ echo UUID=`sudo blkid -s UUID -o value /dev/disk/by-id/google-local-nvme-ssd-0` /mnt/disks/[MNT_DIR] ext4 discard,defaults,nofail 0 2 | sudo tee -a /etc/fstabFor a Local SSD in a non-NVMe mode such as SCSI, use the following command:
$ echo UUID=`sudo blkid -s UUID -o value /dev/disk/by-id/google-local-ssd-0` /mnt/disks/[MNT_DIR] ext4 discard,defaults,nofail 0 2 | sudo tee -a /etc/fstabReplace
[MNT_DIR]with the directory where you mounted your Local SSD.Use the
catcommand to verify that your/etc/fstabentries are correct:$ cat /etc/fstab
If you create a snapshot from the boot disk of this instance and use it
to create a separate instance that does not have Local SSD disks, edit the
/etc/fstab file and remove the entry for this Local SSD disk. Even
with the nofail option in place, keep the /etc/fstab file in sync
with the partitions that are attached to your instance and remove these
entries before you create your boot disk snapshot.
Windows instances
Use the Windows Disk Management tool to format and mount a Local SSD disk on a Windows instance.
Connect to the instance through RDP. For this example, go to the VM instances page and click the RDP button next the instance that has the Local SSD disks attached. After you enter your username and password, a window opens with the desktop interface for your server.
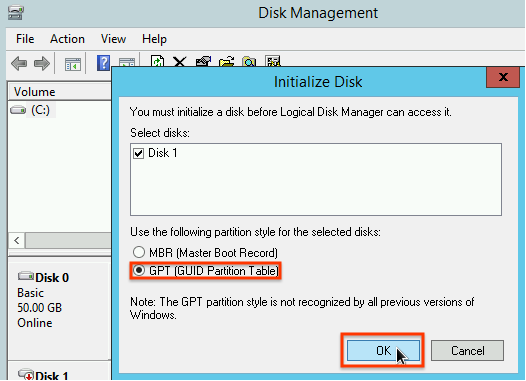
Right-click the Windows Start button and select Disk Management.

If you have not initialized the Local SSD disk before, the tool prompts you to select a partitioning scheme for the new partitions. Select GPT and click OK.
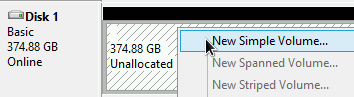
After the Local SSD disk initializes, right-click the unallocated disk space and select New Simple Volume.
Follow the instructions in the New Simple Volume Wizard to configure the new volume. You can use any partition format that you like, but for this example select
NTFS. Also, check Perform a quick format to speed up the formatting process.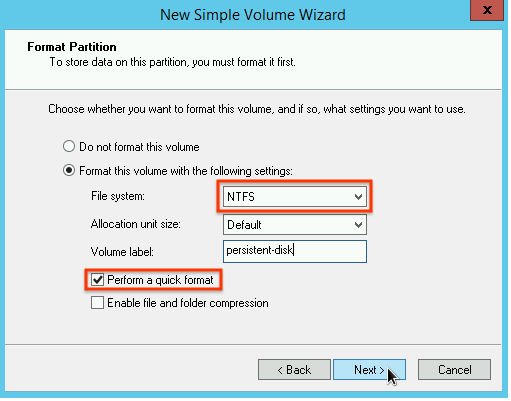
After you complete the wizard and the volume finishes formatting, check the new Local SSD disk to ensure it has a
Healthystatus.
That's it! You can now write files to the Local SSD disk.
Format and mount multiple Local SSD disks into a single logical volume
Unlike Google Cloud Hyperdisk and Persistent Disk volumes, Local SSD disks have a fixed capacity for each disk that you attach to the instance. If you want to combine multiple Local SSD disks into a single logical volume, then you must define volume management across these partitions yourself.
Linux instances
Use mdadm to create a RAID 0 array. This example formats the array with
a single ext4 file system, but you can apply any file system that you
prefer.
Go to the VM instances page.
Click the SSH button next to the instance that has the new attached Local SSD disk. The browser opens a terminal connection to the instance.
In the terminal, install the
mdadmtool. The install process formdadmincludes a user prompt that halts scripts, so run this process manually.Debian and Ubuntu:
$ sudo apt update && sudo apt install mdadm --no-install-recommendsCentOS and RHEL:
$ sudo yum install mdadm -ySLES and openSUSE:
$ sudo zypper install -y mdadmUse the
findcommand to identify all of the Local SSD disks that you want to mount together.For this example, the instance has eight Local SSD partitions in NVMe mode:
$  find /dev/ | grep google-local-nvme-ssd

 /dev/disk/by-id/google-local-nvme-ssd-7
 /dev/disk/by-id/google-local-nvme-ssd-6
 /dev/disk/by-id/google-local-nvme-ssd-5
 /dev/disk/by-id/google-local-nvme-ssd-4
 /dev/disk/by-id/google-local-nvme-ssd-3
 /dev/disk/by-id/google-local-nvme-ssd-2
 /dev/disk/by-id/google-local-nvme-ssd-1
 /dev/disk/by-id/google-local-nvme-ssd-0
finddoes not guarantee an ordering. It's alright if the devices are listed in a different order as long as number of output lines match the expected number of SSD disks. Local SSD disks in SCSI mode have standard names likegoogle-local-ssd. Local SSD disks in NVMe mode have names likegoogle-local-nvme-ssd.Use
mdadmto combine multiple Local SSD disk into a single array named/dev/md0. This example merges eight Local SSD disk in NVMe mode. For Local SSD disks in SCSI mode, specify the names that you obtained from thefindcommand:$ sudo mdadm --create /dev/md0 --level=0 --raid-devices=8 \ /dev/disk/by-id/google-local-nvme-ssd-0 \ /dev/disk/by-id/google-local-nvme-ssd-1 \ /dev/disk/by-id/google-local-nvme-ssd-2 \ /dev/disk/by-id/google-local-nvme-ssd-3 \ /dev/disk/by-id/google-local-nvme-ssd-4 \ /dev/disk/by-id/google-local-nvme-ssd-5 \ /dev/disk/by-id/google-local-nvme-ssd-6 \ /dev/disk/by-id/google-local-nvme-ssd-7 mdadm: Defaulting to version 1.2 metadata mdadm: array /dev/md0 started.
You can confirm the details of the array with
mdadm --detail. Adding the--prefer=by-idflag will list the devices using the/dev/disk/by-idpaths.sudo mdadm --detail --prefer=by-id /dev/md0
The output should look similar to the following for each device in the array.
 ...
 Number   Major   Minor   RaidDevice State
    0      259      0         0      active sync   /dev/disk/by-id/google-local-nvme-ssd-0
 ...
Format the full
/dev/md0array with an ext4 file system.$ sudo mkfs.ext4 -F /dev/md0Create a directory to where you can mount
/dev/md0. For this example, create the/mnt/disks/ssd-arraydirectory:$ sudo mkdir -p /mnt/disks/[MNT_DIR]Replace
[MNT_DIR]with the directory where you want to mount your Local SSD array.Mount the
/dev/md0array to the/mnt/disks/ssd-arraydirectory:$ sudo mount /dev/md0 /mnt/disks/[MNT_DIR]Replace
[MNT_DIR]with the directory where you want to mount your Local SSD array.Configure read and write access to the device. For this example, grant write access to the device for all users.
$ sudo chmod a+w /mnt/disks/[MNT_DIR]Replace
[MNT_DIR]with the directory where you mounted your Local SSD array.
Optionally, you can add the Local SSD disk to the /etc/fstab file so that
the device automatically mounts again when the instance restarts. This
entry does not preserve data on your Local SSD disk if the instance stops.
See Local SSD data persistence
for details.
When you specify the entry /etc/fstab file, be sure to include the
nofail option so that the instance can continue to boot even if the
Local SSD disk is not present. For example, if you take a snapshot of the
boot disk and create a new instance without any Local SSD disks attached,
the instance can continue through the startup process and not pause indefinitely.
Create the
/etc/fstabentry. Use theblkidcommand to find the UUID for the file system on the device and edit the/etc/fstabfile to include that UUID with the mount options. Specify thenofailoption to allow the system to boot even if the Local SSD disk is unavailable.You can complete this step with a single command. For example:$ echo UUID=`sudo blkid -s UUID -o value /dev/md0` /mnt/disks/[MNT_DIR] ext4 discard,defaults,nofail 0 2 | sudo tee -a /etc/fstabReplace
[MNT_DIR]with the directory where you mounted your Local SSD array.If you use a device name like
/dev/md0in the/etc/fstabfile instead of the UUID, you need to edit the file/etc/mdadm/mdadm.confto make sure the array is reassembled automatically at boot. To do this, complete the following two steps:- Make sure the disk array is scanned and reassembled automatically at boot.
$ sudo mdadm --detail --scan | sudo tee -a /etc/mdadm/mdadm.conf - Update
initramfsso that the array will be available during the early boot process.$ sudo update-initramfs -u
- Make sure the disk array is scanned and reassembled automatically at boot.
Use the
catcommand to verify that your/etc/fstabentries are correct:$ cat /etc/fstab
If you create a snapshot from the boot disk of this instance and use it
to create a separate instance that does not have Local SSD disks, edit the
/etc/fstab file and remove the entry for this Local SSD disk array. Even
with the nofail option in place, keep the /etc/fstab file in sync
with the partitions that are attached to your instance and remove these
entries before you create your boot disk snapshot.
Windows instances
Use the Windows Disk Management tool to format and mount an array of Local SSD disks on a Windows instance.
Connect to the instance through RDP. For this example, go to the VM instances page and click the RDP button next the instance that has the Local SSD disks attached. After you enter your username and password, a window opens with the desktop interface for your server.
Right-click the Windows Start button and select Disk Management.
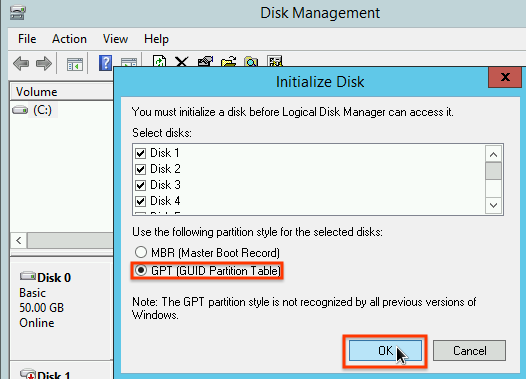
If you have not initialized the Local SSD disks before, the tool prompts you to select a partitioning scheme for the new partitions. Select GPT and click OK.
After the Local SSD disk initializes, right-click the unallocated disk space and select New Striped Volume.
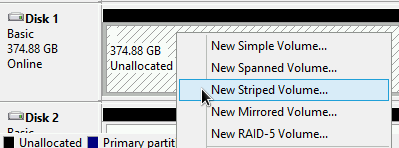
Select the Local SSD disks that you want to include in the striped array. For this example, select all of the partitions to combine them into a single Local SSD disk.
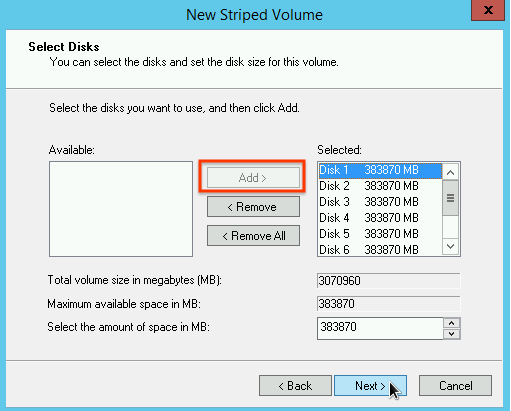
Follow the instructions in the New Striped Volume Wizard to configure the new volume. You can use any partition format that you like, but for this example select
NTFS. Also, check Perform a quick format to speed up the formatting process. After you complete the wizard and the volume finishes formatting, check the new Local SSD disk to ensure it has a
Healthystatus.
You can now write files to the Local SSD disk.
What's next
- Learn more about device names for your compute instances.
- Learn how to benchmark performance for Local SSD disks