
Create and manage folders
The following document describes how create and manage folders in BigQuery. You can use folders to organize and control access to single file code assets, such as notebooks, saved queries, data canvases, and data preparation files. BigQuery offers user folders for individuals to manage their own code assets, and team folders to manage a team's code assets.
BigQuery folders are powered by Dataform.
Before creating folders, learn how BigQuery folders work by reading Organize code assets with folders.
Before you begin
- Sign in to your Google Cloud account. If you're new to Google Cloud, create an account to evaluate how our products perform in real-world scenarios. New customers also get $300 in free credits to run, test, and deploy workloads.
-
In the Google Cloud console, on the project selector page, select or create a Google Cloud project.
Roles required to select or create a project
- Select a project: Selecting a project doesn't require a specific IAM role—you can select any project that you've been granted a role on.
-
Create a project: To create a project, you need the Project Creator role
(
roles/resourcemanager.projectCreator), which contains theresourcemanager.projects.createpermission. Learn how to grant roles.
-
Verify that billing is enabled for your Google Cloud project.
Enable the BigQuery and Dataform APIs.
Roles required to enable APIs
To enable APIs, you need the Service Usage Admin IAM role (
roles/serviceusage.serviceUsageAdmin), which contains theserviceusage.services.enablepermission. Learn how to grant roles.-
In the Google Cloud console, on the project selector page, select or create a Google Cloud project.
Roles required to select or create a project
- Select a project: Selecting a project doesn't require a specific IAM role—you can select any project that you've been granted a role on.
-
Create a project: To create a project, you need the Project Creator role
(
roles/resourcemanager.projectCreator), which contains theresourcemanager.projects.createpermission. Learn how to grant roles.
-
Verify that billing is enabled for your Google Cloud project.
Enable the BigQuery and Dataform APIs.
Roles required to enable APIs
To enable APIs, you need the Service Usage Admin IAM role (
roles/serviceusage.serviceUsageAdmin), which contains theserviceusage.services.enablepermission. Learn how to grant roles.
Required roles
To get the permissions that you need to complete the tasks in this document, ask your administrator to grant you the appropriate IAM roles on the project, folder, or resource.
To get the permissions that you need to use the BigQuery file
browser, ask your administrator to grant you the BigQuery
User (roles/bigquery.user) or
BigQuery Studio User
(roles/bigquery.studioUser) role on the project.
Permissions granted on a folder propagate to all the files and folders contained within it.
The following apply to files and the folders that contain them:
| Role | Granted on | Permissions and use cases |
|---|---|---|
Code Owner (roles/dataform.codeOwner) |
File or folder | Grants full control over a resource in the files and folders system. A user with this role can perform all actions, including deleting the resource, setting its IAM policy, and moving it. |
Code Editor (roles/dataform.codeEditor) |
File or folder | Allows for editing and managing content. A user with this role can add content to folders, edit files, and get the IAM policy for a file or folder. This role is also required on the destination folder when moving a resource. |
Code Commenter (roles/dataform.codeCommenter) |
File or folder | Allows for commenting on code assets or folders. |
Code Viewer (roles/dataform.codeViewer) |
File or folder | Provides read-only access. A user with this role can query the contents of files and folders. |
Code Creator (roles/dataform.codeCreator) |
Project | Grants permission to create new files and folders within a project. |
The following roles are specific to managing team folders:
| Role | Granted on | Permissions and use cases |
|---|---|---|
Team Folder Owner (roles/dataform.teamFolderOwner) |
Team folder | Grants full control over a team folder in the files and folders system. A user with this role can delete the team folder and set its IAM policy. |
Team Folder Contributor (roles/dataform.teamFolderContributor) |
Team folder | Allows for content management within a team folder. A user with this role can update a team folder. |
Team Folder Commenter (roles/dataform.teamFolderCommenter) |
Team folder | Allows for commenting on a team folder and the code assets that it contains. |
Team Folder Viewer (roles/dataform.teamFolderViewer) |
Team folder | Provides read-only access to a team folder and its contents. A user with this role can view a team folder and get its IAM policy. |
Team Folder Creator (roles/dataform.teamFolderCreator) |
Project | Grants permission to create new team folders within a project. |
For more information about granting roles, see Manage access to projects, folders, and organizations.
These predefined roles contain the permissions required to complete the tasks in this document. To see the exact permissions that are required, expand the Required permissions section:
Required permissions
- Create a folder:
folders.createon the parent user folder, team folder, or projectfolders.addContentson the parent folder or team folder
- Retrieve the properties of a folder:
folders.geton the folder - Query the contents of a folder or team folder:
folders.queryContentson the folder - Update a folder:
folders.updateon the folder - Delete a folder:
folders.deleteon the folder - Get the IAM policy for a folder:
folders.getIamPolicyon the folder - Set the IAM policy for a folder:
folders.setIamPolicyon the folder - Move a folder:
folders.moveon the folder being movedfolders.addContentson the destination folder or team folder (not needed if moving to a root folder)
- Create a team folder:
teamFolders.createon the project - Delete a team folder:
teamFolders.deleteon the team folder - Get the IAM policy for a team folder:
teamFolders.getIamPolicyon the team folder - Set the IAM policy for a team folder:
teamFolders.setIamPolicyon the team folder - Retrieve the properties of a team folder:
teamFolders.geton the team folder - Update a team folder:
teamFolders.updateon the team folder
You might also be able to get these permissions with custom roles or other predefined roles.
To gain full access to all the folders and files in your project, ask your administrator to grant you the following IAM roles on the project:
- Dataform Admin
(
roles/dataform.admin) - Dataform Editor
(
roles/dataform.editor) - Dataform Viewer
(
roles/dataform.viewer)
View resources
Follow these steps to view folders and code assets in BigQuery:
Go to the BigQuery page.
In the left pane, click Files to open the file browser:
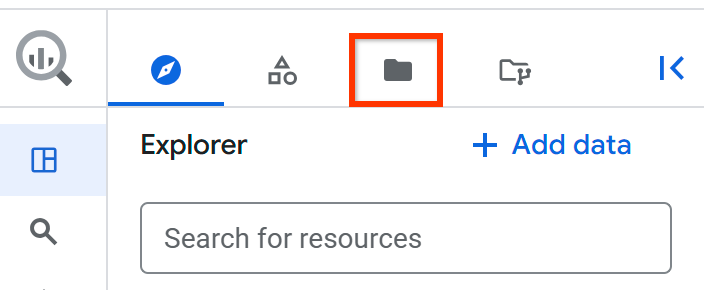
If you don't see the left pane, click Expand left pane to open the pane.
Do one of the following to view folders and code assets in the selected project and code region:
- Expand the User (your email address) node to see folders and files that you have created.
- Expand the Team folders node to view all team folders that you have access to.
- Expand the Shared with me node to view all folders and files that other users have shared with you.
Set the default region for code assets
You can have folders and code assets in different code regions.
All new code assets in your Google Cloud project use a default region. After the asset is created, you can't change its region.
To set the default region for new code assets, do the following:
Go to the BigQuery page.
In the left pane, click Files to open the file browser:
Next to the project name, click View files panel actions > Switch code region.
Select the code region that you want to use as a default.
Click Save.
For a list of supported regions, see BigQuery Studio locations.
Refresh folder contents
To ensure that any recent changes made by you or shared by others are visible in the file browser, do the following:
Go to the BigQuery page.
In the left pane, click Files to open the file browser:
Select the folder that you want to refresh, such as your user root node, a team folder root, or an individual folder.
Click View actions > Refresh contents.
Create a folder or code asset
Use this procedure to create any of the following resources:
- A user folder or code asset at any level.
- A subfolder in a team folder.
- A code asset in the subfolder of a team folder.
For information about creating a team folder, see Create a team folder.
Follow these steps to create a folder or code asset in BigQuery:
Go to the BigQuery page.
In the left pane, click Files to open the file browser:
Select the user root node or the folder in which you want to create the resource.
Click View actions > Create, and then select the type of resource that you want to create.
In the create resource pane, type a name for the new resource.
Click Save.
Create a team folder
Follow these steps to create a team folder in BigQuery:
Go to the BigQuery page.
In the left pane, click Files to open the file browser:
Select the team folder root node.
Click View actions > Create team folder.
In the Create team folder dialog, type a name for the team folder.
Click Create.
Upload a code asset
Follow these steps to upload a code asset in BigQuery:
Go to the BigQuery page.
In the left pane, click Files to open the file browser:
Select the folder to which you want to upload the code asset.
Click View actions > Upload, and then select the type of code asset that you want to upload.
In the upload resource pane, do one of the following:
- Click the File upload radio button, and then browse for and select a local file.
- Click the URL radio button, and then type the URL for a code asset file that resides in a GitHub repository.
Type a name for the code asset.
Optional: Select a region in which to store the code asset.
Click Save.
Download a code asset
Follow these steps to download a code asset in BigQuery:
Go to the BigQuery page.
In the left pane, click Files to open the file browser:
Select the code asset that you want to download.
Click View actions > Download.
Rename a folder or code asset
Follow these steps to rename a folder or code asset in BigQuery:
Go to the BigQuery page.
In the left pane, click Files to open the file browser:
Select the folder or code asset that you want to rename.
Click View actions > Rename.
In the resource renaming dialog, type a new name for the resource.
Click Rename.
Share a folder or code asset
Follow these steps to share a folder or code asset in BigQuery:
Go to the BigQuery page.
In the left pane, click Files to open the file browser:
Select the folder or code asset that you want to share.
In the Share permissions pane, click Add User/Group.
In the New principals field, enter a principal.
Do one of the following:
In the Role list, select one of the following roles to share a code asset, including a user folder:
roles/dataform.codeOwner: Can perform any action on the code asset, including deleting or sharing it.roles/dataform.codeEditor: Can perform any action on the code asset except for deleting or sharing it.roles/dataform.codeCommenter: Can view and comment on the code asset.roles/dataform.codeViewer: Can view the code asset.
In the Role list, select one of the following roles to share a team folder:
roles/dataform.teamFolderOwner: Can perform any action on the team folder, including deleting or sharing it.roles/dataform.teamFolderContributor: Can perform any action on the team folder except for deleting or sharing it.roles/dataform.teamFolderCommenter: Can view and comment on the team folder and the code assets that it contains.roles/dataform.teamFolderViewer: Can view the team folder and the code assets that it contains.
Click Save.
To return to the notebook information page, click Close.
Move a folder or code asset
Follow these steps to move a folder or code asset in BigQuery:
Go to the BigQuery page.
In the left pane, click Files to open the file browser:
Depending on how many resources you want to move, do one of the following:
- Move a single resource: In the file browser, select the folder or code asset you want to move, and then click View actions > Move.
- Move multiple resources: In the folder view, select the checkbox next to each resource that you want to move, and then click Move.
In the move resource dialog, select the user folder or team folder to which you want to move the resource.
Click Move.
Copy a folder or code asset
Follow these steps to copy a folder or code asset in BigQuery:
Go to the BigQuery page.
In the left pane, click Files to open the file browser:
Select the folder or code asset that you want to copy.
Click View actions > Copy.
In the copy resource dialog, select the user or team folder to which you want to copy the resource.
Click Copy.
Delete a folder or code asset
Follow these steps to delete a folder or code asset in BigQuery:
Go to the BigQuery page.
In the left pane, click Files to open the file browser:
Depending on how many resources you want to delete, do one of the following:
- Delete a single resource: In the file browser, select the folder or code asset you want to delete, and then click View actions > Delete.
- Delete multiple resources: In the folder view, select the checkbox next to each resource you want to delete, and then click Delete.
In the delete resource dialog, click Delete.
What's next
- Organize code assets with folders
- Create notebooks
- Create saved queries
- Create data canvases
- Create data preparations