
本页面介绍了如何替换图片背景。借助 Imagen on Vertex AI,您可以使用自动对象细分保留部分内容,同时修改其他图片内容。借助 Imagen 3,您还可以提供自己的蒙版区域,以便在修改时更好地控制。
以下模型支持替换图片背景:
查看 Imagen for Editing and Customization 模型卡片
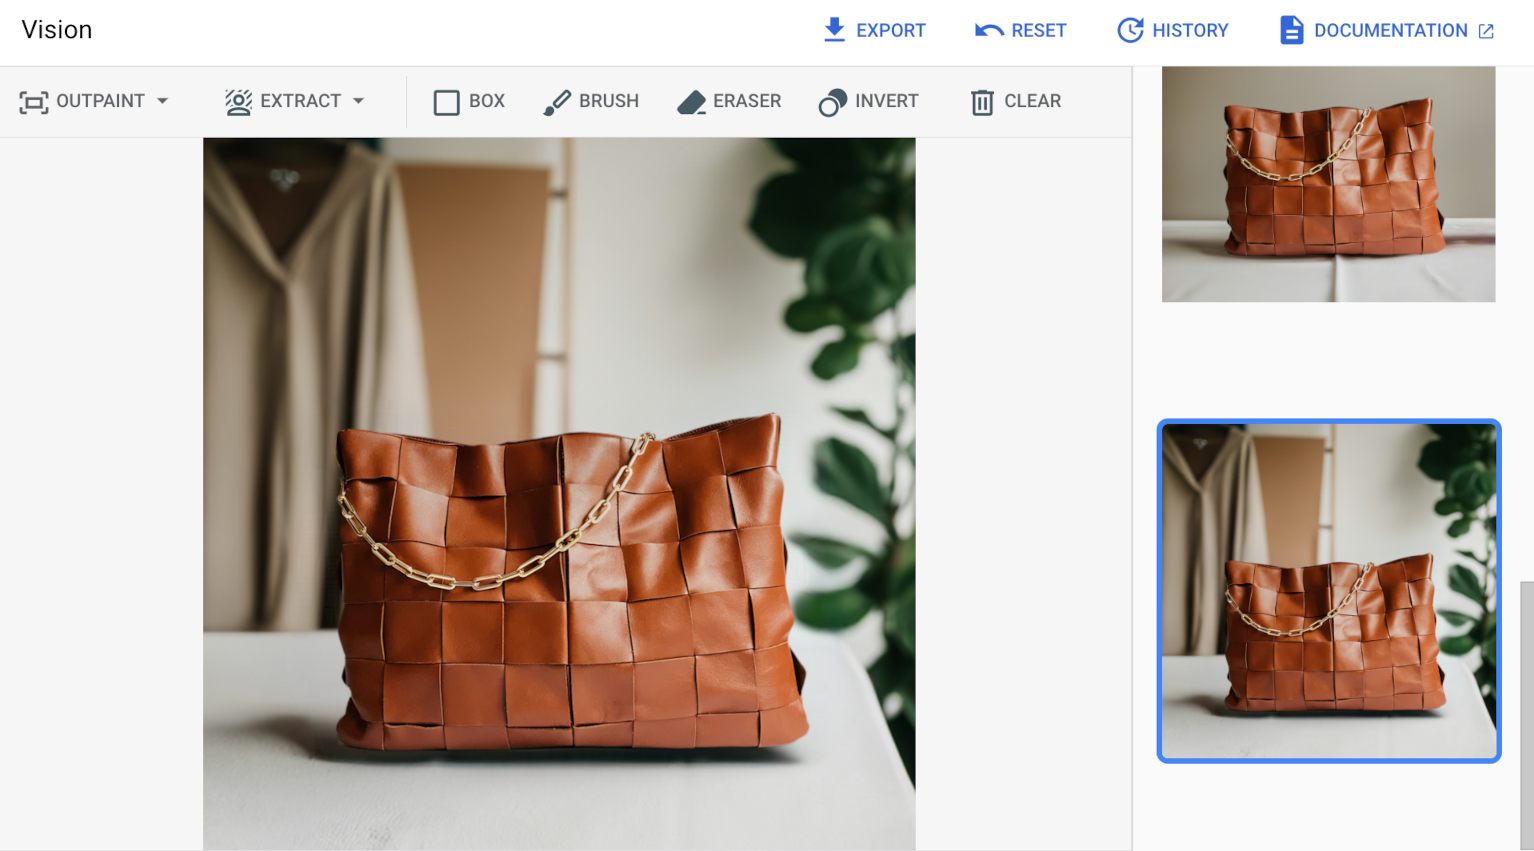
产品图片修改示例
以下使用情形重点介绍了如何通过修改图片的背景来美化产品图片,同时保留图片中产品的外观。
准备工作
- 登录您的 Google Cloud 账号。如果您是 Google Cloud新手,请 创建一个账号来评估我们的产品在实际场景中的表现。新客户还可获享 $300 赠金,用于运行、测试和部署工作负载。
-
In the Google Cloud console, on the project selector page, select or create a Google Cloud project.
Roles required to select or create a project
- Select a project: Selecting a project doesn't require a specific IAM role—you can select any project that you've been granted a role on.
-
Create a project: To create a project, you need the Project Creator role
(
roles/resourcemanager.projectCreator), which contains theresourcemanager.projects.createpermission. Learn how to grant roles.
-
Verify that billing is enabled for your Google Cloud project.
Enable the Vertex AI API.
Roles required to enable APIs
To enable APIs, you need the
serviceusage.services.enablepermission. If you created the project, then you likely already have this permission through the Owner role (roles/owner). Otherwise, you can get this permission through the Service Usage Admin role (roles/serviceusage.serviceUsageAdmin). Learn how to grant roles.-
为您的环境设置身份验证。
选择标签页以了解您打算如何使用本页面上的示例:
控制台
当您使用 Google Cloud 控制台访问 Google Cloud 服务和 API 时,无需设置身份验证。
Python
如需在本地开发环境中使用本页面上的 Python 示例,请安装并初始化 gcloud CLI,然后使用您的用户凭据设置应用默认凭据。
-
安装 Google Cloud CLI。
-
如果您使用的是外部身份提供方 (IdP),则必须先使用联合身份登录 gcloud CLI。
-
如果您使用的是本地 shell,请为您的用户账号创建本地身份验证凭证:
gcloud auth application-default login
如果您使用的是 Cloud Shell,则无需执行此操作。
如果系统返回身份验证错误,并且您使用的是外部身份提供方 (IdP),请确认您已 使用联合身份登录 gcloud CLI。
如需了解详情,请参阅 Google Cloud 身份验证文档中的 为本地开发环境设置 ADC。
REST
如需在本地开发环境中使用本页面上的 REST API 示例,请使用您提供给 gcloud CLI 的凭证。
安装 Google Cloud CLI。
如果您使用的是外部身份提供方 (IdP),则必须先使用联合身份登录 gcloud CLI。
如需了解详情,请参阅 Google Cloud 身份验证文档中的使用 REST 时进行身份验证。
-
使用自动检测的背景蒙版进行修改
按照以下说明启用并使用具有自动检测背景功能的产品图像修改。
控制台
在 Google Cloud 控制台中,依次前往 Vertex AI > Vertex AI Studio 页面。
点击生成媒体。
点击图片。
从任务列表中,选择 Product-background-editing。
从模型列表中,选择要使用的 Imagen 模型。
在输入图片中,点击添加,然后选择要修改的图片进行上传。
在提示框中,输入描述如何编辑图片的提示。
选择其中一个蒙版提取选项:
- 背景元素:检测背景元素并创建一个围绕它们的蒙版。
- 前景元素:检测前景对象并创建一个围绕它们的蒙版。
- background_replace 人物:检测人物并创建一个围绕他们的蒙版。
点击运行。
Python
安装
pip install --upgrade google-genai
如需了解详情,请参阅 SDK 参考文档。
设置环境变量以将 Gen AI SDK 与 Vertex AI 搭配使用:
# Replace the `GOOGLE_CLOUD_PROJECT` and `GOOGLE_CLOUD_LOCATION` values
# with appropriate values for your project.
export GOOGLE_CLOUD_PROJECT=GOOGLE_CLOUD_PROJECT
export GOOGLE_CLOUD_LOCATION=us-central1
export GOOGLE_GENAI_USE_ENTERPRISE=True
REST
如需了解详情,请参阅修改图片 API 参考文档。
在使用任何请求数据之前,请先进行以下替换:
- PROJECT_ID:您的 Google Cloud 项目 ID。
- LOCATION:您的项目的区域。 例如
us-central1、europe-west2或asia-northeast3。如需查看可用区域的列表,请参阅 Vertex AI 上的生成式 AI 位置。使用区域 API 端点时,端点网址中的区域会决定请求的处理位置,如果发生冲突,系统会忽略资源路径中的LOCATION。 - TEXT_PROMPT:用于指导模型生成什么图片的文本提示。生成和修改都需要此字段。
referenceType:ReferenceImage是一种图片,可为图片修改提供更多上下文。修改应用场景需要使用常规 RGB 原始参考图片 (REFERENCE_TYPE_RAW)。一次请求中最多只能存在一张原始参考图片。 输出图片的高度和宽度与原始参考图片相同。蒙版修改应用场景需要蒙版参考图片 (REFERENCE_TYPE_MASK)。referenceId:参考图片的整数 ID。在此示例中,这两个参考图片对象的类型不同,因此具有不同的referenceId值(1和2)。- B64_BASE_IMAGE:要修改或放大的基础图片。图片必须指定为 base64 编码的字节字符串。大小上限:10 MB。
maskImageConfig.maskMode:用于进行蒙版修改的蒙版模式。MASK_MODE_BACKGROUND用于在没有用户提供的蒙版的情况下自动对背景进行蒙版处理。- MASK_DILATION - 浮点数。将此蒙版扩大的图像宽度的百分比。建议使用值
0.00,以免扩展前景产品。最小值:0,最大值:1。 默认:0.03。 - EDIT_STEPS - 整数。基本模型的采样步数。如需修改产品图片,请从
75步数开始。 - EDIT_IMAGE_COUNT - 已修改图片的数量。接受的整数值:1-4。默认值:4。
HTTP 方法和网址:
POST https://LOCATION-aiplatform.googleapis.com/v1/projects/PROJECT_ID/locations/LOCATION/publishers/google/models/imagen-3.0-capability-001:predict
请求 JSON 正文:
{
  "instances": [
    {
      "prompt": "TEXT_PROMPT",
      "referenceImages": [
        {
          "referenceType": "REFERENCE_TYPE_RAW",
          "referenceId": 1,
          "referenceImage": {
            "bytesBase64Encoded": "B64_BASE_IMAGE"
          }
        },
        {
          "referenceType": "REFERENCE_TYPE_MASK",
          "referenceId": 2,
          "maskImageConfig": {
            "maskMode": "MASK_MODE_BACKGROUND",
            "dilation": MASK_DILATION
          }
        }
      ]
    }
  ],
  "parameters": {
    "editConfig": {
      "baseSteps": EDIT_STEPS
    },
    "editMode": "EDIT_MODE_BGSWAP",
    "sampleCount": EDIT_IMAGE_COUNT
  }
}
如需发送请求,请选择以下方式之一:
curl
将请求正文保存在名为 request.json 的文件中,然后执行以下命令:
curl -X POST \
     -H "Authorization: Bearer $(gcloud auth print-access-token)" \
     -H "Content-Type: application/json; charset=utf-8" \
     -d @request.json \
     "https://LOCATION-aiplatform.googleapis.com/v1/projects/PROJECT_ID/locations/LOCATION/publishers/google/models/imagen-3.0-capability-001:predict"
PowerShell
将请求正文保存在名为 request.json 的文件中,然后执行以下命令:
$cred = gcloud auth print-access-token
$headers = @{ "Authorization" = "Bearer $cred" }

Invoke-WebRequest `
    -Method POST `
    -Headers $headers `
    -ContentType: "application/json; charset=utf-8" `
    -InFile request.json `
    -Uri "https://LOCATION-aiplatform.googleapis.com/v1/projects/PROJECT_ID/locations/LOCATION/publishers/google/models/imagen-3.0-capability-001:predict" | Select-Object -Expand Content
{
  "predictions": [
    {
      "bytesBase64Encoded": "BASE64_IMG_BYTES",
      "mimeType": "image/png"
    },
    {
      "mimeType": "image/png",
      "bytesBase64Encoded": "BASE64_IMG_BYTES"
    },
    {
      "bytesBase64Encoded": "BASE64_IMG_BYTES",
      "mimeType": "image/png"
    },
    {
      "bytesBase64Encoded": "BASE64_IMG_BYTES",
      "mimeType": "image/png"
    }
  ]
}
使用定义的蒙版区域进行修改
您可以选择遮盖要替换的区域,而不是让 Imagen 自动检测蒙版。
控制台
在 Google Cloud 控制台中,依次前往 Vertex AI > Vertex AI Studio 页面。
点击生成媒体。
点击图片。
从任务列表中,选择 Product-background-editing。
从模型列表中,选择要使用的 Imagen 模型。
在输入图片中,点击添加,然后选择要修改的图片进行上传。
在提示框中,输入描述如何编辑图片的提示。
执行下列操作之一以指定遮盖:
- 上传您自己的蒙版:
- 在电脑上创建蒙版。
- 依次点击 上传 导入蒙版,然后选择要上传的蒙版。
- 定义蒙版:在修改工具栏中,使用蒙版工具(方框、画笔或masked_transitions 反转 工具)指定要添加内容的一个或多个区域。
- 上传您自己的蒙版:
点击运行。
Python
安装
pip install --upgrade google-genai
如需了解详情,请参阅 SDK 参考文档。
设置环境变量以将 Gen AI SDK 与 Vertex AI 搭配使用:
# Replace the `GOOGLE_CLOUD_PROJECT` and `GOOGLE_CLOUD_LOCATION` values
# with appropriate values for your project.
export GOOGLE_CLOUD_PROJECT=GOOGLE_CLOUD_PROJECT
export GOOGLE_CLOUD_LOCATION=us-central1
export GOOGLE_GENAI_USE_ENTERPRISE=True
REST
如需详细了解 Imagen API,请参阅以下内容:
- 方法:
endpoints.predict VisionGenerativeModelInstanceVisionGenerativeModelParams-
在使用任何请求数据之前,请先进行以下替换:
- PROJECT_ID:您的 Google Cloud 项目 ID。
- LOCATION:您的项目的区域。 例如
us-central1、europe-west2或asia-northeast3。如需查看可用区域的列表,请参阅 Vertex AI 上的生成式 AI 位置。使用区域 API 端点时,端点网址中的区域会决定请求的处理位置,如果发生冲突,系统会忽略资源路径中的LOCATION。 - TEXT_PROMPT:用于指导模型生成什么图片的文本提示。生成和修改都需要此字段。
referenceId:参考图片的整数 ID。在此示例中,这两个参考图片对象的类型不同,因此具有不同的referenceId值(1和2)。- B64_BASE_IMAGE:要修改或放大的基础图片。图片必须指定为 base64 编码的字节字符串。大小上限:10 MB。
- B64_MASK_IMAGE:您要用作蒙版层来修改原始图片的黑白图片。图片必须指定为 base64 编码的字节字符串。大小上限:10 MB。
- MASK_DILATION - 浮点数。将此蒙版扩大的图像宽度的百分比。建议使用值
0.00,以免扩展前景产品。最小值:0,最大值:1。 默认:0.03。 - EDIT_STEPS - 整数。基本模型的采样步数。如需修改产品图片,请从
75步数开始。 - EDIT_IMAGE_COUNT - 已修改图片的数量。接受的整数值:1-4。默认值:4。
HTTP 方法和网址:
POST https://LOCATION-aiplatform.googleapis.com/v1/projects/PROJECT_ID/locations/LOCATION/publishers/google/models/imagen-3.0-capability-001:predict
请求 JSON 正文:
{
  "instances": [
    {
      "prompt": "TEXT_PROMPT": [
        {
          "referenceType": "REFERENCE_TYPE_RAW",
          "referenceId": 1,
          "referenceImage": {
            "bytesBase64Encoded": "B64_BASE_IMAGE"
          }
        },
        {
          "referenceType": "REFERENCE_TYPE_MASK",
          "referenceId": 2,
          "referenceImage": {
            "bytesBase64Encoded": "B64_MASK_IMAGE"
          },
          "maskImageConfig": {
            "maskMode": "MASK_MODE_USER_PROVIDED",
            "dilation": MASK_DILATION
          }
        }
      ]
    }
  ],
  "parameters": {
    "editConfig": {
      "baseSteps": EDIT_STEPS
    },
    "editMode": "EDIT_MODE_BGSWAP",
    "sampleCount": EDIT_IMAGE_COUNT
  }
}
如需发送请求,请选择以下方式之一:
以下示例回答适用于产品背景修改请求。curl
将请求正文保存在名为
request.json的文件中,然后执行以下命令:curl -X POST \
-H "Authorization: Bearer $(gcloud auth print-access-token)" \
-H "Content-Type: application/json; charset=utf-8" \
-d @request.json \
"https://LOCATION-aiplatform.googleapis.com/v1/projects/PROJECT_ID/locations/LOCATION/publishers/google/models/imagen-3.0-capability-001:predict"PowerShell
将请求正文保存在名为
request.json的文件中,然后执行以下命令:$cred = gcloud auth print-access-token
$headers = @{ "Authorization" = "Bearer $cred" }
Invoke-WebRequest `
-Method POST `
-Headers $headers `
-ContentType: "application/json; charset=utf-8" `
-InFile request.json `
-Uri "https://LOCATION-aiplatform.googleapis.com/v1/projects/PROJECT_ID/locations/LOCATION/publishers/google/models/imagen-3.0-capability-001:predict" | Select-Object -Expand Content{ "predictions": [ { "bytesBase64Encoded": "BASE64_IMG_BYTES", "mimeType": "image/png" }, { "mimeType": "image/png", "bytesBase64Encoded": "BASE64_IMG_BYTES" }, { "bytesBase64Encoded": "BASE64_IMG_BYTES", "mimeType": "image/png" }, { "bytesBase64Encoded": "BASE64_IMG_BYTES", "mimeType": "image/png" } ] }
限制
由于蒙版有时不完整,因此当边界处缺少极小的位时,模型可能会尝试补全前景对象。作为一种罕见的副作用,当前景对象已完成时,模型可能会创建轻微的扩展。
一种解决方法是对模型输出进行分段,然后进行混合。以下是一个 Python 代码段示例,展示了解决方法:
blended = Image.composite(out_images[0].resize(image_expanded.size), image_expanded, mask_expanded)
后续步骤
阅读有关 Imagen 和其他 Vertex AI 上的生成式 AI 产品的文章:
- Imagen 3 on Vertex AI 开发者入门指南
- 与创作者一起为创作者打造的全新生成式媒体模型和工具
- Gemini 中的新功能:自定义 Gem 以及通过 Imagen 3 改进的图片生成
- Google DeepMind:Imagen 3 - 我们质量最高的文本转图片模型