

This tutorial shows you how to create an agent and use the Agent Development Kit
(ADK) Streaming to enable voice and video communication. You install the ADK,
set up a basic agent that uses Google Search, and run the agent with the adk
web tool.
Before you begin
This guide assumes you have experience using a terminal in Windows, macOS, or Linux environments.
Set up your environment and install the ADK
This section shows you how to prepare your local environment.
Create and activate a virtual environment. Using a virtual environment is a recommended practice.
# Create the environment python -m venv .venv # Activate the environment in each new terminal # For macOS or Linux: source .venv/bin/activate # For Windows CMD: .venv\Scripts\activate.bat # For Windows PowerShell: .venv\Scripts\Activate.ps1Install the ADK.
pip install google-adk
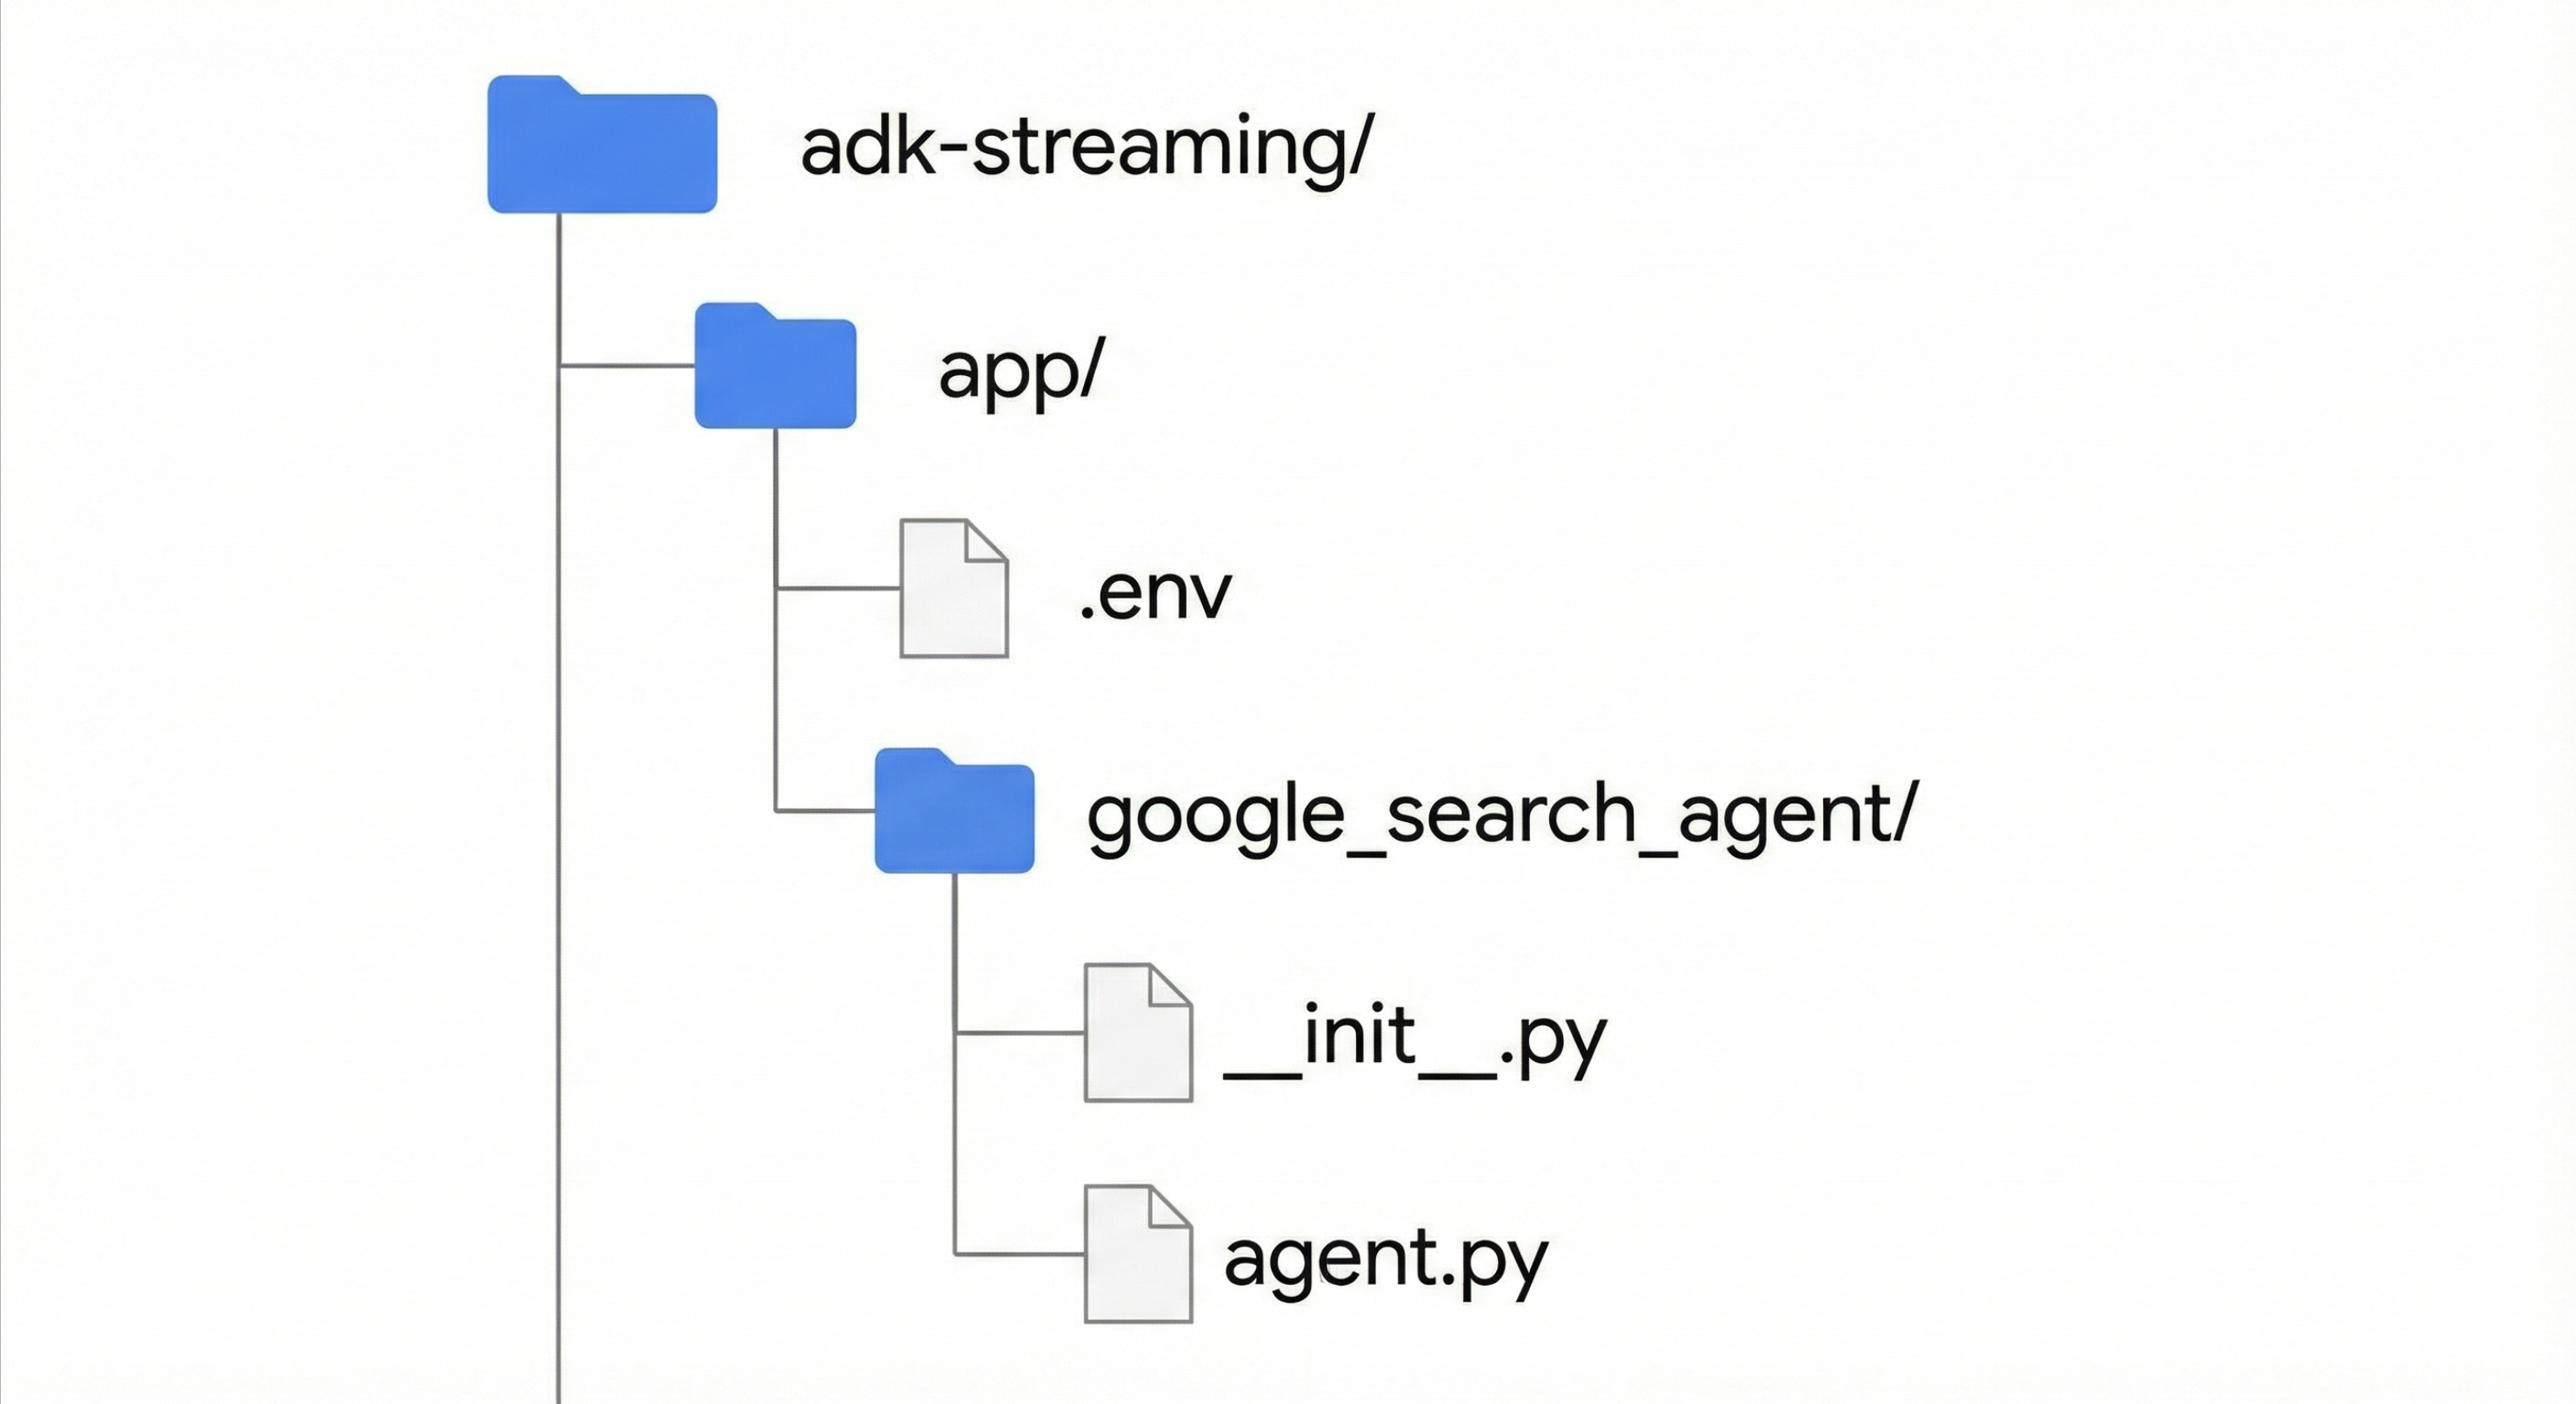
Create the project structure
Create the necessary directories and files for your agent.
Create the following folder structure with empty files:
Add the following code to the
app/google_search_agent/agent.pyfile. This file defines your agent's logic. You must define aroot_agent. In the following code, update themodelfield with a supported model name.from google.adk.agents import Agent from google.adk.tools import google_search # Import the tool root_agent = Agent( # A unique name for the agent. name="basic_search_agent", # The Large Language Model (LLM) that agent will use. # Please fill in the latest model id that supports live from # https://google.github.io/adk-docs/get-started/streaming/quickstart-streaming/#supported-models model="...", # for example: model="gemini-live-2.5-flash-native-audio" # A short description of the agent's purpose. description="Agent to answer questions using Google Search.", # Instructions to set the agent's behavior. instruction="You are an expert researcher. You always stick to the facts.", # Add google_search tool to perform grounding with Google search. tools=[google_search] )Add the following code to the
app/google_search_agent/__init__.pyfile:from . import agent
Set up the platform
To run the agent, configure it to use Google Cloud Gemini Enterprise Agent Platform.
Open the
.envfile located in theapp/directory.Add the following content to the file. Replace
PROJECT_IDwith your Google Cloud project ID and replaceLOCATIONwith your Google Cloud location.GOOGLE_CLOUD_PROJECT=PROJECT_ID GOOGLE_CLOUD_LOCATION=LOCATION GOOGLE_GENAI_USE_ENTERPRISE=True
Run the agent with the dev UI
Launch the development user interface to interact with your agent.
Change your current directory to
app.cd appSet the
SSL_CERT_FILEenvironment variable. This step is required for voice and video tests.macOS/Linux
export SSL_CERT_FILE=$(python -m certifi)
Windows
$env:SSL_CERT_FILE = (python -m certifi)
Run the dev UI.
adk webOpen the URL provided in the terminal, which is typically
http://localhost:8000orhttp://127.0.0.1:8000.Select
google_search_agent.
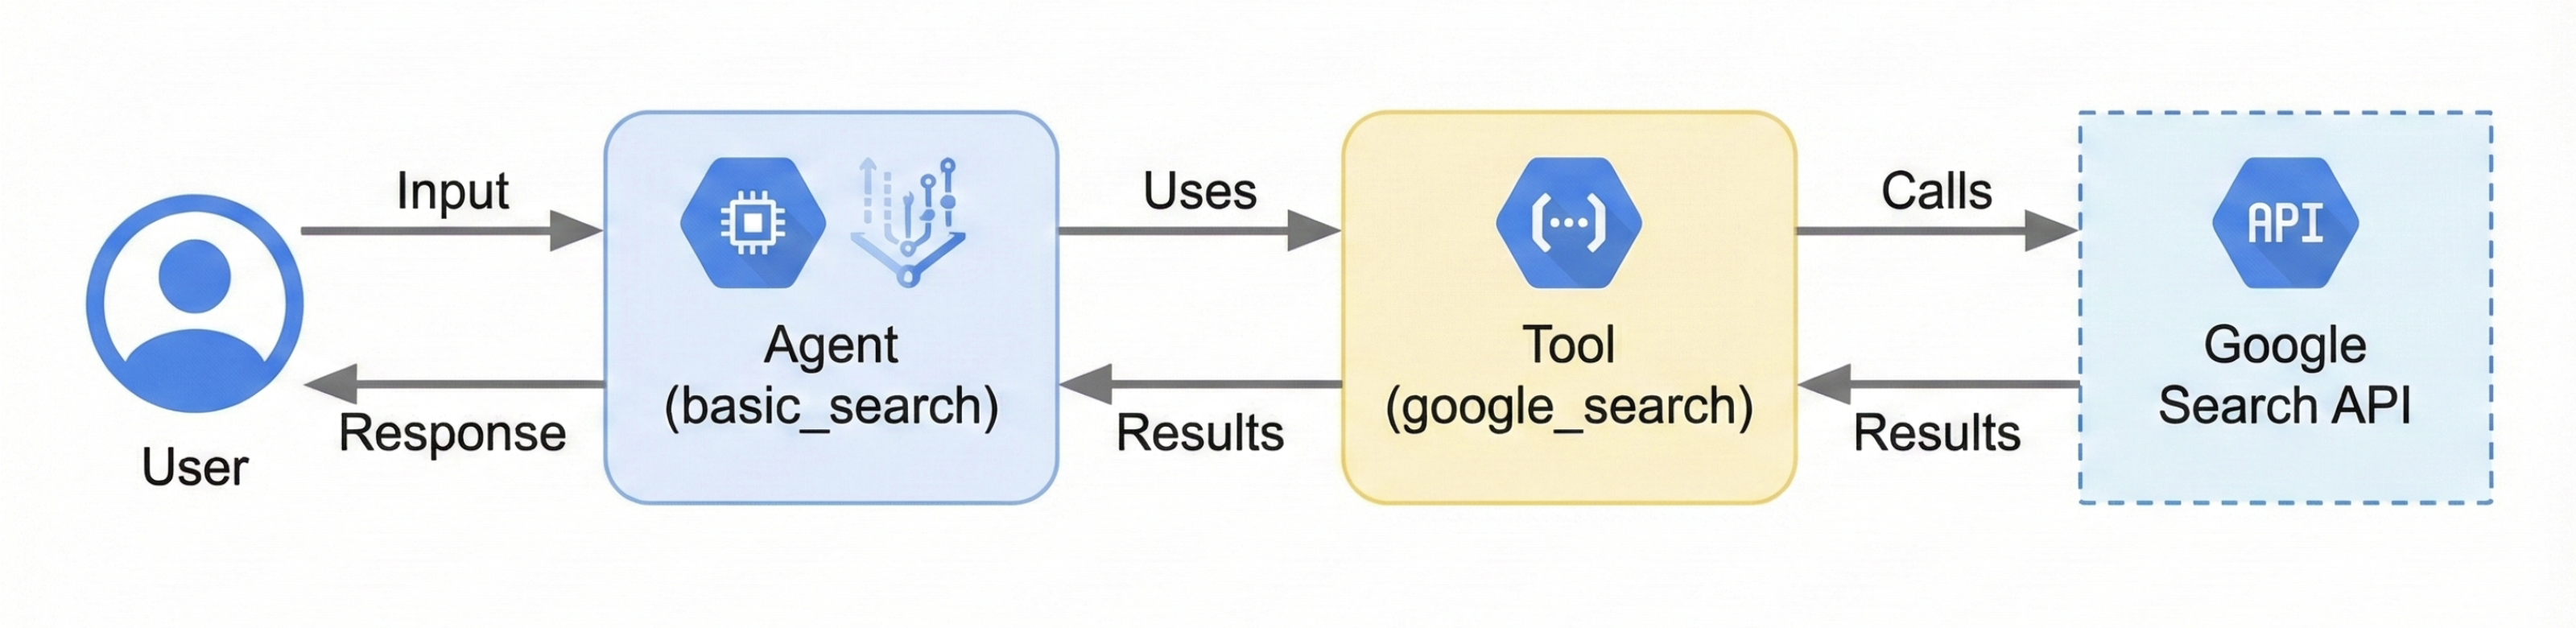
The following diagram shows how user input flows to the agent, how the agent uses the Google Search tool, and how the agent returns a response:
Interact with the agent
After you launch the dev UI, you can interact with your agent by using text, voice, or video.
Use text input
Enter the following prompts in the UI to test the agent's text-based responses.
The agent uses the google_search tool to get the latest information to answer
these questions.
- What is the weather in New York?
- What is the time in New York?
- What is the weather in Paris?
- What is the time in Paris?
Use voice and video input
To use voice input, reload the web browser and click the microphone button. Ask a question, and you hear the answer in real time.
To use video input, reload the web browser and click the camera button. Ask a question like "What do you see?", and the agent describes what it sees from the video input.
Stop the dev UI
To stop the adk web tool, press Ctrl+C in the terminal where it is running.
What's next
- To learn more about Live API development using ADK, see the ADK documentation.
- See the Bidi-streaming demo.
- Get started using the Google Gen AI SDK.
- Get started using WebSockets.
- Learn how to configure language and voice.
- Learn how to configure Gemini capabilities.
- Learn about Gemini Live API best practices.