透過 JAX 在 GKE 上使用 TPU 微調 LLM

本教學課程說明如何使用 JAX,在 Google Kubernetes Engine (GKE) 上透過張量處理單元 (TPU) 微調大型語言模型 (LLM)。微調功能可讓您調整 Gemma 3 等基礎模型,使其適用於特定領域或工作。這個程序會使用您自己的專業資料集更新模型參數,藉此提升模型的精確度和準確率。

如果您需要精細控管、自訂、擴充、復原、移植及提高成本效益,並在微調 AI/機器學習工作負載時使用代管型 Kubernetes,這份指南就是不錯的起點。

背景

在 GKE 上使用 TPU 和 Jax 微調 LLM,即可建構完善且可用於正式環境的微調解決方案,同時享有代管型 Kubernetes 的所有優點。

Gemma

Gemma 是一組開放式輕量級生成式 AI/ML 多模態模型,以開放授權形式發布。您可以在應用程式、硬體、行動裝置或代管服務中執行這些 AI 模型。Gemma 3 導入多模態功能,支援視覺語言輸入和文字輸出。可處理最多 128,000 個權杖的脈絡窗口,並支援超過 140 種語言。Gemma 3 的數學、推論和聊天功能也獲得提升,包括結構化輸出和函式呼叫。

您可以使用 Gemma 模型生成文字,也可以調整這些模型來執行特定工作。

詳情請參閱 Gemma 說明文件

TPU

TPU 是 Google 客製化開發的特殊應用積體電路 (ASIC),可加速機器學習和 AI 模型,這些模型是使用 TensorFlowPyTorchJAX 等架構建構而成。

在 GKE 中使用 TPU 之前,建議您先完成下列學習路徑:

  1. 如要瞭解目前可用的 TPU 版本,請參閱 Cloud TPU 系統架構
  2. 瞭解 GKE 中的 TPU

JAX

JAX 是一種高效能機器學習框架,專為搭配 TPU 和 GPU 使用而設計。JAX 提供 API,用於建構及訓練機器學習模型。

詳情請參閱 JAX 存放區

目標

本教學課程包含下列步驟:

  1. 根據模型特性,建立具有建議 TPU 拓撲的 GKE Autopilot 或 Standard 叢集。在本教學課程中,您將對單一主機節點集區執行微調作業。
  2. 將資料新增至 Cloud Storage 值區,並透過 Cloud Storage FUSE 將資料掛接到容器。
  3. 在 GKE 上部署 LLM 微調作業。
  4. 監控微調作業並查看記錄。

事前準備

  • 登入 Google Cloud 帳戶。如果您是 Google Cloud新手,歡迎 建立帳戶,親自評估產品在實際工作環境中的成效。新客戶還能獲得價值 $300 美元的免費抵免額,可用於執行、測試及部署工作負載。
  • In the Google Cloud console, on the project selector page, select or create a Google Cloud project.

    Roles required to select or create a project

    • Select a project: Selecting a project doesn't require a specific IAM role—you can select any project that you've been granted a role on.
    • Create a project: To create a project, you need the Project Creator role (roles/resourcemanager.projectCreator), which contains the resourcemanager.projects.create permission. Learn how to grant roles.

    Go to project selector

  • Verify that billing is enabled for your Google Cloud project.

  • Enable the required API.

    Roles required to enable APIs

    To enable APIs, you need the Service Usage Admin IAM role (roles/serviceusage.serviceUsageAdmin), which contains the serviceusage.services.enable permission. Learn how to grant roles.

    Enable the API

  • 確認您在專案中具備下列角色: roles/container.admin、roles/iam.serviceAccountAdmin、roles/storage.admin

    檢查角色

    1. 前往 Google Cloud 控制台的「IAM」頁面。

      前往「IAM」頁面
    2. 選取專案。
    3. 在「主體」欄中,找出所有識別您或您所屬群組的資料列。如要瞭解自己所屬的群組,請與管理員聯絡。

    4. 針對指定或包含您的所有列,請檢查「角色」欄,確認角色清單是否包含必要角色。

    授予角色

    1. 前往 Google Cloud 控制台的「IAM」頁面。

      前往「IAM」頁面
    2. 選取專案。
    3. 按一下「Grant access」(授予存取權)
    4. 在「New principals」(新增主體) 欄位中,輸入您的使用者 ID。 這通常是指 Google 帳戶的電子郵件地址。

    5. 按一下「選取角色」,然後搜尋角色。
    6. 如要授予其他角色,請按一下「Add another role」(新增其他角色),然後新增其他角色。
    7. 按一下「Save」(儲存)
  • 請確認您有足夠的配額,可使用 16 個 TPU Trillium (v6e) 晶片。在本教學課程中,您將使用需要 16 個晶片和隨選執行個體的節點集區設定。
  • 確認您有 Docker 存放區。如果沒有,請在 Artifact Registry 中建立標準存放區

準備環境

在本教學課程中,您將使用 Cloud Shell 管理 Google Cloud上代管的資源。Cloud Shell 已預先安裝本教學課程所需的軟體,包括 kubectlGoogle Cloud CLI

如要使用 Cloud Shell 設定環境,請按照下列步驟操作:

  1. 在 Google Cloud 控制台中啟動 Cloud Shell 工作階段,然後按一下「啟用 Cloud Shell」Cloud Shell 啟用圖示。這項操作會在 Google Cloud 控制台的底部窗格啟動工作階段。

  2. 設定預設環境變數:

    gcloud config set project PROJECT_ID
    gcloud config set billing/quota_project PROJECT_ID
    export PROJECT_ID=$(gcloud config get project)
    export CLUSTER_NAME=CLUSTER_NAME
    export REGION=CONTROL_PLANE_LOCATION
    export ZONE=ZONE
    export GCS_BUCKET_NAME=BUCKET_NAME
    

    替換下列值:

    • PROJECT_ID:您的 Google Cloud 專案 ID
    • CLUSTER_NAME:GKE 叢集的名稱。
    • CONTROL_PLANE_LOCATION:GKE 叢集和 TPU 節點所在的 Compute Engine 區域。該區域必須包含提供 TPU Trillium (v6e) 機型的可用區。
    • ZONE:所選CONTROL_PLANE_LOCATION區域內的可用區,提供 TPU Trillium (v6e) 機型。如要列出提供 TPU Trillium (v6e) TPU 的區域,請執行下列指令:

        gcloud compute accelerator-types list --filter="name~ct6e" --format="value(zone)"
      
    • BUCKET_NAME:包含訓練資料的 Cloud Storage bucket 名稱。

  3. 複製範例存放區:

    git clone https://github.com/GoogleCloudPlatform/kubernetes-engine-samples.git
    cd kubernetes-engine-samples
    
  4. 前往工作目錄:

    cd ai-ml/llm-training-jax-tpu-gemma3
    

建立及設定 Google Cloud 資源

在本節中,您將建立及設定 Google Cloud 資源。

建立 GKE 叢集

您可以在 GKE Autopilot 或 Standard 叢集上,使用 TPU 微調 LLM。建議您使用 Autopilot 叢集,享受全代管的 Kubernetes 體驗。如要為工作負載選擇最合適的 GKE 作業模式,請參閱「選擇 GKE 作業模式」。

Autopilot

建立使用 Workload Identity Federation for GKE,並啟用 Cloud Storage FUSE 的 GKE Autopilot 叢集。

gcloud container clusters create-auto ${CLUSTER_NAME} \
    --location=${REGION}

建立叢集可能需要幾分鐘的時間。

標準

  1. 建立使用 Workload Identity Federation for GKE 的地區 GKE Standard 叢集,並啟用 Cloud Storage FUSE。

    gcloud container clusters create ${CLUSTER_NAME} \
        --enable-ip-alias \
        --addons GcsFuseCsiDriver \
        --machine-type=n2-standard-4 \
        --num-nodes=2 \
        --workload-pool=${PROJECT_ID}.svc.id.goog \
        --location=${REGION}
    

    建立叢集可能需要幾分鐘的時間。

  2. 建立單一主機節點集區:

    gcloud container node-pools create jax-tpu-nodepool \
        --cluster=${CLUSTER_NAME} \
        --machine-type=ct6e-standard-1t \
        --num-nodes=1 \
        --location=${REGION} \
        --node-locations=${ZONE} \
        --workload-metadata=GKE_METADATA
    

GKE 會建立具有 1x1 拓撲和一個節點的 TPU Trillium 節點集區。--workload-metadata=GKE_METADATA 旗標會將節點集區設定為使用 GKE 中繼資料伺服器。

安裝 JobSet

  1. 設定 kubectl,與叢集通訊:

    gcloud container clusters get-credentials ${CLUSTER_NAME} --location=${REGION}
    
  2. 安裝最新發布的 JobSet 版本:

    kubectl apply --server-side -f https://github.com/kubernetes-sigs/jobset/releases/download/JOBSET_VERSION/manifests.yaml
    

    JOBSET_VERSION 替換為 JobSet 的最新發布版本。例如:v0.11.0

  3. 驗證 JobSet 安裝狀態:

    kubectl get pods -n jobset-system
    

    輸出結果會與下列內容相似:

    NAME                                         READY   STATUS    RESTARTS   AGE
    jobset-controller-manager-6c56668494-l4dhc   1/1     Running   0          4m45s
    

    如果 JobSet 正在等待資源,您可能需要新增更多節點。

設定 Cloud Storage FUSE

如要微調 LLM,請提供訓練資料。在本教學課程中,您將使用 Hugging Face 的 TinyStories 資料集。這個資料集包含由 GPT-3.5 和 GPT-4 合成生成,且使用有限詞彙的短篇故事。

本節說明如何設定 Cloud Storage FUSE,從 Cloud Storage 值區讀取資料。

  1. 下載資料集:

    wget https://huggingface.co/datasets/roneneldan/TinyStories/resolve/main/TinyStories-train.txt?download=true -O TinyStories-train.txt
    
  2. 將資料上傳至新的 Cloud Storage 值區:

    gcloud storage buckets create gs://${GCS_BUCKET_NAME} \
        --location=${REGION} \
        --enable-hierarchical-namespace \
        --uniform-bucket-level-access
    gcloud storage cp TinyStories-train.txt gs://${GCS_BUCKET_NAME}
    
  3. 如要允許工作負載透過 Cloud Storage FUSE 讀取資料,請建立 Kubernetes 服務帳戶 (KSA) 並新增必要權限。執行 permissionsetup.sh 指令碼:

    # Copyright 2026 Google LLC
    #
    # Licensed under the Apache License, Version 2.0 (the "License");
    # you may not use this file except in compliance with the License.
    # You may obtain a copy of the License at
    #
    #     http://www.apache.org/licenses/LICENSE-2.0
    #
    # Unless required by applicable law or agreed to in writing, software
    # distributed under the License is distributed on an "AS IS" BASIS,
    # WITHOUT WARRANTIES OR CONDITIONS OF ANY KIND, either express or implied.
    # See the License for the specific language governing permissions and
    # limitations under the License.
    
    #!/bin/bash
    
    # --- Configuration Variables ---
    # Kubernetes Service Account details
    export KSA_NAME="jaxserviceaccout"
    export NAMESPACE="default"
    
    # Google Cloud IAM Service Account details
    export GSA_NAME="<GSA_NAME>"
    # Automatically get the current project ID
    export PROJECT_ID=$(gcloud config get-value project)
    export  GSA_DESCRIPTION="GKE Service Account to read GCS bucket for ${KSA_NAME}"
    
    # GCS Bucket details
    export GCS_BUCKET_NAME="<GCS_BUCKET_NAME>" # <--- IMPORTANT: Update this to your bucket name
    
    # Derived Variables
    export GSA_EMAIL="${GSA_NAME}@${PROJECT_ID}.iam.gserviceaccount.com"
    export WI_MEMBER="serviceAccount:${PROJECT_ID}.svc.id.goog[${NAMESPACE}/${KSA_NAME}]"
    
    # --- Check if PROJECT_ID is set ---
    if [ -z "${PROJECT_ID}" ]; then
      echo "Error: PROJECT_ID is not set. Please set it using 'gcloud config set project YOUR_PROJECT_ID'"
      exit 1
    fi
    
    echo "--- Configuration ---"
    echo "KSA_NAME:      ${KSA_NAME}"
    echo "NAMESPACE:     ${NAMESPACE}"
    echo "GSA_NAME:      ${GSA_NAME}"
    echo "PROJECT_ID:    ${PROJECT_ID}"
    echo "GSA_EMAIL:     ${GSA_EMAIL}"
    echo "GCS_BUCKET_NAME:   ${GCS_BUCKET_NAME}"
    echo "WI_MEMBER:     ${WI_MEMBER}"
    echo "--------------------"
    read -p "Press enter to continue..."
    
    # --- Command Execution ---
    
    echo "[1/5] Creating Google Cloud IAM Service Account (GSA): ${GSA_NAME}"
    gcloud iam service-accounts create "${GSA_NAME}" \
        --project="${PROJECT_ID}" \
        --description="${GSA_DESCRIPTION}" \
        --display-name="${GSA_NAME}"
    
    echo "[2/5] Granting GSA '${GSA_EMAIL}' read access (roles/storage.objectViewer) to bucket 'gs://${GCS_BUCKET_NAME}'"
    gcloud storage buckets add-iam-policy-binding "gs://${GCS_BUCKET_NAME}" \
        --member="serviceAccount:${GSA_EMAIL}" \
        --role="roles/storage.objectViewer" \
        --project="${PROJECT_ID}"
    
    echo "[3/5] Creating Kubernetes Service Account (KSA): ${KSA_NAME} in namespace ${NAMESPACE}"
    kubectl create serviceaccount "${KSA_NAME}" --namespace "${NAMESPACE}"
    
    echo "[4/5] Allowing KSA to impersonate GSA (Workload Identity Binding): ${GSA_EMAIL}"
    gcloud iam service-accounts add-iam-policy-binding "${GSA_EMAIL}" \
        --role roles/iam.workloadIdentityUser \
        --member "${WI_MEMBER}" \
        --project="${PROJECT_ID}"
    
    echo "[5/5] Annotating KSA '${KSA_NAME}' to link with GSA '${GSA_EMAIL}'"
    kubectl annotate serviceaccount "${KSA_NAME}" \
        --namespace "${NAMESPACE}" \
        iam.gke.io/gcp-service-account="${GSA_EMAIL}"
    
    echo "--- Setup Complete ---"
    echo "Pods in namespace '${NAMESPACE}' using serviceAccount '${KSA_NAME}' can now authenticate as '${GSA_EMAIL}' and have read access to 'gs://${GCS_BUCKET_NAME}'."
    

    執行這項指令碼後,系統會在Google Cloud 專案和 GKE 叢集中設定下列資源:

    • 系統會在專案中建立名為 gcs-fuse-sa 的新 IAM 服務帳戶。
    • 建立的 Google Cloud 服務帳戶 (GSA) (gcs-fuse-sa) 會在 ${GCS_BUCKET_NAME} 指定的 Cloud Storage 儲存空間上獲得 roles/storage.objectViewer 角色。這項權限可讓 GSA 從值區讀取物件。
    • 系統會在 GKE 叢集的 default 命名空間中,建立名為 jaxserviceaccount 的新 KSA。
    • 更新 GSA 的 IAM 政策,將 roles/iam.workloadIdentityUser 角色授予 KSA。這項權限允許 KSA 模擬 GSA。
    • 系統會註解 KSA,將其連結至 GSA。這項註解會告知 GKE,KSA 應使用 Workload Identity 模擬哪個 GSA。

      現在,凡是在 GKE 叢集的 default 命名空間中執行的 Pod,只要使用 jaxserviceaccount 服務帳戶,就能以 gcs-fuse-sa GSA 身分進行驗證。這些 Pod 將具備 gs://${GCS_BUCKET_NAME} bucket 中儲存物件的讀取權,這對於微調工作使用 Cloud Storage FUSE 存取資料集至關重要。

建立微調指令碼

在本節中,您將瞭解訓練指令碼,該指令碼會對 Gemma 3 模型執行微調作業。這個指令碼使用 Gemma3Tokenizer

請查看下列Gemma3LLMTrain.py微調指令碼:

# Copyright 2026 Google LLC
#
# Licensed under the Apache License, Version 2.0 (the "License");
# you may not use this file except in compliance with the License.
# You may obtain a copy of the License at
#
#     http://www.apache.org/licenses/LICENSE-2.0
#
# Unless required by applicable law or agreed to in writing, software
# distributed under the License is distributed on an "AS IS" BASIS,
# WITHOUT WARRANTIES OR CONDITIONS OF ANY KIND, either express or implied.
# See the License for the specific language governing permissions and
# limitations under the License.

import grain.python as pygrain
import jax
import jax.numpy as jnp
import optax
import pandas as pd
import time
import argparse

from dataclasses import dataclass
from functools import partial
from gemma import gm
from flax.training import train_state
from jax.sharding import Mesh, PartitionSpec, NamedSharding

jax.distributed.initialize()
print("Global device count:", jax.device_count())
print("jax version:", jax.__version__)

tokenizer = gm.text.Gemma3Tokenizer()
num_epochs = 1
learning_rate = 2e-5

@dataclass
class TextDataset:
    data: list
    maxlen: int
    tokenizer: gm.text.Gemma3Tokenizer

    def __len__(self):
        return len(self.data)

    def __getitem__(self, idx: int):
        encoding = self.tokenizer.encode(self.data[idx])[:self.maxlen]  # Tokenize and truncate
        return encoding + [0] * (self.maxlen - len(encoding))  # Pad to maxlen

def load_and_preprocess_data(file_path, batch_size, maxlen, datacount, tokenizer):

    with open(file_path, 'r') as f:
      text = f.read()

    stories = text.split('<|endoftext|>')
    stories = [story for story in stories if story.strip()][:datacount]
    df = pd.DataFrame({'text': stories})
    data = df['text'].dropna().tolist()
    dataset = TextDataset(data, maxlen, tokenizer)

    sampler = pygrain.IndexSampler(
        len(dataset),
        shuffle=False,
        seed=42,
        shard_options=pygrain.NoSharding(),
        num_epochs=num_epochs,
    )

    dataloader = pygrain.DataLoader(
        data_source=dataset,
        sampler=sampler,
        operations=[pygrain.Batch(batch_size=batch_size, drop_remainder=True)],
    )

    return dataloader

def generate_text(model, params, tokenizer, prompt):
    sampler = gm.text.Sampler(
        model=model,
        params=params,
        tokenizer=tokenizer,
    )
    print("Generating response for: " + prompt)
    out = sampler.sample(prompt, max_new_tokens=32)
    print("Reponse: \n" + out + "\n")
    return out

prep_target_batch = jax.vmap(lambda tokens: jnp.concatenate((tokens[1:], jnp.array([0]))))

@partial(jax.jit, donate_argnums=(0,))
def train_step(state, batch):
    """Performs one supervised fine-tuning step."""

    def loss_fn(params):
        # Run the forward pass. The model returns logits.
        logits = state.apply_fn({'params': params}, batch[0]).logits

        # Calculate the cross-entropy loss.
        loss = optax.softmax_cross_entropy_with_integer_labels(
            logits=logits, labels=batch[1]
        ).mean()

        return loss

    # Compute gradients
    grad_fn = jax.value_and_grad(loss_fn)
    loss, grads = grad_fn(state.params)

    # Update the model state
    state = state.apply_gradients(grads=grads)

    metrics = {'loss': loss}
    return state, metrics

def train_model(state, text_dl, num_epochs, sharding):
    batchCount = 0
    start_time = time.time()
    for epoch in range(num_epochs):
        start_time = time.time()
        for batch in text_dl:
            if len(batch) % len(jax.devices()) != 0:
              continue  # skip the remaining elements
            input_batch = jnp.array(jnp.array(batch).T)
            target_batch = prep_target_batch(input_batch)
            state, metrics = train_step(state, jax.device_put((input_batch, target_batch), sharding))

            if batchCount % 10 == 0:
                print(f"Loss after batch {batchCount}: {metrics['loss']}")
            batchCount += 1

    end_time = time.time()
    print(f"Completed training model. Total time for training {end_time - start_time} seconds \n")
    return state

def run_training(maxlen, batch_size, datacount):
    print(f"Batch size: {batch_size}, Max length: {maxlen}, Data count: {datacount}")
    #Load the training data
    tiny_stories_dl = load_and_preprocess_data('/data/TinyStories-train.txt', batch_size, maxlen, datacount, tokenizer)
    # Get the Gemma3 model
    model = gm.nn.Gemma3_270M()
    # Load the pretrained parameters
    params = gm.ckpts.load_params(gm.ckpts.CheckpointPath.GEMMA3_270M_PT)
    # Create an optimizer
    optimizer = optax.adamw(learning_rate=learning_rate)
    # Define sharding for data parallel training
    mesh = Mesh(jax.devices(), ('batch',))
    sharding = NamedSharding(mesh, PartitionSpec('batch', None))

    # Testing out current state of the model
    test_prompt = "Once upon a time, there was a girl named Amy."
    generate_text(model, params, tokenizer, test_prompt)

    state = train_state.TrainState.create(
        apply_fn=model.apply,
        params=params,
        tx=optimizer
    )

    # Perform post training
    print("Start training model")
    state = train_model(state, tiny_stories_dl, num_epochs, sharding)

    # Final text generation
    generate_text(model, state.params, tokenizer, test_prompt)

if __name__ == '__main__':
    parser = argparse.ArgumentParser(description='Train Gemma model with custom parameters.')
    parser.add_argument('--maxlen', type=int, default=256, help='Maximum sequence length')
    parser.add_argument('--batch_size', type=int, default=128, help='Batch size')
    parser.add_argument('--datacount', type=int, default=296000, help='Number of data samples to use')
    args = parser.parse_args()

    run_training(maxlen=args.maxlen, batch_size=args.batch_size, datacount=args.datacount)

這段指令碼適用下列情況:

  • Gemma3Tokenizer 會將文字資料轉換為模型可處理的權杖。
  • load_and_preprocess_data 函式會從檔案讀取訓練資料,將資料分割為個別故事,並使用權杖化工具將文字轉換為權杖的填補序列。
  • generate_text 函式會採用模型、模型參數和提示來生成文字。
  • train_step 函式會定義單一訓練疊代,包括正向傳遞、損失計算 (使用交叉熵)、梯度計算和參數更新。
  • train_model 函式會針對指定數量的訓練週期,逐一處理資料集,並針對每個批次呼叫 train_step 函式。
  • run_training 函式會協調整個程序,包括載入資料、初始化 Gemma 3 模型 (Gemma3_270M) 和最佳化工具、載入預先訓練的參數、設定資料分片以進行平行處理、執行測試生成作業、執行訓練迴圈,以及執行最終的文字生成作業,以展示微調效果。
  • 這個指令碼會使用 argparse 程式庫,接受 maxlenbatch_sizedatacount 參數的指令列引數。

您已瞭解微調指令碼,現在可以將其容器化,以便在 GKE 上執行。

將微調指令碼容器化

在 GKE 叢集中執行微調指令碼前,您需要先將其容器化。本教學課程使用 JAX AI 圖像做為基礎圖像。

  1. Gemma3LLMTrain.py 檔案所在的目錄中開啟 Dockerfile

    # Copyright 2026 Google LLC
    #
    # Licensed under the Apache License, Version 2.0 (the "License");
    # you may not use this file except in compliance with the License.
    # You may obtain a copy of the License at
    #
    #     http://www.apache.org/licenses/LICENSE-2.0
    #
    # Unless required by applicable law or agreed to in writing, software
    # distributed under the License is distributed on an "AS IS" BASIS,
    # WITHOUT WARRANTIES OR CONDITIONS OF ANY KIND, either express or implied.
    # See the License for the specific language governing permissions and
    # limitations under the License.
    
    FROM us-docker.pkg.dev/cloud-tpu-images/jax-ai-image/tpu:jax0.7.2-rev1
    RUN apt-get update && apt-get install -y wget && rm -rf /var/lib/apt/lists/*
    
    RUN pip install --upgrade pip
    RUN pip install gemma grain
    
    WORKDIR /app
    
    # Copy your training script into the container
    COPY Gemma3LLMTrain.py .
    

    這個 Dockerfile 會安裝必要的依附元件,並將 Gemma3LLMTrain.py 檔案複製到容器中。

  2. 建構 Docker 映像檔並推送至映像檔存放區:

    export REPOSITORY=REPOSITORY_NAME
    export IMAGE_NAME="jax-gemma3-training"
    export IMAGE_TAG="latest"
    export DOCKERFILE_PATH="./Dockerfile"
    export IMAGE_URI="${REGION}-docker.pkg.dev/${PROJECT_ID}/${REPOSITORY}/${IMAGE_NAME}:${IMAGE_TAG}"
    
    docker build -t "${IMAGE_URI}" -f "${DOCKERFILE_PATH}" .
    gcloud auth configure-docker "${REGION}-docker.pkg.dev" -q
    docker push "${IMAGE_URI}"
    

    REPOSITORY_NAME 替換為 Artifact Registry 存放區的名稱。

  3. 將角色繫結新增至服務帳戶:

    export PROJECT_NUMBER=$(gcloud projects describe $PROJECT_ID --format 'get(projectNumber)')
    gcloud artifacts repositories add-iam-policy-binding ${REPOSITORY} \
        --project=${PROJECT_ID} \
        --location=${REGION} \
        --member="serviceAccount:${PROJECT_NUMBER}-compute@developer.gserviceaccount.com" \
        --role="roles/artifactregistry.reader"
    

映像檔已儲存至存放區,現在可以將微調作業部署至 GKE 叢集。

部署 LLM 微調工作

本節說明如何將 LLM 微調工作部署至 GKE 叢集。

  1. 開啟 training_singlehost.yaml 資訊清單:

    # Copyright 2026 Google LLC
    #
    # Licensed under the Apache License, Version 2.0 (the "License");
    # you may not use this file except in compliance with the License.
    # You may obtain a copy of the License at
    #
    #     http://www.apache.org/licenses/LICENSE-2.0
    #
    # Unless required by applicable law or agreed to in writing, software
    # distributed under the License is distributed on an "AS IS" BASIS,
    # WITHOUT WARRANTIES OR CONDITIONS OF ANY KIND, either express or implied.
    # See the License for the specific language governing permissions and
    # limitations under the License.
    
    apiVersion: batch/v1
    kind: Job
    metadata:
      name: jax-gemma3-train-singlehost
    spec:
      template:
        metadata:
          annotations:
            gke-gcsfuse/volumes: "true"
        spec:
          serviceAccountName: jaxserviceaccout
          containers:
          - name: training-container
            image: ${IMAGE_URI}
            imagePullPolicy: "Always"
            command: ["python", "Gemma3LLMTrain.py", "--maxlen", "256", "--batch_size", "64", "--datacount", "355120"]
            resources:
              limits:
                google.com/tpu: 1
            volumeMounts:
            - name: gcs-fuse-csi-ephemeral
              mountPath: /data
          nodeSelector:
            cloud.google.com/gke-tpu-accelerator: tpu-v6e-slice
            cloud.google.com/gke-tpu-topology: 1x1
          restartPolicy: Never
          volumes:
          - name: gcs-fuse-csi-ephemeral
            csi:
              driver: gcsfuse.csi.storage.gke.io
              volumeAttributes:
                bucketName: ${GCS_BUCKET_NAME}
                mountOptions: "implicit-dirs,file-cache:enable-parallel-downloads:true,file-cache:parallel-downloads-per-file:100,file-cache:max-parallel-downloads:-1,file-cache:download-chunk-size-mb:10,file-cache:max-size-mb:-1"
      backoffLimit: 1
  2. 套用資訊清單:

    envsubst < training_singlehost.yaml | kubectl apply -f -
    

GKE 會建立 Job,在 TPU Trillium (v6e) 節點上啟動 Pod。這個 Pod 會執行 Python 微調指令碼,並使用 Cloud Storage FUSE,從掛接在 /data 路徑的指定 Cloud Storage 值區存取微調資料。然後指令碼會微調 Gemma 模型。

監控訓練工作

在本節中,您將監控微調工作的進度和效能。

查看微調進度

  1. 列出 Pod:

    # Find the Pods
    kubectl get pods
    
  2. 追蹤記錄輸出:

    kubectl logs -f pods/POD_NAME
    

    POD_NAME 替換為 Pod 名稱。

    輸出結果會與下列內容相似:

    Global device count: 1
    Batch size: 128, Max length: 256, Data count: 96000
    I1028 00:12:55.925999 1387 google_auth_provider.cc:181] Running on GCE, using service account ...
    Generating response for: Once upon a time, there was a girl named Amy.
    Response:
    Amy lived in a small house. The house was in a big field. Amy liked to play in the big field. She
    Start training model
    Loss after batch 0: 10.25
    Loss after batch 10: 4.3125
    .
    .
    .
    Loss after batch 740: 1.41406
    Completed training model. Total time for training 294.6791355609894 seconds
    Generating response for: Once upon a time, there was a girl named Amy.
    Response:
    She loved to play with her toys. One day, Amy's mom told her that she had to go to the store to
    
  3. 分析輸出內容:

    • Global device count: 1 行表示使用的 TPU 核心。
    • 模型會從預先訓練的檢查點載入,因此在微調執行前會產生合理的文字。
    • 微調後產生的輸出內容與短篇故事的開頭更為相似,表示模型正在從新資料集學習。
    • 對完整資料集進行微調,應可產生更精確的輸出內容。

觀察指標

查看 TPU 和 CPU 指標,瞭解微調作業的效能。如要查看叢集的觀測指標,請按照「查看叢集和工作負載觀測指標」一文中的步驟操作。

其他微調設定

本節說明微調工作負載的替代設定。

多種模型供您選擇

本教學課程使用 Gemma3_270M 模型,這個小型模型適合單一主機 TPU Trillium (v6e) 節點集區。如果大型模型需要更多記憶體和運算資源才能微調,可以使用多主機或多切片節點集區設定。

如需可用模型的完整清單,請參閱 Gemma 說明文件

節點集區設定

本教學課程使用單一主機節點集區。您也可以視需求建立多主機 TPU 配量節點集區多配量節點集區

以下分頁說明如何為多主機和多切片節點集區建立節點集區:

多主機

  1. 在 Cloud Shell 中執行下列指令:

    gcloud container node-pools create jax-tpu-multihost1 \
        --cluster=${CLUSTER_NAME} \
        --machine-type=ct6e-standard-4t \
        --num-nodes=2 \
        --tpu-topology=2x4 \
        --location=${REGION} \
        --node-locations=${ZONE}
    

    GKE 會建立具有 2x4 拓撲和兩個節點的 TPU Trillium 節點集區。

  2. 開啟 training_multihost_jobset.yaml 工作定義:

    # Copyright 2026 Google LLC
    #
    # Licensed under the Apache License, Version 2.0 (the "License");
    # you may not use this file except in compliance with the License.
    # You may obtain a copy of the License at
    #
    #     http://www.apache.org/licenses/LICENSE-2.0
    #
    # Unless required by applicable law or agreed to in writing, software
    # distributed under the License is distributed on an "AS IS" BASIS,
    # WITHOUT WARRANTIES OR CONDITIONS OF ANY KIND, either express or implied.
    # See the License for the specific language governing permissions and
    # limitations under the License.
    
    apiVersion: jobset.x-k8s.io/v1alpha2
    kind: JobSet
    metadata:
      name: jax-gemma3-train-multihost
    spec:
      replicatedJobs:
        - name: trainers
          replicas: 1
          template:
            spec:
              parallelism: 2
              completions: 2
              backoffLimit: 1
              template:
                metadata:
                  annotations:
                    gke-gcsfuse/volumes: "true"
                spec:
                  serviceAccountName: jaxserviceaccout
                  nodeSelector:
                    cloud.google.com/gke-tpu-accelerator: tpu-v6e-slice
                    cloud.google.com/gke-tpu-topology: 2x4
                    cloud.google.com/gke-nodepool: jax-tpu-multihost1
                  containers:
                  - name: training-container
                    image: ${IMAGE_URI} 
                    imagePullPolicy: "Always"
                    ports:
                      - containerPort: 8471
                    command: ["python", "Gemma3LLMTrain.py", "--maxlen", "256", "--batch_size", "64", "--datacount", "5120"]
                    resources:
                      limits:
                        google.com/tpu: 4
                    volumeMounts:
                    - name: gcs-fuse-csi-ephemeral
                      mountPath: /data
                  volumes:
                    - name: gcs-fuse-csi-ephemeral
                      csi:
                        driver: gcsfuse.csi.storage.gke.io
                        volumeAttributes:
                          bucketName: ${GCS_BUCKET_NAME}
                          mountOptions: "implicit-dirs,file-cache:enable-parallel-downloads:true,file-cache:parallel-downloads-per-file:100,file-cache:max-parallel-downloads:-1,file-cache:download-chunk-size-mb:10,file-cache:max-size-mb:-1"
    
  3. 部署微調作業:

    envsubst < training_multihost_jobset.yaml | kubectl apply -f -
    

多配量

  1. 在 Cloud Shell 中執行下列指令:

    gcloud container node-pools create jax-tpu-multihost1 \
      --cluster=${CLUSTER_NAME} \
      --machine-type=ct6e-standard-4t \
      --num-nodes=2 \
      --tpu-topology=2x4 \
      --location=${REGION} \
      --node-locations=${ZONE}
    
    gcloud container node-pools create jax-tpu-multihost2 \
      --cluster=${CLUSTER_NAME} \
      --machine-type=ct6e-standard-4t \
      --num-nodes=2 \
      --tpu-topology=2x4 \
      --location=${REGION} \
      --node-locations=${ZONE}
    

    GKE 會建立兩個 TPU Trillium 節點集區。每個節點集區都有 2x4 拓撲和兩個節點。

  2. 開啟 training_multislice_jobset.yaml 工作定義:

    # Copyright 2026 Google LLC
    #
    # Licensed under the Apache License, Version 2.0 (the "License");
    # you may not use this file except in compliance with the License.
    # You may obtain a copy of the License at
    #
    #     http://www.apache.org/licenses/LICENSE-2.0
    #
    # Unless required by applicable law or agreed to in writing, software
    # distributed under the License is distributed on an "AS IS" BASIS,
    # WITHOUT WARRANTIES OR CONDITIONS OF ANY KIND, either express or implied.
    # See the License for the specific language governing permissions and
    # limitations under the License.
    
    apiVersion: jobset.x-k8s.io/v1alpha2
    kind: JobSet
    metadata:
      name: jax-gemma3-train-multislice
    spec:
      replicatedJobs:
        - name: trainers
          replicas: 2
          template:
            spec:
              parallelism: 2
              completions: 2
              backoffLimit: 1
              template:
                metadata:
                  annotations:
                    gke-gcsfuse/volumes: "true"
                spec:
                  serviceAccountName: jaxserviceaccout
                  nodeSelector:
                    cloud.google.com/gke-tpu-accelerator: tpu-v6e-slice
                    cloud.google.com/gke-tpu-topology: 2x4
                  containers:
                  - name: training-container
                    image: ${IMAGE_URI}
                    imagePullPolicy: "Always"
                    ports:
                      - containerPort: 8471
                    command: ["python", "Gemma3LLMTrain.py", "--maxlen", "256", "--batch_size", "64", "--datacount", "5120"]
                    resources:
                      limits:
                        google.com/tpu: 4
                    volumeMounts:
                    - name: gcs-fuse-csi-ephemeral
                      mountPath: /data
                  volumes:
                    - name: gcs-fuse-csi-ephemeral
                      csi:
                        driver: gcsfuse.csi.storage.gke.io
                        volumeAttributes:
                          bucketName: ${GCS_BUCKET_NAME}
                          mountOptions: "implicit-dirs,file-cache:enable-parallel-downloads:true,file-cache:parallel-downloads-per-file:100,file-cache:max-parallel-downloads:-1,file-cache:download-chunk-size-mb:10,file-cache:max-size-mb:100"
    
  3. 部署微調作業:

    envsubst < training_multislice_jobset.yaml | kubectl apply -f -
    

效能分析與最佳化

如要分析及最佳化機器學習微調作業的效能,可以使用 XProf。XProf 是一套工具,可剖析及檢查以 JAX、TensorFlow 或 PyTorch/XLA 建構的機器學習工作負載。XProf 會顯示執行追蹤記錄、記憶體用量和其他資料,方便您微調模型和訓練設定,進而提高效率及加快訓練速度。

如要使用 XProf 分析微調工作負載的效能,請完成本節中的下列步驟:

  • 安裝 xprof 套件。修改訓練指令碼,啟動 XProf 伺服器。
  • 修改 Kubernetes 工作資訊清單,加入 XProf 記錄的磁碟區掛接。
  • 授予服務帳戶權限,將 XProf 記錄寫入 Cloud Storage bucket。
  • 在 Pod 中執行 XProf,並設定通訊埠轉送,存取 XProf 資訊主頁。

安裝 XProf 套件

  1. 前往包含 XProf 範例的目錄:

      cd ai-ml/llm-training-jax-tpu-gemma3/xprof-enabled
    
  2. 建構 Docker 映像檔並推送至映像檔存放區:

    export REPOSITORY=REPOSITORY_NAME
    export IMAGE_NAME="jax-gemma3-training-xp"
    export IMAGE_TAG="latest"
    export DOCKERFILE_PATH="./Dockerfile"
    export IMAGE_URI="${REGION}-docker.pkg.dev/${PROJECT_ID}/${REPOSITORY}/${IMAGE_NAME}:${IMAGE_TAG}"
    
    docker build -t "${IMAGE_URI}" -f "${DOCKERFILE_PATH}" .
    gcloud auth configure-docker "${REGION}-docker.pkg.dev" -q
    docker push "${IMAGE_URI}"
    

    REPOSITORY_NAME 替換為 Artifact Registry 存放區的名稱。

  3. 執行 Dockerfile 指令碼:

    # Copyright 2026 Google LLC
    #
    # Licensed under the Apache License, Version 2.0 (the "License");
    # you may not use this file except in compliance with the License.
    # You may obtain a copy of the License at
    #
    #     http://www.apache.org/licenses/LICENSE-2.0
    #
    # Unless required by applicable law or agreed to in writing, software
    # distributed under the License is distributed on an "AS IS" BASIS,
    # WITHOUT WARRANTIES OR CONDITIONS OF ANY KIND, either express or implied.
    # See the License for the specific language governing permissions and
    # limitations under the License.
    
    FROM us-docker.pkg.dev/cloud-tpu-images/jax-ai-image/tpu:jax0.7.2-rev1
    RUN apt-get update && apt-get install -y wget && rm -rf /var/lib/apt/lists/*
    
    RUN pip install --upgrade pip
    RUN pip install gemma grain equinox
    RUN pip install xprof
    
    WORKDIR /app
    
    # Copy your training script into the container
    COPY Gemma3LLMTrain.py .
    

    這個 Dockerfile 會安裝 XProf 依附元件。

將微調指令碼複製到容器中

在本節中,請建立並套用 Kubernetes Job 資訊清單,其中包含 XProf 記錄檔的必要磁碟區掛接。

  1. 開啟 training_singlehost.yaml 工作定義:

    # Copyright 2026 Google LLC
    #
    # Licensed under the Apache License, Version 2.0 (the "License");
    # you may not use this file except in compliance with the License.
    # You may obtain a copy of the License at
    #
    #     http://www.apache.org/licenses/LICENSE-2.0
    #
    # Unless required by applicable law or agreed to in writing, software
    # distributed under the License is distributed on an "AS IS" BASIS,
    # WITHOUT WARRANTIES OR CONDITIONS OF ANY KIND, either express or implied.
    # See the License for the specific language governing permissions and
    # limitations under the License.
    
    apiVersion: batch/v1
    kind: Job
    metadata:
      name: jax-gemma3-train-singlehost
    spec:
      template:
        metadata:
          annotations:
            gke-gcsfuse/volumes: "true"
        spec:
          serviceAccountName: jaxserviceaccout
          containers:
          - name: training-container
            image: ${IMAGE_URI}
            imagePullPolicy: "Always"
            command: ["python", "Gemma3LLMTrain.py", "--maxlen", "256", "--batch_size", "64", "--datacount", "851200"]
            resources:
              limits:
                google.com/tpu: 1
            volumeMounts:
            - name: gcs-fuse-csi-ephemeral
              mountPath: /data
            - name: gcs-fuse-csi-ephemeral2
              mountPath: /xprof
          nodeSelector:
            cloud.google.com/gke-tpu-accelerator: tpu-v6e-slice
            cloud.google.com/gke-tpu-topology: 1x1
          restartPolicy: Never
          volumes:
          - name: gcs-fuse-csi-ephemeral
            csi:
              driver: gcsfuse.csi.storage.gke.io
              volumeAttributes:
                bucketName: ${GCS_BUCKET_NAME}
                mountOptions: "implicit-dirs,file-cache:enable-parallel-downloads:true,file-cache:parallel-downloads-per-file:100,file-cache:max-parallel-downloads:-1,file-cache:download-chunk-size-mb:10,file-cache:max-size-mb:-1"
          - name: gcs-fuse-csi-ephemeral2
            csi:
              driver: gcsfuse.csi.storage.gke.io
              volumeAttributes:
                bucketName: ${XPROF_GCS_BUCKET_NAME}
                mountOptions: "implicit-dirs,file-cache:enable-parallel-downloads:true,file-cache:parallel-downloads-per-file:100,file-cache:max-parallel-downloads:-1,file-cache:download-chunk-size-mb:10,file-cache:max-size-mb:-1"
      backoffLimit: 1
  2. 套用資訊清單:

    envsubst < training_singlehost.yaml | kubectl apply -f -
    

授予服務帳戶寫入 XProf 記錄的權限

  1. 如要讓服務帳戶能夠寫入及讀取資料,請新增 "roles/storage.objectUser" 角色:

    export GSA_NAME="GSA_NAME" # Same as used in initial setup
    
    # Automatically get the current project ID
    export PROJECT_ID=$(gcloud config get-value project)
    
    # Cloud Storage Bucket details
    export XPROF_GCS_BUCKET_NAME="XPROF_GCS_BUCKET_NAME"
    
    # Derived Variables
    export GSA_EMAIL="${GSA_NAME}@${PROJECT_ID}.iam.gserviceaccount.com"
    
    gcloud storage buckets add-iam-policy-binding "gs://${XPROF_GCS_BUCKET_NAME}" \
        --member="serviceAccount:${GSA_EMAIL}" \
        --role="roles/storage.objectUser" \
        --project="${PROJECT_ID}"
    

    更改下列內容:

    • GSA_NAME:要授予角色的 Google 服務帳戶名稱。
    • XPROF_GCS_BUCKET_NAME:要授予角色的 bucket 名稱。
  2. 在 Pod 中執行 XProf:

    kubectl exec POD_NAME -c training-container -it -- bash # exec into the container
    xprof --port 9001 --logdir /xprof # start xprof
    

    POD_NAME 替換為 Pod 名稱。

存取 XProf 資訊主頁

  1. 將通訊埠轉送設定為 Pod 中的 XProf 伺服器:

    kubectl port-forward POD_NAME 9001:9001
    
  2. 在瀏覽器的網址列中輸入下列內容:

    http://localhost:9001/
    

    XProf Trace Viewer 隨即開啟。

  3. 在 TensorBoard 視窗中,按一下「擷取設定檔」

  4. 在「Profile Service URL(s) or TPU name」(剖析服務網址或 TPU 名稱) 欄位中輸入 localhost:9002

  5. 如要擷取更多詳細資料,請在「主機追蹤 (TraceMe) 層級」中選取「詳細」,並啟用 Python 追蹤記錄功能。

  6. 如要查看資訊主頁,請按一下「擷取」

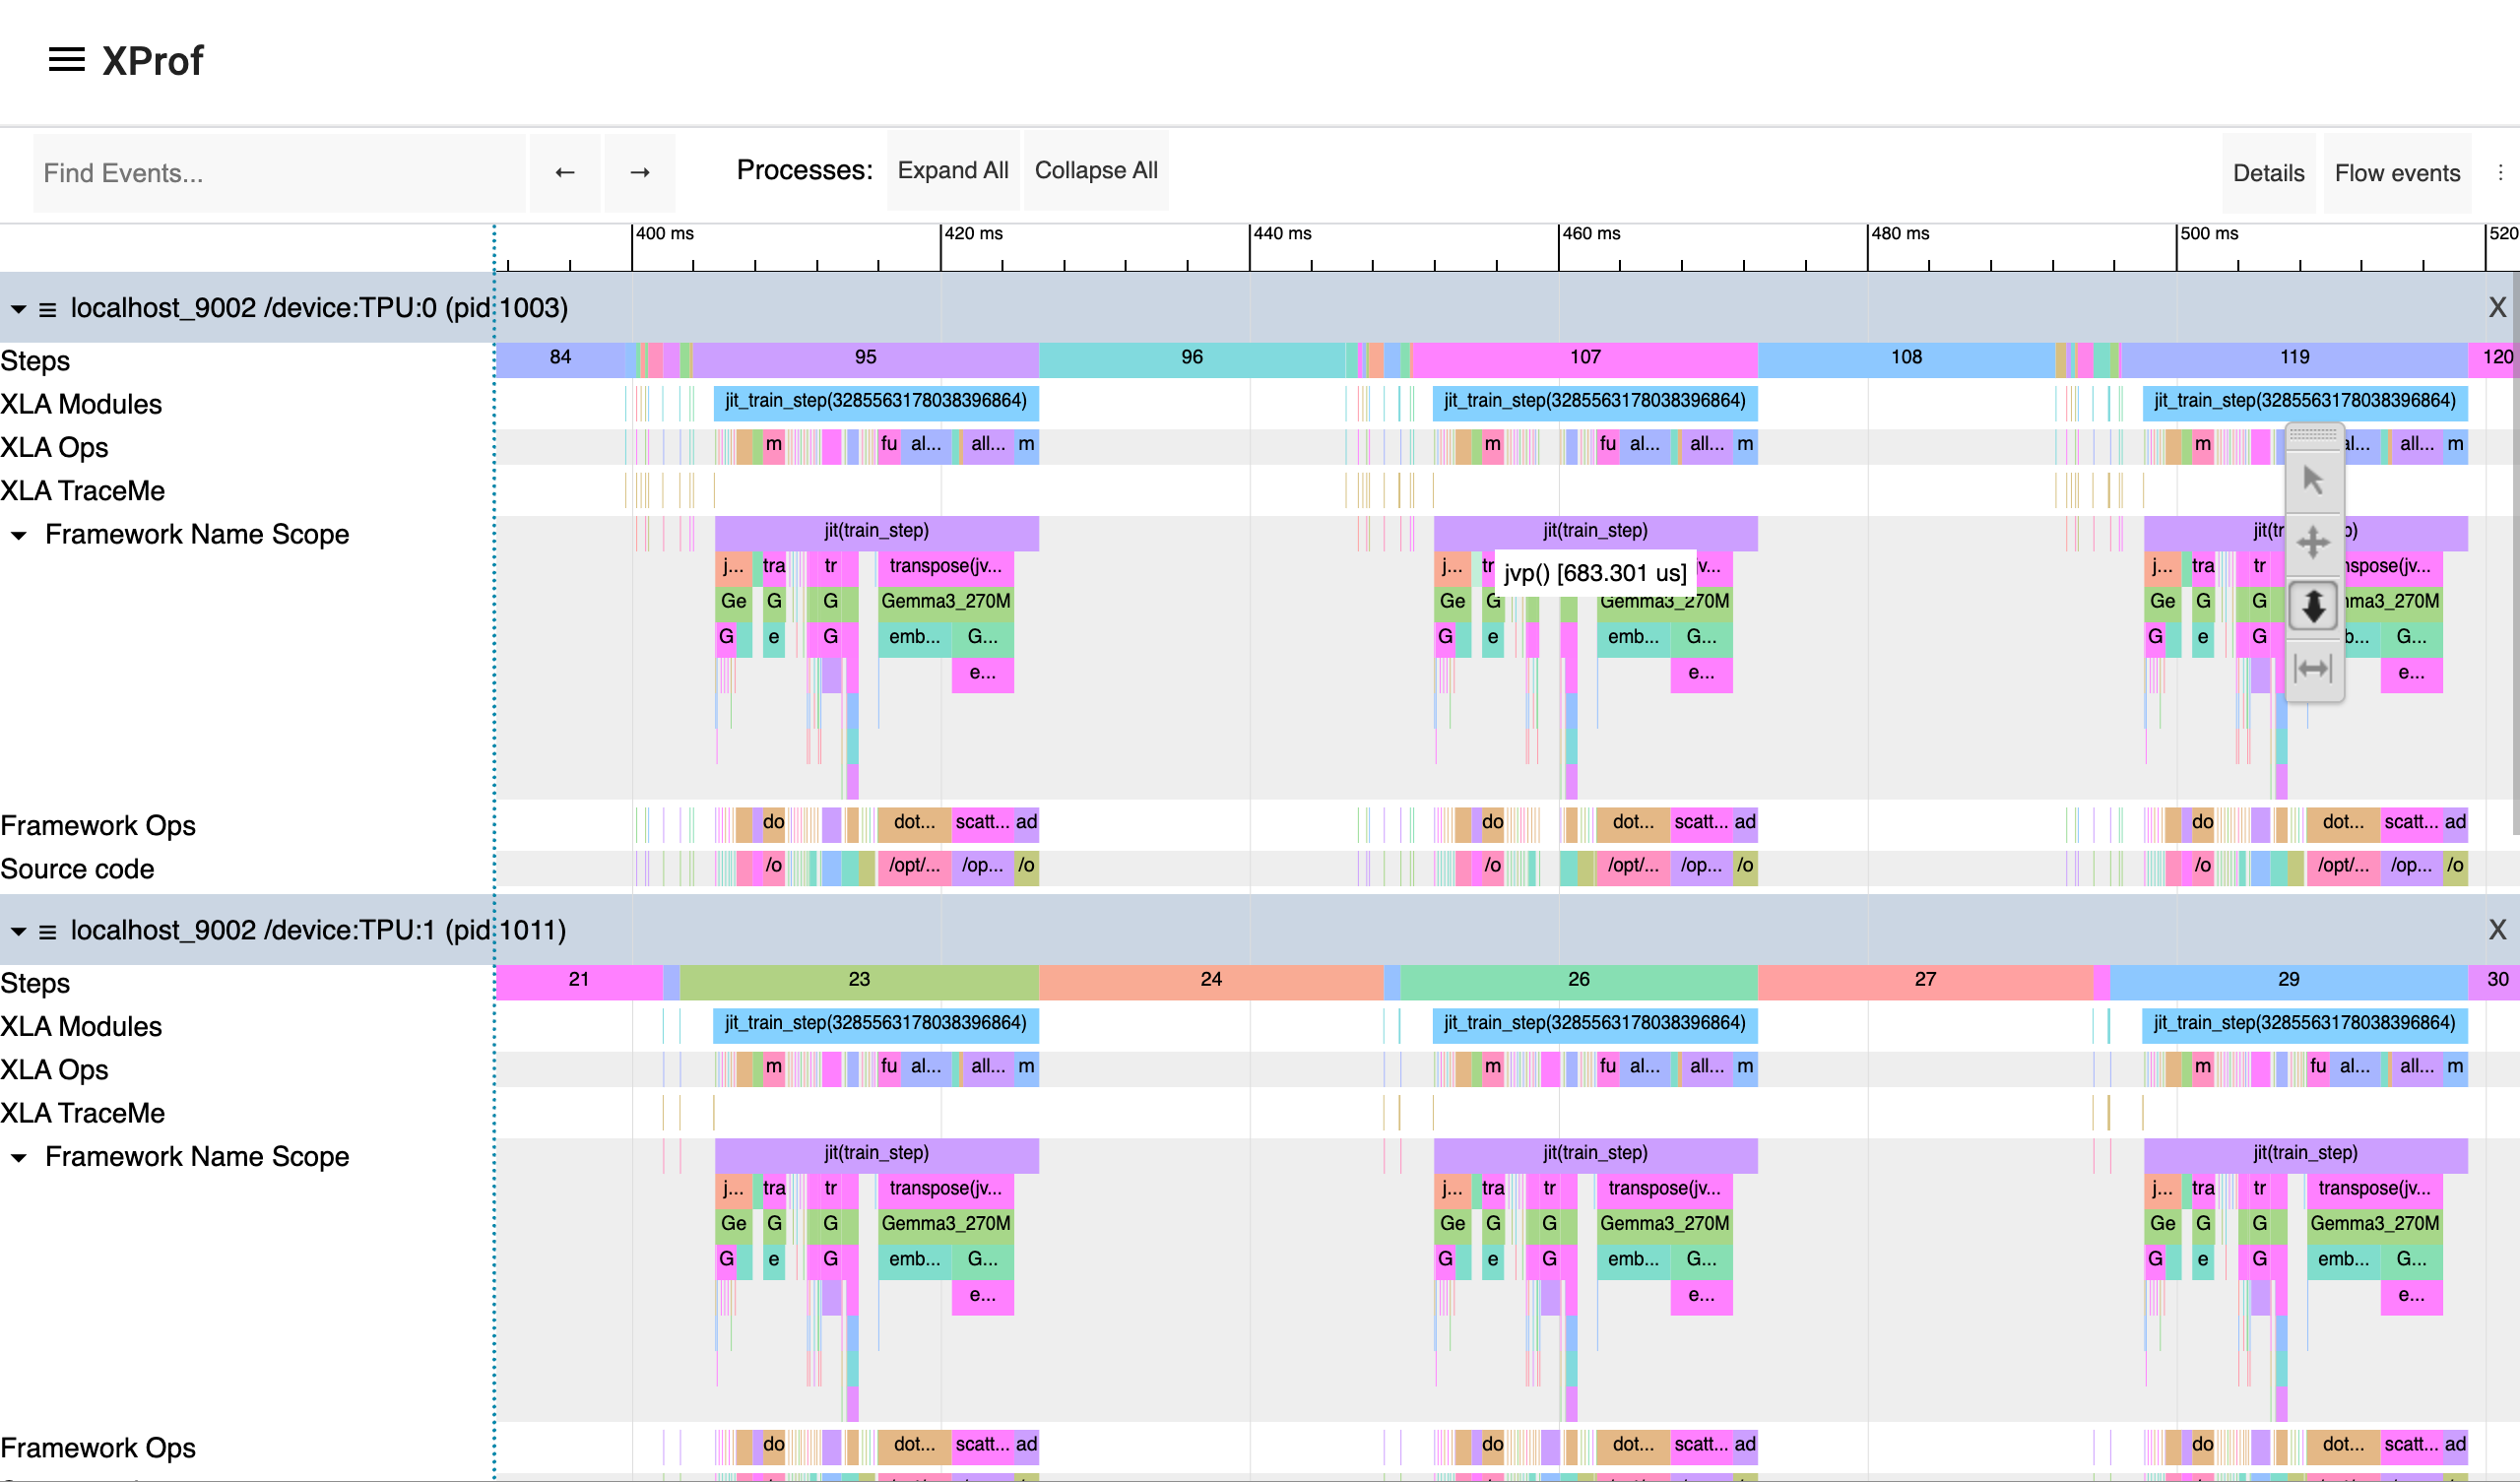
    TensorBoard 會擷取設定檔,方便您分析訓練指令碼的效能。圖表會顯示 TPU 和 CPU 效能設定檔的執行時間軸:

XProf 追蹤記錄檢視器範例,顯示效能矩陣圖

如要瞭解更多分析訓練工作負載效能的剖析選項,請參閱 JAX 說明文件中的「剖析運算」一節。

在實際工作環境中微調

本教學課程說明如何在分散式環境中測試以 JAX 為基礎的訓練作業。如要在正式環境中微調 LLM,請使用 Maxtext 程式庫。如果您對擴散模型感興趣,請使用 Maxdiffusion 實作項目。

如要在正式環境中執行長時間的訓練或微調工作負載,請設定工作負載查核點,盡量減少失敗時的進度損失。如要進一步瞭解如何設定多層級檢查點,請參閱使用多層級檢查點在 GKE 上訓練大規模機器學習模型

清除所用資源

為避免因為本教學課程所用資源,導致系統向 Google Cloud 帳戶收取費用,請刪除含有相關資源的專案,或者保留專案但刪除個別資源。

刪除個別資源

如要避免系統向您的 Google Cloud 帳戶收取本教學課程所用資源的費用,請刪除含有相關資源的專案,或者保留專案但執行下列指令刪除個別資源:

  1. 刪除您在本教學課程中建立的資源:

    gcloud container clusters delete ${CLUSTER_NAME} --location=${REGION}
    gcloud storage rm --recursive gs://${GCS_BUCKET_NAME}
    gcloud artifacts docker images delete ${IMAGE_URI} --delete-tags
    
  2. 如果不需要 XProf 產生的資料,請移除 XProf 使用的 Cloud Storage bucket:

    gcloud storage rm --recursive gs://${XPROF_GCS_BUCKET_NAME}
    

後續步驟