
This tutorial shows you how to fine-tune a large language model (LLM) using Tensor Processing Units (TPUs) on Google Kubernetes Engine (GKE) with JAX. Fine-tuning lets you adapt a foundation model like Gemma 3 to a specific domain or task. This process improves the precision and accuracy of the model by updating its parameters with your own specialized dataset.
This guide is a good starting point if you need the granular control, customization, scalability, resilience, portability, and cost-effectiveness of managed Kubernetes when fine-tuning your AI/ML workloads.
Background
By using TPUs on GKE with Jax to fine-tune an LLM, you can build a robust, production-ready fine-tuning solution with all the benefits of managed Kubernetes.
Gemma
Gemma is a set of openly available, lightweight, generative AI/ML multimodal models released under an open license. These AI models are available to run in your applications, hardware, mobile devices, or hosted services. Gemma 3 introduces multimodality, and it supports vision-language input and text outputs. It handles context windows of up to 128,000 tokens and supports over 140 languages. Gemma 3 also offers improved math, reasoning, and chat capabilities, including structured outputs and function calling.
You can use the Gemma models for text generation, or you can also tune these models for specialized tasks.
For more information, see the Gemma documentation.
TPUs
TPUs are application-specific integrated circuits (ASICs) that Google custom-developed to accelerate machine learning and AI models that are built using frameworks such as TensorFlow, PyTorch, and JAX.
Before you use TPUs in GKE, we recommend that you complete the following learning path:
- Learn about current TPU version availability with the Cloud TPU system architecture.
- Learn about TPUs in GKE.
JAX
JAX is a high-performance machine learning framework that is designed to be used with TPUs and GPUs. JAX provides an API for building and training machine learning models.
To learn more, see the JAX repository.
Objectives
This tutorial covers the following steps:
- Create a GKE Autopilot or Standard cluster with the recommended TPU topology, based on the model characteristics. During this tutorial, you perform the fine-tuning on single-host node pools.
- Add data to a Cloud Storage bucket and mount it to the container through Cloud Storage FUSE.
- Deploy the LLM fine-tuning Job on GKE.
- Monitor the fine-tuning Job and view the logs.
Before you begin
- Sign in to your Google Cloud account. If you're new to Google Cloud, create an account to evaluate how our products perform in real-world scenarios. New customers also get $300 in free credits to run, test, and deploy workloads.
-
In the Google Cloud console, on the project selector page, select or create a Google Cloud project.
Roles required to select or create a project
- Select a project: Selecting a project doesn't require a specific IAM role—you can select any project that you've been granted a role on.
-
Create a project: To create a project, you need the Project Creator role
(
roles/resourcemanager.projectCreator), which contains theresourcemanager.projects.createpermission. Learn how to grant roles.
-
Verify that billing is enabled for your Google Cloud project.
Enable the required API.
Roles required to enable APIs
To enable APIs, you need the
serviceusage.services.enablepermission. If you created the project, then you likely already have this permission through the Owner role (roles/owner). Otherwise, you can get this permission through the Service Usage Admin role (roles/serviceusage.serviceUsageAdmin). Learn how to grant roles.-
Make sure that you have the following role or roles on the project: roles/container.admin,roles/iam.serviceAccountAdmin,roles/storage.admin
Check for the roles
-
In the Google Cloud console, go to the IAM page.
Go to IAM - Select the project.
-
In the Principal column, find all rows that identify you or a group that you're included in. To learn which groups you're included in, contact your administrator.
- For all rows that specify or include you, check the Role column to see whether the list of roles includes the required roles.
Grant the roles
-
In the Google Cloud console, go to the IAM page.
Go to IAM - Select the project.
- Click Grant access.
-
In the New principals field, enter your user identifier. This is typically the email address for a Google Account.
- Click Select a role, then search for the role.
- To grant additional roles, click Add another role and add each additional role.
- Click Save.
-
- Ensure that you have sufficient quota for 16 TPU Trillium (v6e) chips. In this tutorial, you use a node pool configuration that requires 16 chips and on-demand instances.
- Ensure that you have a Docker repository. If you don't have one, create a standard repository in Artifact Registry.
Prepare the environment
In this tutorial, you use Cloud Shell to
manage resources hosted on Google Cloud. Cloud Shell comes
preinstalled with the software you need for this tutorial, including
kubectl and
Google Cloud CLI.
To set up your environment with Cloud Shell, follow these steps:
In the Google Cloud console, launch a Cloud Shell session and click
 Activate Cloud Shell. This action launches a session in
the bottom pane of the Google Cloud console.
Activate Cloud Shell. This action launches a session in
the bottom pane of the Google Cloud console.Set the default environment variables:
gcloud config set project PROJECT_ID
gcloud config set billing/quota_project PROJECT_ID
export PROJECT_ID=$(gcloud config get project)
export CLUSTER_NAME=CLUSTER_NAME
export REGION=CONTROL_PLANE_LOCATION
export ZONE=ZONE
export GCS_BUCKET_NAME=BUCKET_NAME
Replace the following values:
PROJECT_ID: your Google Cloud project ID.CLUSTER_NAME: the name of your GKE cluster.CONTROL_PLANE_LOCATION: the Compute Engine region where your GKE cluster and TPU nodes are located. The region must contain zones where TPU Trillium (v6e) machine types are available.ZONE: a zone within your selectedCONTROL_PLANE_LOCATIONregion where TPU Trillium (v6e) machine types are available. To list zones where TPU Trillium (v6e) TPUs are available, run the following command:gcloud compute accelerator-types list --filter="name~ct6e" --format="value(zone)"BUCKET_NAME: the name of the Cloud Storage bucket that contains your training data.
Clone the sample repository:
git clone https://github.com/GoogleCloudPlatform/kubernetes-engine-samples.git
cd kubernetes-engine-samples
Navigate to the working directory:
cd ai-ml/llm-training-jax-tpu-gemma3
Create and configure Google Cloud resources
In this section, you create and configure Google Cloud resources.
Create a GKE cluster
You can fine-tune an LLM on TPUs in a GKE Autopilot or Standard cluster. We recommend that you use a Autopilot cluster for a fully managed Kubernetes experience. To choose the GKE mode of operation that's the best fit for your workloads, see Choose a GKE mode of operation.
Autopilot
Create a GKE Autopilot cluster that uses Workload Identity Federation for GKE and has Cloud Storage FUSE enabled.
gcloud container clusters create-auto ${CLUSTER_NAME} \
    --location=${REGION}
The cluster creation might take several minutes.
Standard
Create a regional GKE Standard cluster that uses Workload Identity Federation for GKE and has Cloud Storage FUSE enabled.
gcloud container clusters create ${CLUSTER_NAME} \
    --enable-ip-alias \
    --addons GcsFuseCsiDriver \
    --machine-type=n2-standard-4 \
    --num-nodes=2 \
    --workload-pool=${PROJECT_ID}.svc.id.goog \
    --location=${REGION}
The cluster creation might take several minutes.
Create a single-host node pool:
gcloud container node-pools create jax-tpu-nodepool \
    --cluster=${CLUSTER_NAME} \
    --machine-type=ct6e-standard-1t \
    --num-nodes=1 \
    --location=${REGION} \
    --node-locations=${ZONE} \
    --workload-metadata=GKE_METADATA
GKE creates a TPU Trillium node pool with a 1x1
topology and one node. The --workload-metadata=GKE_METADATA flag configures the node pool to use the GKE metadata server.
Install JobSet
Configure
kubectlto communicate with your cluster:gcloud container clusters get-credentials ${CLUSTER_NAME} --location=${REGION}Install the latest released version of JobSet:
kubectl apply --server-side -f https://github.com/kubernetes-sigs/jobset/releases/download/JOBSET_VERSION/manifests.yamlReplace
JOBSET_VERSIONwith the latest released version of JobSet. For example,v0.11.0.Verify the JobSet installation:
kubectl get pods -n jobset-systemThe output is similar to the following:
NAME                                         READY   STATUS    RESTARTS   AGE
jobset-controller-manager-6c56668494-l4dhc   1/1     Running   0          4m45s
You might need to add more nodes if JobSet is waiting for resources.
Configure Cloud Storage FUSE
To fine-tune the LLM, you need to provide training data. In this tutorial, you use the TinyStories dataset from Hugging Face. This dataset contains short stories, synthetically generated by GPT-3.5 and GPT-4, that use a limited vocabulary.
This section covers the steps to configure Cloud Storage FUSE to read data from a Cloud Storage bucket.
Download the dataset:
wget https://huggingface.co/datasets/roneneldan/TinyStories/resolve/main/TinyStories-train.txt?download=true -O TinyStories-train.txtUpload the data into a new Cloud Storage bucket:
gcloud storage buckets create gs://${GCS_BUCKET_NAME} \
    --location=${REGION} \
    --enable-hierarchical-namespace \
    --uniform-bucket-level-access
gcloud storage cp TinyStories-train.txt gs://${GCS_BUCKET_NAME}
To allow your workload to read data through Cloud Storage FUSE, create a Kubernetes service account (KSA) and add the required permissions. Run the
permissionsetup.shscript:After you run this script, the following resources are configured in your Google Cloud project and GKE cluster:
- A new IAM service account named
gcs-fuse-sais created in your project. - The created Google Cloud Service Account (GSA) (
gcs-fuse-sa) is granted theroles/storage.objectViewerrole on the Cloud Storage bucket specified by${GCS_BUCKET_NAME}. This permission allows the GSA to read objects from the bucket. - A new KSA named
jaxserviceaccountis created in thedefaultnamespace within your GKE cluster. - The IAM policy of the GSA is updated to grant the
roles/iam.workloadIdentityUserrole to the KSA. This permission allows the KSA to impersonate the GSA. The KSA is annotated to link it to the GSA. This annotation tells GKE which GSA the KSA should impersonate by using Workload Identity.
Any Pod running in the
defaultnamespace of your GKE cluster that uses thejaxserviceaccountservice account will now be able to authenticate as thegcs-fuse-saGSA. These Pods will have read access to the objects stored in thegs://${GCS_BUCKET_NAME}bucket, which is essential for the fine-tuning Job to access the dataset by using Cloud Storage FUSE.
- A new IAM service account named
Create the fine-tuning script
In this section, you explore the training script that performs a fine-tuning
operation on a
Gemma 3 model. This script uses the Gemma3Tokenizer.
Review the following Gemma3LLMTrain.py fine-tuning script:
In this script, the following applies:
- A
Gemma3Tokenizerconverts text data into tokens that the model can process. - The
load_and_preprocess_datafunction reads the training data from a file, splits it into individual stories, and uses the tokenizer to convert the text into padded sequences of tokens. - The
generate_textfunction takes the model, its parameters, and a prompt to generate text. - The
train_stepfunction defines a single iteration of training that includes the forward pass, loss calculation (using cross-entropy), gradient computation, and parameter updates. - The
train_modelfunction iterates through the dataset for a specified number of epochs, which calls thetrain_stepfunction for each batch. - The
run_trainingfunction orchestrates the entire process to load data, initialize the Gemma 3 model (Gemma3_270M) and optimizer, load pre-trained parameters, set up data sharding for parallel processing, run a test generation, execute the training loop, and perform a final text generation to demonstrate the effect of fine-tuning. - The script uses
argparselibrary to accept command-line arguments formaxlen,batch_size, anddatacountparameters.
Now that you have explored the fine-tuning script, containerize it to run on GKE.
Containerize the fine-tuning script
Before you run the fine-tuning script in a GKE cluster, you need to containerize it. This tutorial uses a JAX AI image as the base image.
Open the
Dockerfilein the same directory as theGemma3LLMTrain.pyfile:This Dockerfile installs the necessary dependencies and copies the
Gemma3LLMTrain.pyfile into the container.Build the Docker image and push it to an image repository:
export REPOSITORY=REPOSITORY_NAME
export IMAGE_NAME="jax-gemma3-training"
export IMAGE_TAG="latest"
export DOCKERFILE_PATH="./Dockerfile"
export IMAGE_URI="${REGION}-docker.pkg.dev/${PROJECT_ID}/${REPOSITORY}/${IMAGE_NAME}:${IMAGE_TAG}"

docker build -t "${IMAGE_URI}" -f "${DOCKERFILE_PATH}" .
gcloud auth configure-docker "${REGION}-docker.pkg.dev" -q
docker push "${IMAGE_URI}"
Replace
REPOSITORY_NAMEwith the name of your Artifact Registry repository.Add role bindings to the service account:
export PROJECT_NUMBER=$(gcloud projects describe $PROJECT_ID --format 'get(projectNumber)')
gcloud artifacts repositories add-iam-policy-binding ${REPOSITORY} \
    --project=${PROJECT_ID} \
    --location=${REGION} \
    --member="serviceAccount:${PROJECT_NUMBER}-compute@developer.gserviceaccount.com" \
    --role="roles/artifactregistry.reader"
With the image in the repository, you can now deploy the fine-tuning Job into a GKE cluster.
Deploy the LLM fine-tuning Job
This section shows you how to deploy the LLM fine-tuning Job to your GKE cluster.
Open the
training_singlehost.yamlmanifest:Apply the manifest:
envsubst < training_singlehost.yaml | kubectl apply -f -
GKE creates a Job that launches a Pod on a
TPU Trillium (v6e) node. This Pod runs the Python fine-tuning script, which
accesses the fine-tuning data from the specified Cloud Storage bucket
mounted at /data path by using Cloud Storage FUSE. The script then fine-tunes the
Gemma model.
Monitor the training Job
In this section, you monitor the progress of the fine-tuning Job and its performance.
See fine-tuning progress
List the Pods:
# Find the Pods
kubectl get pods
Follow the log output:
kubectl logs -f pods/POD_NAMEReplace
POD_NAMEwith the name of your Pod.The output is similar to the following:
Global device count: 1
Batch size: 128, Max length: 256, Data count: 96000
I1028 00:12:55.925999 1387 google_auth_provider.cc:181] Running on GCE, using service account ...
Generating response for: Once upon a time, there was a girl named Amy.
Response:
Amy lived in a small house. The house was in a big field. Amy liked to play in the big field. She
Start training model
Loss after batch 0: 10.25
Loss after batch 10: 4.3125
.
.
.
Loss after batch 740: 1.41406
Completed training model. Total time for training 294.6791355609894 seconds
Generating response for: Once upon a time, there was a girl named Amy.
Response:
She loved to play with her toys. One day, Amy's mom told her that she had to go to the store to
Analyze the output:
- The
Global device count: 1line indicates the TPU cores used. - The model generates reasonable text before this fine-tuning run because it loads from a pre-trained checkpoint.
- The output generated after fine-tuning shows more resemblance to the start of a short story, indicating the model is learning from the new dataset.
- Fine-tuning on the full dataset should produce even more refined outputs.
- The
Observe metrics
See the performance of the fine-tuning Job by checking the TPU and CPU metrics. To view observability metrics for your cluster, perform the steps in View cluster and workload observability metrics.
Alternative fine-tuning configurations
This section outlines alternative configurations for your fine-tuning workload.
Model selection
This tutorial used the Gemma3_270M model, which is a small model that fits
into a single-host TPU Trillium (v6e) node pool. For larger models that
require more memory and compute for fine-tuning, you can use multi-host or
multislice node pool configurations.
For a complete list of available models, see the Gemma documentation.
Node pool configurations
This tutorial used a single-host node pool. You can also create multi-host TPU slice node pools or multislice node pools, depending on your needs.
The following tabs show how to create for multi-host and multislice node pools:
Multi-host
In Cloud Shell, run the following command:
gcloud container node-pools create jax-tpu-multihost1 \
    --cluster=${CLUSTER_NAME} \
    --machine-type=ct6e-standard-4t \
    --num-nodes=2 \
    --tpu-topology=2x4 \
    --location=${REGION} \
    --node-locations=${ZONE}
GKE creates a TPU Trillium node pool with a
2x4topology and two nodes.Open the
training_multihost_jobset.yamlJob definition:Deploy the fine-tuning Job:
envsubst < training_multihost_jobset.yaml | kubectl apply -f -
Multislice
In Cloud Shell, run the following command:
gcloud container node-pools create jax-tpu-multihost1 \
  --cluster=${CLUSTER_NAME} \
  --machine-type=ct6e-standard-4t \
  --num-nodes=2 \
  --tpu-topology=2x4 \
  --location=${REGION} \
  --node-locations=${ZONE}

gcloud container node-pools create jax-tpu-multihost2 \
  --cluster=${CLUSTER_NAME} \
  --machine-type=ct6e-standard-4t \
  --num-nodes=2 \
  --tpu-topology=2x4 \
  --location=${REGION} \
  --node-locations=${ZONE}
GKE creates two TPU Trillium node pools. Each node pool has a
2x4topology and two nodes.Open the
training_multislice_jobset.yamlJob definition:Deploy the fine-tuning Job:
envsubst < training_multislice_jobset.yaml | kubectl apply -f -
Performance analysis and optimization
To analyze and optimize the performance of your machine learning fine-tuning, you can use XProf. XProf is a suite of tools that profiles and inspects ML workloads built with JAX, TensorFlow, or PyTorch/XLA. By showing execution traces, memory usage, and other data, XProf lets you fine-tune your models and training setup for better efficiency and faster training.
To analyze the performance of your fine-tuning workload by using XProf, you complete the following steps in this section:
- Install the
xprofpackage. Modify your training script to start the XProf server. - Modify your Kubernetes Job manifest to include a volume mount for XProf logs.
- Grant the service account permissions to write XProf logs to a Cloud Storage bucket.
- Run XProf within your Pod and set up port forwarding to access the XProf dashboard.
Install the XProf package
Navigate to the directory that contains the XProf samples:
cd ai-ml/llm-training-jax-tpu-gemma3/xprof-enabledBuild the Docker image and push it to an image repository:
export REPOSITORY=REPOSITORY_NAME
export IMAGE_NAME="jax-gemma3-training-xp"
export IMAGE_TAG="latest"
export DOCKERFILE_PATH="./Dockerfile"
export IMAGE_URI="${REGION}-docker.pkg.dev/${PROJECT_ID}/${REPOSITORY}/${IMAGE_NAME}:${IMAGE_TAG}"

docker build -t "${IMAGE_URI}" -f "${DOCKERFILE_PATH}" .
gcloud auth configure-docker "${REGION}-docker.pkg.dev" -q
docker push "${IMAGE_URI}"
Replace
REPOSITORY_NAMEwith the name of your Artifact Registry repository.Run the
Dockerfilescript:This Dockerfile installs XProf dependencies.
Copy your fine-tuning script into the container
In this section, create and apply a Kubernetes Job manifest that includes the necessary volume mounts for XProf logs.
Open the
training_singlehost.yamlJob definition:Apply the manifest:
envsubst < training_singlehost.yaml | kubectl apply -f -
Grant the service account permissions to write XProf logs
To enable the service account to write and read, add the
"roles/storage.objectUser"role:export GSA_NAME="GSA_NAME" # Same as used in initial setup # Automatically get the current project ID export PROJECT_ID=$(gcloud config get-value project) # Cloud Storage Bucket details export XPROF_GCS_BUCKET_NAME="XPROF_GCS_BUCKET_NAME" # Derived Variables export GSA_EMAIL="${GSA_NAME}@${PROJECT_ID}.iam.gserviceaccount.com" gcloud storage buckets add-iam-policy-binding "gs://${XPROF_GCS_BUCKET_NAME}" \ --member="serviceAccount:${GSA_EMAIL}" \ --role="roles/storage.objectUser" \ --project="${PROJECT_ID}"Replace the following:
GSA_NAME: the name of the Google Service Account to which to grant the role.XPROF_GCS_BUCKET_NAME: the name of the bucket to which to grant the role.
Run XProf within your Pod:
kubectl exec POD_NAME -c training-container -it -- bash # exec into the container
xprof --port 9001 --logdir /xprof # start xprof
Replace
POD_NAMEwith the name of your Pod.
Access the XProf dashboard
Set up port forwarding to the XProf server in the Pod:
kubectl port-forward POD_NAME 9001:9001In your browser's address bar, enter the following:
http://localhost:9001/The XProf Trace Viewer opens.
In the TensorBoard window, click Capture profile.
In the Profile Service URL(s) or TPU name field, enter
localhost:9002.To capture more details, in the Host Trace (TraceMe) Level, select verbose and enable Python trace logging.
To view the dashboard, click Capture.
TensorBoard captures the profile and lets you analyze the performance of the training script. The graph shows the execution timeline for both TPU and CPU performance profiles:
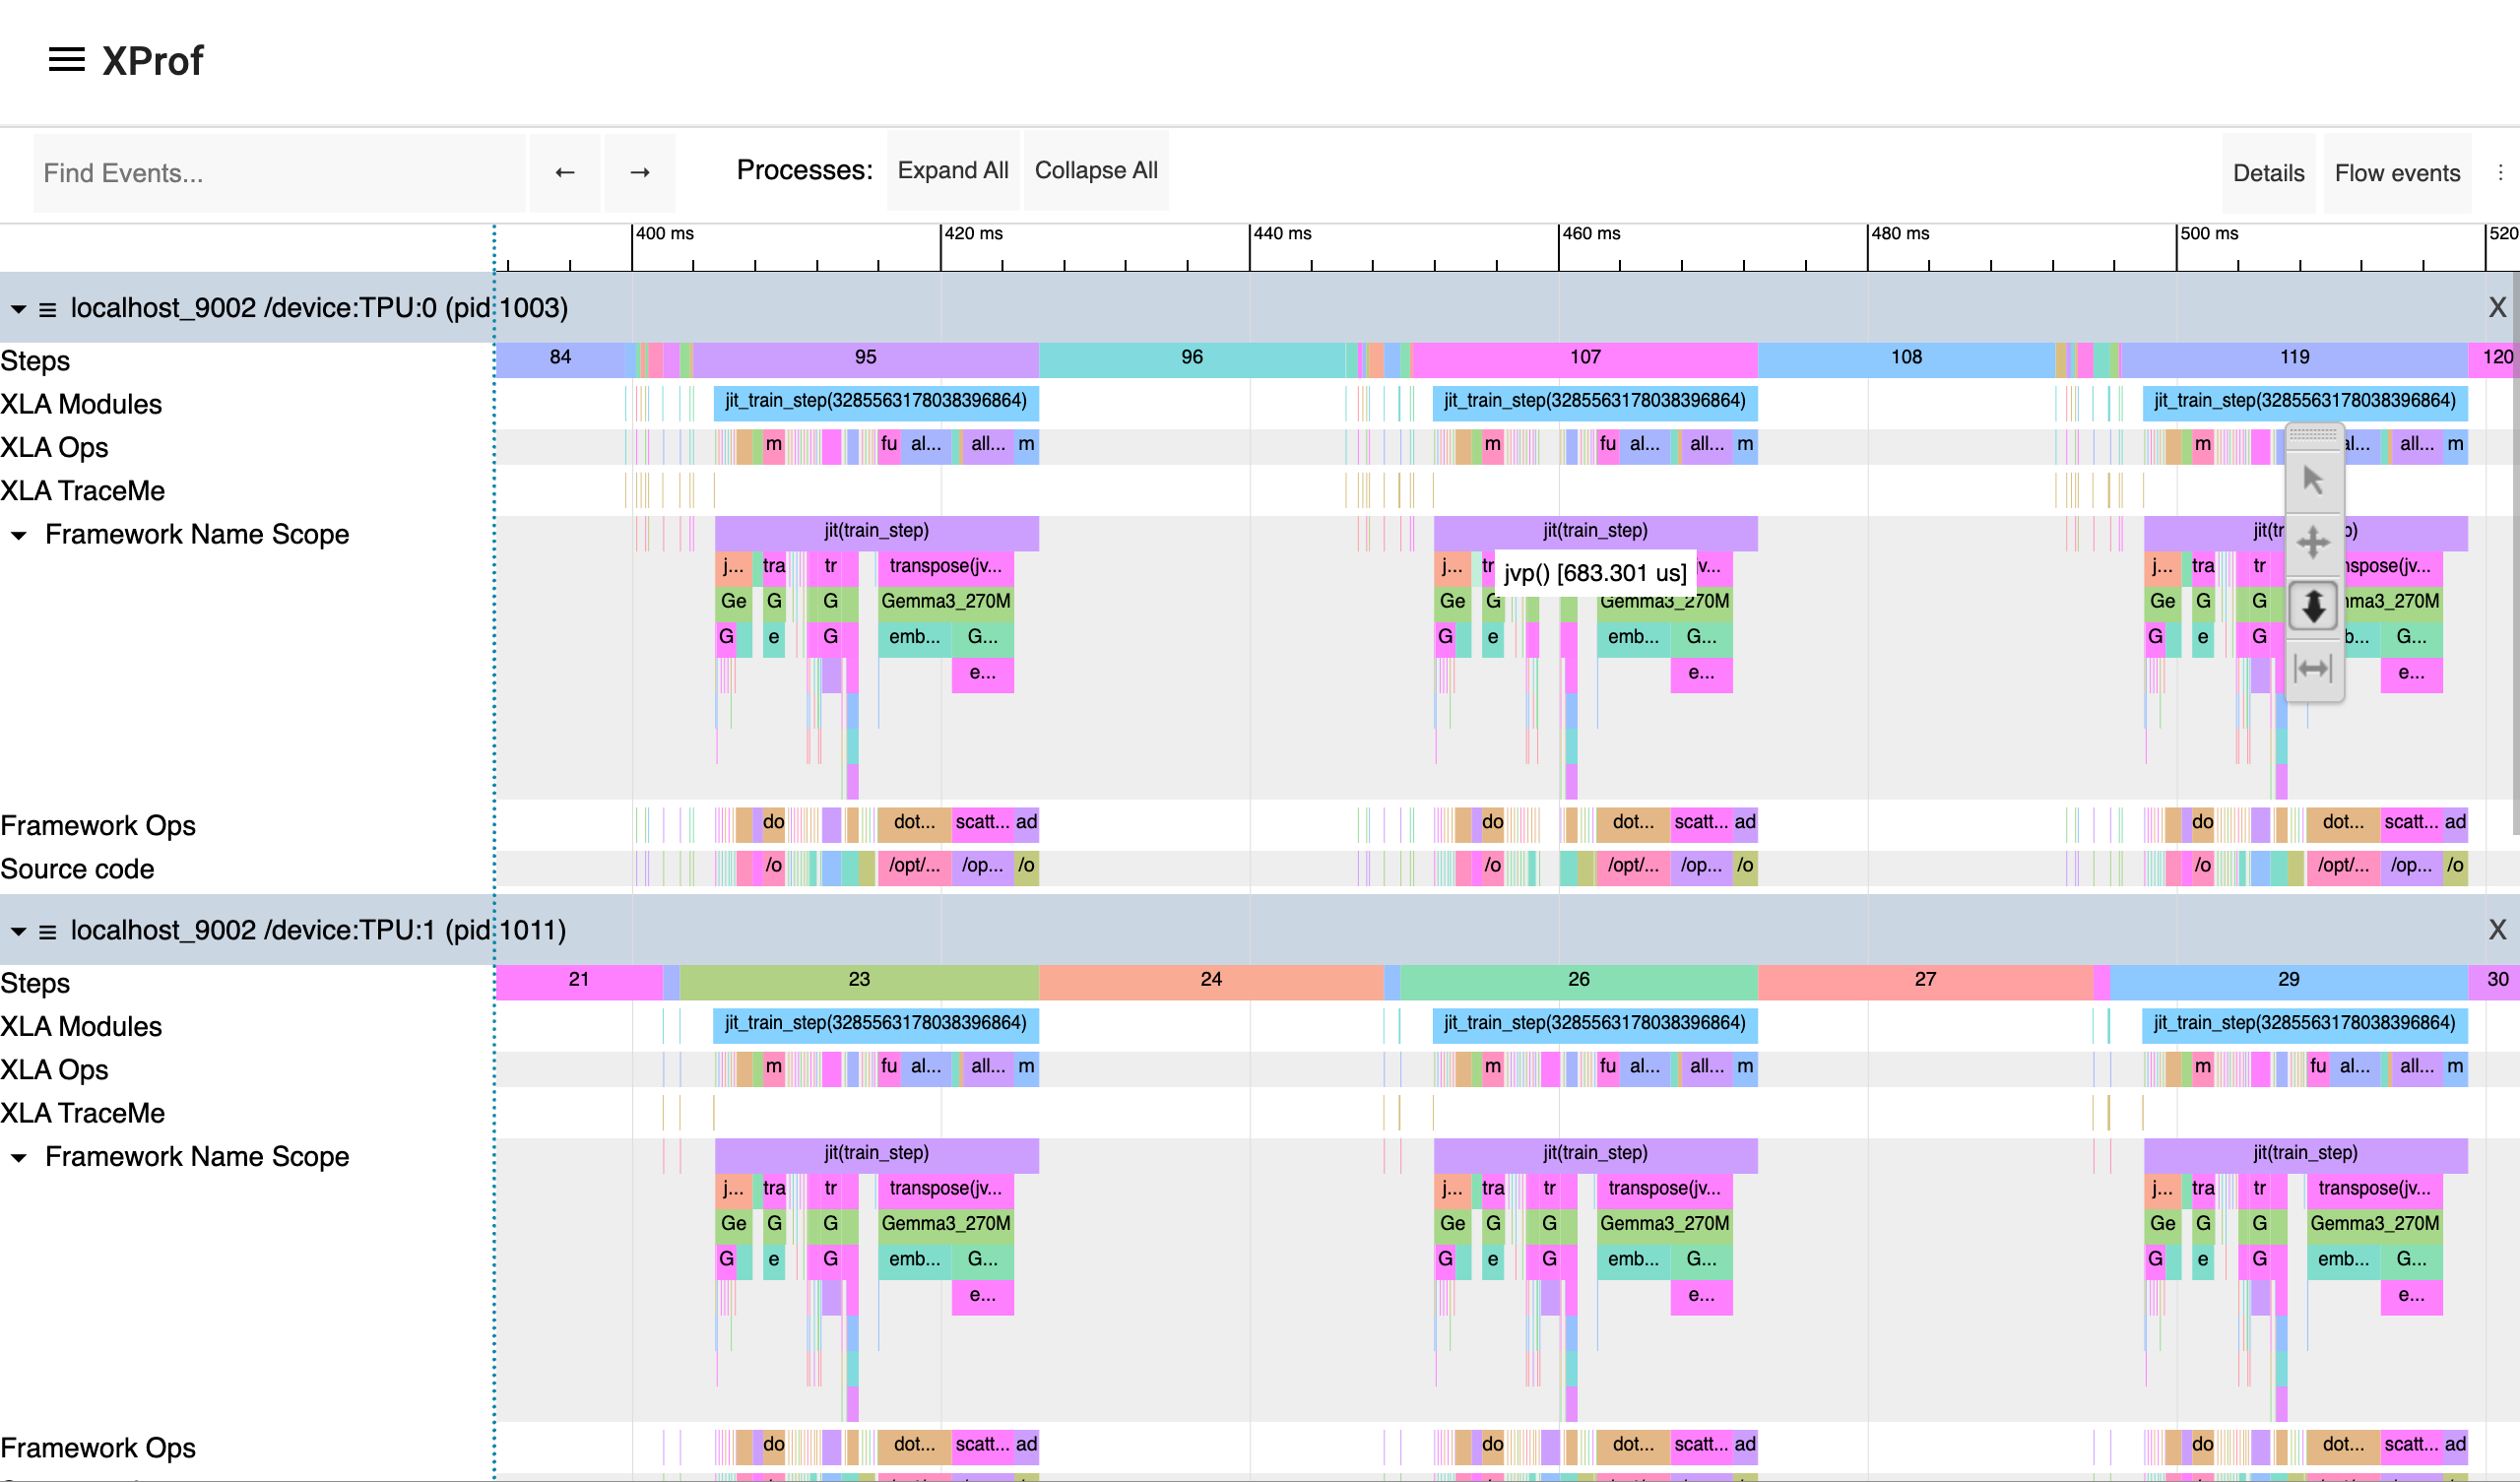
For more profiling options to analyze your training workload performance, see the JAX documentation on Profiling computation.
Fine-tuning in production environments
This tutorial showed you how to test test JAX-based training in a distributed environment. For optimized LLM fine-tuning in production, use the Maxtext library. If you are interested in diffusion models, use Maxdiffusion implementations.
For long-running training or fine-tuning workloads in production, set up workload checkpointing to minimize progress loss during a failure. To learn more about setting up multi-tier checkpointing, see Train large-scale machine learning models on GKE with Multi-Tier Checkpointing.
Clean up
To avoid incurring charges to your Google Cloud account for the resources used in this tutorial, either delete the project that contains the resources, or keep the project and delete the individual resources.
Delete the individual resources
To avoid incurring charges to your Google Cloud account for the resources used in this tutorial, either delete the project that contains the resources, or keep the project and delete the individual resources by running the following commands:
Delete the resources you created in this tutorial:
gcloud container clusters delete ${CLUSTER_NAME} --location=${REGION}
gcloud storage rm --recursive gs://${GCS_BUCKET_NAME}
gcloud artifacts docker images delete ${IMAGE_URI} --delete-tags
If you don't need the data generated by XProf, remove the Cloud Storage bucket used by XProf:
gcloud storage rm --recursive gs://${XPROF_GCS_BUCKET_NAME}
What's next
- Learn more about TPUs in GKE.
- Explore the JAX repository.