本教程介绍了如何将使用 Google 智能体开发套件 (ADK) 和 A2UI 扩展程序构建的 Agent-to-Agent (A2A) 智能体部署到 Cloud Run。您还将了解如何向 Gemini Enterprise 注册已部署的代理。
本教程的示例代码具有以下文件夹结构。
教程文件夹结构
该项目具有以下文件夹结构:
| 文件/目录 | 说明 |
|---|---|
examples/0.8/ |
包含示例配置或数据的目录。 |
__init__.py |
将目录标记为 Python 软件包。 |
agent.py |
定义代理、其技能和行为。 |
agent_executor.py |
管理执行流程和工具互动。 |
contact_data.json |
智能体使用的示例数据(例如,模拟联系人)。 |
deploy.sh |
用于构建代理并将其部署到 Cloud Run 的脚本。 |
main.py |
主要应用入口点(FastAPI 应用)。 |
prompt_builder.py |
用于为模型构建提示的辅助程序。 |
pyproject.toml |
项目配置和依赖项。 |
tools.py |
定义智能体可以使用的工具(函数)。 |
准备工作
在开始之前,请确保满足以下条件:
现有的 Gemini Enterprise 应用。如需创建应用,请参阅创建应用。
克隆代码库并前往
cloud_run示例目录:git clone https://github.com/a2ui-project/a2ui.git cd a2ui/samples/community/agent/adk/gemini_enterprise/cloud_run
启用 API
为您的项目启用以下 API:
控制台
启用以下 API:
- Vertex AI API
- Cloud Build API
- Artifact Registry API
- Cloud Run API
- Cloud Logging API
- Discovery Engine API
- Cloud Storage API
- Identity and Access Management (IAM) API
REST
您可以通过 Google Cloud 控制台或使用以下 gcloud CLI 命令启用这些 API:
gcloud services enable aiplatform.googleapis.com cloudbuild.googleapis.com artifactregistry.googleapis.com run.googleapis.com logging.googleapis.com discoveryengine.googleapis.com storage.googleapis.com iam.googleapis.com
授予权限
向 Cloud Run Invoker (roles/run.invoker) 角色授予权限。
gcloud projects add-iam-policy-binding PROJECT_ID \
   --member="serviceAccount:service-PROJECT_NUMBER@gcp-sa-discoveryengine.iam.gserviceaccount.com" \
   --role="roles/run.invoker"
替换以下内容:
- PROJECT_ID:您的项目的 ID。
- PROJECT_NUMBER:您的 Google Cloud 项目编号。
部署智能体
deploy.sh 脚本可自动执行部署流程。如需部署代理,请从项目目录中运行脚本,并提供您的 Google Cloud ID 和新服务的名称。您还可以选择指定要使用的 Gemini 模型。
该脚本会执行以下操作:
- 根据源代码构建容器映像。
- 将映像推送到 Artifact Registry。
- 将映像部署到 Cloud Run。
- 设置环境变量,包括
MODEL和服务本身的公共AGENT_URL。
chmod +x deploy.sh
./deploy.sh YOUR_PROJECT_ID contacts-agent MODEL_NAME
替换以下内容:
- PROJECT_ID:您的项目的 ID。
- MODEL_NAME:可选。这是脚本的第三个实参。支持的值包括
gemini-2.5-pro和gemini-2.5-flash。如果未提供,脚本会默认使用gemini-2.5-flash。
脚本完成后,系统会输出已部署代理的服务网址。您需要在下一步中使用此服务网址。
向 Gemini Enterprise 注册代理
现在,您的代理已部署完毕,您需要向 Gemini Enterprise 注册该代理,以便用户可以发现它。
运行以下 curl 命令,并将占位符替换为您自己的值:
curl -X POST -H "Authorization: Bearer $(gcloud auth print-access-token)" -H "Content-Type: application/json" https://discoveryengine.googleapis.com/v1alpha/projects/PROJECT_NUMBER/locations/LOCATION/collections/default_collection/engines/ENGINE_ID/assistants/default_assistant/agents -d '{
"name": "contacts-agent",
"displayName": "Contacts Agent",
"description": "This is a test agent which lists the contacts.",
"a2aAgentDefinition": {
  "jsonAgentCard": "{\"protocolVersion\": \"0.3.0\", \"name\": \"contacts-agent\", \"description\": \"This is a test agent which lists the contacts.\", \"url\": \"AGENT_URL\", \"version\": \"1.0.0\", \"capabilities\": {\"streaming\": true, \"extensions\": [{\"uri\": \"https://a2ui.org/a2a-extension/a2ui/v0.8\", \"description\": \"Ability to render A2UI\", \"required\": false, \"params\": {\"supportedCatalogIds\": [\"https://a2ui.org/specification/v0_8/standard_catalog_definition.json\"]}}]}, \"skills\": [], \"defaultInputModes\": [\"text/plain\"], \"defaultOutputModes\": [\"text/plain\"]}"
}
}'
替换以下内容:
PROJECT_NUMBER:您的 Google Cloud 项目编号。LOCATION:数据存储区的多区域:global、us或euENGINE_ID:您要向其注册代理的应用的 ID。AGENT_URL:已部署代理的服务网址。
在 Gemini Enterprise Web 应用中使用代理
创建并注册代理后,您就可以开始在 Gemini Enterprise Web 应用中使用该代理并与之互动。
获取 Web 应用网址
如需使用该代理,您首先需要获取 Web 应用网址。Gemini Enterprise 管理员可以按照以下步骤获取并分享 Web 应用网址:
在 Google Cloud 控制台中,前往 Gemini Enterprise 页面。
点击向其注册了代理的应用的名称。
点击集成 (Integrations)。
复制您的 Web 应用的链接:并将其分享给组织中的用户。
使用智能体
如需使用智能体并与之互动,请执行以下操作:
- 在新浏览器标签页中打开该 Web 应用网址。
- 在 Web 应用导航菜单中,点击代理。
- 前往您的组织部分,然后点击您创建的代理。
- 系统会打开代理的对话界面。开始提问并与智能体互动。
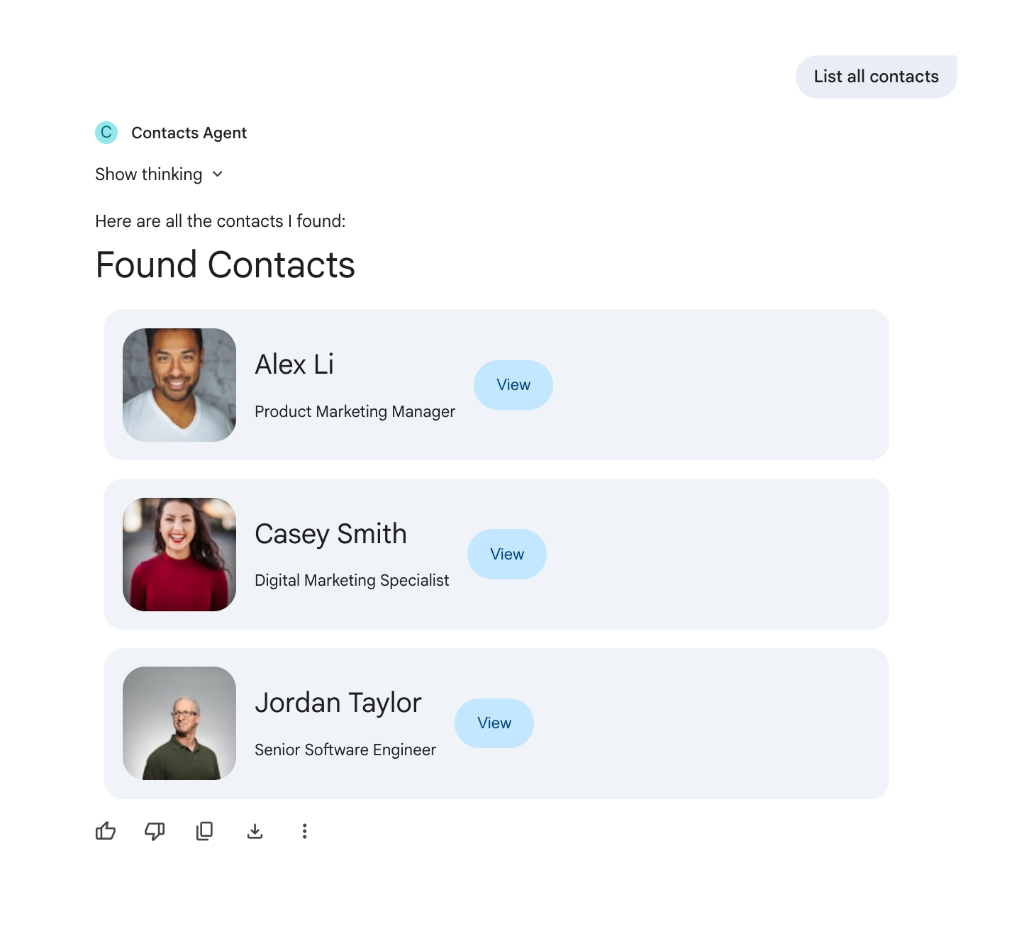
例如,您可以让智能体列出所有联系人。代理使用 list_contacts 工具从 contact_data.json 中检索联系人,并使用自定义界面元素在对话中呈现列表,如以下示例所示: