This tutorial explains how to deploy an Agent-to-Agent (A2A) agent, built with the Agent Development Kit (ADK) and the A2UI extension, to Cloud Run. You also learn how to register the deployed agent with Gemini Enterprise.
This example uses publicly available sample code. The sample code for this tutorial has the following folder structure.
Tutorial folder structure
The project has the following folder structure:
| File/Directory | Description |
|---|---|
/samples/community/agent/adk/gemini_enterprise/v0_9 |
Directory containing example configurations and data for this tutorial. |
__init__.py |
Marks the directory as a Python package. |
__main__.py |
The entry point to run the agent locally. |
agent.py |
Defines the agent, its skills, and behavior. |
agent_executor.py |
Manages the execution flow and tool interactions. |
deploy.sh |
Script to build and deploy the agent to Cloud Run. |
examples/ |
Directory containing component template examples. |
gemini_enterprise_composite_catalog.json |
Component catalog defining standard Material and custom Gemini Enterprise components. |
main.py |
The main application entry point (FastAPI app). |
prompt_builder.py |
Helper to construct prompts for the model. |
pyproject.toml |
Project configuration and dependencies. |
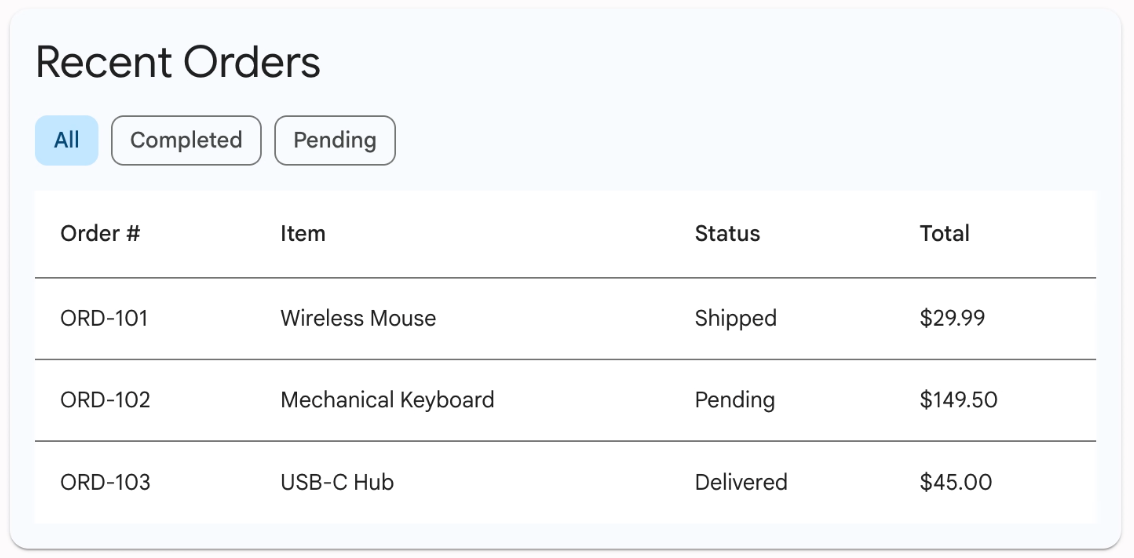
examples/0.9/material_table_orders.json |
Sample UI template containing the layout and mock data for the recent orders demo. |
tools.py |
Defines the tools (functions) the agent can use. |
Before you begin
Before you begin, make sure you have the following:
The Discovery Engine Admin role.
An existing Gemini Enterprise app. To create an app, see Create an app.
Clone the repository and navigate to the
v0_9sample directory:git clone https://github.com/a2ui-project/a2ui.git cd a2ui/samples/community/agent/adk/gemini_enterprise/v0_9
Enable APIs
Enable the following APIs for your project:
Console
Enable the following APIs:
- Vertex AI API
- Cloud Build API
- Artifact Registry API
- Cloud Run API
- Cloud Logging API
- Discovery Engine API
- Cloud Storage API
- Identity and Access Management (IAM) API
REST
You can enable these APIs from the Google Cloud console or by using the following gcloud CLI command:
gcloud services enable aiplatform.googleapis.com cloudbuild.googleapis.com artifactregistry.googleapis.com run.googleapis.com logging.googleapis.com discoveryengine.googleapis.com storage.googleapis.com iam.googleapis.com
Grant permissions
Grant permission to the Cloud Run Invoker (roles/run.invoker) role.
gcloud projects add-iam-policy-binding PROJECT_ID \
   --member="serviceAccount:service-PROJECT_NUMBER@gcp-sa-discoveryengine.iam.gserviceaccount.com" \
   --role="roles/run.invoker"
Replace the following:
- PROJECT_ID : the ID of your project.
- PROJECT_NUMBER: Your Google Cloud project number.
Deploy the agent
The deploy.sh script automates the deployment process. To deploy your agent,
run the script from the project directory with your Google Cloud ID and a name
for your new service. You can also optionally specify the Gemini model
to use.
The script performs the following actions:
- Builds a container image from your source code.
- Pushes the image to Artifact Registry.
- Deploys the image to Cloud Run.
- Sets environment variables, including the
MODELand the publicAGENT_URLof the service itself.
chmod +x deploy.sh
./deploy.sh PROJECT_ID a2ui-demo-agent MODEL_NAME
Replace the following:
- PROJECT_ID: the ID of your project.
- MODEL_NAME: Optional. This is the third argument to the
script. Supported values are
gemini-2.5-proandgemini-2.5-flash. If not provided, the script defaults togemini-2.5-flash.
Once the script completes, it prints the service URL of your deployed agent. You need this Service URL in the next step.
Register agent with Gemini Enterprise
Now that your agent is deployed, you need to register it with Gemini Enterprise to make it discoverable.
Run the following curl command, replacing the placeholders with your own
values:
curl -X POST -H "Authorization: Bearer $(gcloud auth print-access-token)" -H "Content-Type: application/json" https://discoveryengine.googleapis.com/v1alpha/projects/PROJECT_NUMBER/locations/LOCATION/collections/default_collection/engines/ENGINE_ID/assistants/default_assistant/agents -d '{
  "name": "a2ui-demo-agent",
  "displayName": "A2UI v0.9 Demo Agent",
  "description": "A demo agent that showcases A2UI v0.9 UI templates.",
  "a2aAgentDefinition": {
      "jsonAgentCard": "{\"protocolVersion\": \"0.3.0\", \"name\": \"A2UI v0.9 Demo\", \"description\": \"A demo agent that showcases A2UI v0.9 UIs built from the Material component catalog and Gemini Enterprise custom components (Canvas, Iframe). Ask it what can you do? to see the available demos.\", \"url\": \"AGENT_URL\", \"version\": \"1.0.0\", \"capabilities\": {\"streaming\": true, \"preferredTransport\": \"JSONRPC\", \"extensions\": [{\"uri\": \"https://a2ui.org/a2a-extension/a2ui/v0.9\", \"description\": \"Ability to render A2UI v0.9\", \"required\": false, \"params\": {\"supportedCatalogIds\": [\"https://www.gstatic.com/vertexaisearch/a2ui/v0_9/gemini_enterprise_composite_catalog.json\"]}}]}, \"skills\": [{\"id\": \"a2ui_demo\", \"name\": \"A2UI v0.9 Component Demo\", \"description\": \"Demonstrates A2UI v0.9 UIs built from the Material catalog and Gemini Enterprise custom components: cards, forms & inputs, tabs, tables, progress indicators, dialogs & menus, the Canvas side panel, and the Iframe (IFrameSrcdoc / IFrameUrl) components.\"}], \"defaultInputModes\": [\"text/plain\"], \"defaultOutputModes\": [\"text/plain\"]}"
    }
}'
Replace the following:
PROJECT_NUMBER: Your Google Cloud project number.LOCATION: The multi-region of your data store:global,us, oreuENGINE_ID: The ID of the app with which you want to register the agent.AGENT_URL: The service URL of your deployed agent.
Unregister agent (Optional)
If you want to unregister the agent, run the following curl command:
curl -X DELETE -H "Authorization: Bearer $(gcloud auth print-access-token)" -H "Content-Type: application/json" https://discoveryengine.googleapis.com/v1alpha/projects/PROJECT_NUMBER/locations/LOCATION/collections/default_collection/engines/ENGINE_ID/assistants/default_assistant/agents/AGENT_ID
Replace the following:
PROJECT_NUMBER: Your Google Cloud project number.LOCATION: The multi-region of your data store:global,us, oreuENGINE_ID: The ID of the app with which the agent is registered.AGENT_ID: The ID of the agent that you want to delete.
Use the agent on the Gemini Enterprise web app
After an agent is created and registered, you can start using and interacting with it on the Gemini Enterprise web app.
Get the web app URL
To use the agent, you first need to get the web app URL. A Gemini Enterprise administrator can get and share the web app URL by following these steps:
In the Google Cloud console, go to the Gemini Enterprise page.
Click the name of the app that you registered the agent with.
Click Integrations.
Copy the The link to your web app: and share it with the users in the organization.
Use the agent
To use and interact with the agent, do the following:
- Open the web app URL in a new browser tab.
- In the web app navigation menu, click Agents.
- Go to the From your organization section, and click the agent that you created.
- This opens the conversational interface for the agent. Start asking questions and interacting with the agent.
For example, you can use a prompt like Show me the recent orders table to get
information on recent orders that are part of the sample data. The agent
retrieves the order information from material_table_orders.json and renders
the list in the chat using custom UI components, as shown in the following
example: