


本指南將逐步說明如何建立基本的代理應用程式,回答使用者提出的天氣相關問題。
事前準備
請務必先完成設定操作說明,再按照本指南操作。
建立代理應用程式
建立代理應用程式和根代理:
- 開啟 CX Agent Studio 控制台。
- 選取專案。
- 按一下「建立代理」或「新增代理」。
- 將代理程式名稱設為「weather app」。
- 點選「建立」。 如果這是您為專案建立的第一個代理程式應用程式,建立作業可能需要 1 到 2 分鐘。系統會顯示代理程式建立工具,並為您建立根層級代理程式。
建立代理程式階層
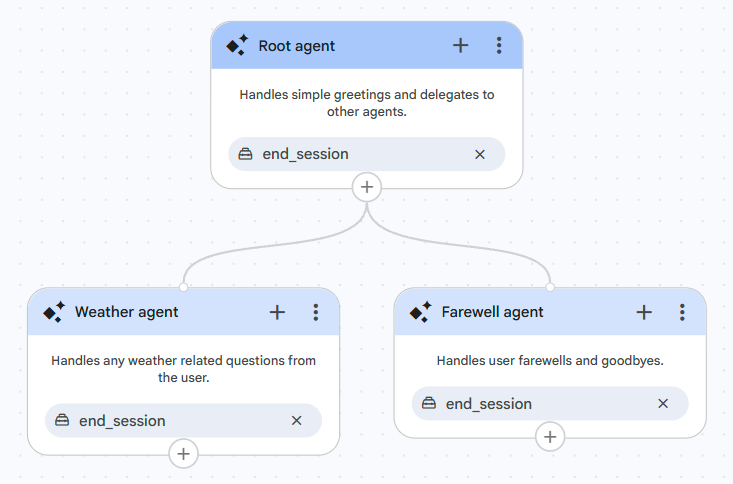
這個代理程式應用程式會使用三個代理程式:
- 根層級代理會向使用者致意,並委派給其他子代理。
- 天氣代理程式,可回答天氣相關問題。
- 向服務專員道別,結束對話。
根代理程式已建立,但您應更新這個代理程式的設定:
- 按一下根代理程式的標題列。
- 您可以選擇變更代理程式名稱。
- 輸入說明:「Handles simple greetings and delegates to other agents」(處理簡單問候並委派給其他代理程式)。
- 按一下「儲存」,然後關閉設定面板。
建立天氣代理程式:
- 點選根代理底部的「+」按鈕。
- 按一下「新增子代理人」。
- 按一下新代理的標題列。
- 將名稱變更為「Weather agent」。
- 輸入說明:「Handles any weather related questions from the user」(處理使用者提出的任何天氣相關問題)。
- 按一下「儲存」,然後關閉設定面板。
以類似方式建立根層級代理的另一個子代理,稱為「Farewell agent」,並加上「Handles user farewells and goodbyes」(處理使用者道別) 的說明。
建立天氣工具
工具可用於將代理程式連結至外部系統,或提供給代理程式的內嵌程式碼。有了工具,代理就能與其他系統互動,進而擷取、更新、格式化或分析資訊。
在這個步驟中,您會建立天氣工具,用來擷取天氣資訊。為方便說明,本指南會提供這個工具的模擬使用者回應。在實際的天氣應用程式中,這個工具會存取外部伺服器來取得資訊。
建立天氣工具:
- 按一下代理程式建構工具右側的工具按鈕。
- 按一下「+」,為代理程式應用程式建立新工具。
- 按一下「Python code」。
貼上下列程式碼:
def get_weather(city: str) -> dict: """Retrieves the current weather report for a specified city. Args: city (str): The name of the city. Returns: dict: A dictionary containing the weather information. Includes a 'status' key ('success' or 'error'). If 'success', includes a 'report' key with weather details. If 'error', includes an 'error_message' key. """ city_normalized = city.lower().replace(" ", "") mock_weather_db = { "newyork": {"status": "success", "report": "The weather in New York is sunny and 25°C."}, "london": {"status": "success", "report": "It's cloudy in London and 15°C."}, "tokyo": {"status": "success", "report": "Tokyo is experiencing light rain and 18°C."}, } if city_normalized in mock_weather_db: return mock_weather_db[city_normalized] else: return {"status": "error", "error_message": f"No weather information for '{city}'."}點選「建立」。
現在,您需要將這項工具新增至天氣代理:
- 按一下天氣代理程式標題列中的「+」按鈕。
- 按一下「新增工具」。
- 選取天氣工具。
建立代理指令
提供參照代理程式的指令時,請使用 {@AGENT: Agent name} 語法。如要參照工具,請使用 {@TOOL: tool_name}。
為每個代理建立指令:
- 按一下根代理程式標題列中的「+」按鈕。
- 按一下「新增說明」。
輸入下列指令:
You are a helpful weather application. Your job is to greet the user and delegate to other sub-agents as needed. When greeting the user, describe how you can help them. When the user asks for the weather, delegate to {@AGENT: Weather agent}. When the user is ending the conversation, delegate to {@AGENT: Farewell agent}. Handle only weather requests, greetings, and farewells.點選「建立」。
以類似方式,為天氣代理新增下列指令:
You are a helpful weather agent.
When the user asks for the weather in a specific city,
use {@TOOL: get_weather} to find the information.
If the tool returns an error, inform the user politely.
If the tool is successful, present the weather report clearly.
以類似方式,為告別代理新增下列指令:
You are the Farewell Agent.
Your ONLY task is to provide a polite goodbye message.
測試代理
現在可以使用模擬器與代理程式應用程式互動:
- 在控制台畫面左下角,按一下「預覽代理程式」列展開視窗 (如果尚未展開)。
- 輸入「hello」,然後按 Enter 鍵。 代理會回覆一般問候語。
- 輸入「紐約的天氣如何?」,然後按下 Enter 鍵。 代理會回覆天氣資訊。
- 輸入「goodbye」,然後按 Enter 鍵。 服務專員結束對話。
使用變數
變數 可用來儲存及擷取執行階段的對話資料。 這樣代理就能在多輪對話之間記住資訊,提供更符合脈絡的互動體驗。您將為這個代理程式建立變數,擷取使用者的名稱。
如要建立變數,請按照下列步驟操作:
- 按一下代理程式建構工具右側的變數按鈕。
- 按一下「建立變數」或「+」。
- 輸入「username」做為變數名稱。
- 將類型保留為「文字」。
- 點選「建立」。
定義變數後,您需要定義工具,讓代理程式更新變數:
- 按一下代理程式建構工具右側的工具按鈕。
- 按一下「+」,為代理程式應用程式建立新工具。
- 按一下「Python code」。
貼上下列程式碼:
from typing import Optional def update_username(username: str) -> Optional[str]: """Updates the current user's name""" set_variable("username", username)點選「建立」。
將這項工具新增至根代理:
- 按一下根代理程式標題列中的「+」按鈕。
- 按一下「新增工具」。
- 選取 update_username 工具。
在根代理程式指令中加入下列句子,使用 {variable_name} 語法參照變數:
If provided, the current user is {username},
and you should address them with this name.
You can use {@TOOL: update_username} to update the user's name if they provide
it.
您可以再次測試代理,確認變數使用情況:
- 按一下模擬器標題列中的「發起新對話」。
- 輸入「Hello, my name is Frank」。
- 輸入「你的資訊有多準確?」。
請注意,代理程式現在會使用你的名字來回應。 您也可以展開模擬器對話的「步驟」部分,驗證工具執行情況等資訊。
控管工作階段的結束方式
根據預設,每個代理程式都會設定為使用end_session
系統工具,但您可以建立明確的指令,提升工作階段的可靠性,並控管工作階段的結束方式。
點選每個代理中工具旁的 x,從根層級和天氣代理移除 end_session 工具。
這樣一來,就只有告別代理程式會結束工作階段。
在告別代理的指令中新增下列內容:
After providing the goodbye message and confirming the user has no more
questions, execute the tool {@TOOL: end_session}(reason="success").
使用回呼在工作階段結束時強制顯示靜態訊息
回呼提供一種機制,可使用 Python 程式碼,掛鉤至特定代理程式的執行程序。您可以在特定預先定義的時間點觀察、自訂,甚至是控制代理的行為。
您可以運用各種回呼類型,每種回呼類型都會在對話回合中的特定時間點執行。
在本教學課程中,請在工作階段結束時,將靜態訊息附加至模型回應:
- 按一下告別代理的標題列。
- 按一下「新增回呼」。
- 選取「After LLM」。
請輸入以下程式碼:
SURVEY_MESSAGE = "Click here to take our post call survey." def after_model_callback( callback_context: CallbackContext, llm_response: LlmResponse ) -> Optional[LlmResponse]: for index, part in enumerate(llm_response.content.parts): if part.has_function_call('end_session'): return LlmResponse.from_parts(parts=[ *llm_response.content.parts, Part.from_text(SURVEY_MESSAGE) ]) return None按一下「完成」。
按一下 [儲存]。
您可以再次測試代理程式,確認工作階段結束行為:
- 按一下模擬器標題列中的「發起新對話」。
- 輸入「Hello」。
- 輸入「再見」。
請注意,現在代理程式會使用您附加的訊息回覆。
調整指令結構
如要改善代理程式行為,可以採用自由形式的 XML 格式,建構所有代理程式指令,以便模型處理。針對每個代理程式執行下列操作:
- 開啟代理的指令面板。
- 按一下右上方的「結構」按鈕。
- 按一下 [儲存]。
部署
建立可正常運作的代理後,您有多種部署選項。