
写入查询结果
本文档介绍如何将查询结果写入临时表或永久表。
临时表和永久表
BigQuery 将所有查询结果保存到表中,该表可以是永久表,也可以是临时表:
BigQuery 使用临时表来缓存未写入永久表的查询结果。这些表在特殊数据集中创建并随机命名。您还可以在多语句查询和会话中创建供自己使用的临时表。 您不需要为临时缓存的查询结果表支付费用。您需要为非缓存查询结果的临时表付费。
查询完成后,临时表最多存在 24 小时。如需查看表结构和数据,请执行以下操作:
转到 BigQuery 页面。
在左侧窗格中,点击 探索器:

如果您没有看到左侧窗格,请点击 展开左侧窗格以打开该窗格。
在探索器窗格中,点击作业记录。
点击个人历史记录。
选择创建了临时表的查询。 然后,在目标表行中,点击临时表。
只有创建查询作业的用户或服务账号才能访问临时表数据。
您无法共享临时表,也无法使用任何标准列表或其他表操作方法显示临时表。如果您需要分享查询结果,请将结果写入永久表,然后下载这些结果,或通过 Google 表格或 Google 云端硬盘分享这些结果。
系统会在正在查询的表所在的区域创建临时表。
永久表可以是您有权访问的任何数据集中的新表或现有表。如果将查询结果写入新表,那么您就需要为存储数据支付费用。将查询结果写入永久表时,需要查询的表必须与目标表所在的数据集位于相同的位置。
启用网域限定组织政策后,您无法将查询结果保存在临时表中。一种解决方法是,暂时停用网域限定组织政策,运行查询,然后再次启用该政策。 或者,您也可以将查询结果保存在目标表中。
所需权限
如需将查询结果写入表中,您必须至少具有以下权限:
bigquery.tables.create权限:用于创建新表bigquery.tables.updateData权限:用于将数据写入新表、覆盖表或将数据附加到表中bigquery.jobs.create权限:用于运行查询作业
如需访问要查询的数据,您可能还需要具备其他权限(例如 bigquery.tables.getData)。
以下预定义的 IAM 角色同时具有 bigquery.tables.create 和 bigquery.tables.updateData 权限:
bigquery.dataEditorbigquery.dataOwnerbigquery.admin
以下预定义的 IAM 角色包含 bigquery.jobs.create 权限:
bigquery.userbigquery.jobUserbigquery.admin
此外,如果用户具有 bigquery.datasets.create 权限,则当该用户创建数据集时,系统会为其授予该数据集的 bigquery.dataOwner 访问权限。借助 bigquery.dataOwner 访问权限,用户可以在数据集内创建和更新表。
如需详细了解 BigQuery 中的 IAM 角色和权限,请参阅预定义的角色和权限。
将查询结果写入永久表
将查询结果写入永久表时,您可以创建新表,将结果附加到现有表,或覆盖现有表。
写入查询结果
使用以下过程将查询结果写入永久表。为帮助控制费用,您可以在运行查询之前预览数据。
控制台
在 Google Cloud 控制台中打开 BigQuery 页面。
在左侧窗格中,点击 探索器:
如果您没有看到左侧窗格,请点击 展开左侧窗格以打开该窗格。
在探索器窗格中,展开您的项目,点击数据集,然后选择一个数据集。
在查询编辑器中,输入有效的 SQL 查询。
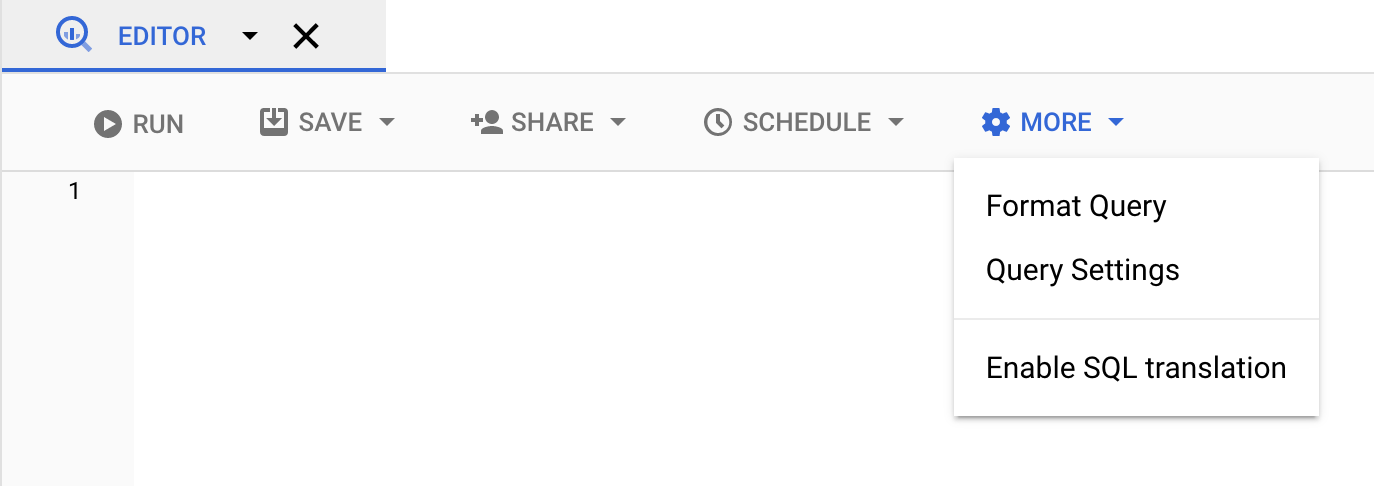
点击更多,然后选择查询设置。
选择为查询结果设置目标表选项。
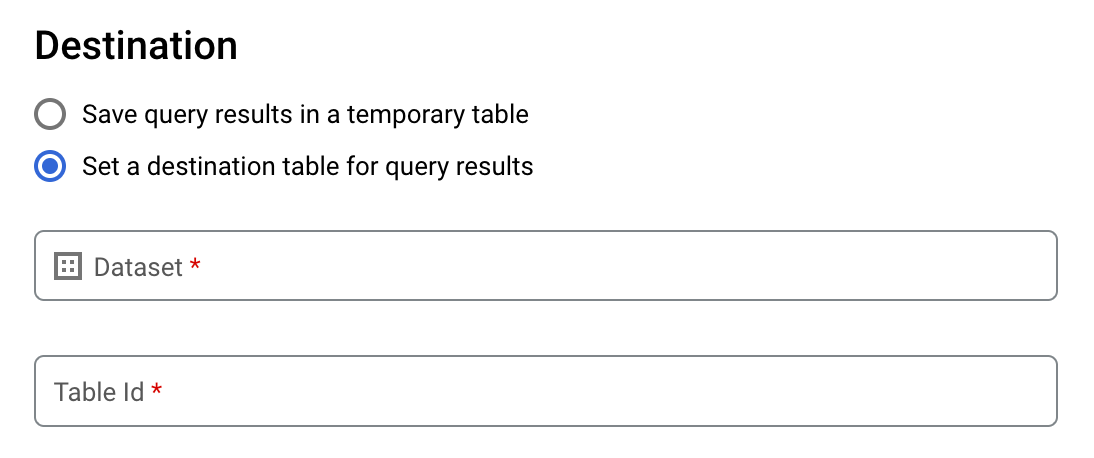
在目标部分,选择要在其中创建表的数据集,然后选择表 ID。
在目标表的写入设置部分,选择以下选项之一:
- 只写入空白表 - 仅在表为空时才将查询结果写入表。
- 附加到表 - 将查询结果附加到现有表。
- 覆盖表 - 使用查询结果覆盖名称相同的现有表。
可选:对于数据位置,请选择您的位置。
要更新查询设置,请点击保存。
点击运行。这会创建一个查询作业,并将查询结果写入您指定的表中。
或者,如果您在运行查询之前忘记指定目标表,可以点击编辑器上方的保存结果按钮,将缓存结果表复制到永久表。
SQL
以下示例使用 CREATE TABLE 语句从公共 bikeshare_trips 表中的数据创建 trips 表:
在 Google Cloud 控制台中,前往 BigQuery 页面。
在查询编辑器中,输入以下语句:
CREATE TABLE mydataset.trips AS (
  SELECT
    bike_id,
    start_time,
    duration_minutes
  FROM
    bigquery-public-data.austin_bikeshare.bikeshare_trips
);
点击 运行。
如需详细了解如何运行查询,请参阅运行交互式查询。
如需了解详情,请参阅从现有表创建新表。
bq
-
In the Google Cloud console, activate Cloud Shell.
At the bottom of the Google Cloud console, a Cloud Shell session starts and displays a command-line prompt. Cloud Shell is a shell environment with the Google Cloud CLI already installed and with values already set for your current project. It can take a few seconds for the session to initialize.
输入
bq query命令,并指定--destination_table标志以根据查询结果创建永久表。指定use_legacy_sql=false标志以使用 GoogleSQL 语法。如需将查询结果写入非默认项目中的某个表,请按以下格式将相应项目 ID 添加到数据集名称:project_id:dataset。可选:提供
--location标志并将其值设置为您所在的位置。如需控制现有目标表的写入处置方式,请指定以下可选标志之一:
--append_table:如果目标表存在,指定该标志可将查询结果附加到该表。--replace:如果目标表存在,指定该标志可使用查询结果覆盖该表。bq --location=location query \ --destination_table project_id:dataset.table \ --use_legacy_sql=false 'query'
替换以下内容:
location是用于处理查询的位置的名称。--location标志是可选的。例如,如果您在东京区域使用 BigQuery,可将该标志的值设置为asia-northeast1。您可以使用.bigqueryrc文件设置位置的默认值。project_id是项目 ID。dataset是数据集名称,该数据集包含您要向其中写入查询结果的表。table是您要向其中写入查询结果的表的名称。query是采用 GoogleSQL 语法的查询。如果未指定写入处置方式标志,则默认行为是仅在表为空时将结果写入其中。如果表已存在且不为空,则系统会返回以下错误:
BigQuery error in query operation: Error processing job project_id:bqjob_123abc456789_00000e1234f_1: Already Exists: Table project_id:dataset.table。示例:
输入以下命令可将查询结果写入
mydataset中名为mytable的目标表。该数据集属于默认项目。由于命令中未指定“写入处置方式”标志,因此该表必须为新表或空表。否则,系统将返回Already exists错误。该查询从美国名字数据公共数据集中检索数据。bq query \ --destination_table mydataset.mytable \ --use_legacy_sql=false \ 'SELECT name, number FROM `bigquery-public-data`.usa_names.usa_1910_current WHERE gender = "M" ORDER BY number DESC'
输入以下命令可使用查询结果覆盖
mydataset中名为mytable的目标表。该数据集在默认项目中。该命令使用--replace标志覆盖目标表。bq query \ --destination_table mydataset.mytable \ --replace \ --use_legacy_sql=false \ 'SELECT name, number FROM `bigquery-public-data`.usa_names.usa_1910_current WHERE gender = "M" ORDER BY number DESC'
输入以下命令可将查询结果附加到
mydataset中名为mytable的目标表。该数据集属于my-other-project,而非默认项目。该命令使用--append_table标志将查询结果附加到目标表。bq query \ --append_table \ --use_legacy_sql=false \ --destination_table my-other-project:mydataset.mytable \ 'SELECT name, number FROM `bigquery-public-data`.usa_names.usa_1910_current WHERE gender = "M" ORDER BY number DESC'
各示例的输出如下所示。为了方便阅读,部分输出已被截断。
Waiting on bqjob_r123abc456_000001234567_1 ... (2s) Current status: DONE
+---------+--------+
|  name   | number |
+---------+--------+
| Robert  |  10021 |
| John    |   9636 |
| Robert  |   9297 |
| ...              |
+---------+--------+
API
如需将查询结果保存到永久表中,请调用 jobs.insert 方法,配置 query 作业,并添加 destinationTable 属性的值。如需控制现有目标表的写入处置方式,请配置 writeDisposition 属性。
如需控制查询作业的处理位置,请在作业资源的 jobReference 部分中指定 location 属性。
Go
试用此示例之前,请按照 BigQuery 快速入门:使用客户端库中的 Go 设置说明进行操作。 如需了解详情,请参阅 BigQuery Go API 参考文档。
如需向 BigQuery 进行身份验证,请设置应用默认凭证。如需了解详情,请参阅为客户端库设置身份验证。
Java
试用此示例之前,请按照 BigQuery 快速入门:使用客户端库中的 Java 设置说明进行操作。 如需了解详情,请参阅 BigQuery Java API 参考文档。
如需向 BigQuery 进行身份验证,请设置应用默认凭证。如需了解详情,请参阅为客户端库设置身份验证。
如需将查询结果保存到永久表中,请在 QueryJobConfiguration 中将目标表设置为所需的 TableId。
Node.js
试用此示例之前,请按照 BigQuery 快速入门:使用客户端库中的 Node.js 设置说明进行操作。 如需了解详情,请参阅 BigQuery Node.js API 参考文档。
如需向 BigQuery 进行身份验证,请设置应用默认凭证。如需了解详情,请参阅为客户端库设置身份验证。
Python
试用此示例之前,请按照 BigQuery 快速入门:使用客户端库中的 Python 设置说明进行操作。 如需了解详情,请参阅 BigQuery Python API 参考文档。
如需向 BigQuery 进行身份验证,请设置应用默认凭证。如需了解详情,请参阅为客户端库设置身份验证。
如需将查询结果保存到永久表中,请创建 QueryJobConfig,并将目标设置为所需的 TableReference。将作业配置传递给查询方法。写入大型查询结果
通常,查询都存在响应大小上限。如果您计划运行可能返回大型结果的查询,则可以执行以下任一操作:
- 在 GoogleSQL 中,指定一个目标表来存放查询结果。
- 在旧版 SQL 中,指定目标表并设置
allowLargeResults选项。
为大型查询结果指定目标表时,您需要为存储数据支付费用。
限制
在旧版 SQL中,写入大型结果受到以下限制:
- 您必须指定目标表。
- 您不能指定顶级
ORDER BY、TOP或LIMIT子句。如果指定这些子句,您就无法再并行计算查询输出,如此会抵消使用allowLargeResults的好处。 - 窗口函数只有在与
PARTITION BY子句配合使用时才能返回大型查询结果。
使用旧版 SQL 写入大型结果
如需使用旧版 SQL 写入大型结果集,请执行以下操作:
控制台
在 Google Cloud 控制台中,打开 BigQuery 页面。
点击编写新查询。
在查询编辑器文本区域中输入有效的 SQL 查询。请使用
#legacySQL前缀,或务必在查询设置中勾选使用旧版 SQL。点击更多,然后选择查询设置。
在目标位置部分中,勾选为查询结果设置目标表。
对于 Project,选择要用于存储该表的数据集。
在表 ID 字段中,输入表名称。
如需将大型结果集写入现有表,您可以使用目标表的写入设置选项控制目标表的写入处置方式:
- Write if empty:仅在表为空时才将查询结果写入表。
- Append to table:将查询结果附加到现有表。
- 覆盖表:使用查询结果覆盖名称相同的现有表。
在结果大小部分,勾选允许大型结果(无大小限制)。
可选:对于数据位置,选择您的数据所在的位置。
点击保存以更新查询设置。
点击运行。这会创建一个查询作业,并将大型结果集写入您指定的表中。
bq
搭配使用 --allow_large_results 标志与 --destination_table 标志,以创建用于存储大型结果集的目标表。由于 --allow_large_results 选项仅适用于旧版 SQL,因此您还必须指定 --use_legacy_sql=true 标志。如需将查询结果写入非默认项目中的某个表,请按以下格式将相应项目 ID 添加到数据集名称:PROJECT_ID:DATASET。
提供 --location 标志并将其值设置为您的位置。
如需控制现有目标表的写入处置方式,请指定以下可选标志之一:
--append_table:如果目标表存在,指定该标志可将查询结果附加到该表。--replace:如果目标表存在,指定该标志可使用查询结果覆盖该表。
bq --location=location query \
--destination_table PROJECT_ID:DATASET.TABLE \
--use_legacy_sql=true \
--allow_large_results "QUERY"
替换以下内容:
LOCATION是用于处理查询的位置的名称。--location标志是可选的。例如,如果您在东京区域使用 BigQuery,可将该标志的值设置为asia-northeast1。您可以使用.bigqueryrc文件设置位置的默认值。PROJECT_ID是项目 ID。DATASET是数据集名称,该数据集包含您要向其中写入查询结果的表。TABLE是您要向其中写入查询结果的表的名称。QUERY是使用旧版 SQL 语法的查询。
示例:
输入以下命令可将大型查询结果写入 mydataset 中名为 mytable 的目标表。该数据集属于默认项目。由于命令中未指定“写入处置方式”标志,因此该表必须为新表或空表。否则,系统将返回 Already exists 错误。该查询从美国名字数据公共数据集中检索数据。该查询仅用于举例。所返回的结果集不会超过响应大小上限。
bq query \
--destination_table mydataset.mytable \
--use_legacy_sql=true \
--allow_large_results \
"SELECT
  name,
  number
FROM
  [bigquery-public-data:usa_names.usa_1910_current]
WHERE
  gender = 'M'
ORDER BY
  number DESC"
输入以下命令可使用大型查询结果覆盖 mydataset 中名为 mytable 的目标表。该数据集属于 myotherproject,而非默认项目。该命令使用 --replace 标志覆盖目标表。
bq query \
--destination_table mydataset.mytable \
--replace \
--use_legacy_sql=true \
--allow_large_results \
"SELECT
  name,
  number
FROM
  [bigquery-public-data:usa_names.usa_1910_current]
WHERE
  gender = 'M'
ORDER BY
  number DESC"
输入以下命令可将大型查询结果附加到 mydataset 中名为 mytable 的目标表。该数据集属于 myotherproject,而非默认项目。该命令使用 --append_table 标志将查询结果附加到目标表。
bq query \
--destination_table myotherproject:mydataset.mytable \
--append_table \
--use_legacy_sql=true \
--allow_large_results \
"SELECT
  name,
  number
FROM
  [bigquery-public-data:usa_names.usa_1910_current]
WHERE
  gender = 'M'
ORDER BY
  number DESC"
API
如需将大型结果写入目标表中,请调用 jobs.insert 方法,配置 query 作业,并将 allowLargeResults 属性设置为 true。
使用 destinationTable 属性指定目标表。如需控制现有目标表的写入处置方式,请配置 writeDisposition 属性。
在作业资源 jobReference 部分的 location 属性中指定您的位置。
Go
试用此示例之前,请按照 BigQuery 快速入门:使用客户端库中的 Go 设置说明进行操作。 如需了解详情,请参阅 BigQuery Go API 参考文档。
如需向 BigQuery 进行身份验证,请设置应用默认凭证。如需了解详情,请参阅为客户端库设置身份验证。
Java
如需启用大型结果,请在 QueryJobConfiguration 中将允许大型结果设置为 true,并将目标表设置为所需的 TableId。
试用此示例之前,请按照 BigQuery 快速入门:使用客户端库中的 Java 设置说明进行操作。 如需了解详情,请参阅 BigQuery Java API 参考文档。
如需向 BigQuery 进行身份验证,请设置应用默认凭证。如需了解详情,请参阅为客户端库设置身份验证。
Node.js
试用此示例之前,请按照 BigQuery 快速入门:使用客户端库中的 Node.js 设置说明进行操作。 如需了解详情,请参阅 BigQuery Node.js API 参考文档。
如需向 BigQuery 进行身份验证,请设置应用默认凭证。如需了解详情,请参阅为客户端库设置身份验证。
Python
试用此示例之前,请按照 BigQuery 快速入门:使用客户端库中的 Python 设置说明进行操作。 如需了解详情,请参阅 BigQuery Python API 参考文档。
如需向 BigQuery 进行身份验证,请设置应用默认凭证。如需了解详情,请参阅为客户端库设置身份验证。
通过 Google Cloud 控制台下载和保存查询结果
使用 Google Cloud 控制台运行 SQL 查询后,您可以将结果保存到其他位置。您可以使用 Google Cloud 控制台将查询结果下载到本地文件、Google 表格或 Google 云端硬盘中。如果您先按列对查询结果进行排序,则下载的数据中会保留该顺序。bq 命令行工具或 API 不支持将结果保存到本地文件、Google 表格或 Google 云端硬盘。
限制
查询结果的下载和保存受到以下限制:
- 您只能以 CSV 或换行符分隔的 JSON 格式在本地下载查询结果。
- 不能将包含嵌套和重复数据的查询结果保存到 Google 表格。
- 如需使用 Google Cloud 控制台将查询结果保存到 Google 云端硬盘,结果集必须不超过 1 GB。如果结果较大,则可以改为将其保存到表中。
- 将查询结果保存到本地 CSV 文件时,下载大小上限为 10 MB。
下载大小上限基于
tabledata.list方法响应中返回的每一行的大小,具体因查询结果的架构而异。因此,下载的 CSV 文件的大小可能会有所不同,并且可能小于下载大小上限。 - 您只能以 CSV 或换行符分隔的 JSON 格式将查询结果保存到 Google 云端硬盘。
后续步骤
- 了解如何以编程方式将表导出到 JSON 文件。
- 了解查询作业的配额。
- 了解 BigQuery 存储价格。