
Set permissions for generative AI functions that call Gemini Enterprise Agent Platform LLMs
This document shows you how to set up permissions for running generative AI
queries. Generative AI queries contain AI.* functions that call foundation
models in Gemini Enterprise Agent Platform; for example, AI.GENERATE.
There are two ways to set up permissions to run queries that use AI.*
functions:
- Run the query using your end-user credentials
- Create a BigQuery connection to run the query using a service account
In most cases, you can use end-user credentials and leave the
CONNECTION argument blank. If your query job is
expected to run for 48 hours or longer, you should use a BigQuery
connection and include it in the CONNECTION argument.
Run generative AI queries with end-user credentials
To run generative AI queries using end-user credentials, configure the necessary permissions using the Google Cloud console. Note that if you are the project owner, you already have all the required permissions so you don't need to do anything.
Required roles
To get the permissions that you need to run a query job that calls a Vertex AI model, ask your administrator to grant you the following IAM roles on the project:
-
Run query jobs:
BigQuery Job User (
roles/bigquery.jobUser) -
Access a foundation model in Gemini Enterprise Agent Platform:
Agent Platform User (
roles/aiplatform.user)
For more information about granting roles, see Manage access to projects, folders, and organizations.
You might also be able to get the required permissions through custom roles or other predefined roles.
Grant the required roles to the user or group
You can use the Google Cloud console or SQL to grant the required roles for a
principal. The principal is the user or group that runs the query that uses
AI.* functions to call a Gemini Enterprise Agent Platform foundation model.
Console
In the Google Cloud console, go to the IAM page.
Select your project.
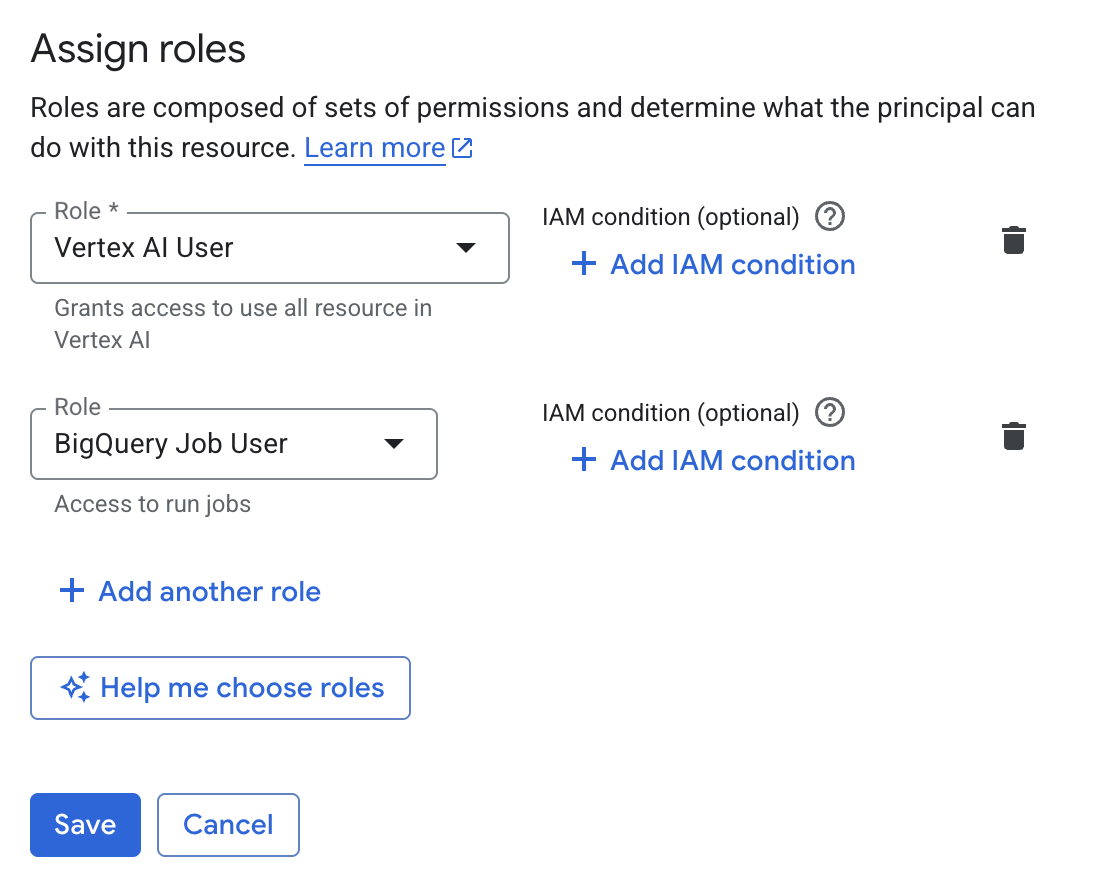
To grant roles to a principal, do the following:
Go to the IAM & Admin page.
Click Grant access.
The Add principals dialog opens.
In the New principals field, enter the principal identifier— for example,
my-user@example.comor//iam.googleapis.com/locations/global/workforcePools/example-pool/group/example-group@example.com.In the Assign roles section, for Select a role, click the drop-down arrow.
Search for the Agent Platform User role and select it.
Click Add another role.
In the Assign roles section, for Select a role, click the drop-down arrow.
Search for or browse to the BigQuery Job User role and select it.
Click Save.
SQL
Use the GRANT statement:
In the Google Cloud console, go to the BigQuery page.
In the query editor, enter the following statement:
GRANT `roles/aiplatform.user`, `roles/bigquery.jobUser`
ON PROJECT `PROJECT_ID`
TO "USER_OR_GROUP";
Replace the following:
-
PROJECT_ID: the project where you plan to useAI.*functions. -
USER_OR_GROUP: the user or group to grant access to, in theuser:USER@DOMAINorgroup:GROUP@DOMAINformat.
-
Click Run.
For more information about how to run queries, see Run an interactive query.
To modify roles for a principal who already has roles on the project, see Grant additional roles to the same principal.
For information on other methods of granting project-level roles to a principal, see Grant or revoke multiple IAM roles programmatically.
Run generative AI queries with a BigQuery Connection
To run generative AI queries using a connection, create the connection, and then grant access to the service account created by the connection.
Create a connection
You can set up a Cloud Resource Connection to run all generative AI queries that
contain AI.* functions. When you create a connection, you grant permissions to
run queries to a service account.
Console
Go to the BigQuery page.
In the left pane, click Explorer:

If you don't see the left pane, click Expand left pane to open the pane.
In the Explorer pane, expand your project name, and then click Connections.
On the Connections page, click Create connection.
For Connection type, choose Vertex AI remote models, remote functions, BigLake and Spanner (Cloud Resource).
In the Connection ID field, enter a name for your connection.
For Location type, select a location for your connection. The connection should be colocated with your other resources such as datasets.
Click Create connection.
Click Go to connection.
In the Connection info pane, copy the service account ID for use in a later step.
SQL
Use the CREATE CONNECTION statement:
In the Google Cloud console, go to the BigQuery page.
In the query editor, enter the following statement:
CREATE CONNECTION [IF NOT EXISTS] `CONNECTION_NAME`
OPTIONS (
  connection_type = "CLOUD_RESOURCE",
  friendly_name = "FRIENDLY_NAME",
  description = "DESCRIPTION"
  );
Replace the following:
-
CONNECTION_NAME: the name of the connection in either thePROJECT_ID.LOCATION.CONNECTION_ID,LOCATION.CONNECTION_ID, orCONNECTION_IDformat. If the project or location are omitted, then they are inferred from the project and location where the statement is run. -
FRIENDLY_NAME(optional): a descriptive name for the connection. -
DESCRIPTION(optional): a description of the connection.
-
Click Run.
For more information about how to run queries, see Run an interactive query.
bq
In a command-line environment, create a connection:
bq mk --connection --location=REGION --project_id=PROJECT_ID \
    --connection_type=CLOUD_RESOURCE CONNECTION_ID
The
--project_idparameter overrides the default project.Replace the following:
REGION: your connection regionPROJECT_ID: your Google Cloud project IDCONNECTION_ID: an ID for your connection
When you create a connection resource, BigQuery creates a unique system service account and associates it with the connection.
Troubleshooting: If you get the following connection error, update the Google Cloud SDK:
Flags parsing error: flag --connection_type=CLOUD_RESOURCE: value should be one of...
Retrieve and copy the service account ID for use in a later step:
bq show --connection PROJECT_ID.REGION.CONNECTION_ID
The output is similar to the following:
name                          properties
1234.REGION.CONNECTION_ID     {"serviceAccountId": "connection-1234-9u56h9@gcp-sa-bigquery-condel.iam.gserviceaccount.com"}
Python
Before trying this sample, follow the Python setup instructions in the BigQuery quickstart using client libraries. For more information, see the BigQuery Python API reference documentation.
To authenticate to BigQuery, set up Application Default Credentials. For more information, see Set up authentication for client libraries.
Node.js
Before trying this sample, follow the Node.js setup instructions in the BigQuery quickstart using client libraries. For more information, see the BigQuery Node.js API reference documentation.
To authenticate to BigQuery, set up Application Default Credentials. For more information, see Set up authentication for client libraries.
Terraform
Use the
google_bigquery_connection
resource.
To authenticate to BigQuery, set up Application Default Credentials. For more information, see Set up authentication for client libraries.
The following example creates a Cloud resource connection named
my_cloud_resource_connection in the US region:
To apply your Terraform configuration in a Google Cloud project, complete the steps in the following sections.
Prepare Cloud Shell
- Launch Cloud Shell.
-
Set the default Google Cloud project where you want to apply your Terraform configurations.
You only need to run this command once per project, and you can run it in any directory.
export GOOGLE_CLOUD_PROJECT=PROJECT_ID
Environment variables are overridden if you set explicit values in the Terraform configuration file.
Prepare the directory
Each Terraform configuration file must have its own directory (also called a root module).
-
In Cloud Shell, create a directory and a new
file within that directory. The filename must have the
.tfextension—for examplemain.tf. In this tutorial, the file is referred to asmain.tf.mkdir DIRECTORY && cd DIRECTORY && touch main.tf
-
If you are following a tutorial, you can copy the sample code in each section or step.
Copy the sample code into the newly created
main.tf.Optionally, copy the code from GitHub. This is recommended when the Terraform snippet is part of an end-to-end solution.
- Review and modify the sample parameters to apply to your environment.
- Save your changes.
-
Initialize Terraform. You only need to do this once per directory.
terraform init
Optionally, to use the latest Google provider version, include the
-upgradeoption:terraform init -upgrade
Apply the changes
-
Review the configuration and verify that the resources that Terraform is going to create or
update match your expectations:
terraform plan
Make corrections to the configuration as necessary.
-
Apply the Terraform configuration by running the following command and entering
yesat the prompt:terraform apply
Wait until Terraform displays the "Apply complete!" message.
- Open your Google Cloud project to view the results. In the Google Cloud console, navigate to your resources in the UI to make sure that Terraform has created or updated them.
For more information, see Create and set up a Cloud resource connection.
Grant access to the service account
To run queries that use generative AI.* functions that call Gemini Enterprise Agent Platform
models, you must grant appropriate permissions to the service account that was
created when you created your connection. To run functions that call a
Gemini Enterprise Agent Platform foundation model, the Agent Platform User role
(roles/aiplatform.user) is required.
Select one of the following options:
Console
Go to the IAM & Admin page.
Click Grant access.
The Add principals dialog opens.
In the New principals field, enter the service account ID that you copied earlier.
In the Assign roles section, click Add roles.
Search for the Agent Platform User role, select it, and then click Apply.
Click Save.
SQL
Use the GRANT statement:
In the Google Cloud console, go to the BigQuery page.
In the query editor, enter the following statement:
GRANT `roles/aiplatform.user`
ON PROJECT `PROJECT_ID`
TO "connection:CONNECTION_NAME";
Replace the following:
-
PROJECT_ID: the project where you plan to use Agent Platform. -
CONNECTION_NAME: the name of the connection in either thePROJECT_ID.LOCATION.CONNECTION_IDorLOCATION.CONNECTION_IDformat. If the project is omitted, then it is inferred from the project where the statement is run.
-
Click Run.
For more information about how to run queries, see Run an interactive query.
gcloud
Use the gcloud projects add-iam-policy-binding command:
gcloud projects add-iam-policy-binding PROJECT_ID \
--member="serviceAccount:$(bq show --format=prettyjson --connection $PROJECT_ID.$REGION.$CONNECTION_ID | jq -r .cloudResource.serviceAccountId)"
--role=roles/aiplatform.user
Replace the following:
PROJECT_ID: the name of your project.REGION: the location where the connection was created.CONNECTION_ID: The name of the connection you created.
Terraform
Use the
google_bigquery_connection
resource.
To authenticate to BigQuery, set up Application Default Credentials. For more information, see Set up authentication for client libraries.
The following example grants IAM role access to the service account of the Cloud resource connection:
To apply your Terraform configuration in a Google Cloud project, complete the steps in the following sections.
Prepare Cloud Shell
- Launch Cloud Shell.
-
Set the default Google Cloud project where you want to apply your Terraform configurations.
You only need to run this command once per project, and you can run it in any directory.
export GOOGLE_CLOUD_PROJECT=PROJECT_ID
Environment variables are overridden if you set explicit values in the Terraform configuration file.
Prepare the directory
Each Terraform configuration file must have its own directory (also called a root module).
-
In Cloud Shell, create a directory and a new
file within that directory. The filename must have the
.tfextension—for examplemain.tf. In this tutorial, the file is referred to asmain.tf.mkdir DIRECTORY && cd DIRECTORY && touch main.tf
-
If you are following a tutorial, you can copy the sample code in each section or step.
Copy the sample code into the newly created
main.tf.Optionally, copy the code from GitHub. This is recommended when the Terraform snippet is part of an end-to-end solution.
- Review and modify the sample parameters to apply to your environment.
- Save your changes.
-
Initialize Terraform. You only need to do this once per directory.
terraform init
Optionally, to use the latest Google provider version, include the
-upgradeoption:terraform init -upgrade
Apply the changes
-
Review the configuration and verify that the resources that Terraform is going to create or
update match your expectations:
terraform plan
Make corrections to the configuration as necessary.
-
Apply the Terraform configuration by running the following command and entering
yesat the prompt:terraform apply
Wait until Terraform displays the "Apply complete!" message.
- Open your Google Cloud project to view the results. In the Google Cloud console, navigate to your resources in the UI to make sure that Terraform has created or updated them.