
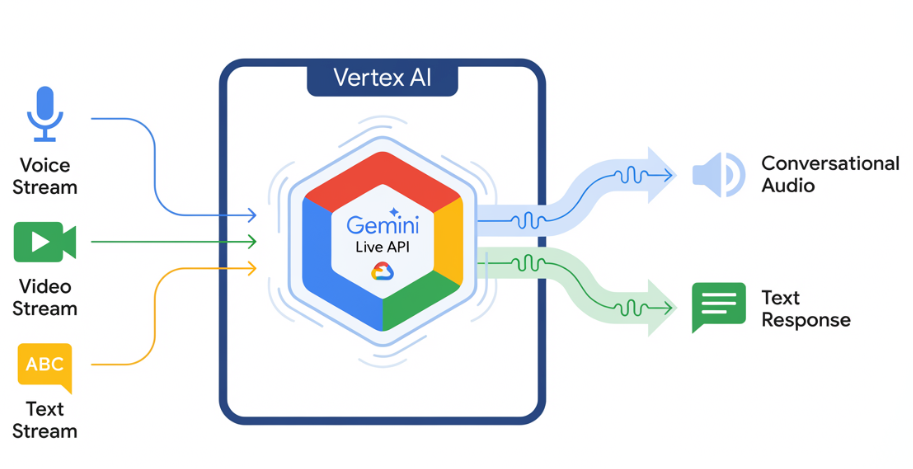
Gemini Live API enables low-latency, real-time voice and video interactions with Gemini. It processes continuous streams of audio, video, or text to deliver immediate, human-like spoken responses. This creates a natural conversational experience for your users.
Try Gemini Live API in Vertex AI Studio
Example use cases
Gemini Live API can be used to build real-time voice and video agents for a variety of industries, including:
- E-commerce and retail: Shopping assistants that offer personalized recommendations and support agents that resolve customer issues.
- Gaming: Interactive non-player characters (NPCs), in-game help assistants, and real-time translation of in-game content.
- Next-gen interfaces: Voice- and video-enabled experiences in robotics, smart glasses, and vehicles.
- Healthcare: Health companions for patient support and education.
- Financial services: AI advisors for wealth management and investment guidance.
- Education: AI mentors and learner companions that provide personalized instruction and feedback.
Key features
Gemini Live API offers a comprehensive set of features for building robust voice and video agents:
- High audio quality: Gemini Live API provides natural, realistic-sounding speech across multiple languages.
- Multilingual support: Converse in 24 supported languages.
- Barge-in: Users can interrupt the model at any time for responsive interactions.
- Affective dialog: Adapts response style and tone to match the user's input expression.
- Tool use: Integrates tools like function calling and Google Search for dynamic interactions.
- Audio transcriptions: Provides text transcripts of both user input and model output.
- Proactive audio: (Preview) Lets you control when the model responds and in what contexts.
Technical specifications
The following table outlines the technical specifications for the Gemini Live API:
| Category | Details |
|---|---|
| Input modalities | Audio (raw 16-bit PCM audio, 16kHz, little-endian), images/video (JPEG 1FPS), text |
| Output modalities | Audio (raw 16-bit PCM audio, 24kHz, little-endian), text |
| Protocol | Stateful WebSocket connection (WSS) |
Supported models
The following models support Gemini Live API. Select the appropriate model based on your interaction requirements.
| Model ID | Availability | Use case | Key features |
|---|---|---|---|
gemini-live-2.5-flash-native-audio |
Generally available | Recommended. Low-latency voice agents. Supports seamless multilingual switching and emotional tone. |
|
gemini-live-2.5-flash-preview-native-audio-09-2025 |
Public preview | Cost-efficiency in real-time voice agents. |
|
Get started
Select the guide that matches your development environment:
Gen AI SDK tutorial
Connect to the Gemini Live API using the Gen AI SDK to build a real-time multimodal application with a Python backend.
WebSocket tutorial
Connect to the Gemini Live API using WebSockets to build a real-time multimodal application with a JavaScript frontend and a Python backend.
ADK tutorial
Create an agent and use the Agent Development Kit (ADK) Streaming to enable voice and video communication.
Partner integrations
If you want to integrate with some of our partners, these platforms have already integrated Gemini Live API over the WebRTC protocol to streamline the development of real-time audio and video applications.