
Il connettore BigQuery per Apache Spark consente ai data scientist di combinare la potenza del motore SQL scalabile senza problemi con le funzionalità di machine learning di Apache Spark. In questo tutorial, ti mostreremo come utilizzare Managed Service for Apache Spark, BigQuery e Apache Spark ML per eseguire il machine learning su un set di dati.
Obiettivi
Utilizzare la regressione lineare per creare un modello del peso alla nascita in funzione di cinque fattori:- Settimane di gestazione
- Età della madre
- Età del padre
- Aumento di peso della madre durante la gravidanza
- Punteggio Apgar
Utilizzare i seguenti strumenti:
- BigQuery, per preparare la tabella di input della regressione lineare, che viene scritta nel tuo Google Cloud progetto
- Python, per eseguire query e gestire i dati in BigQuery
- Apache Spark, per accedere alla tabella di regressione lineare risultante
- Spark ML, per creare e valutare il modello
- Job PySpark di Managed Service for Apache Spark, per richiamare le funzioni di Spark ML
Costi
In questo documento vengono utilizzati i seguenti componenti fatturabili di Google Cloud:
- Compute Engine
- Managed Service for Apache Spark
- BigQuery
Per generare una stima dei costi in base all'utilizzo previsto,
utilizza il calcolatore prezzi.
Prima di iniziare
Un cluster Managed Service for Apache Spark ha installato i componenti Spark, incluso Spark ML. Per configurare un cluster Managed Service for Apache Spark ed eseguire il codice in questo esempio, devi eseguire (o aver eseguito) le seguenti operazioni:
- Accedi al tuo Google Cloud account. Se non conosci Google Cloud, crea un account per valutare le prestazioni dei nostri prodotti in scenari reali. I nuovi clienti ricevono anche 300 $di crediti senza costi per l'esecuzione, il test e il deployment dei carichi di lavoro.
-
In the Google Cloud console, on the project selector page, select or create a Google Cloud project.
Roles required to select or create a project
- Select a project: Selecting a project doesn't require a specific IAM role—you can select any project that you've been granted a role on.
-
Create a project: To create a project, you need the Project Creator role
(
roles/resourcemanager.projectCreator), which contains theresourcemanager.projects.createpermission. Learn how to grant roles.
Enable the Dataproc, BigQuery, Compute Engine APIs.
Roles required to enable APIs
To enable APIs, you need the
serviceusage.services.enablepermission. If you created the project, then you likely already have this permission through the Owner role (roles/owner). Otherwise, you can get this permission through the Service Usage Admin role (roles/serviceusage.serviceUsageAdmin). Learn how to grant roles.-
Installa Google Cloud CLI.
-
Se utilizzi un provider di identità (IdP) esterno, devi prima accedere a gcloud CLI con la tua identità federata.
-
Per inizializzare gcloud CLI, esegui questo comando:
gcloud init -
In the Google Cloud console, on the project selector page, select or create a Google Cloud project.
Roles required to select or create a project
- Select a project: Selecting a project doesn't require a specific IAM role—you can select any project that you've been granted a role on.
-
Create a project: To create a project, you need the Project Creator role
(
roles/resourcemanager.projectCreator), which contains theresourcemanager.projects.createpermission. Learn how to grant roles.
Enable the Dataproc, BigQuery, Compute Engine APIs.
Roles required to enable APIs
To enable APIs, you need the
serviceusage.services.enablepermission. If you created the project, then you likely already have this permission through the Owner role (roles/owner). Otherwise, you can get this permission through the Service Usage Admin role (roles/serviceusage.serviceUsageAdmin). Learn how to grant roles.-
Installa Google Cloud CLI.
-
Se utilizzi un provider di identità (IdP) esterno, devi prima accedere a gcloud CLI con la tua identità federata.
-
Per inizializzare gcloud CLI, esegui questo comando:
gcloud init - Crea un cluster Managed Service for Apache Spark nel tuo progetto. Il cluster deve eseguire una versione di Managed Service for Apache Spark con Spark 2.0 o versioni successive (incluse le librerie di machine learning).
Crea un sottoinsieme di dati sulla natalità di BigQuery
In questa sezione, creerai un set di dati nel tuo progetto, quindi creerai una tabella nel set di dati in cui copierai un sottoinsieme di dati sul tasso di natalità dal set di dati BigQuery sulla natalità disponibile pubblicamente natality. Più avanti in questo tutorial utilizzerai i dati del sottoinsieme in questa tabella per prevedere il peso alla nascita in funzione dell'età materna, dell'età paterna e delle settimane di gestazione.
Puoi creare il sottoinsieme di dati utilizzando la Google Cloud console o eseguendo uno script Python sulla tua macchina locale.
Console
Crea un set di dati nel tuo progetto.
- Vai all'UI web di BigQuery.
- Nel pannello di navigazione a sinistra, fai clic sul nome del progetto, quindi fai clic su CREA SET DI DATI.
- Nella finestra di dialogo Crea set di dati :
- In ID set di dati, inserisci "natality_regression".
- In Località dei dati, puoi scegliere una
località
per il set di dati. La località del valore predefinito è
US multi-region. Una volta creato un set di dati, la località non può essere modificata. - Per Scadenza tabella predefinita, scegli una delle seguenti opzioni:
- Mai (impostazione predefinita): devi eliminare la tabella manualmente.
- Numero di giorni: la tabella verrà eliminata dopo il numero di giorni specificato dalla data di creazione.
- Per Criptaggio, scegli una delle seguenti opzioni:
- Google-owned and Google-managed encryption key (impostazione predefinita).
- Chiave gestita dal cliente: vedi Protezione dei dati con le chiavi Cloud KMS.
- Fai clic su Crea set di dati.
Esegui una query sul set di dati pubblico sulla natalità, quindi salva i risultati della query in una nuova tabella nel set di dati.
- Copia e incolla la seguente query nell'Editor di query, quindi fai clic su Esegui.
CREATE OR REPLACE TABLE natality_regression.regression_input as
SELECT
weight_pounds,
mother_age,
father_age,
gestation_weeks,
weight_gain_pounds,
apgar_5min
FROM
`bigquery-public-data.samples.natality`
WHERE
weight_pounds IS NOT NULL
AND mother_age IS NOT NULL
AND father_age IS NOT NULL
AND gestation_weeks IS NOT NULL
AND weight_gain_pounds IS NOT NULL
AND apgar_5min IS NOT NULL
- Al termine della query (in circa un minuto), i risultati vengono salvati come tabella BigQuery "regression_input" nel set di dati
natality_regressionnel tuo progetto.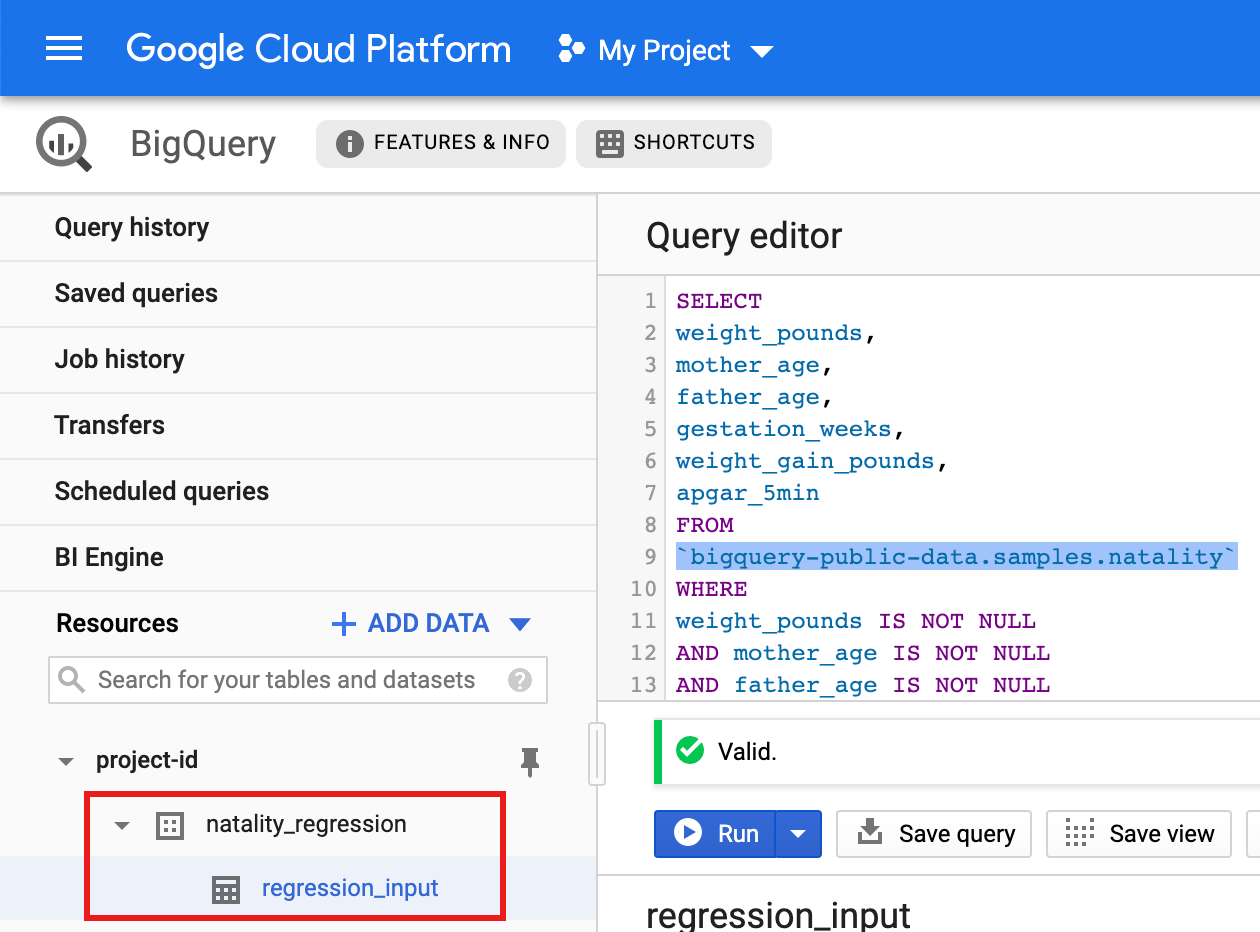
- Copia e incolla la seguente query nell'Editor di query, quindi fai clic su Esegui.
Python
Prima di provare questo esempio, segui le istruzioni di configurazione Python nella guida rapida di Managed Service for Apache Spark per l'utilizzo delle librerie client. Per saperne di più, consulta la documentazione di riferimento dell' API Pythondi Managed Service for Apache Spark.
Per eseguire l'autenticazione in Managed Service for Apache Spark, configura le credenziali predefinite dell'applicazione. Per saperne di più, consulta Configura l'autenticazione per un ambiente di sviluppo locale.
Per istruzioni sull'installazione di Python e della libreria client di Google Cloud per Python (necessaria per eseguire il codice), vedi Configurazione di un ambiente di sviluppo Python. È consigliabile installare e utilizzare un
virtualenvPython.Copia e incolla il codice
natality_tutorial.pyriportato di seguito in una shellpythonsulla tua macchina locale. Premi il tasto<return>nella shell per eseguire il codice per creare un "natality_regression" set di dati BigQuery nel tuo Google Cloud progetto predefinito con una "regression_input" tabella compilata con un sottoinsieme dei datinatalitypubblici.Verifica la creazione del set di dati
natality_regressione della tabellaregression_input.
Esegui una regressione lineare
In questa sezione, eseguirai una regressione lineare PySpark inviando
il job a Managed Service for Apache Spark utilizzando la Google Cloud console
o eseguendo il comando gcloud da un terminale locale.
Console
Copia e incolla il seguente codice in un nuovo file
natality_sparkml.pysulla tua macchina locale."""Run a linear regression using Apache Spark ML. In the following PySpark (Spark Python API) code, we take the following actions: * Load a previously created linear regression (BigQuery) input table into our Cloud Dataproc Spark cluster as an RDD (Resilient Distributed Dataset) * Transform the RDD into a Spark Dataframe * Vectorize the features on which the model will be trained * Compute a linear regression using Spark ML """ from pyspark.context import SparkContext from pyspark.ml.linalg import Vectors from pyspark.ml.regression import LinearRegression from pyspark.sql.session import SparkSession # The imports, above, allow us to access SparkML features specific to linear # regression as well as the Vectors types. # Define a function that collects the features of interest # (mother_age, father_age, and gestation_weeks) into a vector. # Package the vector in a tuple containing the label (`weight_pounds`) for that # row. def vector_from_inputs(r): return (r["weight_pounds"], Vectors.dense(float(r["mother_age"]), float(r["father_age"]), float(r["gestation_weeks"]), float(r["weight_gain_pounds"]), float(r["apgar_5min"]))) sc = SparkContext() spark = SparkSession(sc) # Read the data from BigQuery as a Spark Dataframe. natality_data = spark.read.format("bigquery").option( "table", "natality_regression.regression_input").load() # Create a view so that Spark SQL queries can be run against the data. natality_data.createOrReplaceTempView("natality") # As a precaution, run a query in Spark SQL to ensure no NULL values exist. sql_query = """ SELECT * from natality where weight_pounds is not null and mother_age is not null and father_age is not null and gestation_weeks is not null """ clean_data = spark.sql(sql_query) # Create an input DataFrame for Spark ML using the above function. training_data = clean_data.rdd.map(vector_from_inputs).toDF(["label", "features"]) training_data.cache() # Construct a new LinearRegression object and fit the training data. lr = LinearRegression(maxIter=5, regParam=0.2, solver="normal") model = lr.fit(training_data) # Print the model summary. print("Coefficients:" + str(model.coefficients)) print("Intercept:" + str(model.intercept)) print("R^2:" + str(model.summary.r2)) model.summary.residuals.show()
Copia il file locale
natality_sparkml.pyin un bucket Cloud Storage nel tuo progetto.gcloud storage cp natality_sparkml.py gs://bucket-name
Esegui la regressione dalla pagina Invia un job di Managed Service for Apache Spark.
Nel campo File Python principale, inserisci l'URI
gs://del bucket Cloud Storage in cui si trova la copia del filenatality_sparkml.py.Seleziona
PySparkcome Tipo di prestazione.Inserisci
gs://spark-lib/bigquery/spark-bigquery-latest_2.12.jarnel campo File jar. In questo modo, il connettore spark-bigquery è disponibile per l'applicazione PySpark in fase di esecuzione per consentirle di leggere i dati BigQuery in un DataFrame Spark.Compila i campi ID job, Regione e Cluster.
Fai clic su Invia per eseguire il job sul cluster.
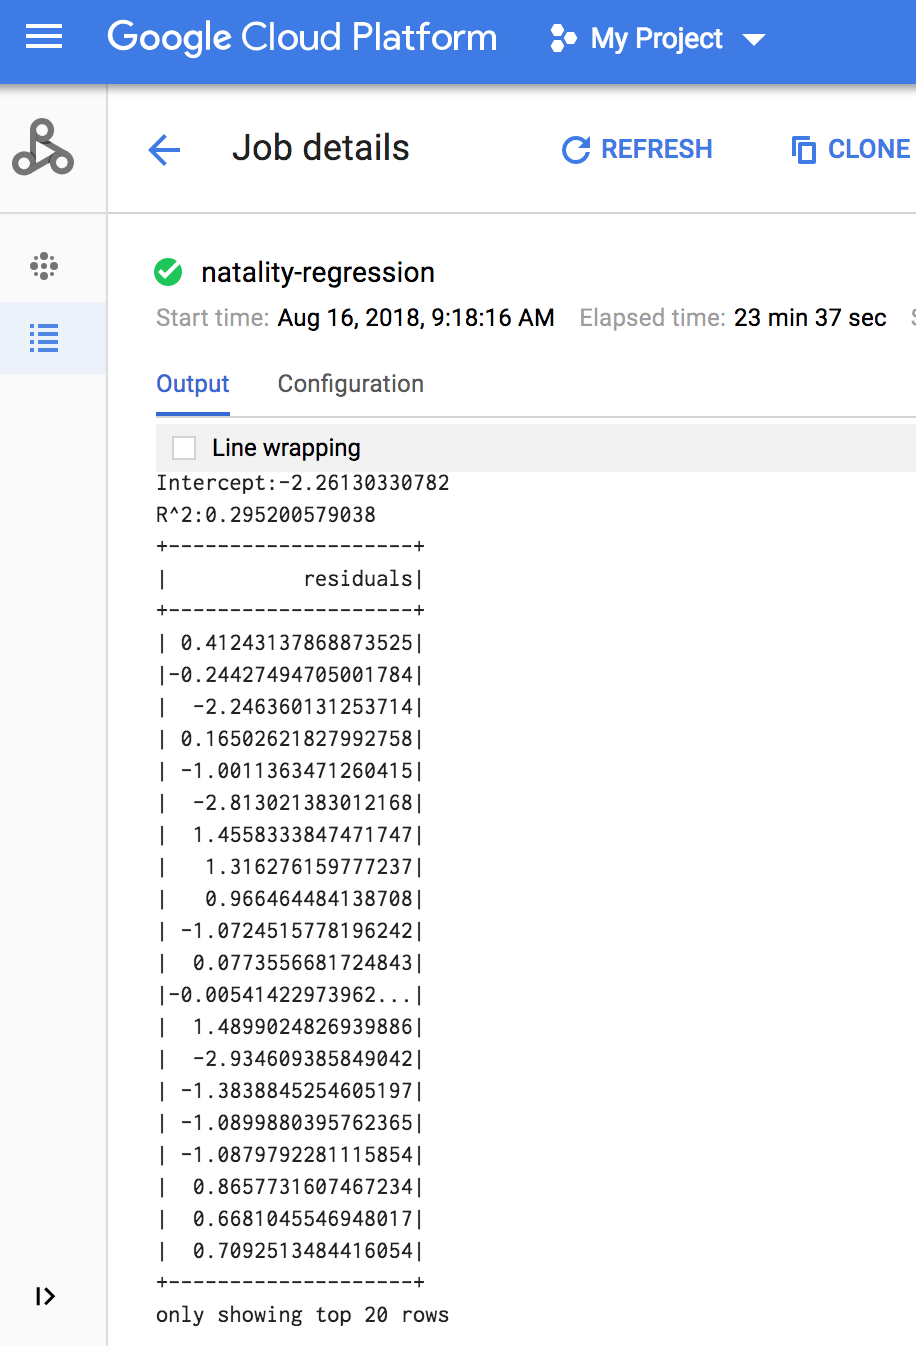
Al termine del job, il riepilogo del modello di output della regressione lineare viene visualizzato nella finestra Dettagli job di Managed Service for Apache Spark.
gcloud
Copia e incolla il seguente codice in un nuovo file
natality_sparkml.pysulla tua macchina locale."""Run a linear regression using Apache Spark ML. In the following PySpark (Spark Python API) code, we take the following actions: * Load a previously created linear regression (BigQuery) input table into our Cloud Dataproc Spark cluster as an RDD (Resilient Distributed Dataset) * Transform the RDD into a Spark Dataframe * Vectorize the features on which the model will be trained * Compute a linear regression using Spark ML """ from pyspark.context import SparkContext from pyspark.ml.linalg import Vectors from pyspark.ml.regression import LinearRegression from pyspark.sql.session import SparkSession # The imports, above, allow us to access SparkML features specific to linear # regression as well as the Vectors types. # Define a function that collects the features of interest # (mother_age, father_age, and gestation_weeks) into a vector. # Package the vector in a tuple containing the label (`weight_pounds`) for that # row. def vector_from_inputs(r): return (r["weight_pounds"], Vectors.dense(float(r["mother_age"]), float(r["father_age"]), float(r["gestation_weeks"]), float(r["weight_gain_pounds"]), float(r["apgar_5min"]))) sc = SparkContext() spark = SparkSession(sc) # Read the data from BigQuery as a Spark Dataframe. natality_data = spark.read.format("bigquery").option( "table", "natality_regression.regression_input").load() # Create a view so that Spark SQL queries can be run against the data. natality_data.createOrReplaceTempView("natality") # As a precaution, run a query in Spark SQL to ensure no NULL values exist. sql_query = """ SELECT * from natality where weight_pounds is not null and mother_age is not null and father_age is not null and gestation_weeks is not null """ clean_data = spark.sql(sql_query) # Create an input DataFrame for Spark ML using the above function. training_data = clean_data.rdd.map(vector_from_inputs).toDF(["label", "features"]) training_data.cache() # Construct a new LinearRegression object and fit the training data. lr = LinearRegression(maxIter=5, regParam=0.2, solver="normal") model = lr.fit(training_data) # Print the model summary. print("Coefficients:" + str(model.coefficients)) print("Intercept:" + str(model.intercept)) print("R^2:" + str(model.summary.r2)) model.summary.residuals.show()
Copia il file locale
natality_sparkml.pyin un bucket Cloud Storage nel tuo progetto.gcloud storage cp natality_sparkml.py gs://bucket-name
Invia il job Pyspark a Managed Service for Apache Spark eseguendo il comando
gcloudriportato di seguito da una finestra del terminale sulla tua macchina locale.- Il valore del flag --jars rende disponibile il connettore spark-bigquery
per il job PySpark in fase di esecuzione per consentirgli di leggere
i dati BigQuery in un DataFrame Spark.
gcloud dataproc jobs submit pyspark \
    gs://your-bucket/natality_sparkml.py \
    --cluster=cluster-name \
    --region=region \
    --jars=gs://spark-lib/bigquery/spark-bigquery-with-dependencies_SCALA_VERSION-CONNECTOR_VERSION.jar
- Il valore del flag --jars rende disponibile il connettore spark-bigquery
per il job PySpark in fase di esecuzione per consentirgli di leggere
i dati BigQuery in un DataFrame Spark.
L'output della regressione lineare (riepilogo del modello) viene visualizzato nella finestra del terminale al termine del job.
<<< # Print the model summary.
... print "Coefficients:" + str(model.coefficients)
Coefficients:[0.0166657454602,-0.00296751984046,0.235714392936,0.00213002070133,-0.00048577251587]
<<< print "Intercept:" + str(model.intercept)
Intercept:-2.26130330748
<<< print "R^2:" + str(model.summary.r2)
R^2:0.295200579035
<<< model.summary.residuals.show()
+--------------------+
|           residuals|
+--------------------+
| -0.7234737533344147|
|  -0.985466980630501|
| -0.6669710598385468|
|  1.4162434829714794|
|-0.09373154375186754|
|-0.15461747949235072|
| 0.32659061654192545|
|  1.5053877697929803|
|  -0.640142797263989|
|   1.229530260294963|
|-0.03776160295256...|
| -0.5160734239126814|
| -1.5165972740062887|
|  1.3269085258245008|
|  1.7604670124710626|
|  1.2348130901905972|
|   2.318660276655887|
|  1.0936947030883175|
|  1.0169768511417363|
| -1.7744915698181583|
+--------------------+
only showing top 20 rows.
Libera spazio
Al termine del tutorial, puoi eliminare le risorse che hai creato in modo che non utilizzino più la quota generando addebiti. Le seguenti sezioni descrivono come eliminare o disattivare queste risorse.
Elimina il progetto
Il modo più semplice per eliminare la fatturazione è eliminare il progetto creato per il tutorial.
Per eliminare il progetto:
- Nella Google Cloud console, vai alla pagina Gestisci risorse.
- Nell'elenco dei progetti, seleziona il progetto che vuoi eliminare, quindi fai clic su Elimina.
- Nella finestra di dialogo, digita l'ID progetto, quindi fai clic su Chiudi per eliminare il progetto.
Elimina il cluster Managed Service for Apache Spark
Vedi Eliminare un cluster.