
Using the Self-service Explores feature, you can specify a data source and then query and visualize the data in a Looker Explore without needing to configure a LookML model or set up Git version control. The following data sources are supported:
For Looker connections to BigQuery:
- Comma-separated files (CSV)
- Excel files (XLS and XLSX)
- Google Sheets files
- BigQuery tables
For Looker connections to Snowflake:
- Comma-separated files (CSV)
- Excel files (XLS and XLSX)
See the Before you begin and Uploading data to create a self-service Explore sections for details on the requirements and procedures.
After you upload your file, Looker analyzes the data: For each of the fields in the data file, Looker automatically detects the data type and applies the appropriate format for the data type. Looker also applies a name and a label for each field. Looker creates a LookML model of the data and persists the data by writing it to the BigQuery or Snowflake database that is specified by your Looker admin. When the model is ready, Looker displays the Edit Self-service Explore page.
After you upload your data, you can do the following:
- Open the Explore to create Looker queries that are based on your uploaded data.
- Add dimensions and measures to your Explore.
- Manage access to your Explore so that other users can query your Explore.
- Certify the Explore so that other users know the data is reliable.
- Remove the data if you no longer need it.
Before you begin
To use self-service Explores, you must have the following:
- A Looker instance that meets the following requirements:
- Running the minimum Looker version:
- To upload data on a BigQuery connection, your instance must be running Looker 25.20 or later.
- To upload data on a Snowflake connection, your instance must be running Looker 26.8 or later.
- Configured by a Looker admin to enable self-service Explores.
- Running the minimum Looker version:
- A Looker user account with the
upload_datapermission, which allows a user to upload data files to your instance.
Uploading data to create a self-service Explore
The following sections provide information on creating self-service Explores from different data sources:
- Uploading data files from your computer (CSV, XLS, and XLSX files)
- Uploading data from Google Sheets
- Using data from a BigQuery table
Uploading data files from your computer (CSV, XLS, and XLSX files)
You can create a self-service Explore from a file on your computer as long as the file meets the following requirements:
- The file must be 100 MB or smaller.
- The file must be a comma-separated values text file (CSV) or an Excel file (XLS or XLSX).
- For CSV files, the first row of data in the CSV file must contain the column names for the file.
To create a self-service Explore from a data file on your computer, follow these steps:
- From the Looker main navigation menu, click the Create button.
- Select Data source from the drop-down menu. This action opens the Create data source dialog.
- In the Create data source dialog, select the Upload from local tab, and then click the Choose data button to navigate to and select your data file. (Alternatively, you can drag a file into the Create data source dialog.)
- If you selected an Excel file that has more than one worksheet, specify which worksheet to upload from the Sheet in selected Excel file drop-down menu.
- Click Upload.
When the model is ready, Looker displays the Edit Self-service Explore page.
Uploading data from Google Sheets
Looker supports creating a self-service Explore from a tab in Google Sheets. In addition to the requirements for self-service Explores, the following are required:
- A Looker instance that your Looker admin has enabled for Data Uploads and Google Sheets data import (see the Admin settings - Self-service Explores documentation page for information).
- A BigQuery connection that is specified by your Looker admin in the Default Connection field of the Self-service Explores admin page.
- The required APIs enabled by your Looker admin in the Google Cloud project that houses your BigQuery database.
- A Google Sheets document that you have permission to share, and where the first row of data in the Google Sheets tab contains the column names for the data.
Note the following limitations for uploading data from Google Sheets:
- Looker (Google Cloud core) instances that use Private Service Connect don't support the OAuth flow for Google Sheets uploads. These instances must use the manual URL flow to upload data from Google Sheets.
- Looker (Google Cloud core) instances that use VPC Service Controls don't support Google Sheets uploads.
- If your data contains only string values in all columns, Looker may include the header rows as part of your data and create generic names for each column, such as
string_field_0andstring_field_1. In this case, you can edit the self-service Explore and rename the data fields.
The following sections describe the two ways that you can upload a Google Sheets document to create a self-service Explore:
- Using the Google Drive navigation to select your Google Sheets document: If your Looker admin has enabled the Data Uploads toggle, enabled the Google Sheets data import toggle, and configured OAuth for your instance (as described in the Enabling OAuth for Google Sheets uploads section), you can use Google Drive navigation to select a tab in your Google Sheets document to upload.
- Manually specifying the URL for your Google Sheets document: If your Looker admin has enabled the Data Uploads toggle and the Google Sheets data import toggle, but has not configured OAuth for your instance, you can enter the URL for your Google Sheets document and then manually share the Google Sheets document with the Looker service account so that Looker can upload the data.
Specifying Google Sheets data using Google Drive navigation
To create a self-service Explore from a Google Sheets file using Google Drive navigation, follow these steps:
- From the Looker main navigation menu, click the Create button.
- Select Data source from the Create drop-down menu. This action opens the Create data source dialog.
- In the Create data source dialog, click the Import from cloud tab.
- Click the Browse Google Drive button.
- From the Sign in with Google dialog, select the Google Account you want to use to navigate to your Google Sheets document.
- In the looker.com wants access to your Google Account dialog, click Continue to allow Looker to access your Drive files.
In the Select a file dialog, navigate to the Google Sheets document that you want to upload, select the file, and then click Select.
If your Google Sheets document contains multiple tabs, the Create data source dialog will display a Sheet drop-down menu. Select the sheet that you want to upload, and then click Continue.
When the model is ready, Looker displays the Edit Self-service Explore page.
Specifying Google Sheets data using the document URL
To create a self-service Explore from a Google Sheets file using the Google Sheets URL, follow these steps:
- In a web browser, navigate to the Google Sheets document that you want to upload to Looker.
- In the Google Sheets document, select the tab for the specific Sheet that you want to upload.
In the web browser URL, verify that the URL contains the following elements:
- The spreadsheet ID: This is located in the URL between the
/d/and the/editor/viewsuffix. - The sheet/tab ID: This is the
gidparameter that provides the ID of the Sheet.
- The spreadsheet ID: This is located in the URL between the
Copy the URL for the specific tab in Google Sheets that you want to upload, and keep this browser tab open.
In another browser tab, open Looker; then, in the Looker main navigation menu, click the Create button.
Select Data source from the Create drop-down menu. This action opens the Create data source dialog.
In the Create data source dialog, click the Import from cloud tab.
In the Google Sheets URL field, paste the URL for the tab in Google Sheets that you want to upload.
In the How to grant Google Sheet permission to Looker section of the Create data source dialog, click the Copy button to save the Looker service account email to your clipboard. Leave the Create data source dialog open.
Go back to the browser tab that contains your Google Sheet. In Google Sheets, click Share.
In the Share dialog, do the following:
- Paste the Looker service account email into the Add people, groups, spaces, and calendar events field.
- In the drop-down menu next to the input field, select Viewer.
- Clear the Notify people checkbox.
- Click Share.
Return to the Create data source dialog and click Continue.
When the model is ready, Looker displays the Edit Self-service Explore page.
Using data from a BigQuery table
Looker supports creating a self-service Explore from a table in a BigQuery database. In addition to the requirements for self-service Explores, the following are required:
- A Looker instance that is running Looker 26.10 or later.
- A BigQuery connection specified by your Looker admin in the Default Connection field of the Self-service Explores admin page (see the Admin settings - Self-service Explores documentation page for information).
- The BigQuery connection must be configured for authentication with OAuth.
- A Google Account that has the
bigquery.jobUserandbigquery.dataViewerIAM roles for the BigQuery table you want to upload to Looker.
To create a self-service Explore from a table in your BigQuery database, follow these steps:
- From the Looker main navigation menu, click the Create button.
- Select Data source from the drop-down menu. This action opens the Create data source dialog.
- In the Create data source dialog, select the Connect to database tab.
- In the Connect to database tab, use the BigQuery connection drop-down menu to select from the BigQuery connections that you have access to on the Looker instance.
- If the dialog displays the OAuth log in required banner, click the Log In button to select your Google Account to use for OAuth login, and then click Allow when prompted.
- In the Connect to database tab, use the drop-down menus to select the BigQuery Project and Dataset that contain the table that you want to upload, and then select the Table that you want to upload to Looker.
- Click Continue to upload the table.
When the model is ready, Looker displays the Edit Self-service Explore page.
Opening a self-service Explore
You can open any self-service Explore that you own or that the owner has shared with you:
- If you are the owner of the self-service Explore and you are on its Edit Self-service Explore page, you can click the Explore Data button to open the Explore.
- Otherwise, you can select the Explore from the Self-service Explores section of the Looker Explore menu.
In addition, if you are a Looker admin, you can open any self-service Explore on the instance by using the links in the Data uploads table on the Self-service Explores admin page. For Looker admins, the Self-service Explores section of the Looker Explore menu doesn't list every self-service Explore on the instance, only those that you own or that the owner has specifically shared with you.
You can use a self-service Explore much in the same way as any other Looker Explore, including performing the following tasks:
- Query your data in the Explore.
- Filter and limit your results to just the data you're interested in.
- Merge results from different Explores.
- Use table calculations to create ad hoc Explore metrics.
- Use custom fields to create ad hoc dimensions and measures.
- Create visualizations.
- Save Explore queries as Looks.
- Add Explore queries to dashboards.
- Share data with other users.
In addition, you can prompt Looker to update the data if the information in your data file has changed since you initially uploaded it.
Editing a self-service Explore
After you upload a data file, you can edit the Explore's data fields and manage user access from the Edit Self-service Explore page.
There are two ways to access the Edit Self-service Explore page:
- When you first upload a data file, Looker will automatically display the Edit Self-service Explore page for your data upload.
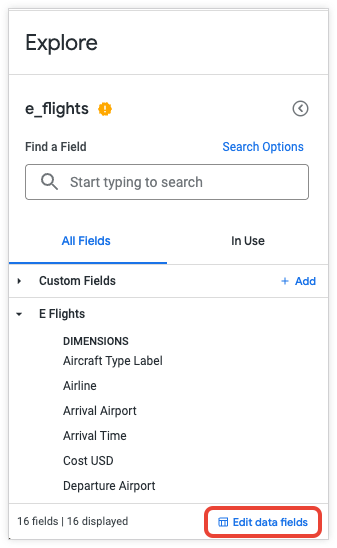
Otherwise, from the Looker Explore menu, select the Explore from the Self-service Explores section. In the Explore page, click the Edit data fields link from the bottom of the field picker panel in the Explore:
From the Edit Self-service Explore page, you can do the following:
- Rename the Explore
- Modify the data fields
- Add dimensions and measures
- Manage access to the self-service Explore
- Open the self-service Explore
- Remove the data upload from your instance
Rename the Explore
To rename a self-service Explore, follow these steps:
- In the Explore page, click the Edit data fields link from the bottom of the field picker panel in the Explore.
- In the Edit Self-service Explore page, click the name of the data upload and then enter a new name.
- Press the Enter key to save the name.
The self-service Explore's new name will now be used as the title in the Explore window when you open the Explore, and in the Self-service Explores section of the Looker Explore menu (you may have to refresh your browser to see the updated name in the Explore menu).
Modify data fields
On the Edit Self-service Explore page, the Data Fields tab lists the fields that Looker generated from your data file.
You can't delete a generated field; you can only hide it, either by selecting Hide from the field's gear menu in the Data Fields table, or by clicking the field's Edit button and selecting the Hide this field from Explores and visualizations checkbox.
To edit a field in a self-service Explore, follow these steps:
- From the Edit Self-service Explore page, in the Data Fields tab, click the Edit button in the field's row of the Data Fields table.
In the Edit dialog, you can do the following for a field:
- If a formatting option other than the default is needed, select one from the Format drop-down.
- Edit the name in the Name field. The name is used to identify the field in LookML, such as when you want to reference the field to create a new dimension or measure in the self-service Explore.
- Edit the label in the Label field. The label appears in the field picker and in the data table of the Explore.
- Select + Add Description to add a description, or edit the existing description. The description gives other users more context or information about the field. The description appears in the tooltip for the field in the field picker and in the data table of the Explore.
- Use the checkbox to hide or display the field in Explores and visualizations.
After making your edits, click Save.
Add dimensions and measures
You can build your own dimensions and measures for your self-service Explore. They are defined based on existing fields in the Explore or from Looker expressions, and they remain available to all users of your self-service Explore.
To add a dimension or measure to your self-service Explore, follow these steps:
- From the Edit Self-service Explore page, in the Data Fields tab, click the Add Dimension or Add Measure button.
- In the Create Dimension or Create Measure dialog, use the Expression box to enter a Looker expression that calculates the value for your dimension or measure, using any Looker functions and operators. The Creating Looker expressions documentation page describes how the Looker expression editor suggests field names and displays syntax help for any functions that you use.
- To use a formatting option other than the default formatting, select a formatting option in the Format drop-down.
- Specify a name in the Name field. The name is used to identify the field in LookML, such as when you want to reference the field to create a new dimension or measure in the self-service Explore.
- Specify a label in the Label field. The label appears in the field picker and in the data table of the Explore.
- Optionally, select + Add Description to add a description that will give other users more context or information about the custom dimension. The description appears in the tool tip for the field in the field picker and in the data table of the Explore.
- Optionally, select the Hide this field from Explores and visualizations checkbox if you want to hide the field.
- Click Save.
On the Edit Self-service Explore page, your created fields appear under the generated fields in the Data Fields table.
Updating the data for a self-service Explore
When you create a self-service Explore, Looker uploads the data from your file at the time of the upload. Subsequently, if the data in your file changes after you created the self-service Explore, you can update the data by following the steps in this section.
Note the following for updating the data for a self-service Explore:
- You can update data only for self-service Explores that you created.
- If any of the fields have been changed since the self-service Explore was created, Looker will automatically resolve all backwards-compatible changes.
- If a field from the originally uploaded file is changed in a significant way, such as if the column is renamed or if the data type is changed, Looker will present a Review changes dialog that lists the differences. The Review changes dialog will list the old name or data type as "Removed," and the new name or data type as "Added." In the dialog you can apply the changes or cancel the data upload. If you confirm the changes, Looker will permanently delete the removed fields from your self-service Explore.
To update the data for a self-service Explore, follow these steps:
- From the Edit Self-service Explore page, click the Update data button.
In the Update data dialog, depending on how you initially created the self-service Explore, do one of the following:
- If you initially created the self-service Explore by uploading a file from your computer, click Choose data to navigate to the file on your computer.
- If you initially created the self-service Explore by specifying a Google Sheets document, Looker will upload data from the same sheet of the same Google Sheets document.
Click Continue.
If Looker detects that any of the fields from the original file upload are significantly changed in the new file, Looker will present the Review changes dialog:
- To keep the data from the initial file upload, click Cancel to cancel the data update.
- Otherwise, to accept the updates, click Confirm. Looker will permanently delete the removed and renamed fields from your self-service Explore.
If your updated file had no significant changes, or if you confirmed the changes, Looker uploads the data from the specified file to your self-service Explore. When the model is ready, Looker displays the Edit Self-service Explore page.
Managing access to the self-service Explore
You can share your self-service Explore with other Looker users and user groups by following these steps:
- From the Edit Self-service Explore page, click the User Access tab and then click the Share access button. (You can also click the three-dot menu at the top of the Edit Self-service Explore page and select Share access.)
- In the Share access dialog, click the User or group field and either select from the drop-down menu or begin typing a username or a group name to filter the menu.
- In the Access permission field, leave the value as View.
- Optionally, click the Add button to provide access to another user or group.
- Click Share.
On the Edit Self-service Explore page, the User Access tab will show the new user or group to which you provided access.
If you want to remove a user or group's access to your self-service Explore, you can click the Delete user button in the user or group's row of the User Access table.
Certifying a self-service Explore
Self-service Explores are not based on a LookML model, and therefore their data is considered "ungoverned." When you upload data, the self-service Explore's name is displayed with a yellow "uncertified" badge ![]() in the Explore menu and on the Explore page. This badge indicates that data is both uncertified and ungoverned.
in the Explore menu and on the Explore page. This badge indicates that data is both uncertified and ungoverned.
If you have the certify_content permission, you can add a certification to the Explore so that other users know the data is reliable.
To add a certification to the self-service Explore, perform the following steps:
- From the Looker Explore menu, select the Explore from the Self-service Explores section.
- Click the Explore's gear menu and select Certify.
- In the Certify this content? dialog, enter your notes about the Explore, such as the origins of the data and how you know it's valid data.
- Click Certify.
When you certify a self-service Explore, Looker displays a certification badge ![]() next to the Explore's name in the Explore menu and on the Explore page.
next to the Explore's name in the Explore menu and on the Explore page.
See the Content certification documentation page for more information.
Removing a self-service Explore
You can delete your own data upload and its associated self-service Explore by performing the following steps:
- From the Looker main Explore menu, select the Explore from the Self-service Explores section.
Click the Edit data fields link from the bottom of the field picker panel in the Explore.
On the Edit Self-service Explore page, click the three-dot menu.
Select Remove data.
Click Delete in the confirmation dialog.
In addition, a Looker admin can delete any user's data upload from the Self-service Explores admin page by performing the following steps:
- From the Looker Admin menu, select Self-service Explores.
- In the Data uploads table on the Self-service Explores page, find the data upload and click the Delete button in its table row.
- Click Delete in the confirmation dialog.
What's next
- Learn more about creating custom fields.
- Learn about viewing and interacting with Explores in Looker.