
The IP Allowlist page lets you specify a list of IP addresses that can access your Looker instance. For a list of specific IP addresses to allow based on your region, see Enabling secure database access. When the IP allowlist is enabled, your Looker instance filters IP addresses at the application level, allowing connections from only the IP addresses on the allowlist. Looker refuses connection attempts from all other IP addresses. When the IP allowlist is disabled, your Looker instance can accept connections from any IP address.
The IP Allowlist page is available only for Looker-hosted instances. Customer-hosted instances won't see this option in the Admin menu. To view the IP Allowlist page, from the Server section of the Admin menu, select IP Allowlist.
The IP Allowlist page lists the rules that you use to configure which IP addresses and subnet masks can access your Looker instance. Each rule also defines whether users from those IP addresses can sign in only from the Looker UI, only from the Looker API, or from both sources.
In addition to viewing existing IP allowlist rules, you can perform the following tasks:
- Enable or disable the IP allowlist with the Enable Allowlist setting. When the allowlist is active, only users from listed IP address can connect.
- Define a new rule, which adds more IP addresses to the allowlist.
- Enable, disable, edit, or delete an existing rule.
- Grant access to essential Google Cloud services.
Enabling the IP allowlist setting
If no IP allowlist rules have been defined for your Looker instance, the IP Allowlist page displays the following message: "Your IP address is not allowlisted." You must define an IP allowlist rule for the IP address that you are using to access the Looker instance before you can turn on the Enable Allowlist setting.
To add your IP address to your instance allowlist, follow these steps:
- Select the Your IP address is not allowlisted text. Looker displays a dialog that displays your source public IP address with the following message: "No currently enabled rules allow access via your IP address. You must first create or enable a rule to allowlist yourself before you can enable the IP Allowlist feature. Your detected IP address is 192.168.1.1."
- Copy your detected IP address.
- Add a rule that includes your IP address.
- After saving the rule, turn on the Enable Allowlist setting.
- Optionally, enable the Allow Google Cloud services setting to grant essential Google Cloud services access to the instance.
Adding a new rule
Select Add Rule to add an IP address or a range of addresses to the allowlist. Looker displays the New IP Allowlist Rule dialog. To add a new rule, follow these steps:
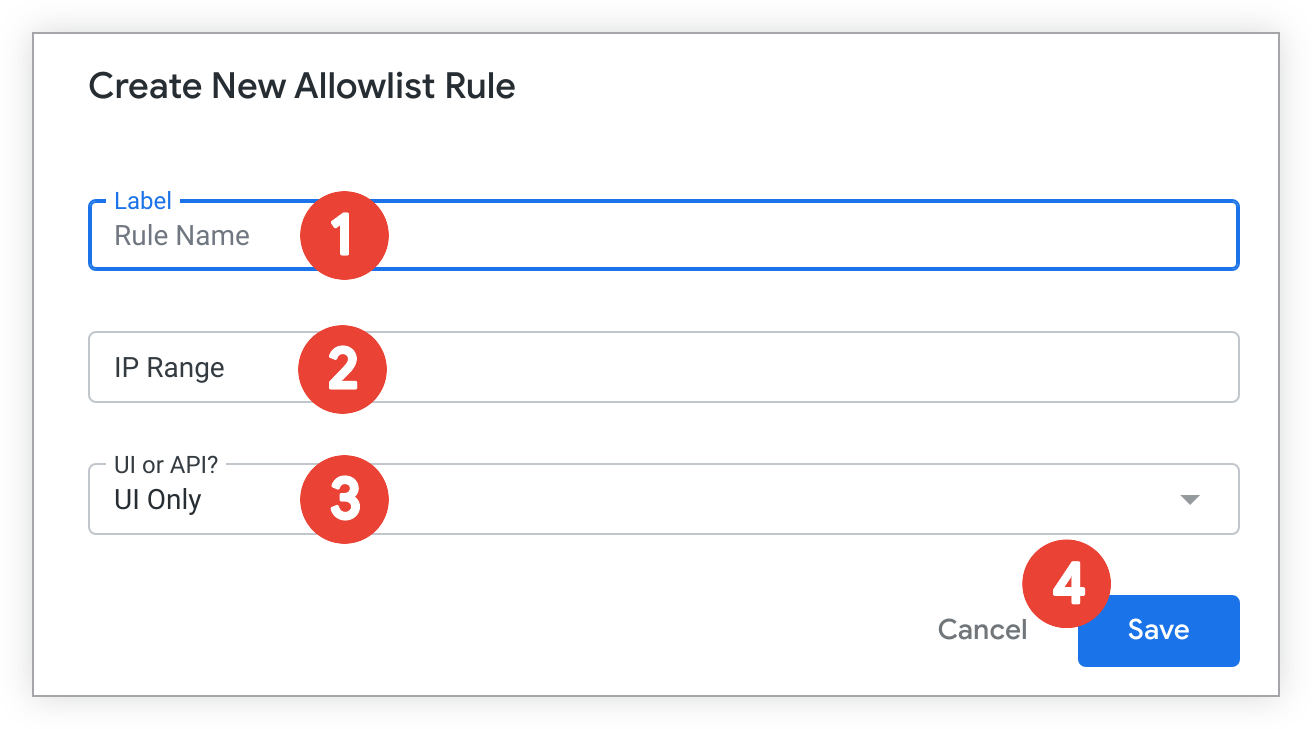
- Enter a name for the new rule in the Label field.
- Enter a range of approved IP addresses in the IP Range field using an IP address and a subnet mask, as described in CIDR notation.
- Specify whether the new rule applies only to login attempts from the Looker UI, only to login attempts from the Looker API, or to login attempts from both sources in the UI or API? drop-down menu.
- Select Save.
Things to know
While configuring your IP allowlist, keep the following considerations in mind:
- Adding more than 50 rules may negatively impact Looker's performance.
- Certain Looker Action Hub features such as the Slack integration and OAuth-enabled actions don't work when the IP allowlist is enabled.
- To integrate Git pull requests with any LookML projects, you need to add to the allowlist the range of IP addresses from which your Git provider makes outbound requests. For example, GitHub IP addresses are available from their meta API endpoint. IPs are subject to change and will be different for other Git providers.