


本教學課程說明如何使用 虛擬私有雲網路對等互連部署中樞和輪輻架構。
本教學課程適用於雲端網路工程師和營運專業人員,他們想在Google Cloud 環境中實作中樞輻射架構,方法是使用由 Compute Engine 虛擬機器組成的集中式裝置。在本教學課程中,您會將這些虛擬機器部署為 NAT 閘道,但您也可以將相同方法用於其他功能,例如新一代防火牆。本教學課程假設您熟悉虛擬私有雲網路和 Compute Engine。
架構
在這個架構中,一組輪輻虛擬私有雲網路會透過中樞虛擬私有雲網路與外部通訊,而流量會透過集中式設備集區 (在本例中為網路位址轉譯 (NAT) 閘道) 轉送。相關路由會從中樞虛擬私有雲網路匯出至輪輻虛擬私有雲網路。NAT 閘道會設為內部負載平衡器的後端,並採用新的預設路由,其下一個躍點為 Cloud Load Balancing 的內部直通式網路負載平衡器。
您可以使用多個路徑,並採用等價多路徑 (ECMP) 轉送,達到相同的負載分配和高可用性。不過,使用內部直通式網路負載平衡器有以下優點:
- 如果依賴健康狀態檢查,流量只會轉送至健康狀態良好的執行個體。使用 ECMP 時,流量會轉送至路徑指向的所有有效執行個體;使用內部直通式網路負載平衡器,則可避免出現未使用的路徑。此外,執行個體終止或重新啟動時,也不需要清除路徑。
- 您可以微調健康狀態檢查計時器,因此容錯移轉速度可能更快。如果您使用代管執行個體群組和自動修復功能,還是可以自訂健康狀態檢查計時器,但這些計時器是用於重新建立執行個體,而非轉送流量。
Google 也提供 Cloud NAT 做為代管服務,提供高可用性,且不須使用者管理和介入。不過,由於NAT 設定不會匯入對等互連網路,因此這個使用情境不支援 Cloud NAT。
下圖顯示您在本教學課程中建構的拓撲。
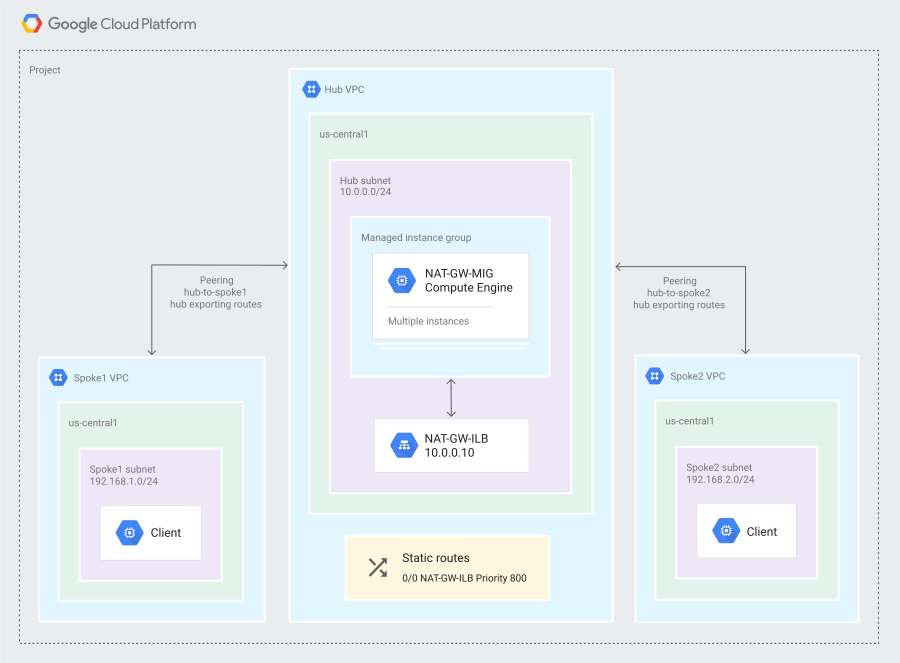
拓撲包含一個中樞虛擬私有雲網路,以及兩個透過虛擬私有雲網路對接與中樞虛擬私有雲網路對等的輪輻虛擬私有雲網路。中樞虛擬私有雲網路有兩個 NAT 閘道執行個體,位於內部直通式網路負載平衡器後方。靜態預設路由 (0/0 NAT-GW-ILB) 會將內部直通式網路負載平衡器做為下一個躍點。這個靜態預設路徑會透過虛擬私有雲網路對等互連,使用自訂路徑匯出。
目標
- 建立多個虛擬私有雲網路,並使用中樞輻射架構對等互連。
- 在中樞虛擬私有雲網路中,建立及設定 NAT 閘道。
- 設定內部直通式網路負載平衡器,並將其設為下一個躍點。
- 確認輪輻虛擬私有雲網路與公開網際網路之間的連線能力。
費用
在本文件中,您將使用下列 Google Cloud計費元件:
您可以使用 Pricing Calculator,根據預測用量估算費用。
完成本文所述工作後,您可以刪除建立的資源,避免繼續計費,詳情請參閱「清除所用資源」。
事前準備
- 登入 Google Cloud 帳戶。如果您是 Google Cloud新手,歡迎 建立帳戶,親自體驗產品的實際應用成效。新客戶還能獲得價值 $300 美元的免費抵免額,能用於執行、測試及部署工作負載。
-
In the Google Cloud console, on the project selector page, select or create a Google Cloud project.
Roles required to select or create a project
- Select a project: Selecting a project doesn't require a specific IAM role—you can select any project that you've been granted a role on.
-
Create a project: To create a project, you need the Project Creator role
(
roles/resourcemanager.projectCreator), which contains theresourcemanager.projects.createpermission. Learn how to grant roles.
-
Verify that billing is enabled for your Google Cloud project.
Enable the Compute Engine API, if it is not already enabled.
Roles required to enable APIs
To enable APIs, you need the
serviceusage.services.enablepermission. If you created the project, then you likely already have this permission through the Owner role (roles/owner). Otherwise, you can get this permission through the Service Usage Admin role (roles/serviceusage.serviceUsageAdmin). Learn how to grant roles.-
In the Google Cloud console, on the project selector page, select or create a Google Cloud project.
Roles required to select or create a project
- Select a project: Selecting a project doesn't require a specific IAM role—you can select any project that you've been granted a role on.
-
Create a project: To create a project, you need the Project Creator role
(
roles/resourcemanager.projectCreator), which contains theresourcemanager.projects.createpermission. Learn how to grant roles.
-
Verify that billing is enabled for your Google Cloud project.
Enable the Compute Engine API, if it is not already enabled.
Roles required to enable APIs
To enable APIs, you need the
serviceusage.services.enablepermission. If you created the project, then you likely already have this permission through the Owner role (roles/owner). Otherwise, you can get this permission through the Service Usage Admin role (roles/serviceusage.serviceUsageAdmin). Learn how to grant roles.-
在 Google Cloud 控制台中啟用 Cloud Shell。
Google Cloud 控制台底部會開啟 Cloud Shell 工作階段,並顯示指令列提示。Cloud Shell 是已安裝 Google Cloud CLI 的殼層環境,並已設定適用於您目前專案的值。工作階段可能要幾秒鐘的時間才能初始化。
在本教學課程中,您將透過 Cloud Shell 執行所有指令。
設定環境
在 Cloud Shell 中,確認您是在建立或選取的Google Cloud 專案中操作。將
project-id替換為 Google Cloud 專案。gcloud config set project project-id export PROJECT_ID=`gcloud config list --format="value(core.project)"`
設定預設運算區域和可用區。
gcloud config set compute/region us-central1
gcloud config set compute/zone us-central1-c
export REGION=us-central1
export ZONE=us-central1-c
在本教學課程中,區域為
us-central1,可用區為us-central1-c。
建立虛擬私有雲網路和子網路
在 Cloud Shell 建立中樞虛擬私有雲網路和子網路:
gcloud compute networks create hub-vpc --subnet-mode custom

gcloud compute networks subnets create hub-subnet1 \
    --network hub-vpc --range 10.0.0.0/24
建立輪輻虛擬私有雲網路 (分別命名為
spoke1-vpc和spoke2-vpc),每個網路各有一個子網路:gcloud compute networks create spoke1-vpc --subnet-mode custom gcloud compute networks create spoke2-vpc --subnet-mode custom gcloud compute networks subnets create spoke1-subnet1 \ --network spoke1-vpc --range 192.168.1.0/24 gcloud compute networks subnets create spoke2-subnet1 \ --network spoke2-vpc --range 192.168.2.0/24在中心虛擬私有雲網路和輻射虛擬私有雲網路中建立防火牆規則。這些規則允許來自指定 RFC 1918 範圍的內部流量 (TCP/80 和 443、UDP/53 和 ICMP):
gcloud compute firewall-rules create hub-vpc-web-ping-dns \
    --network hub-vpc --allow tcp:80,tcp:443,icmp,udp:53 \
    --source-ranges 10.0.0.0/24,192.168.1.0/24,192.168.2.0/24

gcloud compute firewall-rules create spoke1-vpc-web-ping-dns \
    --network spoke1-vpc --allow tcp:80,tcp:443,icmp,udp:53 \
    --source-ranges 10.0.0.0/24,192.168.1.0/24

gcloud compute firewall-rules create spoke2-vpc-web-ping-dns \
    --network spoke2-vpc --allow tcp:80,tcp:443,icmp,udp:53 \
    --source-ranges 10.0.0.0/24,192.168.2.0/24
在中心虛擬私有雲網路和輻射虛擬私有雲網路中建立防火牆規則,允許 IAP for SSH 存取所有虛擬機器:
gcloud compute firewall-rules create hub-vpc-iap \
    --network hub-vpc --allow tcp:22 \
    --source-ranges 35.235.240.0/20

gcloud compute firewall-rules create spoke1-vpc-iap \
    --network spoke1-vpc --allow tcp:22 \
    --source-ranges 35.235.240.0/20

gcloud compute firewall-rules create spoke2-vpc-iap \
    --network spoke2-vpc --allow tcp:22 \
    --source-ranges 35.235.240.0/20
本教學課程使用 Identity-Aware Proxy (IAP) 進行 SSH 連線。詳情請參閱「連線至沒有外部 IP 位址的執行個體」。
建立防火牆規則,允許中樞虛擬私有雲網路中自動修復執行個體群組的健康狀態檢查:
gcloud compute firewall-rules create hub-vpc-health-checks \ --network hub-vpc --allow tcp:443 --target-tags nat-gw \ --source-ranges35.191.0.0/16
建立執行個體和必要路徑
在 Cloud Shell 中,為 NAT 閘道建立執行個體範本,其中包含設定 NAT 閘道的開機指令碼:
gcloud compute instance-templates create \
  hub-nat-gw-ilbnhop-template \
  --network hub-vpc \
  --subnet hub-subnet1 \
  --machine-type n1-standard-2 --can-ip-forward \
  --tags nat-gw --scopes default,compute-rw \
  --metadata startup-script='#! /bin/bash
apt-get update
# Enable IP forwarding:
echo 1 > /proc/sys/net/ipv4/ip_forward
echo "net.ipv4.ip_forward=1" > /etc/sysctl.d/20-example.conf
# Read VM network configuration:
md_vm="http://metadata.google.internal/computeMetadata/v1/instance/"
md_net="$md_vm/network-interfaces"
nic0_gw="$(curl $md_net/0/gateway -H "Metadata-Flavor:Google")"
nic0_mask="$(curl $md_net/0/subnetmask -H "Metadata-Flavor:Google")"
nic0_addr="$(curl $md_net/0/ip -H "Metadata-Flavor:Google")"
nic0_id="$(ip addr show | grep $nic0_addr | tail -c 5)"
# Use a web server to pass the health check for this example.
# In production, use a more complete test.
sudo apt-get update
sudo apt-get install apache2 -y
sudo a2ensite default-ssl
sudo a2enmod ssl
echo "Example web page to pass health check" | \
tee /var/www/html/index.html
sudo systemctl restart apache2
# Enable IP masquerading
iptables -t nat -A POSTROUTING -o $nic0_id -j MASQUERADE'
本教學課程使用
n1-standard-2做為執行個體類型,但您可以視需要使用任何其他閘道編號或大小。請務必考量每個 VM 的最大輸出頻寬等因素。建立 HTTP 健康狀態檢查:
gcloud compute health-checks create http nat-gw-ilbnhop-health-check \ --region us-central1 \ --port 80建立區域執行個體群組,其中包含兩個執行個體,分布於單一區域:
gcloud compute instance-groups managed create \
    hub-nat-gw-ilbnhop-mig \
    --region us-central1 --size=2 \
    --template=hub-nat-gw-ilbnhop-template \
    --health-check nat-gw-ilbnhop-health-check \
    --initial-delay 15
在本教學課程中,初始延遲時間設為 15 秒。在正式環境部署作業中,請根據需求自訂這項設定。本教學課程不會使用自動調度資源政策。
建立後端服務並新增執行個體群組:
gcloud compute backend-services create hub-nat-gw-ilbnhop-backend \
    --load-balancing-scheme=internal \
    --protocol=tcp \
    --health-checks=nat-gw-ilbnhop-health-check

gcloud compute backend-services add-backend \
    hub-nat-gw-ilbnhop-backend \
    --instance-group=hub-nat-gw-ilbnhop-mig \
    --instance-group-region=us-central1
建立轉送規則:
gcloud compute forwarding-rules create \
    hub-nat-gw-ilbnhop \
    --load-balancing-scheme=internal \
    --network=hub-vpc \
    --subnet=hub-subnet1 \
    --address=10.0.0.10 \
    --ip-protocol=TCP \
    --ports=all \
    --backend-service=hub-nat-gw-ilbnhop-backend \
    --backend-service-region=us-central1 \
    --service-label=hub-nat-gw-ilbnhop
即使轉送規則只定義了 TCP,當您使用內部直通式網路負載平衡器做為下一個躍點時,轉送規則會將所有流量轉送至後端 VM 的所有通訊埠。內部直通式網路負載平衡器是區域性負載平衡器。
以轉送規則做為下一個躍點,建立新路徑:
gcloud compute routes create hub-nat-gw-ilbnhop \
    --network=hub-vpc \
    --destination-range=0.0.0.0/0 \
    --next-hop-ilb=hub-nat-gw-ilbnhop \
    --next-hop-ilb-region=us-central1 \
    --priority=800
您可以指定網路標記,讓下一個躍點路由只套用至已設定標記的用戶端執行個體,但標記不會透過虛擬私有雲網路對等互連匯出或匯入。
從中樞 VPC 刪除預設路徑:
export hub_default_route=$(gcloud compute routes list \
    --format="value(name)" --filter="network:hub-vpc AND \
    nextHopGateway:default-internet-gateway" | head -n 1)
gcloud compute routes delete $hub_default_route -q
建立新的標記路由,只允許來自 NAT 閘道的流量:
gcloud compute routes create hub-default-tagged \
    --network hub-vpc --destination-range 0.0.0.0/0 \
    --next-hop-gateway default-internet-gateway \
    --priority 700 --tags nat-gw
從每個輻射虛擬私有雲的虛擬私有雲中,刪除網際網路的預設路由:
export spoke1_default_route=$(gcloud compute routes list \ --format="value(name)" --filter="network:spoke1-vpc AND \ nextHopGateway:default-internet-gateway") gcloud compute routes delete $spoke1_default_route -q export spoke2_default_route=$(gcloud compute routes list \ --format="value(name)" \ --filter="network:spoke2-vpc AND nextHopGateway:default-internet-gateway") gcloud compute routes delete $spoke2_default_route -q如果本機和匯入的路徑發生衝突,系統一律會優先採用本機路徑。詳情請參閱「轉送順序」。
建立用戶端 VM:
gcloud compute instances create spoke1-client \
    --subnet=spoke1-subnet1 --no-address \
    --metadata startup-script='#! /bin/bash
apt-get update
apt-get install dnsutils -y'

gcloud compute instances create spoke2-client \
    --subnet=spoke2-subnet1 --no-address \
    --metadata startup-script='#! /bin/bash
apt-get update
apt-get install dnsutils -y'
建立虛擬私有雲網路對接連線
虛擬私有雲網路對等互連是雙向的,因此必須在兩端定義。一個虛擬私有雲網路可以與多個虛擬私有雲網路對等互連,但須遵守限制。如要透過虛擬私有雲網路對等互連連線存取預設路徑,請使用「透過虛擬私有雲網路對等互連連線匯入及匯出自訂路徑」功能。
在本教學課程中,您會在同一個Google Cloud 專案中建立所有虛擬私有雲網路。
在 Cloud Shell 中,從中樞虛擬私有雲網路建立虛擬私有雲連線至輻射虛擬私有雲網路,並啟用路由匯出旗標:
gcloud compute networks peerings create hub-to-spoke1 \
    --network hub-vpc --peer-network spoke1-vpc \
    --peer-project $PROJECT_ID \
    --export-custom-routes

gcloud compute networks peerings create hub-to-spoke2 \
    --network hub-vpc --peer-network spoke2-vpc \
    --peer-project $PROJECT_ID \
    --export-custom-routes
從
spoke1虛擬私有雲網路建立虛擬私有雲網路對等互連連線,連至中樞虛擬私有雲網路,並啟用路由匯入標記:gcloud compute networks peerings create spoke1-to-hub \ --network spoke1-vpc --peer-network hub-vpc \ --peer-project $PROJECT_ID \ --import-custom-routes從
spoke2虛擬私有雲網路建立虛擬私有雲網路對等互連連線,連至中樞虛擬私有雲網路,並啟用路由匯入標記:gcloud compute networks peerings create spoke2-to-hub \ --network spoke2-vpc --peer-network hub-vpc \ --peer-project $PROJECT_ID \ --import-custom-routes
驗證路由傳播和連線能力
在 Cloud Shell 中,確認靜態路由已正確建立為開機指令碼的一部分。
gcloud compute routes list --filter="network:hub-vpc"確認輸出內容中是否包含
hub-default-tagged和hub-nat-gw-ilbanhop路由:NAME NETWORK DEST_RANGE NEXT_HOP PRIORITY default-route-13a4b635b5eab48c hub-vpc 10.0.0.0/24 hub-vpc 1000 hub-default-tagged hub-vpc 0.0.0.0/0 default-internet-gateway 700 hub-nat-gw-ilbanhop hub-vpc 0.0.0.0/0 10.0.0.10 800 peering-route-3274f1257a9842a0 hub-vpc 192.168.2.0/24 hub-to-spoke2 1000 peering-route-798c5777f13094bc hub-vpc 192.168.1.0/24 hub-to-spoke1 1000
確認
spoke1-vpc轉送表,確保預設路徑已正確匯入:gcloud compute routes list --filter="network:spoke1-vpc"請確認輸出內容中有一條開頭為
peering-route的路徑,且DEST_RANGE值為0.0.0.0/0:NAME NETWORK DEST_RANGE NEXT_HOP PRIORITY default-route-75f6ea8f5fc54813 spoke1-vpc 192.168.1.0/24 spoke1-vpc 1000 peering-route-6c7f130b860bfd39 spoke1-vpc 10.0.0.0/24 spoke1-to-hub 1000 peering-route-9d44d362f98afbd8 spoke1-vpc 0.0.0.0/0 spoke1-to-hub 800
透過 IAP 使用 SSH 連線至其中一個用戶端:
gcloud compute ssh spoke1-client --tunnel-through-iap透過 NAT 閘道測試 Google 公用 DNS,確認連線能力是否正常:
sudo hping3 -S -p 80 -c 3 dns.google由於內部直通式網路負載平衡器支援 TCP 和 UDP,因此您無法使用以 ICMP 為基礎的 ping 驗證網際網路連線,必須使用 hping3 等工具。
輸出結果會與下列內容相似:
HPING dns.google (eth0 8.8.4.4): S set, 40 headers + 0 data bytes
len=44 ip=8.8.4.4 ttl=126 DF id=0 sport=80 flags=SA seq=0 win=65535 rtt=4.6 ms
len=44 ip=8.8.4.4 ttl=126 DF id=0 sport=80 flags=SA seq=1 win=65535 rtt=4.4 ms
len=44 ip=8.8.4.4 ttl=126 DF id=0 sport=80 flags=SA seq=2 win=65535 rtt=4.3 ms

--- dns.google hping statistic ---
3 packets transmitted, 3 packets received, 0% packet loss
round-trip min/avg/max = 4.3/4.4/4.6 ms
確認您用來與網際網路通訊的公開 IP 位址:
curl ifconfig.co輸出內容會顯示其中一個 NAT 閘道執行個體的公開 IP 位址。如果再次執行指令,輸出內容可能會顯示不同的公開 IP 位址,因為連線是使用設定的內部負載平衡工作階段相依性 (預設為用戶端 IP、通訊協定和通訊埠) 分配。
VPC 網路對接不具遞移性,因此輪輻 VPC 網路之間無法透過 VPC 網路對接連線。
正式環境的注意事項
您在本教學課程中建立的設定會在單一區域中提供兩個網路位址轉譯 (NAT) 閘道。不過,ECMP 負載平衡並非完美,個別流量不會分散到多個連結,這正是使用新一代防火牆等有狀態裝置時所需的效果。
如要在正式環境中部署這項設定,請注意下列事項:
- 這項設定最適合用於暫時性或非有狀態的傳出連結。如果 NAT 閘道集區的大小有所變更,TCP 連線可能會重新平衡,導致已建立的連線遭到重設。
- 節點不會自動更新,因此如果預設 Debian 安裝作業有安全漏洞,您必須手動更新映像檔。
- 如果您在多個區域中設有 VM,則須在各個區域中設定 NAT 閘道。
- 每個閘道的頻寬可能因硬體類型而異。請務必考量每個 VM 的最大輸出頻寬等因素。閘道故障時,流量會分配給其餘閘道。由於系統不會重新規劃執行中的流程,因此閘道恢復連線後,流量不會立即重新結算。因此,請務必在調整大小時預留足夠的額外空間。
- 如要接收異常結果的快訊,請使用 Cloud Monitoring 監控代管執行個體群組和網路流量。
清除所用資源
如要避免付費,最簡單的方法就是刪除您為了本教學課程所建立的 Google Cloud 專案。或者,你也可以刪除個別資源。
刪除專案
- 前往 Google Cloud 控制台的「Manage resources」(管理資源) 頁面。
- 在專案清單中選取要刪除的專案,然後點選「Delete」(刪除)。
- 在對話方塊中輸入專案 ID,然後按一下 [Shut down] (關閉) 以刪除專案。
刪除個別資源
如要保留 Google Cloud 專案,可以刪除為本教學課程建立的資源。
刪除虛擬私有雲網路對等互連連線:
gcloud compute networks peerings delete spoke2-to-hub \
    --network spoke2-vpc -q

gcloud compute networks peerings delete spoke1-to-hub \
    --network spoke1-vpc -q

gcloud compute networks peerings delete hub-to-spoke1 \
    --network hub-vpc -q

gcloud compute networks peerings delete hub-to-spoke2 \
    --network hub-vpc -q
刪除執行個體、負載平衡器資源、範本和路徑:
gcloud compute instances delete spoke1-client \
  --zone=us-central1-c -q

gcloud compute instances delete spoke2-client \
  --zone=us-central1-c -q

gcloud compute routes delete hub-nat-gw-ilbnhop -q

gcloud compute forwarding-rules delete hub-nat-gw-ilbnhop -q

gcloud compute backend-services delete -q hub-nat-gw-ilbnhop-backend -q

gcloud compute instance-groups managed delete hub-nat-gw-ilbnhop-mig \
  --region us-central1 -q

gcloud compute health-checks delete nat-gw-ilbnhop-health-check -q

gcloud compute instance-templates delete hub-nat-gw-ilbnhop-template -q

gcloud compute routes delete hub-default-tagged -q
刪除防火牆規則、子網路和虛擬私有雲網路:
gcloud compute firewall-rules delete spoke2-vpc-iap -q

gcloud compute firewall-rules delete spoke2-vpc-web-ping-dns -q

gcloud compute firewall-rules delete spoke1-vpc-iap -q

gcloud compute firewall-rules delete spoke1-vpc-web-ping-dns -q

gcloud compute firewall-rules delete hub-vpc-iap -q

gcloud compute firewall-rules delete hub-vpc-web-ping-dns -q

gcloud compute firewall-rules delete hub-vpc-health-checks -q

gcloud compute networks subnets delete spoke1-subnet1 \
    --region us-central1 -q

gcloud compute networks subnets delete spoke2-subnet1 \
    --region us-central1 -q

gcloud compute networks subnets delete hub-subnet1 \
    --region us-central1 -q

gcloud compute networks delete spoke1-vpc -q

gcloud compute networks delete spoke2-vpc -q

gcloud compute networks delete hub-vpc -q
後續步驟
- 請參閱「虛擬私有雲設計的最佳做法與參考架構」。
- 請參閱「虛擬私有雲網路對等互連」和「內部直通式網路負載平衡器做為下一個躍點」文件。
- 瞭解 VM 執行個體的特殊設定。