
במסמך הזה מוסבר איך ליצור צינור נתונים שמבצע אימון אוטומטי של מודל בהתאמה אישית, לפי לוח זמנים מחזורי או כשנתונים חדשים מוכנסים למערך הנתונים באמצעות Vertex AI Pipelines ופונקציות Cloud Run.
מטרות
השלבים הבאים מתארים את התהליך הזה:
משיגים ומכינים מערך נתונים ב-BigQuery.
יצירה והעלאה של חבילת אימון בהתאמה אישית. כשמריצים את הפעולה, היא קוראת נתונים ממערך הנתונים ומאמנת את המודל.
יוצרים צינור עיבוד נתונים ב-Vertex AI. בצינור הזה מופעל חבילת האימון בהתאמה אישית, המודל מועלה למאגר המודלים של Vertex AI, מופעלת משימת ההערכה ונשלחת התראה באימייל.
מריצים את צינור עיבוד הנתונים באופן ידני.
יוצרים Cloud Function עם טריגר Eventarc שמפעיל את צינור הנתונים בכל פעם שנתונים חדשים מוכנסים למערך הנתונים ב-BigQuery.
לפני שמתחילים
מגדירים את הפרויקט ואת ה-Notebook.
הגדרת הפרויקט
-
In the Google Cloud console, go to the project selector page.
-
Select or create a Google Cloud project.
Roles required to select or create a project
- Select a project: Selecting a project doesn't require a specific IAM role—you can select any project that you've been granted a role on.
-
Create a project: To create a project, you need the Project Creator role
(
roles/resourcemanager.projectCreator), which contains theresourcemanager.projects.createpermission. Learn how to grant roles.
-
Verify that billing is enabled for your Google Cloud project.
יצירת notebook
אנחנו משתמשים בnotebook של Colab Enterprise כדי להריץ חלק מהקוד במדריך הזה.
אם אתם לא בעלי הפרויקט, בקשו מבעלי הפרויקט להקצות לכם את תפקידי ה-IAM
roles/resourcemanager.projectIamAdminו-roles/aiplatform.colabEnterpriseUser.כדי להשתמש ב-Colab Enterprise ולהעניק לעצמכם ולחשבונות שירות תפקידים והרשאות ב-IAM, אתם צריכים לקבל את התפקידים האלה.
במסוף Google Cloud , עוברים לדף Colab Enterprise Notebooks.
אם ממשקי ה-API הנדרשים הבאים לא מופעלים, תופיע ב-Colab Enterprise בקשה להפעיל אותם.
- Vertex AI API
- Dataform API
- Compute Engine API
בתפריט אזור, בוחרים את האזור שבו רוצים ליצור את מחברת ה-notebook. אם אתם לא בטוחים, השתמשו באזור us-central1.
צריך להשתמש באותו אזור לכל המשאבים במדריך הזה.
לוחצים על יצירת מחברת חדשה.
המחברת החדשה תופיע בכרטיסייה המחברות שלי. כדי להריץ קוד במחברת, מוסיפים תא קוד ולוחצים על הלחצן הרצת התא.
הגדרת סביבת פיתוח
במחברת, מתקינים את חבילות Python3 הבאות.
! pip3 install  google-cloud-aiplatform==1.34.0 \
                google-cloud-pipeline-components==2.6.0 \
                kfp==2.4.0 \
                scikit-learn==1.0.2 \
                mlflow==2.10.0
מגדירים את הפרויקט ב-Google Cloud CLI באמצעות הפקודה הבאה:
PROJECT_ID = "PROJECT_ID"

# Set the project id
! gcloud config set project {PROJECT_ID}
מחליפים את PROJECT_ID במזהה הפרויקט. במקרה הצורך, אפשר למצוא את מזהה הפרויקט במסוף Google Cloud .
מקצים תפקידים לחשבון Google:
! gcloud projects add-iam-policy-binding PROJECT_ID --member="user:"EMAIL_ADDRESS"" --role=roles/bigquery.admin
! gcloud projects add-iam-policy-binding PROJECT_ID --member="user:"EMAIL_ADDRESS"" --role=roles/aiplatform.user
! gcloud projects add-iam-policy-binding PROJECT_ID --member="user:"EMAIL_ADDRESS"" --role=roles/storage.admin
! gcloud projects add-iam-policy-binding PROJECT_ID --member="user:"EMAIL_ADDRESS"" --role=roles/pubsub.editor
! gcloud projects add-iam-policy-binding PROJECT_ID --member="user:"EMAIL_ADDRESS"" --role=roles/cloudfunctions.admin
! gcloud projects add-iam-policy-binding PROJECT_ID --member="user:"EMAIL_ADDRESS"" --role=roles/logging.viewer
! gcloud projects add-iam-policy-binding PROJECT_ID --member="user:"EMAIL_ADDRESS"" --role=roles/logging.configWriter
! gcloud projects add-iam-policy-binding PROJECT_ID --member="user:"EMAIL_ADDRESS"" --role=roles/iam.serviceAccountUser
! gcloud projects add-iam-policy-binding PROJECT_ID --member="user:"EMAIL_ADDRESS"" --role=roles/eventarc.admin
! gcloud projects add-iam-policy-binding PROJECT_ID --member="user:"EMAIL_ADDRESS"" --role=roles/aiplatform.colabEnterpriseUser
! gcloud projects add-iam-policy-binding PROJECT_ID --member="user:"EMAIL_ADDRESS"" --role=roles/artifactregistry.admin
! gcloud projects add-iam-policy-binding PROJECT_ID --member="user:"EMAIL_ADDRESS"" --role=roles/serviceusage.serviceUsageAdmin
הפעלת ממשקי ה-API הבאים
- Artifact Registry API
- BigQuery API
- Cloud Build API
- Cloud Functions API
- Cloud Logging API
- Pub/Sub API
- Cloud Run Admin API
- Cloud Storage API
- Eventarc API
- Service Usage API
- Vertex AI API
! gcloud services enable artifactregistry.googleapis.com bigquery.googleapis.com cloudbuild.googleapis.com cloudfunctions.googleapis.com logging.googleapis.com pubsub.googleapis.com run.googleapis.com storage-component.googleapis.com eventarc.googleapis.com serviceusage.googleapis.com aiplatform.googleapis.comמקצים תפקידים לחשבונות השירות של הפרויקט:
הצגת השמות של חשבונות השירות
! gcloud iam service-accounts listרושמים את השם של סוכן השירות של Compute. הפורמט הנדרש הוא
xxxxxxxx-compute@developer.gserviceaccount.com.מקצים לסוכן השירות את התפקידים הנדרשים.
! gcloud projects add-iam-policy-binding PROJECT_ID --member="serviceAccount:"SA_ID-compute@developer.gserviceaccount.com"" --role=roles/aiplatform.serviceAgent
! gcloud projects add-iam-policy-binding PROJECT_ID --member="serviceAccount:"SA_ID-compute@developer.gserviceaccount.com"" --role=roles/eventarc.eventReceiver
איך משיגים ומכינים מערך נתונים
במדריך הזה תבנו מודל שמנבא את מחיר הנסיעה במונית על סמך מאפיינים כמו זמן הנסיעה, המיקום והמרחק. נשתמש בנתונים ממערך הנתונים הציבורי Chicago Taxi Trips. מערך הנתונים הזה כולל נסיעות במוניות משנת 2013 ועד היום, שדווחו לעיריית שיקגו בתפקידה כסוכנות רגולטורית. כדי להגן על הפרטיות של הנהגים והמשתמשים במונית ולאפשר למרכז המוניות לנתח את הנתונים, מזהה המונית נשאר עקבי לכל מספר רישיון מונית נתון, אבל המספר לא מוצג, נתוני מפקד האוכלוסין מושמטים במקרים מסוימים, והשעות מעוגלות ל-15 הדקות הקרובות.
מידע נוסף זמין במאמר Chicago Taxi Trips on Marketplace.
יצירת מערך נתונים ב-BigQuery
במסוף Google Cloud , עוברים אל BigQuery Studio.
בחלונית Explorer, מאתרים את הפרויקט, לוחצים על Actions (פעולות) ואז על Create dataset (יצירת מערך נתונים).
בדף Create dataset:
בשדה Dataset ID (מזהה מערך הנתונים), מזינים
mlops. מידע נוסף זמין במאמר בנושא מתן שמות למערכי נתונים.בשדה Location type, בוחרים את האזור במספר אזורים. לדוגמה, בוחרים באפשרות ארה"ב (מספר אזורים בארצות הברית) אם משתמשים ב-
us-central1. אחרי שיוצרים את מערך הנתונים, אי אפשר לשנות את המיקום.לוחצים על יצירת מערך נתונים.
מידע נוסף על יצירת מערכי נתונים זמין כאן.
יצירה של טבלה ב-BigQuery ואכלוס שלה
בקטע הזה תיצרו את הטבלה ותייבאו נתונים של שנה אחת ממערך הנתונים הציבורי למערך הנתונים של הפרויקט.
מעבר אל BigQuery Studio
לוחצים על Create SQL Query (יצירת שאילתת SQL) ומריצים את שאילתת ה-SQL הבאה בלחיצה על Run (הפעלה).
CREATE OR REPLACE TABLE `PROJECT_ID.mlops.chicago`
AS (
    WITH
      taxitrips AS (
      SELECT
        trip_start_timestamp,
        trip_end_timestamp,
        trip_seconds,
        trip_miles,
        payment_type,
        pickup_longitude,
        pickup_latitude,
        dropoff_longitude,
        dropoff_latitude,
        tips,
        tolls,
        fare,
        pickup_community_area,
        dropoff_community_area,
        company,
        unique_key
      FROM
        `bigquery-public-data.chicago_taxi_trips.taxi_trips`
      WHERE pickup_longitude IS NOT NULL
      AND pickup_latitude IS NOT NULL
      AND dropoff_longitude IS NOT NULL
      AND dropoff_latitude IS NOT NULL
      AND trip_miles > 0
      AND trip_seconds > 0
      AND fare > 0
      AND EXTRACT(YEAR FROM trip_start_timestamp) = 2019
    )

    SELECT
      trip_start_timestamp,
      EXTRACT(MONTH from trip_start_timestamp) as trip_month,
      EXTRACT(DAY from trip_start_timestamp) as trip_day,
      EXTRACT(DAYOFWEEK from trip_start_timestamp) as trip_day_of_week,
      EXTRACT(HOUR from trip_start_timestamp) as trip_hour,
      trip_seconds,
      trip_miles,
      payment_type,
      ST_AsText(
          ST_SnapToGrid(ST_GeogPoint(pickup_longitude, pickup_latitude), 0.1)
      ) AS pickup_grid,
      ST_AsText(
          ST_SnapToGrid(ST_GeogPoint(dropoff_longitude, dropoff_latitude), 0.1)
      ) AS dropoff_grid,
      ST_Distance(
          ST_GeogPoint(pickup_longitude, pickup_latitude),
          ST_GeogPoint(dropoff_longitude, dropoff_latitude)
      ) AS euclidean,
      CONCAT(
          ST_AsText(ST_SnapToGrid(ST_GeogPoint(pickup_longitude,
              pickup_latitude), 0.1)),
          ST_AsText(ST_SnapToGrid(ST_GeogPoint(dropoff_longitude,
              dropoff_latitude), 0.1))
      ) AS loc_cross,
      IF((tips/fare >= 0.2), 1, 0) AS tip_bin,
      tips,
      tolls,
      fare,
      pickup_longitude,
      pickup_latitude,
      dropoff_longitude,
      dropoff_latitude,
      pickup_community_area,
      dropoff_community_area,
      company,
      unique_key,
      trip_end_timestamp
    FROM
      taxitrips
    LIMIT 1000000
)
השאילתה הזו יוצרת את הטבלה
<PROJECT_ID>.mlops.chicagoומאכלסת אותה בנתונים מהטבלה הציבוריתbigquery-public-data.chicago_taxi_trips.taxi_trips.כדי לראות את הסכימה של הטבלה, לוחצים על מעבר לטבלה ואז על הכרטיסייה סכימה.
כדי לראות את תוכן הטבלה, לוחצים על הכרטיסייה תצוגה מקדימה.
יצירה והעלאה של חבילת אימון בהתאמה אישית
בקטע הזה יוצרים חבילת Python שמכילה את הקוד שקורא את מערך הנתונים, מפצל את הנתונים למערכי אימון ובדיקה ומאמן את המודל המותאם אישית. החבילה תופעל כאחת מהמשימות בצינור. מידע נוסף זמין במאמר בנושא יצירת אפליקציית אימון ב-Python לקונטיינר מוכן מראש.
יצירת חבילת אימון בהתאמה אישית
ב-notebook של Colab, יוצרים תיקיות ראשיות לאפליקציית האימון:
!mkdir -p training_package/trainerיוצרים קובץ
__init__.pyבכל תיקייה כדי להפוך אותה לחבילה באמצעות הפקודה הבאה:! touch training_package/__init__.py ! touch training_package/trainer/__init__.pyהקבצים והתיקיות החדשים יופיעו בחלונית תיקייה קבצים.
בחלונית Files, יוצרים קובץ בשם
task.pyבתיקייה training_package/trainer עם התוכן הבא.# Import the libraries from sklearn.model_selection import train_test_split, cross_val_score from sklearn.preprocessing import OneHotEncoder, StandardScaler from google.cloud import bigquery, bigquery_storage from sklearn.ensemble import RandomForestRegressor from sklearn.compose import ColumnTransformer from sklearn.pipeline import Pipeline from google import auth from scipy import stats import numpy as np import argparse import joblib import pickle import csv import os # add parser arguments parser = argparse.ArgumentParser() parser.add_argument('--project-id', dest='project_id', type=str, help='Project ID.') parser.add_argument('--training-dir', dest='training_dir', default=os.getenv("AIP_MODEL_DIR"), type=str, help='Dir to save the data and the trained model.') parser.add_argument('--bq-source', dest='bq_source', type=str, help='BigQuery data source for training data.') args = parser.parse_args() # data preparation code BQ_QUERY = """ with tmp_table as ( SELECT trip_seconds, trip_miles, fare, tolls, company, pickup_latitude, pickup_longitude, dropoff_latitude, dropoff_longitude, DATETIME(trip_start_timestamp, 'America/Chicago') trip_start_timestamp, DATETIME(trip_end_timestamp, 'America/Chicago') trip_end_timestamp, CASE WHEN (pickup_community_area IN (56, 64, 76)) OR (dropoff_community_area IN (56, 64, 76)) THEN 1 else 0 END is_airport, FROM `{}` WHERE dropoff_latitude IS NOT NULL and dropoff_longitude IS NOT NULL and pickup_latitude IS NOT NULL and pickup_longitude IS NOT NULL and fare > 0 and trip_miles > 0 and MOD(ABS(FARM_FINGERPRINT(unique_key)), 100) between 0 and 99 ORDER BY RAND() LIMIT 10000) SELECT *, EXTRACT(YEAR FROM trip_start_timestamp) trip_start_year, EXTRACT(MONTH FROM trip_start_timestamp) trip_start_month, EXTRACT(DAY FROM trip_start_timestamp) trip_start_day, EXTRACT(HOUR FROM trip_start_timestamp) trip_start_hour, FORMAT_DATE('%a', DATE(trip_start_timestamp)) trip_start_day_of_week FROM tmp_table """.format(args.bq_source) # Get default credentials credentials, project = auth.default() bqclient = bigquery.Client(credentials=credentials, project=args.project_id) bqstorageclient = bigquery_storage.BigQueryReadClient(credentials=credentials) df = ( bqclient.query(BQ_QUERY) .result() .to_dataframe(bqstorage_client=bqstorageclient) ) # Add 'N/A' for missing 'Company' df.fillna(value={'company':'N/A','tolls':0}, inplace=True) # Drop rows containing null data. df.dropna(how='any', axis='rows', inplace=True) # Pickup and dropoff locations distance df['abs_distance'] = (np.hypot(df['dropoff_latitude']-df['pickup_latitude'], df['dropoff_longitude']-df['pickup_longitude']))*100 # Remove extremes, outliers possible_outliers_cols = ['trip_seconds', 'trip_miles', 'fare', 'abs_distance'] df=df[(np.abs(stats.zscore(df[possible_outliers_cols].astype(float))) < 3).all(axis=1)].copy() # Reduce location accuracy df=df.round({'pickup_latitude': 3, 'pickup_longitude': 3, 'dropoff_latitude':3, 'dropoff_longitude':3}) # Drop the timestamp col X=df.drop(['trip_start_timestamp', 'trip_end_timestamp'],axis=1) # Split the data into train and test X_train, X_test = train_test_split(X, test_size=0.10, random_state=123) ## Format the data for batch predictions # select string cols string_cols = X_test.select_dtypes(include='object').columns # Add quotes around string fields X_test[string_cols] = X_test[string_cols].apply(lambda x: '\"' + x + '\"') # Add quotes around column names X_test.columns = ['\"' + col + '\"' for col in X_test.columns] # Save DataFrame to csv X_test.to_csv(os.path.join(args.training_dir,"test.csv"),index=False,quoting=csv.QUOTE_NONE, escapechar=' ') # Save test data without the target for batch predictions X_test.drop('\"fare\"',axis=1,inplace=True) X_test.to_csv(os.path.join(args.training_dir,"test_no_target.csv"),index=False,quoting=csv.QUOTE_NONE, escapechar=' ') # Separate the target column y_train=X_train.pop('fare') # Get the column indexes col_index_dict = {col: idx for idx, col in enumerate(X_train.columns)} # Create a column transformer pipeline ct_pipe = ColumnTransformer(transformers=[ ('hourly_cat', OneHotEncoder(categories=[range(0,24)], sparse = False), [col_index_dict['trip_start_hour']]), ('dow', OneHotEncoder(categories=[['Mon', 'Tue', 'Sun', 'Wed', 'Sat', 'Fri', 'Thu']], sparse = False), [col_index_dict['trip_start_day_of_week']]), ('std_scaler', StandardScaler(), [ col_index_dict['trip_start_year'], col_index_dict['abs_distance'], col_index_dict['pickup_longitude'], col_index_dict['pickup_latitude'], col_index_dict['dropoff_longitude'], col_index_dict['dropoff_latitude'], col_index_dict['trip_miles'], col_index_dict['trip_seconds']]) ]) # Add the random-forest estimator to the pipeline rfr_pipe = Pipeline([ ('ct', ct_pipe), ('forest_reg', RandomForestRegressor( n_estimators = 20, max_features = 1.0, n_jobs = -1, random_state = 3, max_depth=None, max_leaf_nodes=None, )) ]) # train the model rfr_score = cross_val_score(rfr_pipe, X_train, y_train, scoring = 'neg_mean_squared_error', cv = 5) rfr_rmse = np.sqrt(-rfr_score) print ("Crossvalidation RMSE:",rfr_rmse.mean()) final_model=rfr_pipe.fit(X_train, y_train) # Save the model pipeline with open(os.path.join(args.training_dir,"model.joblib"), 'wb') as model_file: pickle.dump(final_model, model_file)הקוד מבצע את המשימות הבאות:
- בחירת תכונות.
- המרת נתוני השעה של האיסוף וההורדה משעון UTC לשעון המקומי בשיקגו.
- שליפת התאריך, השעה, היום בשבוע, החודש והשנה מתוך התאריך והשעה של האיסוף.
- חישוב משך הנסיעה לפי שעת ההתחלה ושעת הסיום.
- זיהוי וסימון של נסיעות שהתחילו או הסתיימו בשדה תעופה על סמך אזורי הקהילה.
- מודל הרגרסיה של יער אקראי מאומן כדי לחזות את מחיר הנסיעה במונית באמצעות מסגרת scikit-learn.
המודל שאומן נשמר בקובץ pickle
model.joblib.הגישה שנבחרה והנדסת פיצ'רים (feature engineering) מבוססות על ניתוח וחיפוש נתונים ב-Predicting Chicago Taxi Fare.
בחלונית Files, יוצרים קובץ בשם
setup.pyבתיקייה training_package עם התוכן הבא.from setuptools import find_packages from setuptools import setup REQUIRED_PACKAGES=["google-cloud-bigquery[pandas]","google-cloud-bigquery-storage"] setup( name='trainer', version='0.1', install_requires=REQUIRED_PACKAGES, packages=find_packages(), include_package_data=True, description='Training application package for chicago taxi trip fare prediction.' )במחברת, מריצים את הפקודה
setup.pyכדי ליצור את הפצת המקור לאפליקציית האימון:! cd training_package && python setup.py sdist --formats=gztar && cd ..
בסוף הקטע הזה, בחלונית Files צריכים להופיע הקבצים והתיקיות הבאים מתחת ל-training-package.
dist
  trainer-0.1.tar.gz
trainer
  __init__.py
  task.py
trainer.egg-info
__init__.py
setup.py
העלאת חבילת האימון המותאמת אישית ל-Cloud Storage
יצירת קטגוריה של Cloud Storage.
REGION="REGION"
BUCKET_NAME = "BUCKET_NAME"
BUCKET_URI = f"gs://{BUCKET_NAME}"

! gcloud storage buckets create gs://$BUCKET_URI --location=$REGION --project=$PROJECT_ID
מחליפים את ערכי הפרמטרים הבאים:
REGION: בוחרים את אותו אזור שבחרתם כשיוצרים את מחברת Colab.
BUCKET_NAME: שם הקטגוריה.
מעלים את חבילת האימון לקטגוריה של Cloud Storage.
# Copy the training package to the bucket
! gcloud storage cp training_package/dist/trainer-0.1.tar.gz $BUCKET_URI/
פיתוח צינור עיבוד נתונים
צינור עיבוד נתונים הוא תיאור של תהליך עבודה של MLOps כגרף של שלבים שנקראים משימות של צינור עיבוד נתונים.
בקטע הזה מגדירים את המשימות של צינור העיבוד, מהדרים אותן ל-YAML ורושמים את צינור העיבוד ב-Artifact Registry כדי שאפשר יהיה לשלוט בגרסאות שלו ולהפעיל אותו כמה פעמים, על ידי משתמש אחד או כמה משתמשים.
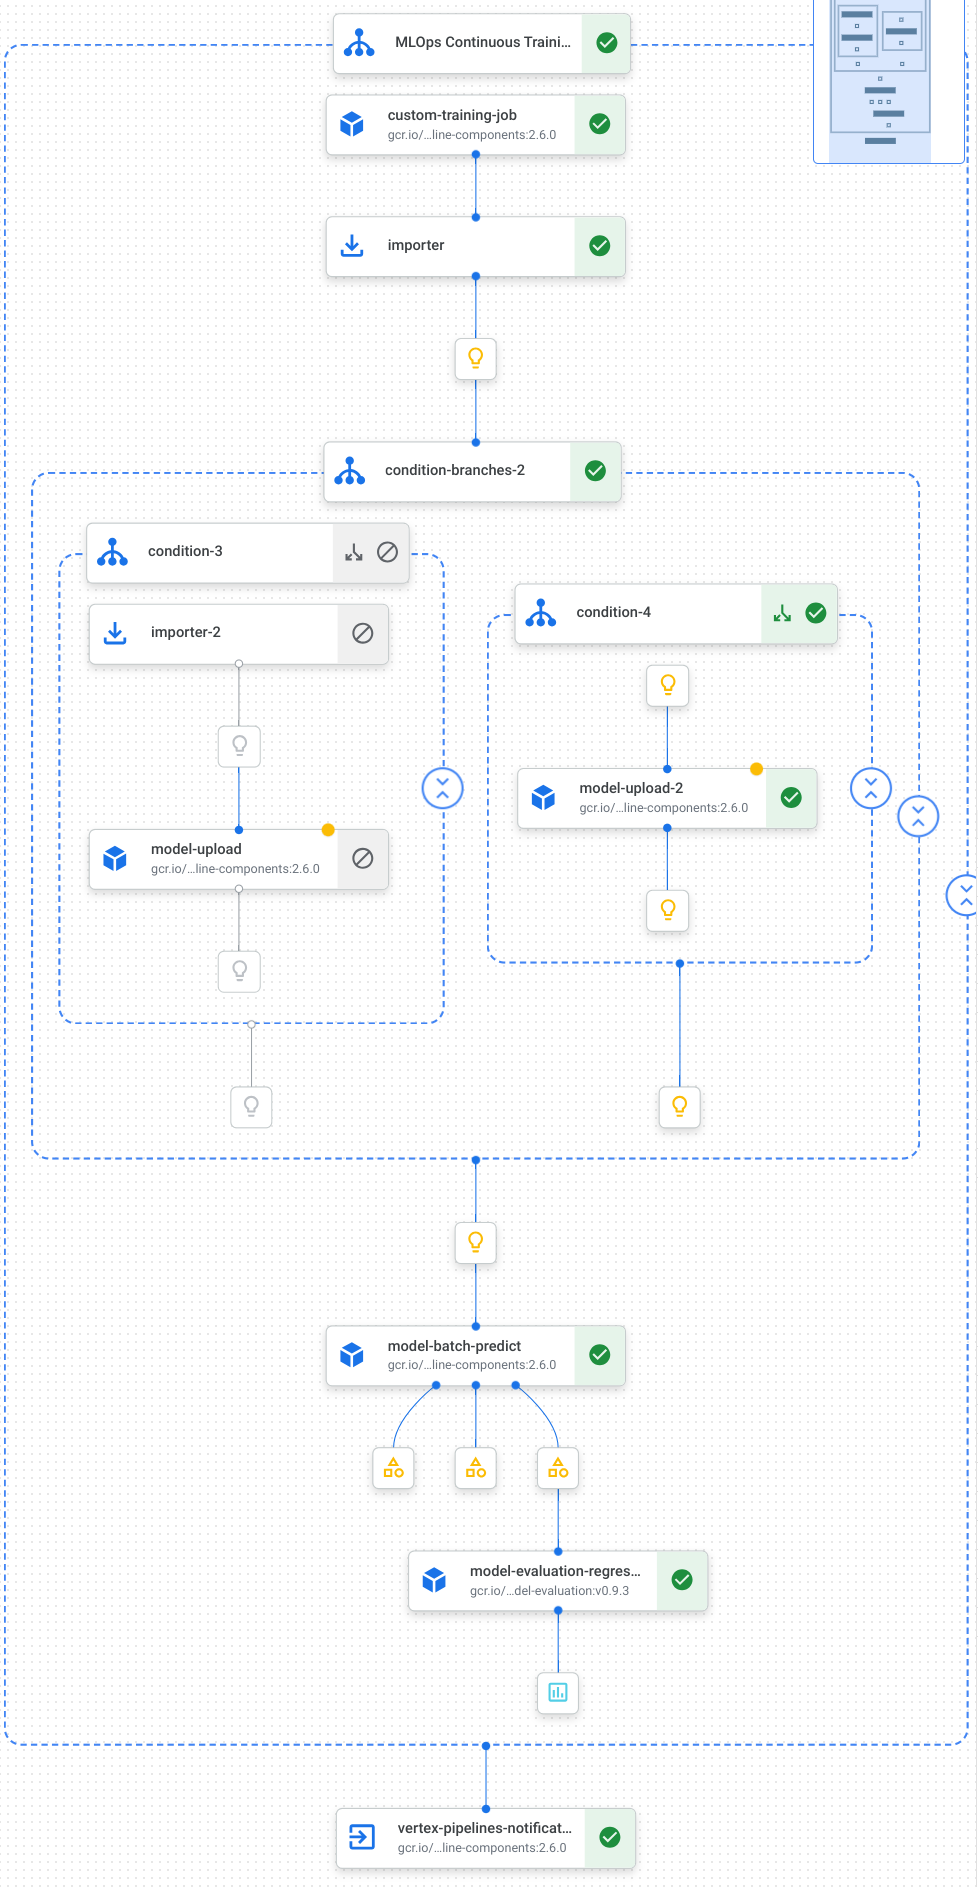
הנה תרשים שמציג את המשימות בצינור שלנו, כולל אימון המודל, העלאת המודל, הערכת המודל והתראה באימייל:
מידע נוסף זמין במאמר בנושא יצירת תבניות של צינורות.
הגדרת קבועים ואתחול לקוחות
במחברת, מגדירים את הקבועים שישמשו בשלבים הבאים:
import os

EMAIL_RECIPIENTS = [ "NOTIFY_EMAIL" ]
PIPELINE_ROOT = "{}/pipeline_root/chicago-taxi-pipe".format(BUCKET_URI)
PIPELINE_NAME = "vertex-pipeline-datatrigger-tutorial"
WORKING_DIR = f"{PIPELINE_ROOT}/mlops-datatrigger-tutorial"
os.environ['AIP_MODEL_DIR'] = WORKING_DIR
EXPERIMENT_NAME = PIPELINE_NAME + "-experiment"
PIPELINE_FILE = PIPELINE_NAME + ".yaml"
מחליפים את
NOTIFY_EMAILבכתובת אימייל. בסיום העבודה בצינור, בין אם היא הושלמה בהצלחה ובין אם לא, נשלח אימייל לכתובת האימייל הזו.מאתחלים את Vertex AI SDK עם הפרויקט, קטגוריית הביניים, המיקום והניסוי.
from google.cloud import aiplatform

aiplatform.init(
    project=PROJECT_ID,
    staging_bucket=BUCKET_URI,
    location=REGION,
    experiment=EXPERIMENT_NAME)

aiplatform.autolog()
הגדרת המשימות בצינור עיבוד הנתונים
במחברת, מגדירים את צינור עיבוד הנתונים custom_model_training_evaluation_pipeline:
from kfp import dsl
from kfp.dsl import importer
from kfp.dsl import OneOf
from google_cloud_pipeline_components.v1.custom_job import CustomTrainingJobOp
from google_cloud_pipeline_components.types import artifact_types
from google_cloud_pipeline_components.v1.model import ModelUploadOp
from google_cloud_pipeline_components.v1.batch_predict_job import ModelBatchPredictOp
from google_cloud_pipeline_components.v1.model_evaluation import ModelEvaluationRegressionOp
from google_cloud_pipeline_components.v1.vertex_notification_email import VertexNotificationEmailOp
from google_cloud_pipeline_components.v1.endpoint import ModelDeployOp
from google_cloud_pipeline_components.v1.endpoint import EndpointCreateOp
from google.cloud import aiplatform

# define the train-deploy pipeline
@dsl.pipeline(name="custom-model-training-evaluation-pipeline")
def custom_model_training_evaluation_pipeline(
    project: str,
    location: str,
    training_job_display_name: str,
    worker_pool_specs: list,
    base_output_dir: str,
    prediction_container_uri: str,
    model_display_name: str,
    batch_prediction_job_display_name: str,
    target_field_name: str,
    test_data_gcs_uri: list,
    ground_truth_gcs_source: list,
    batch_predictions_gcs_prefix: str,
    batch_predictions_input_format: str="csv",
    batch_predictions_output_format: str="jsonl",
    ground_truth_format: str="csv",
    parent_model_resource_name: str=None,
    parent_model_artifact_uri: str=None,
    existing_model: bool=False

):
    # Notification task
    notify_task = VertexNotificationEmailOp(
                    recipients= EMAIL_RECIPIENTS
                    )
    with dsl.ExitHandler(notify_task, name='MLOps Continuous Training Pipeline'):
        # Train the model
        custom_job_task = CustomTrainingJobOp(
                                    project=project,
                                    display_name=training_job_display_name,
                                    worker_pool_specs=worker_pool_specs,
                                    base_output_directory=base_output_dir,
                                    location=location
                            )

        # Import the unmanaged model
        import_unmanaged_model_task = importer(
                                        artifact_uri=base_output_dir,
                                        artifact_class=artifact_types.UnmanagedContainerModel,
                                        metadata={
                                            "containerSpec": {
                                                "imageUri": prediction_container_uri,
                                            },
                                        },
                                    ).after(custom_job_task)

        with dsl.If(existing_model == True):
            # Import the parent model to upload as a version
            import_registry_model_task = importer(
                                        artifact_uri=parent_model_artifact_uri,
                                        artifact_class=artifact_types.VertexModel,
                                        metadata={
                                            "resourceName": parent_model_resource_name
                                        },
                                    ).after(import_unmanaged_model_task)
            # Upload the model as a version
            model_version_upload_op = ModelUploadOp(
                                    project=project,
                                    location=location,
                                    display_name=model_display_name,
                                    parent_model=import_registry_model_task.outputs["artifact"],
                                    unmanaged_container_model=import_unmanaged_model_task.outputs["artifact"],
                                )

        with dsl.Else():
            # Upload the model
            model_upload_op = ModelUploadOp(
                                    project=project,
                                    location=location,
                                    display_name=model_display_name,
                                    unmanaged_container_model=import_unmanaged_model_task.outputs["artifact"],
                                )
        # Get the model (or model version)
        model_resource = OneOf(model_version_upload_op.outputs["model"], model_upload_op.outputs["model"])

        # Batch prediction
        batch_predict_task = ModelBatchPredictOp(
                            project= project,
                            job_display_name= batch_prediction_job_display_name,
                            model= model_resource,
                            location= location,
                            instances_format= batch_predictions_input_format,
                            predictions_format= batch_predictions_output_format,
                            gcs_source_uris= test_data_gcs_uri,
                            gcs_destination_output_uri_prefix= batch_predictions_gcs_prefix,
                            machine_type= 'n1-standard-2'
                            )
        # Evaluation task
        evaluation_task = ModelEvaluationRegressionOp(
                            project= project,
                            target_field_name= target_field_name,
                            location= location,
                            # model= model_resource,
                            predictions_format= batch_predictions_output_format,
                            predictions_gcs_source= batch_predict_task.outputs["gcs_output_directory"],
                            ground_truth_format= ground_truth_format,
                            ground_truth_gcs_source= ground_truth_gcs_source
                            )
    return
צינור עיבוד הנתונים מורכב מתרשים של משימות שמשתמשות בGoogle Cloud רכיבי צינור עיבוד הנתונים הבאים:
CustomTrainingJobOp: מריץ משימות אימון מותאמות אישית ב-Vertex AI.
ModelUploadOp: העלאת מודל למידת המכונה שאומן למאגר המודלים.
ModelBatchPredictOp: יצירת משימת חיזויים רבים בבת אחת.
ModelEvaluationRegressionOp: הערכה של משימת אצווה של רגרסיה.VertexNotificationEmailOp: שליחת התראות באימייל.
לקמפל את צינור עיבוד הנתונים
קומפילציה של צינור עיבוד הנתונים באמצעות הקומפיילר של Kubeflow Pipelines (KFP) לקובץ YAML שמכיל ייצוג הרמטי של צינור עיבוד הנתונים.
from kfp import dsl
from kfp import compiler

compiler.Compiler().compile(
    pipeline_func=custom_model_training_evaluation_pipeline,
    package_path="{}.yaml".format(PIPELINE_NAME),
)
קובץ YAML בשם vertex-pipeline-datatrigger-tutorial.yaml אמור להופיע בספרייה הפעילה.
העלאת הצינור כתבנית
יוצרים מאגר מסוג
KFPב-Artifact Registry.REPO_NAME = "mlops" # Create a repo in the artifact registry ! gcloud artifacts repositories create $REPO_NAME --location=$REGION --repository-format=KFPמעלים את צינור עיבוד הנתונים שעבר קומפילציה למאגר.
from kfp.registry import RegistryClient

host = f"https://{REGION}-kfp.pkg.dev/{PROJECT_ID}/{REPO_NAME}"
client = RegistryClient(host=host)
TEMPLATE_NAME, VERSION_NAME = client.upload_pipeline(
file_name=PIPELINE_FILE,
tags=["v1", "latest"],
extra_headers={"description":"This is an example pipeline template."})
TEMPLATE_URI = f"https://{REGION}-kfp.pkg.dev/{PROJECT_ID}/{REPO_NAME}/{TEMPLATE_NAME}/latest"
במסוף Google Cloud , מוודאים שהתבנית מופיעה בPipeline Templates.
הפעלה ידנית של צינור לעיבוד נתונים
כדי לוודא שהצינור פועל, מריצים אותו באופן ידני.
במחברת, מציינים את הפרמטרים שנדרשים להרצת צינור העיבוד כמשימה.
DATASET_NAME = "mlops" TABLE_NAME = "chicago" worker_pool_specs = [{ "machine_spec": {"machine_type": "e2-highmem-2"}, "replica_count": 1, "python_package_spec":{ "executor_image_uri": "us-docker.pkg.dev/vertex-ai/training/sklearn-cpu.1-0:latest", "package_uris": [f"{BUCKET_URI}/trainer-0.1.tar.gz"], "python_module": "trainer.task", "args":["--project-id",PROJECT_ID, "--training-dir",f"/gcs/{BUCKET_NAME}","--bq-source",f"{PROJECT_ID}.{DATASET_NAME}.{TABLE_NAME}"] }, }] parameters = { "project": PROJECT_ID, "location": REGION, "training_job_display_name": "taxifare-prediction-training-job", "worker_pool_specs": worker_pool_specs, "base_output_dir": BUCKET_URI, "prediction_container_uri": "us-docker.pkg.dev/vertex-ai/prediction/sklearn-cpu.1-0:latest", "model_display_name": "taxifare-prediction-model", "batch_prediction_job_display_name": "taxifare-prediction-batch-job", "target_field_name": "fare", "test_data_gcs_uri": [f"{BUCKET_URI}/test_no_target.csv"], "ground_truth_gcs_source": [f"{BUCKET_URI}/test.csv"], "batch_predictions_gcs_prefix": f"{BUCKET_URI}/batch_predict_output", "existing_model": False }יצירה והפעלה של עבודת פייפליין.
# Create a pipeline job
job = aiplatform.PipelineJob(
    display_name="triggered_custom_regression_evaluation",
    template_path=TEMPLATE_URI ,
    parameter_values=parameters,
    pipeline_root=BUCKET_URI,
    enable_caching=False
)
# Run the pipeline job
job.run()
השלמת העבודה נמשכת כ-30 דקות.
במסוף, אמורה להופיע הפעלת צינור חדשה בדף Pipelines:
אחרי שהפעלת צינור העיבוד תושלם, אמור להופיע מודל חדש בשם
taxifare-prediction-modelאו גרסה חדשה של מודל ב-מרשם המודלים של Vertex AI:אמורה להופיע גם משימת חיזוי חדשה של קבוצת נתונים:
הפעלה אוטומטית של צינור לעיבוד נתונים
יש שתי דרכים להפעיל את צינור הנתונים באופן אוטומטי: לפי לוח זמנים או כשנתונים חדשים מוכנסים למערך הנתונים.
הפעלת צינור עיבוד הנתונים לפי לוח זמנים
ב-notebook, קוראים ל-
PipelineJob.create_schedule.job_schedule = job.create_schedule( display_name="mlops tutorial schedule", cron="0 0 1 * *", # max_concurrent_run_count=1, max_run_count=12, )הביטוי
cronמתזמן את העבודה כך שתפעל ב-1 בכל חודש בשעה 00:00 UTC.במדריך הזה אנחנו לא רוצים שכמה משימות יפעלו בו-זמנית, ולכן אנחנו מגדירים את
max_concurrent_run_countל-1.ב Google Cloud מסוף, מוודאים ש-
scheduleמופיע בPipelines schedules.
הפעלת צינור העיבוד כשיש נתונים חדשים
יצירת פונקציה עם טריגר Eventarc
יוצרים Cloud Function (דור שני) שמפעיל את צינור הנתונים בכל פעם שנתונים חדשים מוכנסים לטבלה ב-BigQuery.
באופן ספציפי, אנחנו משתמשים ב-Eventarc כדי להפעיל את הפונקציה בכל פעם שמתרחש אירוע google.cloud.bigquery.v2.JobService.InsertJob. לאחר מכן הפונקציה מפעילה את תבנית צינור עיבוד הנתונים.
מידע נוסף זמין במאמרים בנושא טריגרים של Eventarc וסוגי אירועים נתמכים.
במסוף Google Cloud , נכנסים לדף פונקציות Cloud Run.
לוחצים על הלחצן יצירת פונקציה. בדף Configuration (הגדרה):
בוחרים באפשרות דור שני כסביבה.
בשדה Function name (שם הפונקציה), משתמשים ב-mlops.
בשדה Region, בוחרים את אותו אזור שבו נמצאים קטגוריה של Cloud Storage ומאגר Artifact Registry.
בקטע Trigger (טריגר), בוחרים באפשרות Other trigger (טריגר אחר). החלונית Eventarc Trigger תיפתח.
בקטע Trigger Type (סוג הטריגר), בוחרים באפשרות Google Sources (מקורות Google).
בשדה ספק אירועים, בוחרים באפשרות BigQuery.
בשדה סוג האירוע, בוחרים באפשרות
google.cloud.bigquery.v2.JobService.InsertJob.בשדה Resource, בוחרים באפשרות Specific resource ומציינים את טבלת BigQuery.
projects/PROJECT_ID/datasets/mlops/tables/chicagoבשדה Region (אזור), בוחרים מיקום לטריגר Eventarc, אם רלוונטי. מידע נוסף זמין במאמר בנושא מיקום הטריגר.
לוחצים על Save Trigger (שמירת הטריגר).
אם מתבקשים להקצות תפקידים לחשבונות שירות, לוחצים על Grant All(הקצאת הכל).
לוחצים על הבא כדי לעבור לדף קוד. בדף Code:
מגדירים את סביבת זמן הריצה ל-Python 3.12.
מגדירים את Entry point ל-
mlops_entrypoint.בעורך המובנה, פותחים את הקובץ
main.pyומחליפים את התוכן שלו בתוכן הבא:מחליפים את
PROJECT_ID,REGION,BUCKET_NAMEבערכים שבהם השתמשתם קודם.import json import functions_framework import requests import google.auth import google.auth.transport.requests # CloudEvent function to be triggered by an Eventarc Cloud Audit Logging trigger # Note: this is NOT designed for second-party (Cloud Audit Logs -> Pub/Sub) triggers! @functions_framework.cloud_event def mlops_entrypoint(cloudevent): # Print out the CloudEvent's (required) `type` property # See https://github.com/cloudevents/spec/blob/v1.0.1/spec.md#type print(f"Event type: {cloudevent['type']}") # Print out the CloudEvent's (optional) `subject` property # See https://github.com/cloudevents/spec/blob/v1.0.1/spec.md#subject if 'subject' in cloudevent: # CloudEvent objects don't support `get` operations. # Use the `in` operator to verify `subject` is present. print(f"Subject: {cloudevent['subject']}") # Print out details from the `protoPayload` # This field encapsulates a Cloud Audit Logging entry # See https://cloud.google.com/logging/docs/audit#audit_log_entry_structure payload = cloudevent.data.get("protoPayload") if payload: print(f"API method: {payload.get('methodName')}") print(f"Resource name: {payload.get('resourceName')}") print(f"Principal: {payload.get('authenticationInfo', dict()).get('principalEmail')}") row_count = payload.get('metadata', dict()).get('tableDataChange',dict()).get('insertedRowsCount') print(f"No. of rows: {row_count} !!") if row_count: if int(row_count) > 0: print ("Pipeline trigger Condition met !!") submit_pipeline_job() else: print ("No pipeline triggered !!!") def submit_pipeline_job(): PROJECT_ID = 'PROJECT_ID' REGION = 'REGION' BUCKET_NAME = "BUCKET_NAME" DATASET_NAME = "mlops" TABLE_NAME = "chicago" base_output_dir = BUCKET_NAME BUCKET_URI = "gs://{}".format(BUCKET_NAME) PIPELINE_ROOT = "{}/pipeline_root/chicago-taxi-pipe".format(BUCKET_URI) PIPELINE_NAME = "vertex-mlops-pipeline-tutorial" EXPERIMENT_NAME = PIPELINE_NAME + "-experiment" REPO_NAME ="mlops" TEMPLATE_NAME="custom-model-training-evaluation-pipeline" TRAINING_JOB_DISPLAY_NAME="taxifare-prediction-training-job" worker_pool_specs = [{ "machine_spec": {"machine_type": "e2-highmem-2"}, "replica_count": 1, "python_package_spec":{ "executor_image_uri": "us-docker.pkg.dev/vertex-ai/training/sklearn-cpu.1-0:latest", "package_uris": [f"{BUCKET_URI}/trainer-0.1.tar.gz"], "python_module": "trainer.task", "args":["--project-id",PROJECT_ID,"--training-dir",f"/gcs/{BUCKET_NAME}","--bq-source",f"{PROJECT_ID}.{DATASET_NAME}.{TABLE_NAME}"] }, }] parameters = { "project": PROJECT_ID, "location": REGION, "training_job_display_name": "taxifare-prediction-training-job", "worker_pool_specs": worker_pool_specs, "base_output_dir": BUCKET_URI, "prediction_container_uri": "us-docker.pkg.dev/vertex-ai/prediction/sklearn-cpu.1-0:latest", "model_display_name": "taxifare-prediction-model", "batch_prediction_job_display_name": "taxifare-prediction-batch-job", "target_field_name": "fare", "test_data_gcs_uri": [f"{BUCKET_URI}/test_no_target.csv"], "ground_truth_gcs_source": [f"{BUCKET_URI}/test.csv"], "batch_predictions_gcs_prefix": f"{BUCKET_URI}/batch_predict_output", "existing_model": False } TEMPLATE_URI = f"https://{REGION}-kfp.pkg.dev/{PROJECT_ID}/{REPO_NAME}/{TEMPLATE_NAME}/latest" print("TEMPLATE URI: ", TEMPLATE_URI) request_body = { "name": PIPELINE_NAME, "displayName": PIPELINE_NAME, "runtimeConfig":{ "gcsOutputDirectory": PIPELINE_ROOT, "parameterValues": parameters, }, "templateUri": TEMPLATE_URI } pipeline_url = "https://us-central1-aiplatform.googleapis.com/v1/projects/{}/locations/{}/pipelineJobs".format(PROJECT_ID, REGION) creds, project = google.auth.default() auth_req = google.auth.transport.requests.Request() creds.refresh(auth_req) headers = { 'Authorization': 'Bearer {}'.format(creds.token), 'Content-Type': 'application/json; charset=utf-8' } response = requests.request("POST", pipeline_url, headers=headers, data=json.dumps(request_body)) print(response.text)פותחים את הקובץ
requirements.txtומחליפים את התוכן שלו בתוכן הבא:requests==2.31.0 google-auth==2.25.1
לוחצים על Deploy (פריסה) כדי לפרוס את הפונקציה.
הוספת נתונים להפעלת הצינור
במסוף Google Cloud , עוברים אל BigQuery Studio.
לוחצים על Create SQL Query (יצירת שאילתת SQL) ומריצים את שאילתת ה-SQL הבאה בלחיצה על Run (הפעלה).
INSERT INTO `PROJECT_ID.mlops.chicago`
(
    WITH
      taxitrips AS (
      SELECT
        trip_start_timestamp,
        trip_end_timestamp,
        trip_seconds,
        trip_miles,
        payment_type,
        pickup_longitude,
        pickup_latitude,
        dropoff_longitude,
        dropoff_latitude,
        tips,
        tolls,
        fare,
        pickup_community_area,
        dropoff_community_area,
        company,
        unique_key
      FROM
        `bigquery-public-data.chicago_taxi_trips.taxi_trips`
      WHERE pickup_longitude IS NOT NULL
      AND pickup_latitude IS NOT NULL
      AND dropoff_longitude IS NOT NULL
      AND dropoff_latitude IS NOT NULL
      AND trip_miles > 0
      AND trip_seconds > 0
      AND fare > 0
      AND EXTRACT(YEAR FROM trip_start_timestamp) = 2022
    )

    SELECT
      trip_start_timestamp,
      EXTRACT(MONTH from trip_start_timestamp) as trip_month,
      EXTRACT(DAY from trip_start_timestamp) as trip_day,
      EXTRACT(DAYOFWEEK from trip_start_timestamp) as trip_day_of_week,
      EXTRACT(HOUR from trip_start_timestamp) as trip_hour,
      trip_seconds,
      trip_miles,
      payment_type,
      ST_AsText(
          ST_SnapToGrid(ST_GeogPoint(pickup_longitude, pickup_latitude), 0.1)
      ) AS pickup_grid,
      ST_AsText(
          ST_SnapToGrid(ST_GeogPoint(dropoff_longitude, dropoff_latitude), 0.1)
      ) AS dropoff_grid,
      ST_Distance(
          ST_GeogPoint(pickup_longitude, pickup_latitude),
          ST_GeogPoint(dropoff_longitude, dropoff_latitude)
      ) AS euclidean,
      CONCAT(
          ST_AsText(ST_SnapToGrid(ST_GeogPoint(pickup_longitude,
              pickup_latitude), 0.1)),
          ST_AsText(ST_SnapToGrid(ST_GeogPoint(dropoff_longitude,
              dropoff_latitude), 0.1))
      ) AS loc_cross,
      IF((tips/fare >= 0.2), 1, 0) AS tip_bin,
      tips,
      tolls,
      fare,
      pickup_longitude,
      pickup_latitude,
      dropoff_longitude,
      dropoff_latitude,
      pickup_community_area,
      dropoff_community_area,
      company,
      unique_key,
      trip_end_timestamp
    FROM
      taxitrips
    LIMIT 1000000
)
שאילתת ה-SQL הזו מוסיפה שורות חדשות לטבלה.
כדי לבדוק אם האירוע הופעל, מחפשים את
pipeline trigger condition metביומן של הפונקציה.אם הפונקציה מופעלת בהצלחה, אמורה להופיע הרצה חדשה של צינור עיבוד הנתונים ב-Vertex AI Pipelines. השלמת פעולת הצינור נמשכת כ-30 דקות.
הסרת המשאבים
כדי לנקות את כל Google Cloud המשאבים שבהם השתמשתם בפרויקט הזה, אתם יכולים למחוק את Google Cloud הפרויקט שבו השתמשתם במדריך.
אפשר גם למחוק את המשאבים הבודדים שיצרתם לצורך המדריך הזה.
כדי למחוק את המודל:
בקטע Vertex AI, עוברים לדף מרשם המודלים.
לצד שם המודל, לוחצים על תפריט הפעולות ובוחרים באפשרות מחיקת המודל.
מחיקת ההרצות של צינורות העיבוד:
עוברים לדף Pipeline runs.
לצד השם של כל הרצה של צינור, לוחצים על התפריט פעולות ובוחרים באפשרות מחיקת הרצה של צינור.
מחיקת משימות האימון המותאמות אישית:
לצד השם של כל משימת אימון בהתאמה אישית, לוחצים על התפריט פעולות ובוחרים באפשרות מחיקת משימת אימון בהתאמה אישית.
כדי למחוק את משימות החיזוי באצווה:
לצד השם של כל משימת חיזוי באצווה, לוחצים על התפריט פעולות ובוחרים באפשרות מחיקת משימת חיזוי באצווה.