המרת קידוד של סרטון באמצעות Transcoder API

בדף הזה מוסבר איך ליצור משימת המרת וידאו בסיסית באמצעות הגדרות ברירת המחדל של Transcoder API, ‏ curl, Windows PowerShell או ספריות הלקוח.

אפשר גם לבצע את המדריך למתחילים הזה ישירות במסוף Google Cloud באמצעות אחת משפות התכנות הבאות:

לפני שמתחילים

  1. נכנסים לחשבון Google Cloud . אם אתם משתמשים חדשים ב- Google Cloud, צרו חשבון כדי שתוכלו להעריך את הביצועים של המוצרים שלנו בתרחישים מהעולם האמיתי. לקוחות חדשים מקבלים בחינם גם קרדיט בשווי 300$ להרצה, לבדיקה ולפריסה של עומסי העבודה.
  2. התקינו את ה-CLI של Google Cloud.

  3. אם אתם משתמשים בספק זהויות חיצוני (IdP), קודם אתם צריכים להיכנס ל-CLI של gcloud באמצעות המאגר המאוחד לניהול זהויות.

  4. כדי לאתחל את ה-CLI של gcloud, הריצו את הפקודה הבאה:

    gcloud init
  5. יוצרים או בוחרים Google Cloud פרויקט.

    תפקידים שנדרשים כדי לבחור או ליצור פרויקט

    • Select a project: כדי לבחור פרויקט לא צריך תפקיד IAM ספציפי – אפשר לבחור כל פרויקט שקיבלתם בו תפקיד.
    • יצירת פרויקט: כדי ליצור פרויקט, צריך את התפקיד Project Creator (יצירת פרויקטים) (roles/resourcemanager.projectCreator), שכולל את ההרשאה resourcemanager.projects.create. איך מקצים תפקידים
    • יוצרים Google Cloud פרויקט:

      gcloud projects create PROJECT_ID

      מחליפים את PROJECT_ID בשם של פרויקט Google Cloud שיוצרים.

    • בוחרים את הפרויקט שיצרתם: Google Cloud

      gcloud config set project PROJECT_ID

      מחליפים את PROJECT_ID בשם הפרויקט ב- Google Cloud .

  6. מוודאים שהחיוב מופעל בפרויקט Google Cloud .

  7. מפעילים את Transcoder API:

    תפקידים שנדרשים להפעלת ממשקי API

    כדי להפעיל ממשקי API, צריך את תפקיד ה-IAM 'אדמין של Service Usage' (roles/serviceusage.serviceUsageAdmin), שכולל את ההרשאה serviceusage.services.enable. איך מקצים תפקידים

    gcloud services enable transcoder.googleapis.com
  8. יוצרים פרטי כניסה לאימות מקומי עבור חשבון המשתמש:

    gcloud auth application-default login

    אם מוחזרת שגיאת אימות ואתם משתמשים בספק זהויות חיצוני (IdP), ודאו ש נכנסתם ל-CLI של gcloud באמצעות המאגר המאוחד לניהול זהויות.

  9. מעניקים תפקידים לחשבון המשתמש. מריצים את הפקודה הבאה לכל אחד מהתפקידים הבאים ב-IAM: roles/transcoder.admin, roles/storage.admin

    gcloud projects add-iam-policy-binding PROJECT_ID --member="user:USER_IDENTIFIER" --role=ROLE

    מחליפים את מה שכתוב בשדות הבאים:

    • PROJECT_ID: מזהה הפרויקט.
    • USER_IDENTIFIER: המזהה של חשבון המשתמש . לדוגמה, myemail@example.com.
    • ROLE: תפקיד ה-IAM שאתם מקצים לחשבון המשתמש.
  10. התקינו את ה-CLI של Google Cloud.

  11. אם אתם משתמשים בספק זהויות חיצוני (IdP), קודם אתם צריכים להיכנס ל-CLI של gcloud באמצעות המאגר המאוחד לניהול זהויות.

  12. כדי לאתחל את ה-CLI של gcloud, הריצו את הפקודה הבאה:

    gcloud init
  13. יוצרים או בוחרים Google Cloud פרויקט.

    תפקידים שנדרשים כדי לבחור או ליצור פרויקט

    • Select a project: כדי לבחור פרויקט לא צריך תפקיד IAM ספציפי – אפשר לבחור כל פרויקט שקיבלתם בו תפקיד.
    • יצירת פרויקט: כדי ליצור פרויקט, צריך את התפקיד Project Creator (יצירת פרויקטים) (roles/resourcemanager.projectCreator), שכולל את ההרשאה resourcemanager.projects.create. איך מקצים תפקידים
    • יוצרים Google Cloud פרויקט:

      gcloud projects create PROJECT_ID

      מחליפים את PROJECT_ID בשם של פרויקט Google Cloud שיוצרים.

    • בוחרים את הפרויקט שיצרתם: Google Cloud

      gcloud config set project PROJECT_ID

      מחליפים את PROJECT_ID בשם הפרויקט ב- Google Cloud .

  14. מוודאים שהחיוב מופעל בפרויקט Google Cloud .

  15. מפעילים את Transcoder API:

    תפקידים שנדרשים להפעלת ממשקי API

    כדי להפעיל ממשקי API, צריך את תפקיד ה-IAM 'אדמין של Service Usage' (roles/serviceusage.serviceUsageAdmin), שכולל את ההרשאה serviceusage.services.enable. איך מקצים תפקידים

    gcloud services enable transcoder.googleapis.com
  16. יוצרים פרטי כניסה לאימות מקומי עבור חשבון המשתמש:

    gcloud auth application-default login

    אם מוחזרת שגיאת אימות ואתם משתמשים בספק זהויות חיצוני (IdP), ודאו ש נכנסתם ל-CLI של gcloud באמצעות המאגר המאוחד לניהול זהויות.

  17. מעניקים תפקידים לחשבון המשתמש. מריצים את הפקודה הבאה לכל אחד מהתפקידים הבאים ב-IAM: roles/transcoder.admin, roles/storage.admin

    gcloud projects add-iam-policy-binding PROJECT_ID --member="user:USER_IDENTIFIER" --role=ROLE

    מחליפים את מה שכתוב בשדות הבאים:

    • PROJECT_ID: מזהה הפרויקט.
    • USER_IDENTIFIER: המזהה של חשבון המשתמש . לדוגמה, myemail@example.com.
    • ROLE: תפקיד ה-IAM שאתם מקצים לחשבון המשתמש.

יצירת קטגוריה של Cloud Storage

  1. במסוף Google Cloud , נכנסים לדף Buckets של Cloud Storage.

    כניסה לדף Buckets

  2. לוחצים על יצירה.
  3. ממלאים את פרטי הקטגוריה בדף Create a bucket. כדי לעבור לשלב הבא לוחצים על Continue.
    1. בשדה Name your bucket (שם הקטגוריה), מזינים שם ייחודי לקטגוריה. שם הקטגוריה לא יכול להכיל מידע רגיש, כי מרחב השמות של הקטגוריות זמין וגלוי לכולם.
    2. בקטע Choose where to store your data, מבצעים את הפעולות הבאות:
      1. בוחרים סוג מיקום.
      2. בתפריט הנפתח Location type, בוחרים מיקום שבו יישמרו נתוני הקטגוריה באופן קבוע.
      3. כדי להגדיר שכפול בין מאגרי מידע, בוחרים באפשרות הוספת שכפול בין מאגרי מידע באמצעות Storage Transfer Service ופועלים לפי השלבים הבאים:

        הגדרה של רפליקציה בין מאגרי מידע

        1. בתפריט Bucket, בוחרים באפשרות הרצויה.
        2. בקטע הגדרות השכפול, לוחצים על הגדרה כדי להגדיר את ההגדרות של משימת השכפול.

          מופיעה החלונית Configure cross-bucket replication.

          • כדי לסנן אובייקטים לשכפול לפי קידומת של שם האובייקט, מזינים קידומת שרוצים לכלול או להחריג אובייקטים ממנה, ואז לוחצים על הוספת קידומת.
          • כדי להגדיר סוג אחסון לאובייקטים המשוכפלים, בוחרים סוג אחסון בתפריט סוג אחסון. אם מדלגים על השלב הזה, האובייקטים המשוכפלים ישתמשו בסוג האחסון של קטגוריית היעד כברירת מחדל.
          • לוחצים על סיום.
    3. בקטע Choose how to store your data, מבצעים את הפעולות הבאות:
      1. בקטע Set a default class, בוחרים באפשרות הבאה: Standard.
      2. כדי להפעיל מרחב שמות היררכי, בקטע Optimize storage for data-intensive workloads, בוחרים באפשרות Enable hierarchical namespace on this bucket.
    4. בקטע Choose how to control access to objects, בוחרים אם הקטגוריה אוכפת public access prevention או לא, ואז בוחרים שיטת בקרת גישה לאובייקטים של הקטגוריה.
    5. בקטע Choose how to protect object data, מבצעים את הפעולות הבאות:
      • בוחרים באחת מהאפשרויות בקטע הגנה על נתונים שרוצים להגדיר לקטגוריה.
        • כדי להפעיל מחיקה עם יכולת שחזור, מסמנים את התיבה מדיניות מחיקה עם יכולת שחזור (לשחזור נתונים) ומציינים את מספר הימים שבהם רוצים לשמור אובייקטים אחרי המחיקה.
        • כדי להגדיר ניהול גרסאות של אובייקטים, מסמנים את התיבה ניהול גרסאות של אובייקטים (לשליטה בגרסאות) ומציינים את מספר הגרסאות המקסימלי לכל אובייקט ואת מספר הימים שאחריהם הגרסאות הלא עדכניות יפוגו.
        • כדי להפעיל את מדיניות שמירת הנתונים על אובייקטים וקטגוריות, לוחצים על תיבת הסימון שמירת נתונים (לצורך תאימות), ואז מבצעים את הפעולות הבאות:
          • כדי להפעיל את הנעילה של שמירת אובייקטים, מסמנים את התיבה הפעלת שמירת אובייקטים.
          • כדי להפעיל את נעילת הקטגוריה, מסמנים את תיבת הסימון הגדרת מדיניות שמירת נתונים בקטגוריה ובוחרים יחידת זמן ואת משך הזמן של תקופת השמירה.
      • כדי לבחור איך להצפין את נתוני האובייקט, מרחיבים את הקטע Data encryption () ובוחרים Data encryption method.
  4. לוחצים על יצירה.
  5. לוחצים על Create Folder (יצירת תיקייה) ומזינים שם כדי ליצור תיקייה שבה יישמרו פלט הווידאו המקודד.

קידוד מחדש של סרטון באמצעות Transcoder API

כדי לבצע את השלבים הבאים, צריך סרטון באורך של 5 שניות לפחות מהמחשב המקומי (סרטון לאימון המודל). כאן אפשר לעיין ברשימת הפורמטים הנתמכים של קלט ופלט.

העלאת סרטון לקטגוריה שלכם ב-Cloud Storage

  1. פותחים את הדף Cloud Storage Browser במסוף Google Cloud .
    כניסה לדף Cloud Storage Browser
  2. לוחצים על שם ה-bucket כדי לפתוח אותו.
  3. לוחצים על Upload files.
  4. בוחרים קובץ סרטון להעלאה מהמחשב המקומי.

הסרטון נשמר עכשיו בקטגוריה של Cloud Storage.

יצירת משימת המרת קידוד

כברירת מחדל, Transcoder API מבצע המרה של סרטונים באמצעות קידוד H.264 ואריזה בפורמטים MP4,‏ HLS ו-MPEG-DASH. לכל סרטון קלט, הוא מספק פלט של גרסאות שונות באיכות HD ‏ (1,280x720 פיקסלים) ובאיכות רגילה (640x360 פיקסלים).

כדי ליצור משימה, משתמשים בשיטה projects.locations.jobs.create. בדוגמאות הקוד הבאות נוצרת משימת המרת קוד בסיסית באמצעות הגדרה מראש.

REST

לפני שמשתמשים בנתוני הבקשה, צריך להחליף את הנתונים הבאים:

  • PROJECT_ID: מזהה הפרויקט ב- Google Cloud שמופיע בהגדרות IAM.
  • LOCATION: המיקום שבו המשימה תפעל. להשתמש באחד מהאזורים הנתמכים.
    הצגת מיקומים
    • us-central1
    • us-west1
    • us-west2
    • us-east1
    • us-east4
    • southamerica-east1
    • northamerica-northeast1
    • asia-east1
    • asia-northeast1
    • asia-northeast3
    • asia-south1
    • asia-southeast1
    • australia-southeast1
    • europe-west1
    • europe-west2
    • europe-west4
    • me-west1
    • me-central1
    • me-central2
  • STORAGE_BUCKET_NAME: השם של הקטגוריה שיצרתם ב-Cloud Storage.
  • STORAGE_INPUT_VIDEO: השם של הסרטון בקטגוריית Cloud Storage שאתם מקודדים, כמו my-vid.mp4. בשדה הזה צריך להזין את כל התיקיות שיצרתם בדלי (לדוגמה, input/my-vid.mp4).
  • STORAGE_OUTPUT_FOLDER: שם התיקייה ב-Cloud Storage שבה רוצים לשמור את פלט הווידאו המקודד.

כדי לשלוח את הבקשה צריך להרחיב אחת מהאפשרויות הבאות:

בדוגמה הספציפית הזו של REST נעשה שימוש בפרמטר האופציונלי של השאילתה fields כדי להציג בתשובה רק את שם המשאב שנוצר.

{
  "name": "projects/PROJECT_NUMBER/locations/LOCATION/jobs/JOB_ID"
}

gcloud

  1. מחליפים את הפרטים הבאים בפקודה gcloud:
    • STORAGE_BUCKET_NAME: השם של קטגוריית Cloud Storage שיצרתם.
    • STORAGE_INPUT_VIDEO: השם של הסרטון בקטגוריית Cloud Storage שאתם מקודדים, כמו my-vid.mp4. בשדה הזה צריך להזין את כל התיקיות שיצרתם בדלי (לדוגמה, input/my-vid.mp4).
    • LOCATION: המיקום שבו המשימה תפעל. להשתמש באחד מהאזורים הנתמכים.
      הצגת מיקומים
      • us-central1
      • us-west1
      • us-west2
      • us-east1
      • us-east4
      • southamerica-east1
      • northamerica-northeast1
      • asia-east1
      • asia-northeast1
      • asia-northeast3
      • asia-south1
      • asia-southeast1
      • australia-southeast1
      • europe-west1
      • europe-west2
      • europe-west4
      • me-west1
      • me-central1
      • me-central2
    • STORAGE_OUTPUT_FOLDER: שם התיקייה ב-Cloud Storage שבה רוצים לשמור את פלט הווידאו המקודד.
  2. מריצים את הפקודה הבאה:
    gcloud transcoder jobs create \
      --input-uri="gs://STORAGE_BUCKET_NAME/STORAGE_INPUT_VIDEO" \
      --location=LOCATION \
      --output-uri="gs://STORAGE_BUCKET_NAME/STORAGE_OUTPUT_FOLDER/"
    אמורה להופיע תגובה שדומה לזו:
    {
      "config": {
       ...
      },
      "createTime": CREATE_TIME,
      "name": "projects/PROJECT_NUMBER/locations/LOCATION/jobs/JOB_ID",
      "state": "PENDING",
      "ttlAfterCompletionDays": 30
    }
    

C#

לפני שמנסים את הדוגמה הזו, צריך לפעול לפי C#הוראות ההגדרה שבמדריך לתחילת העבודה עם Transcoder API באמצעות ספריות לקוח. מידע נוסף מופיע במאמרי העזרה של Transcoder API C# API.

כדי לבצע אימות ב-Transcoder API, צריך להגדיר את Application Default Credentials. מידע נוסף זמין במאמר הגדרת אימות לסביבת פיתוח מקומית.


using Google.Api.Gax.ResourceNames;
using Google.Cloud.Video.Transcoder.V1;

public class CreateJobFromPresetSample
{
    public Job CreateJobFromPreset(
        string projectId, string location, string inputUri, string outputUri, string preset)
    {
        // Create the client.
        TranscoderServiceClient client = TranscoderServiceClient.Create();

        // Build the parent location name.
        LocationName parent = new LocationName(projectId, location);

        // Build the job.
        Job newJob = new Job
        {
            InputUri = inputUri,
            OutputUri = outputUri,
            TemplateId = preset
        };

        // Call the API.
        Job job = client.CreateJob(parent, newJob);

        // Return the result.
        return job;
    }
}

Go

לפני שמנסים את הדוגמה הזו, צריך לפעול לפי Goהוראות ההגדרה שבמדריך לתחילת העבודה עם Transcoder API באמצעות ספריות לקוח. מידע נוסף מופיע במאמרי העזרה של Transcoder API Go API.

כדי לבצע אימות ב-Transcoder API, צריך להגדיר את Application Default Credentials. מידע נוסף זמין במאמר הגדרת אימות לסביבת פיתוח מקומית.

import (
	"context"
	"fmt"
	"io"

	transcoder "cloud.google.com/go/video/transcoder/apiv1"
	"cloud.google.com/go/video/transcoder/apiv1/transcoderpb"
)

// createJobFromPreset creates a job based on a given preset template. See
// https://cloud.google.com/transcoder/docs/how-to/jobs#create_jobs_presets
// for more information.
func createJobFromPreset(w io.Writer, projectID string, location string, inputURI string, outputURI string) error {
	// projectID := "my-project-id"
	// location := "us-central1"
	// inputURI := "gs://my-bucket/my-video-file"
	// outputURI := "gs://my-bucket/my-output-folder/"
	preset := "preset/web-hd"
	ctx := context.Background()
	client, err := transcoder.NewClient(ctx)
	if err != nil {
		return fmt.Errorf("NewClient: %w", err)
	}
	defer client.Close()

	req := &transcoderpb.CreateJobRequest{
		Parent: fmt.Sprintf("projects/%s/locations/%s", projectID, location),
		Job: &transcoderpb.Job{
			InputUri:  inputURI,
			OutputUri: outputURI,
			JobConfig: &transcoderpb.Job_TemplateId{
				TemplateId: preset,
			},
		},
	}
	// Creates the job, Jobs take a variable amount of time to run.
	// You can query for the job state.
	response, err := client.CreateJob(ctx, req)
	if err != nil {
		return fmt.Errorf("createJobFromPreset: %w", err)
	}

	fmt.Fprintf(w, "Job: %v", response.GetName())
	return nil
}

Java

לפני שמנסים את הדוגמה הזו, צריך לפעול לפי Javaהוראות ההגדרה שבמדריך לתחילת העבודה עם Transcoder API באמצעות ספריות לקוח. מידע נוסף מופיע במאמרי העזרה של Transcoder API Java API.

כדי לבצע אימות ב-Transcoder API, צריך להגדיר את Application Default Credentials. מידע נוסף זמין במאמר הגדרת אימות לסביבת פיתוח מקומית.


import com.google.cloud.video.transcoder.v1.CreateJobRequest;
import com.google.cloud.video.transcoder.v1.Job;
import com.google.cloud.video.transcoder.v1.LocationName;
import com.google.cloud.video.transcoder.v1.TranscoderServiceClient;
import java.io.IOException;

public class CreateJobFromPreset {

  public static void main(String[] args) throws Exception {
    // TODO(developer): Replace these variables before running the sample.
    String projectId = "my-project-id";
    String location = "us-central1";
    String inputUri = "gs://my-bucket/my-video-file";
    String outputUri = "gs://my-bucket/my-output-folder/";
    // See https://cloud.google.com/transcoder/docs/concepts/overview#job_template
    // for information on this preset.
    String preset = "preset/web-hd";

    createJobFromPreset(projectId, location, inputUri, outputUri, preset);
  }

  // Creates a job from a preset.
  public static void createJobFromPreset(
      String projectId, String location, String inputUri, String outputUri, String preset)
      throws IOException {
    // Initialize client that will be used to send requests. This client only needs to be created
    // once, and can be reused for multiple requests.
    try (TranscoderServiceClient transcoderServiceClient = TranscoderServiceClient.create()) {

      CreateJobRequest createJobRequest =
          CreateJobRequest.newBuilder()
              .setJob(
                  Job.newBuilder()
                      .setInputUri(inputUri)
                      .setOutputUri(outputUri)
                      .setTemplateId(preset)
                      .build())
              .setParent(LocationName.of(projectId, location).toString())
              .build();

      // Send the job creation request and process the response.
      Job job = transcoderServiceClient.createJob(createJobRequest);
      System.out.println("Job: " + job.getName());
    }
  }
}

Node.js

לפני שמנסים את הדוגמה הזו, צריך לפעול לפי Node.jsהוראות ההגדרה שבמדריך לתחילת העבודה עם Transcoder API באמצעות ספריות לקוח. מידע נוסף מופיע במאמרי העזרה של Transcoder API Node.js API.

כדי לבצע אימות ב-Transcoder API, צריך להגדיר את Application Default Credentials. מידע נוסף זמין במאמר הגדרת אימות לסביבת פיתוח מקומית.

/**
 * TODO(developer): Uncomment these variables before running the sample.
 */
// projectId = 'my-project-id';
// location = 'us-central1';
// inputUri = 'gs://my-bucket/my-video-file';
// outputUri = 'gs://my-bucket/my-output-folder/';
// preset = 'preset/web-hd';

// Imports the Transcoder library
const {TranscoderServiceClient} =
  require('@google-cloud/video-transcoder').v1;

// Instantiates a client
const transcoderServiceClient = new TranscoderServiceClient();

async function createJobFromPreset() {
  // Construct request
  const request = {
    parent: transcoderServiceClient.locationPath(projectId, location),
    job: {
      inputUri: inputUri,
      outputUri: outputUri,
      templateId: preset,
    },
  };

  // Run request
  const [response] = await transcoderServiceClient.createJob(request);
  console.log(`Job: ${response.name}`);
}

createJobFromPreset();

PHP

לפני שמנסים את הדוגמה הזו, צריך לפעול לפי PHPהוראות ההגדרה שבמדריך לתחילת העבודה עם Transcoder API באמצעות ספריות לקוח. מידע נוסף מופיע במאמרי העזרה של Transcoder API PHP API.

כדי לבצע אימות ב-Transcoder API, צריך להגדיר את Application Default Credentials. מידע נוסף זמין במאמר הגדרת אימות לסביבת פיתוח מקומית.

use Google\Cloud\Video\Transcoder\V1\Client\TranscoderServiceClient;
use Google\Cloud\Video\Transcoder\V1\CreateJobRequest;
use Google\Cloud\Video\Transcoder\V1\Job;

/**
 * Creates a job based on a job preset.
 *
 * @param string $projectId The ID of your Google Cloud Platform project.
 * @param string $location The location of the job.
 * @param string $inputUri Uri of the video in the Cloud Storage bucket.
 * @param string $outputUri Uri of the video output folder in the Cloud Storage bucket.
 * @param string $preset The preset template (for example, "preset/web-hd").
 */
function create_job_from_preset($projectId, $location, $inputUri, $outputUri, $preset)
{
    // Instantiate a client.
    $transcoderServiceClient = new TranscoderServiceClient();

    $formattedParent = $transcoderServiceClient->locationName($projectId, $location);
    $job = new Job();
    $job->setInputUri($inputUri);
    $job->setOutputUri($outputUri);
    $job->setTemplateId($preset);
    $request = (new CreateJobRequest())
        ->setParent($formattedParent)
        ->setJob($job);

    $response = $transcoderServiceClient->createJob($request);

    // Print job name.
    printf('Job: %s' . PHP_EOL, $response->getName());
}

Python

לפני שמנסים את הדוגמה הזו, צריך לפעול לפי Pythonהוראות ההגדרה שבמדריך לתחילת העבודה עם Transcoder API באמצעות ספריות לקוח. מידע נוסף מופיע במאמרי העזרה של Transcoder API Python API.

כדי לבצע אימות ב-Transcoder API, צריך להגדיר את Application Default Credentials. מידע נוסף זמין במאמר הגדרת אימות לסביבת פיתוח מקומית.


import argparse

from google.cloud.video import transcoder_v1
from google.cloud.video.transcoder_v1.services.transcoder_service import (
    TranscoderServiceClient,
)


def create_job_from_preset(
    project_id: str,
    location: str,
    input_uri: str,
    output_uri: str,
    preset: str,
) -> transcoder_v1.types.resources.Job:
    """Creates a job based on a job preset.

    Args:
        project_id: The GCP project ID.
        location: The location to start the job in.
        input_uri: Uri of the video in the Cloud Storage bucket.
        output_uri: Uri of the video output folder in the Cloud Storage bucket.
        preset: The preset template (for example, 'preset/web-hd').

    Returns:
        The job resource.
    """

    client = TranscoderServiceClient()

    parent = f"projects/{project_id}/locations/{location}"
    job = transcoder_v1.types.Job()
    job.input_uri = input_uri
    job.output_uri = output_uri
    job.template_id = preset

    response = client.create_job(parent=parent, job=job)
    print(f"Job: {response.name}")
    return response

Ruby

לפני שמנסים את הדוגמה הזו, צריך לפעול לפי Rubyהוראות ההגדרה שבמדריך לתחילת העבודה עם Transcoder API באמצעות ספריות לקוח. מידע נוסף מופיע במאמרי העזרה של Transcoder API Ruby API.

כדי לבצע אימות ב-Transcoder API, צריך להגדיר את Application Default Credentials. מידע נוסף זמין במאמר הגדרת אימות לסביבת פיתוח מקומית.

# project_id  = "YOUR-GOOGLE-CLOUD-PROJECT"  # (e.g. "my-project")
# location    = "YOUR-JOB-LOCATION"  # (e.g. "us-central1")
# input_uri   = "YOUR-GCS-INPUT-VIDEO"  # (e.g. "gs://my-bucket/my-video-file")
# output_uri  = "YOUR-GCS-OUTPUT-FOLDER/"  # (e.g. "gs://my-bucket/my-output-folder/")
# preset      = "YOUR-JOB-PRESET"  # (e.g. "preset/web-hd")

# Require the Transcoder client library.
require "google/cloud/video/transcoder"

# Create a Transcoder client.
client = Google::Cloud::Video::Transcoder.transcoder_service

# Build the resource name of the parent.
parent = client.location_path project: project_id, location: location

# Set the job fields.
new_job = {
  input_uri: input_uri,
  output_uri: output_uri,
  template_id: preset
}

job = client.create_job parent: parent, job: new_job

# Print the job name.
puts "Job: #{job.name}"

מעתיקים את JOB_ID שמוחזר. הוא נחוץ כדי לקבל את סטטוס המשרה.

בדיקת הסטטוס של משימת הקידוד

כדי לבדוק את הסטטוס של משימה, משתמשים בשיטה projects.locations.jobs.get. בדוגמאות הקוד הבאות אפשר לראות איך מקבלים את פרטי המשרה ואז מציגים את סטטוס המשרה.

REST

לפני שמשתמשים בנתוני הבקשה, צריך להחליף את הנתונים הבאים:

  • JOB_ID: המזהה של המשימה שיצרתם.
  • PROJECT_ID: מזהה הפרויקט ב- Google Cloud .
  • LOCATION: המיקום של המשרה. להשתמש באחד מהאזורים הנתמכים.
    הצגת מיקומים
    • us-central1
    • us-west1
    • us-west2
    • us-east1
    • us-east4
    • southamerica-east1
    • northamerica-northeast1
    • asia-east1
    • asia-northeast1
    • asia-northeast3
    • asia-south1
    • asia-southeast1
    • australia-southeast1
    • europe-west1
    • europe-west2
    • europe-west4
    • me-west1
    • me-central1
    • me-central2
  • כדי לשלוח את הבקשה צריך להרחיב אחת מהאפשרויות הבאות:

    אתם אמורים לקבל תגובת JSON שדומה לזו:

    {
      "name": "projects/PROJECT_NUMBER/locations/LOCATION/jobs/JOB_ID",
      "config": {
        "inputs": [
          {
            "key": "input0",
            "uri": "gs://STORAGE_BUCKET_NAME/STORAGE_INPUT_VIDEO"
          }
        ],
        "editList": [
          {
            "key": "atom0",
            "inputs": [
              "input0"
            ],
            "startTimeOffset": "0s"
          }
        ],
        "elementaryStreams": [
          {
            "videoStream": {
              "h264": {
                "widthPixels": 640,
                "heightPixels": 360,
                "frameRate": 30,
                "bitrateBps": 550000,
                "pixelFormat": "yuv420p",
                "rateControlMode": "vbr",
                "crfLevel": 21,
                "gopDuration": "3s",
                "vbvSizeBits": 550000,
                "vbvFullnessBits": 495000,
                "entropyCoder": "cabac",
                "bFrameCount": 3,
                "aqStrength": 1,
                "profile": "high",
                "preset": "veryfast"
              }
            },
            "key": "video-stream0"
          },
          {
            "videoStream": {
              "h264": {
                "widthPixels": 1280,
                "heightPixels": 720,
                "frameRate": 30,
                "bitrateBps": 2500000,
                "pixelFormat": "yuv420p",
                "rateControlMode": "vbr",
                "crfLevel": 21,
                "gopDuration": "3s",
                "vbvSizeBits": 2500000,
                "vbvFullnessBits": 2250000,
                "entropyCoder": "cabac",
                "bFrameCount": 3,
                "aqStrength": 1,
                "profile": "high",
                "preset": "veryfast"
              }
            },
            "key": "video-stream1"
          },
          {
            "audioStream": {
              "codec": "aac",
              "bitrateBps": 64000,
              "channelCount": 2,
              "channelLayout": [
                "fl",
                "fr"
              ],
              "sampleRateHertz": 48000
            },
            "key": "audio-stream0"
          }
        ],
        "muxStreams": [
          {
            "key": "sd",
            "fileName": "sd.mp4",
            "container": "mp4",
            "elementaryStreams": [
              "video-stream0",
              "audio-stream0"
            ]
          },
          {
            "key": "hd",
            "fileName": "hd.mp4",
            "container": "mp4",
            "elementaryStreams": [
              "video-stream1",
              "audio-stream0"
            ]
          },
          {
            "key": "media-sd",
            "fileName": "media-sd.ts",
            "container": "ts",
            "elementaryStreams": [
              "video-stream0",
              "audio-stream0"
            ]
          },
          {
            "key": "media-hd",
            "fileName": "media-hd.ts",
            "container": "ts",
            "elementaryStreams": [
              "video-stream1",
              "audio-stream0"
            ]
          },
          {
            "key": "video-only-sd",
            "fileName": "video-only-sd.m4s",
            "container": "fmp4",
            "elementaryStreams": [
              "video-stream0"
            ]
          },
          {
            "key": "video-only-hd",
            "fileName": "video-only-hd.m4s",
            "container": "fmp4",
            "elementaryStreams": [
              "video-stream1"
            ]
          },
          {
            "key": "audio-only",
            "fileName": "audio-only.m4s",
            "container": "fmp4",
            "elementaryStreams": [
              "audio-stream0"
            ]
          }
        ],
        "manifests": [
          {
            "fileName": "manifest.m3u8",
            "type": "HLS",
            "muxStreams": [
              "media-sd",
              "media-hd"
            ]
          },
          {
            "fileName": "manifest.mpd",
            "type": "DASH",
            "muxStreams": [
              "video-only-sd",
              "video-only-hd",
              "audio-only"
            ]
          }
        ],
        "output": {
          "uri": "gs://STORAGE_BUCKET_NAME/STORAGE_OUTPUT_FOLDER/"
        }
      },
      "state": "PENDING",
      "createTime": CREATE_TIME,
      "ttlAfterCompletionDays": 30
    }
    

    gcloud

    1. מחליפים את הפרטים הבאים בפקודה gcloud:
      • JOB_ID: המזהה של המשימה שיצרתם.
      • LOCATION: המיקום של המשרה. להשתמש באחד מהאזורים הנתמכים.
        הצגת מיקומים
        • us-central1
        • us-west1
        • us-west2
        • us-east1
        • us-east4
        • southamerica-east1
        • northamerica-northeast1
        • asia-east1
        • asia-northeast1
        • asia-northeast3
        • asia-south1
        • asia-southeast1
        • australia-southeast1
        • europe-west1
        • europe-west2
        • europe-west4
        • me-west1
        • me-central1
        • me-central2
    2. מריצים את הפקודה הבאה:
      gcloud transcoder jobs describe JOB_ID --location=LOCATION
      אמורה להופיע תגובה שדומה לזו:
      {
        "name": "projects/PROJECT_NUMBER/locations/LOCATION/jobs/JOB_ID",
        "config": {
          "inputs": [
            {
              "key": "input0",
              "uri": "gs://STORAGE_BUCKET_NAME/STORAGE_INPUT_VIDEO"
            }
          ],
          "editList": [
            {
              "key": "atom0",
              "inputs": [
                "input0"
              ],
              "startTimeOffset": "0s"
            }
          ],
          "elementaryStreams": [
            {
              "videoStream": {
                "h264": {
                  "widthPixels": 640,
                  "heightPixels": 360,
                  "frameRate": 30,
                  "bitrateBps": 550000,
                  "pixelFormat": "yuv420p",
                  "rateControlMode": "vbr",
                  "crfLevel": 21,
                  "gopDuration": "3s",
                  "vbvSizeBits": 550000,
                  "vbvFullnessBits": 495000,
                  "entropyCoder": "cabac",
                  "bFrameCount": 3,
                  "aqStrength": 1,
                  "profile": "high",
                  "preset": "veryfast"
                }
              },
              "key": "video-stream0"
            },
            {
              "videoStream": {
                "h264": {
                  "widthPixels": 1280,
                  "heightPixels": 720,
                  "frameRate": 30,
                  "bitrateBps": 2500000,
                  "pixelFormat": "yuv420p",
                  "rateControlMode": "vbr",
                  "crfLevel": 21,
                  "gopDuration": "3s",
                  "vbvSizeBits": 2500000,
                  "vbvFullnessBits": 2250000,
                  "entropyCoder": "cabac",
                  "bFrameCount": 3,
                  "aqStrength": 1,
                  "profile": "high",
                  "preset": "veryfast"
                }
              },
              "key": "video-stream1"
            },
            {
              "audioStream": {
                "codec": "aac",
                "bitrateBps": 64000,
                "channelCount": 2,
                "channelLayout": [
                  "fl",
                  "fr"
                ],
                "sampleRateHertz": 48000
              },
              "key": "audio-stream0"
            }
          ],
          "muxStreams": [
            {
              "key": "sd",
              "fileName": "sd.mp4",
              "container": "mp4",
              "elementaryStreams": [
                "video-stream0",
                "audio-stream0"
              ]
            },
            {
              "key": "hd",
              "fileName": "hd.mp4",
              "container": "mp4",
              "elementaryStreams": [
                "video-stream1",
                "audio-stream0"
              ]
            },
            {
              "key": "media-sd",
              "fileName": "media-sd.ts",
              "container": "ts",
              "elementaryStreams": [
                "video-stream0",
                "audio-stream0"
              ]
            },
            {
              "key": "media-hd",
              "fileName": "media-hd.ts",
              "container": "ts",
              "elementaryStreams": [
                "video-stream1",
                "audio-stream0"
              ]
            },
            {
              "key": "video-only-sd",
              "fileName": "video-only-sd.m4s",
              "container": "fmp4",
              "elementaryStreams": [
                "video-stream0"
              ]
            },
            {
              "key": "video-only-hd",
              "fileName": "video-only-hd.m4s",
              "container": "fmp4",
              "elementaryStreams": [
                "video-stream1"
              ]
            },
            {
              "key": "audio-only",
              "fileName": "audio-only.m4s",
              "container": "fmp4",
              "elementaryStreams": [
                "audio-stream0"
              ]
            }
          ],
          "manifests": [
            {
              "fileName": "manifest.m3u8",
              "type": "HLS",
              "muxStreams": [
                "media-sd",
                "media-hd"
              ]
            },
            {
              "fileName": "manifest.mpd",
              "type": "DASH",
              "muxStreams": [
                "video-only-sd",
                "video-only-hd",
                "audio-only"
              ]
            }
          ],
          "output": {
            "uri": "gs://STORAGE_BUCKET_NAME/STORAGE_OUTPUT_FOLDER/"
          }
        },
        "state": "PENDING",
        "createTime": CREATE_TIME,
        "ttlAfterCompletionDays": 30
      }
      

    C#

    לפני שמנסים את הדוגמה הזו, צריך לפעול לפי C#הוראות ההגדרה שבמדריך לתחילת העבודה עם Transcoder API באמצעות ספריות לקוח. מידע נוסף מופיע במאמרי העזרה של Transcoder API C# API.

    כדי לבצע אימות ב-Transcoder API, צריך להגדיר את Application Default Credentials. מידע נוסף זמין במאמר הגדרת אימות לסביבת פיתוח מקומית.

    
    using Google.Cloud.Video.Transcoder.V1;
    
    public class GetJobStateSample
    {
        public Job.Types.ProcessingState GetJobState(string projectId, string location, string jobId)
        {
            // Create the client.
            TranscoderServiceClient client = TranscoderServiceClient.Create();
    
            // Build the job name.
            JobName jobName = JobName.FromProjectLocationJob(projectId, location, jobId);
    
            // Call the API.
            Job job = client.GetJob(jobName);
    
            // Return the result.
            return job.State;
        }
    }

    Go

    לפני שמנסים את הדוגמה הזו, צריך לפעול לפי Goהוראות ההגדרה שבמדריך לתחילת העבודה עם Transcoder API באמצעות ספריות לקוח. מידע נוסף מופיע במאמרי העזרה של Transcoder API Go API.

    כדי לבצע אימות ב-Transcoder API, צריך להגדיר את Application Default Credentials. מידע נוסף זמין במאמר הגדרת אימות לסביבת פיתוח מקומית.

    import (
    	"context"
    	"fmt"
    	"io"
    
    	transcoder "cloud.google.com/go/video/transcoder/apiv1"
    	"cloud.google.com/go/video/transcoder/apiv1/transcoderpb"
    )
    
    // getJobState gets the state for a previously-created job. See
    // https://cloud.google.com/transcoder/docs/how-to/jobs#check_job_status for
    // more information.
    func getJobState(w io.Writer, projectID string, location string, jobID string) error {
    	// projectID := "my-project-id"
    	// location := "us-central1"
    	// jobID := "my-job-id"
    	ctx := context.Background()
    	client, err := transcoder.NewClient(ctx)
    	if err != nil {
    		return fmt.Errorf("NewClient: %w", err)
    	}
    	defer client.Close()
    
    	req := &transcoderpb.GetJobRequest{
    		Name: fmt.Sprintf("projects/%s/locations/%s/jobs/%s", projectID, location, jobID),
    	}
    
    	response, err := client.GetJob(ctx, req)
    	if err != nil {
    		return fmt.Errorf("GetJob: %w", err)
    	}
    	fmt.Fprintf(w, "Job state: %v\n----\nJob failure reason:%v\n", response.State, response.Error)
    	return nil
    }
    

    Java

    לפני שמנסים את הדוגמה הזו, צריך לפעול לפי Javaהוראות ההגדרה שבמדריך לתחילת העבודה עם Transcoder API באמצעות ספריות לקוח. מידע נוסף מופיע במאמרי העזרה של Transcoder API Java API.

    כדי לבצע אימות ב-Transcoder API, צריך להגדיר את Application Default Credentials. מידע נוסף זמין במאמר הגדרת אימות לסביבת פיתוח מקומית.

    
    import com.google.cloud.video.transcoder.v1.GetJobRequest;
    import com.google.cloud.video.transcoder.v1.Job;
    import com.google.cloud.video.transcoder.v1.JobName;
    import com.google.cloud.video.transcoder.v1.TranscoderServiceClient;
    import java.io.IOException;
    
    public class GetJobState {
    
      public static void main(String[] args) throws Exception {
        // TODO(developer): Replace these variables before running the sample.
        String projectId = "my-project-id";
        String location = "us-central1";
        String jobId = "my-job-id";
    
        getJobState(projectId, location, jobId);
      }
    
      // Gets the state of a job.
      public static void getJobState(String projectId, String location, String jobId)
          throws IOException {
        // Initialize client that will be used to send requests. This client only needs to be created
        // once, and can be reused for multiple requests.
        try (TranscoderServiceClient transcoderServiceClient = TranscoderServiceClient.create()) {
          JobName jobName =
              JobName.newBuilder().setProject(projectId).setLocation(location).setJob(jobId).build();
          GetJobRequest getJobRequest = GetJobRequest.newBuilder().setName(jobName.toString()).build();
    
          // Send the get job request and process the response.
          Job job = transcoderServiceClient.getJob(getJobRequest);
          System.out.println("Job state: " + job.getState());
        }
      }
    }

    Node.js

    לפני שמנסים את הדוגמה הזו, צריך לפעול לפי Node.jsהוראות ההגדרה שבמדריך לתחילת העבודה עם Transcoder API באמצעות ספריות לקוח. מידע נוסף מופיע במאמרי העזרה של Transcoder API Node.js API.

    כדי לבצע אימות ב-Transcoder API, צריך להגדיר את Application Default Credentials. מידע נוסף זמין במאמר הגדרת אימות לסביבת פיתוח מקומית.

    /**
     * TODO(developer): Uncomment these variables before running the sample.
     */
    // projectId = 'my-project-id';
    // location = 'us-central1';
    // jobId = 'my-job-id';
    
    // Imports the Transcoder library
    const {TranscoderServiceClient} =
      require('@google-cloud/video-transcoder').v1;
    
    // Instantiates a client
    const transcoderServiceClient = new TranscoderServiceClient();
    
    async function getJob() {
      // Construct request
      const request = {
        name: transcoderServiceClient.jobPath(projectId, location, jobId),
      };
      const [response] = await transcoderServiceClient.getJob(request);
      console.log(`Job state: ${response.state}`);
    }
    
    getJob();

    PHP

    לפני שמנסים את הדוגמה הזו, צריך לפעול לפי PHPהוראות ההגדרה שבמדריך לתחילת העבודה עם Transcoder API באמצעות ספריות לקוח. מידע נוסף מופיע במאמרי העזרה של Transcoder API PHP API.

    כדי לבצע אימות ב-Transcoder API, צריך להגדיר את Application Default Credentials. מידע נוסף זמין במאמר הגדרת אימות לסביבת פיתוח מקומית.

    use Google\Cloud\Video\Transcoder\V1\Client\TranscoderServiceClient;
    use Google\Cloud\Video\Transcoder\V1\GetJobRequest;
    use Google\Cloud\Video\Transcoder\V1\Job;
    
    /**
     * Gets a Transcoder job's state.
     *
     * @param string $projectId The ID of your Google Cloud Platform project.
     * @param string $location The location of the job.
     * @param string $jobId The job ID.
     */
    function get_job_state($projectId, $location, $jobId)
    {
        // Instantiate a client.
        $transcoderServiceClient = new TranscoderServiceClient();
    
        $formattedName = $transcoderServiceClient->jobName($projectId, $location, $jobId);
        $request = (new GetJobRequest())
            ->setName($formattedName);
        $job = $transcoderServiceClient->getJob($request);
    
        // Print job state.
        printf('Job state: %s' . PHP_EOL, Job\ProcessingState::name($job->getState()));
    }

    Python

    לפני שמנסים את הדוגמה הזו, צריך לפעול לפי Pythonהוראות ההגדרה שבמדריך לתחילת העבודה עם Transcoder API באמצעות ספריות לקוח. מידע נוסף מופיע במאמרי העזרה של Transcoder API Python API.

    כדי לבצע אימות ב-Transcoder API, צריך להגדיר את Application Default Credentials. מידע נוסף זמין במאמר הגדרת אימות לסביבת פיתוח מקומית.

    
    import argparse
    
    from google.cloud.video import transcoder_v1
    from google.cloud.video.transcoder_v1.services.transcoder_service import (
        TranscoderServiceClient,
    )
    
    
    def get_job_state(
        project_id: str,
        location: str,
        job_id: str,
    ) -> transcoder_v1.types.resources.Job:
        """Gets a job's state.
    
        Args:
            project_id: The GCP project ID.
            location: The location this job is in.
            job_id: The job ID.
    
        Returns:
            The job resource.
        """
    
        client = TranscoderServiceClient()
    
        name = f"projects/{project_id}/locations/{location}/jobs/{job_id}"
        response = client.get_job(name=name)
    
        print(f"Job state: {str(response.state.name)}")
        return response


    Ruby

    לפני שמנסים את הדוגמה הזו, צריך לפעול לפי Rubyהוראות ההגדרה שבמדריך לתחילת העבודה עם Transcoder API באמצעות ספריות לקוח. מידע נוסף מופיע במאמרי העזרה של Transcoder API Ruby API.

    כדי לבצע אימות ב-Transcoder API, צריך להגדיר את Application Default Credentials. מידע נוסף זמין במאמר הגדרת אימות לסביבת פיתוח מקומית.

    # project_id = "YOUR-GOOGLE-CLOUD-PROJECT"  # (e.g. "my-project")
    # location   = "YOUR-JOB-LOCATION"  # (e.g. "us-central1")
    # job_id     = "YOUR-JOB-ID"  # (e.g. "c82c295b-3f5a-47df-8562-938a89d40fd0")
    
    # Require the Transcoder client library.
    require "google/cloud/video/transcoder"
    
    # Create a Transcoder client.
    client = Google::Cloud::Video::Transcoder.transcoder_service
    
    # Build the resource name of the job.
    name = client.job_path project: project_id, location: location, job: job_id
    
    # Get the job.
    job = client.get_job name: name
    
    # Print the job state.
    puts "Job state: #{job.state}"

    אם הסטטוס של state הוא SUCCEEDED, העבודה הושלמה והפלט של הסרטון זמין עכשיו ברשימת הקבצים המקודדים בקטגוריה שלכם ב-Cloud Storage.

    הפעלת הסרטון

    כדי להפעיל את קובץ המדיה שנוצר ב-Shaka Player, מבצעים את השלבים הבאים:

    1. הפיכת הקטגוריה של Cloud Storage שיצרתם לקריאה באופן ציבורי.
    2. כדי להפעיל שיתוף משאבים בין מקורות (CORS) בקטגוריה של Cloud Storage, מבצעים את הפעולות הבאות:
      1. יוצרים קובץ JSON שמכיל את הפרטים הבאים:
        [
          {
            "origin": ["https://shaka-player-demo.appspot.com/"],
            "responseHeader": ["Content-Type", "Range"],
            "method": ["GET", "HEAD"],
            "maxAgeSeconds": 3600
          }
        ]
      2. מריצים את הפקודה הבאה אחרי שמחליפים את JSON_FILE_NAME בשם של קובץ ה-JSON שיצרתם בשלב הקודם:
        gcloud storage buckets update gs://STORAGE_BUCKET_NAME --cors-file=JSON_FILE_NAME.json
    3. בוחרים אחד מקובצי ה-MP4 או קובצי המניפסט שנוצרו על ידי משימת הקידוד בפורמט אחר בקטגוריה של Cloud Storage. לוחצים על העתקת כתובת URL בעמודה גישה ציבורית של הקובץ.
    4. עוברים אל Shaka Player, נגן שידורים חיים באינטרנט.
    5. בסרגל הניווט העליון, לוחצים על תוכן בהתאמה אישית.
    6. לוחצים על הלחצן +.
    7. מדביקים את כתובת ה-URL הציבורית של הקובץ בתיבה Manifest URL (כתובת ה-URL של קובץ המניפסט).

      מזינים את כתובת ה-URL של הקובץ ב-Shaka Player.

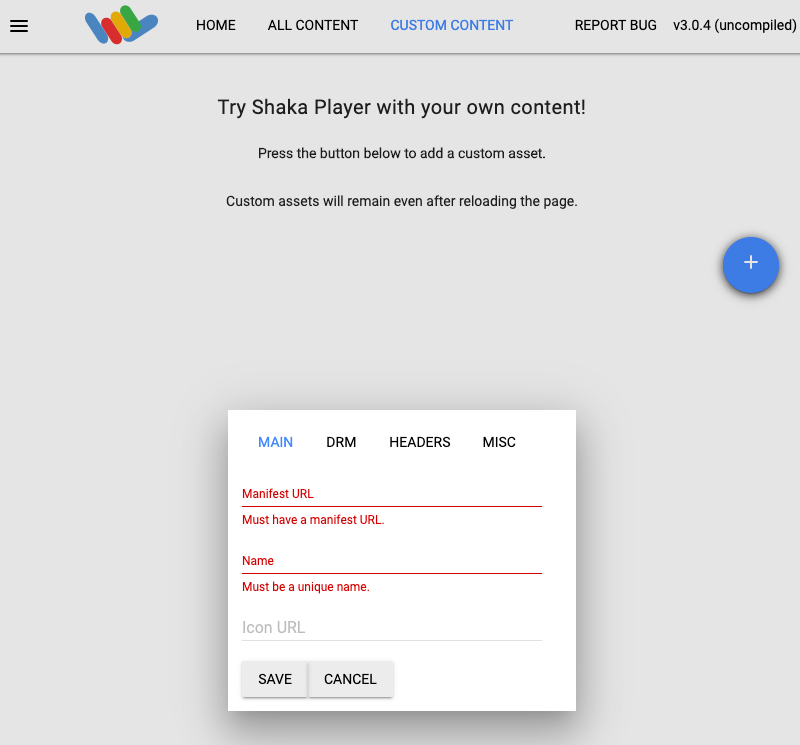
    8. מקלידים שם בתיבה שם.

    9. לוחצים על Save.

    10. לוחצים על הפעלה.

    הסרת המשאבים

    כדי לא לצבור חיובים לחשבון Google Cloud על המשאבים שבהם השתמשתם בדף הזה, פועלים לפי השלבים הבאים:

    מחיקת הקטגוריה

    1. פותחים את הדף Cloud Storage Browser במסוף Google Cloud .

      כניסה לדף Cloud Storage Browser

    2. מסמנים את התיבה ליד הקטגוריה שיצרתם.

    3. לוחצים על Delete.

    4. בחלון הקופץ שמופיע, לוחצים על מחיקה כדי למחוק סופית את הקטגוריה ואת התוכן שלה.

    מחיקת המשימה

    REST

    לפני שמשתמשים בנתוני הבקשה, צריך להחליף את הנתונים הבאים:

  • JOB_ID: המזהה של המשימה שיצרתם.
  • PROJECT_ID: מזהה הפרויקט ב- Google Cloud .
  • LOCATION: המיקום של המשרה. להשתמש באחד מהאזורים הנתמכים.
    הצגת מיקומים
    • us-central1
    • us-west1
    • us-west2
    • us-east1
    • us-east4
    • southamerica-east1
    • northamerica-northeast1
    • asia-east1
    • asia-northeast1
    • asia-northeast3
    • asia-south1
    • asia-southeast1
    • australia-southeast1
    • europe-west1
    • europe-west2
    • europe-west4
    • me-west1
    • me-central1
    • me-central2
  • כדי לשלוח את הבקשה צריך להרחיב אחת מהאפשרויות הבאות:

    אתם אמורים לקבל תגובת JSON שדומה לזו:

    {}
    

    gcloud

    1. מחליפים את הפרטים הבאים בפקודה gcloud:
      • JOB_ID: המזהה של המשימה שיצרתם.
      • LOCATION: המיקום של המשרה. להשתמש באחד מהאזורים הנתמכים.
        הצגת מיקומים
        • us-central1
        • us-west1
        • us-west2
        • us-east1
        • us-east4
        • southamerica-east1
        • northamerica-northeast1
        • asia-east1
        • asia-northeast1
        • asia-northeast3
        • asia-south1
        • asia-southeast1
        • australia-southeast1
        • europe-west1
        • europe-west2
        • europe-west4
        • me-west1
        • me-central1
        • me-central2
    2. מריצים את הפקודה הבאה:
      gcloud transcoder jobs delete JOB_ID --location=LOCATION
      אמורה להופיע תגובה שדומה לזו:
      Deleted job [projects/PROJECT_ID/locations/LOCATION/jobs/JOB_ID].
      

    C#

    לפני שמנסים את הדוגמה הזו, צריך לפעול לפי C#הוראות ההגדרה שבמדריך לתחילת העבודה עם Transcoder API באמצעות ספריות לקוח. מידע נוסף מופיע במאמרי העזרה של Transcoder API C# API.

    כדי לבצע אימות ב-Transcoder API, צריך להגדיר את Application Default Credentials. מידע נוסף זמין במאמר הגדרת אימות לסביבת פיתוח מקומית.

    
    using Google.Cloud.Video.Transcoder.V1;
    
    public class DeleteJobSample
    {
        public void DeleteJob(string projectId, string location, string jobId)
        {
            // Create the client.
            TranscoderServiceClient client = TranscoderServiceClient.Create();
    
            // Build the job name.
            JobName jobName = JobName.FromProjectLocationJob(projectId, location, jobId);
    
            // Call the API.
            client.DeleteJob(jobName);
        }
    }

    Go

    לפני שמנסים את הדוגמה הזו, צריך לפעול לפי Goהוראות ההגדרה שבמדריך לתחילת העבודה עם Transcoder API באמצעות ספריות לקוח. מידע נוסף מופיע במאמרי העזרה של Transcoder API Go API.

    כדי לבצע אימות ב-Transcoder API, צריך להגדיר את Application Default Credentials. מידע נוסף זמין במאמר הגדרת אימות לסביבת פיתוח מקומית.

    import (
    	"context"
    	"fmt"
    	"io"
    
    	transcoder "cloud.google.com/go/video/transcoder/apiv1"
    	"cloud.google.com/go/video/transcoder/apiv1/transcoderpb"
    )
    
    // deleteJob deletes a previously-created job. See
    // https://cloud.google.com/transcoder/docs/how-to/jobs#delete_jobs for more
    // information.
    func deleteJob(w io.Writer, projectID string, location string, jobID string) error {
    	// projectID := "my-project-id"
    	// location := "us-central1"
    	// jobID := "my-job-id"
    	ctx := context.Background()
    	client, err := transcoder.NewClient(ctx)
    	if err != nil {
    		return fmt.Errorf("NewClient: %w", err)
    	}
    	defer client.Close()
    
    	req := &transcoderpb.DeleteJobRequest{
    		Name: fmt.Sprintf("projects/%s/locations/%s/jobs/%s", projectID, location, jobID),
    	}
    
    	err = client.DeleteJob(ctx, req)
    	if err != nil {
    		return fmt.Errorf("DeleteJob: %w", err)
    	}
    
    	fmt.Fprintf(w, "Deleted job")
    	return nil
    }
    

    Java

    לפני שמנסים את הדוגמה הזו, צריך לפעול לפי Javaהוראות ההגדרה שבמדריך לתחילת העבודה עם Transcoder API באמצעות ספריות לקוח. מידע נוסף מופיע במאמרי העזרה של Transcoder API Java API.

    כדי לבצע אימות ב-Transcoder API, צריך להגדיר את Application Default Credentials. מידע נוסף זמין במאמר הגדרת אימות לסביבת פיתוח מקומית.

    
    import com.google.cloud.video.transcoder.v1.DeleteJobRequest;
    import com.google.cloud.video.transcoder.v1.JobName;
    import com.google.cloud.video.transcoder.v1.TranscoderServiceClient;
    import java.io.IOException;
    
    public class DeleteJob {
    
      public static void main(String[] args) throws Exception {
        // TODO(developer): Replace these variables before running the sample.
        String projectId = "my-project-id";
        String location = "us-central1";
        String jobId = "my-job-id";
    
        deleteJob(projectId, location, jobId);
      }
    
      // Deletes a job.
      public static void deleteJob(String projectId, String location, String jobId) throws IOException {
        // Initialize client that will be used to send requests. This client only needs to be created
        // once, and can be reused for multiple requests.
        try (TranscoderServiceClient transcoderServiceClient = TranscoderServiceClient.create()) {
          JobName jobName =
              JobName.newBuilder().setProject(projectId).setLocation(location).setJob(jobId).build();
          DeleteJobRequest deleteJobRequest = DeleteJobRequest.newBuilder().setName(jobName.toString())
              .build();
    
          // Send the delete job request and process the response.
          transcoderServiceClient.deleteJob(deleteJobRequest);
          System.out.println("Deleted job");
        }
      }
    }

    Node.js

    לפני שמנסים את הדוגמה הזו, צריך לפעול לפי Node.jsהוראות ההגדרה שבמדריך לתחילת העבודה עם Transcoder API באמצעות ספריות לקוח. מידע נוסף מופיע במאמרי העזרה של Transcoder API Node.js API.

    כדי לבצע אימות ב-Transcoder API, צריך להגדיר את Application Default Credentials. מידע נוסף זמין במאמר הגדרת אימות לסביבת פיתוח מקומית.

    /**
     * TODO(developer): Uncomment these variables before running the sample.
     */
    // projectId = 'my-project-id';
    // location = 'us-central1';
    // jobId = 'my-job-id';
    
    // Imports the Transcoder library
    const {TranscoderServiceClient} =
      require('@google-cloud/video-transcoder').v1;
    
    // Instantiates a client
    const transcoderServiceClient = new TranscoderServiceClient();
    
    async function deleteJob() {
      // Construct request
      const request = {
        name: transcoderServiceClient.jobPath(projectId, location, jobId),
      };
      await transcoderServiceClient.deleteJob(request);
      console.log('Deleted job');
    }
    
    deleteJob();

    PHP

    לפני שמנסים את הדוגמה הזו, צריך לפעול לפי PHPהוראות ההגדרה שבמדריך לתחילת העבודה עם Transcoder API באמצעות ספריות לקוח. מידע נוסף מופיע במאמרי העזרה של Transcoder API PHP API.

    כדי לבצע אימות ב-Transcoder API, צריך להגדיר את Application Default Credentials. מידע נוסף זמין במאמר הגדרת אימות לסביבת פיתוח מקומית.

    use Google\Cloud\Video\Transcoder\V1\Client\TranscoderServiceClient;
    use Google\Cloud\Video\Transcoder\V1\DeleteJobRequest;
    
    /**
     * Deletes a Transcoder job.
     *
     * @param string $projectId The ID of your Google Cloud Platform project.
     * @param string $location The location of the job.
     * @param string $jobId The job ID.
     */
    function delete_job($projectId, $location, $jobId)
    {
        // Instantiate a client.
        $transcoderServiceClient = new TranscoderServiceClient();
    
        $formattedName = $transcoderServiceClient->jobName($projectId, $location, $jobId);
        $request = (new DeleteJobRequest())
            ->setName($formattedName);
        $transcoderServiceClient->deleteJob($request);
    
        print('Deleted job' . PHP_EOL);
    }

    Python

    לפני שמנסים את הדוגמה הזו, צריך לפעול לפי Pythonהוראות ההגדרה שבמדריך לתחילת העבודה עם Transcoder API באמצעות ספריות לקוח. מידע נוסף מופיע במאמרי העזרה של Transcoder API Python API.

    כדי לבצע אימות ב-Transcoder API, צריך להגדיר את Application Default Credentials. מידע נוסף זמין במאמר הגדרת אימות לסביבת פיתוח מקומית.

    
    import argparse
    
    from google.cloud.video.transcoder_v1.services.transcoder_service import (
        TranscoderServiceClient,
    )
    
    
    def delete_job(
        project_id: str,
        location: str,
        job_id: str,
    ) -> None:
        """Gets a job.
    
        Args:
            project_id: The GCP project ID.
            location: The location this job is in.
            job_id: The job ID."""
    
        client = TranscoderServiceClient()
    
        name = f"projects/{project_id}/locations/{location}/jobs/{job_id}"
        response = client.delete_job(name=name)
        print("Deleted job")
        return response


    Ruby

    לפני שמנסים את הדוגמה הזו, צריך לפעול לפי Rubyהוראות ההגדרה שבמדריך לתחילת העבודה עם Transcoder API באמצעות ספריות לקוח. מידע נוסף מופיע במאמרי העזרה של Transcoder API Ruby API.

    כדי לבצע אימות ב-Transcoder API, צריך להגדיר את Application Default Credentials. מידע נוסף זמין במאמר הגדרת אימות לסביבת פיתוח מקומית.

    # project_id = "YOUR-GOOGLE-CLOUD-PROJECT"  # (e.g. "my-project")
    # location   = "YOUR-JOB-LOCATION"  # (e.g. "us-central1")
    # job_id     = "YOUR-JOB-ID"  # (e.g. "c82c295b-3f5a-47df-8562-938a89d40fd0")
    
    # Require the Transcoder client library.
    require "google/cloud/video/transcoder"
    
    # Create a Transcoder client.
    client = Google::Cloud::Video::Transcoder.transcoder_service
    
    # Build the resource name of the job.
    name = client.job_path project: project_id, location: location, job: job_id
    
    # Delete the job.
    client.delete_job name: name
    
    # Print a success message.
    puts "Deleted job"

    ביטול פרטי הכניסה

    1. אם תרצו, תוכלו לבטל את פרטי הכניסה שיצרתם ולמחוק את הקובץ המקומי של פרטי הכניסה.

      gcloud auth application-default revoke
    2. אם רוצים, מבטלים את פרטי הכניסה של ה-CLI של gcloud.

      gcloud auth revoke

    המאמרים הבאים